Fast, beautiful, and surprisingly affordable, small beading projects are the perfect gateway into handicraft. With just a handful of materials and a little focused time, you can create gifts, accessories, and keepsakes that feel personal and polished. This guide gathers approachable projects that can be completed in a single day—many in under an hour—while teaching foundational techniques you’ll use for years. Whether you love orderly patterns or an organic, boho look, you’ll find plenty of ideas to spark momentum and help you develop your skills one bead at a time.
Gather Your Toolkit and Set Up for Success
Beading is both meditative and practical. You can work at your kitchen table, clean up quickly, and carry a small pouch of supplies anywhere. Start with a compact toolkit and expand as you discover your favorite styles.
- Beading needles: Size 10 or 12 works well with most small beads. Sharps are good for bead embroidery; long needles are great for weaving.
- Thread and cord: Nylon thread (Nymo), braided polyethylene (FireLine), nylon-coated stainless steel beading wire for strung necklaces, silk for pearls, 0.5–1 mm elastic for stretch bracelets, and micro-macramé cord if you enjoy knotting.
- Beads to start: Size 8/0 and 6/0 seed beads (easy to handle), a few strands of glass rounds, accent metal spacers, and a handful of larger focal beads like gemstones or lampwork.
- Basic pliers: Chain-nose, round-nose, and flush cutters. If you plan to open many jump rings, consider two pairs of chain-nose pliers for better control.
- Findings and hardware: Assorted jump rings, lobster or toggle clasps, ear wires, headpins/eyepins, tube crimps, and crimp covers. Keep a few wire guardians and French wire if you like traditional finishes.
- Work surface: A bead mat prevents rolling and dampens sound. A small tray or muffin tin keeps parts organized. Good lighting matters—daylight or a neutral LED lamp reduces eye strain.
- Optional helpers: Thread conditioner, bead stoppers, calipers for measuring beads, and a soft polishing cloth for metal components.
Prepare your space by clearing a flat area and placing a shallow catch tray beneath your hands—dropped beads will bounce into the tray instead of onto the floor. Keep a magnet handy for picking up stray needles. A small trash cup for thread clippings keeps the surface tidy and safe.
Quick Techniques You’ll Use Today
Even the simplest projects teach skills that transfer across styles. Here are the essentials.
Stringing and Securing
- Measuring: For bracelets, measure your wrist and add 1.3–1.9 cm (½–¾ in) for ease. For necklaces, standard lengths include choker (35–41 cm) and princess (43–48 cm), but tailor to your neckline.
- Attaching a clasp to beading wire: Slide on a tube crimp, pass the wire through the clasp loop and back through the crimp, leaving a 3–4 cm tail. Flatten the crimp with chain-nose pliers (or use a crimper tool), slide on a crimp cover for a rounded look, then trim the tail after tucking it through adjacent beads.
- Elastic knotting: Pre-stretch the elastic, string beads, tie a surgeon’s knot with a dab of flexible glue, and hide the knot inside a larger bead or between spacers.
- Jump rings: Open by twisting one side forward and the other back—never pulling apart sideways—to preserve shape and strength.
Needle-Weaving Basics
- Ladder stitch: Forms a neat base for brick stitch. Great for slim earrings and rings.
- Brick stitch: Beads stack like bricks along a foundation row. It’s stable, easy to shape, and perfect for fringe.
- Even-count peyote stitch: Alternating up-down pattern that creates a supple, fabric-like strip. Start with 6/0 or 8/0 beads for a beginner-friendly scale.
- Square stitch: Creates a grid similar to loom work without a loom. Ideal for precise geometric patterns.
Tension, Thread Paths, and Finishing
- Keep consistent tension: Too tight and your work warps; too loose and gaps appear. Aim for a gentle curve that settles flat on your mat.
- Weaving in tails: Zigzag through multiple beads, reversing directions to lock the thread. Avoid repeating the same path to prevent bulk.
- Securing knots: Half-hitch knots tucked between beads or under thread bridges in brick stitch; a touch of flexible adhesive if desired.
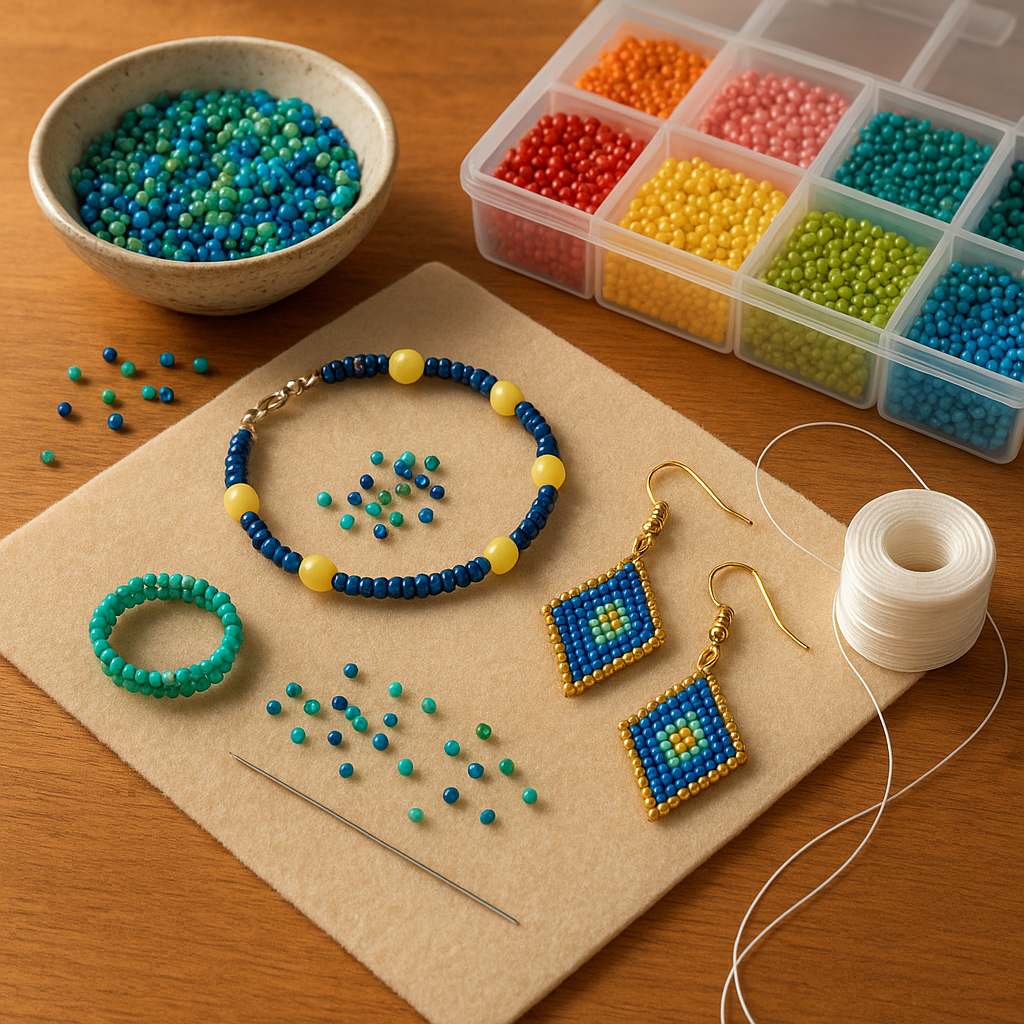
Eight Beginner-Friendly Projects You Can Finish in a Day
Each project includes simple steps, a compact materials list, and finishing techniques. Mix and match colors or add small variations for personal flair.
1) Memory-Wire Cuff Bracelet
Time: 30–60 minutes | Difficulty: Very easy | Skills: Stringing, loop making
- Materials: Medium bracelet memory wire (3–5 loops), mixed beads (6–8 mm) plus spacers, round-nose pliers, flush cutters, optional end caps and glue.
- Cut 3–5 coils of wire. Using round-nose pliers, roll a small loop at one end to prevent beads from sliding off.
- String beads in a repeating or freestyle pattern. Alternate textures (matte, glossy, faceted) for visual rhythm.
- Finish by forming a loop at the other end or attaching an end cap with strong glue. Add a charm to one loop if you like.
Why it works: Memory wire holds its shape and requires no clasp. It’s the lowest-lift way to produce a stackable bracelet with a satisfying weight.
2) Classic Stretch Bracelet with Accent Pattern
Time: 20–40 minutes | Difficulty: Easy | Skills: Elastic knotting, measuring
- Materials: 0.7–1 mm elastic, 6–8 mm beads, two metal spacers for accent, bead stopper, clear flexible glue.
- Pre-stretch elastic. String beads, test fit, and add spacers opposite each other for balance.
- Tie a surgeon’s knot; add a tiny drop of glue. After it sets, pull the knot into a large bead to hide it.
Tip: If your bead holes are sharp, add a small silicone grommet or thread a tiny seed bead on either side of the knot to reduce wear.
3) Brick-Stitch Fringe Earrings
Time: 60–90 minutes | Difficulty: Easy | Skills: Ladder base, brick stitch, fringe
- Materials: Size 8/0 beads for the base, 11/0 for fringe detail, beading thread, needle, ear wires, two beading foundations (small metal hoops or ladder base), jump rings.
- Create a ladder-stitch base 6–8 beads wide. Work brick stitch rows upward for 3–4 rows.
- Add fringe by exiting from the bottom row, stringing 10–20 small beads, adding a tiny accent at the tip, then traveling back up through all but the last bead.
- Repeat to form a symmetrical cascade. Attach ear wires with jump rings.
Design note: Vary fringe length gradually to create a tapered silhouette that elongates the neck.
4) Simple Pendant on Beading Wire
Time: 30–45 minutes | Difficulty: Very easy | Skills: Crimping, jump rings
- Materials: 0.46–0.5 mm beading wire, focal pendant with bail, coordinating beads, 2 crimps, 2 crimp covers, 2 wire guardians (optional), clasp, 4 jump rings.
- String a short pattern of beads, add the pendant at center, and mirror the pattern on the other side.
- Attach clasp components using crimps; add wire guardians for a professional finish at wear points.
Keep it light: A minimal bead count frames the focal and shortens build time while maintaining elegance.
5) Beaded Bookmark (Ribbon or Metal Base)
Time: 25–45 minutes | Difficulty: Very easy | Skills: Simple loops, stringing
- Materials: Ribbon or metal bookmark hook, headpins, a few charms, small beads, round/chain-nose pliers, jump rings.
- Make 2–3 bead charms on headpins with wrapped or simple loops.
- Attach charms to the metal hook or the ends of a ribbon using jump rings.
Great gift: Slim, lightweight, and endlessly customizable to a favorite author, hobby, or season.
6) Ladder-Stitch Band Ring
Time: 45–75 minutes | Difficulty: Easy | Skills: Ladder stitch, finishing
- Materials: 8/0 or cylinder beads, needle, thread, scissors, optional clear glue.
- Stitch a ladder base to the length of your finger circumference, minus a bead or two for a snug fit.
- Join the ends by stitching them together bead by bead; weave in tails securely.
Variation: Add a single contrasting bead as a “stone” at center for a minimalist solitaire style.
7) Keychain Charm Cluster
Time: 30–50 minutes | Difficulty: Easy | Skills: Headpin loops, jump rings
- Materials: Key ring, short chain segment, headpins, bead mix, strong jump rings.
- Create 5–9 bead dangles and attach them at staggered chain links to form a cluster.
- Secure components tightly; keychains encounter jostling, so use thick jump rings and solid closures.
Personality plus: Choose initials, birthstones, or travel charms to tell a story.
8) Mini Bead-Embroidered Brooch
Time: 90–120 minutes | Difficulty: Moderate beginner | Skills: Bead embroidery, glue basting
- Materials: Stiff felt or leatherette, cabochon (flat-back stone or glass), E6000-style glue, seed beads, beading thread/needle, backing material, brooch pin, fabric glue, small sharp scissors.
- Glue the cabochon to felt and let it set. Outline with a backstitch of small beads. Add one or two decorative rows around the focal.
- Cut out the shape, glue to a backing, and whipstitch the edges with beads. Attach the brooch pin.
Pocket gallery: Even a tiny brooch elevates a jacket or bag, and it’s an ideal canvas for experimenting with texture.
Design and Color Made Simple
Design can feel abstract, but you can create harmony with a few clear, actionable ideas.
- Scale and proportion: Pair a large focal with smaller supporting beads. Use tiny spacers to create breathing room and highlight the transitions.
- Rule of odds: Use 3, 5, or 7 repeats in a motif for a balanced, natural look.
- Contrast: Mix matte and glossy, smooth and faceted, opaque and translucent to avoid flatness.
- Palette building: Start with a base palette and introduce a “spice” color sparingly for excitement. Designers sometimes call this a signature colorway.
- Finish tones: Keep metal finishes consistent (all gold or all silver) for cohesion—or intentionally mix warm and cool metals for a modern twist.
- Pattern logic: Establish a short motif (e.g., metal spacer + 2 small beads + 1 medium bead) and repeat. Subtle variations keep the eye engaged.
- Balance and symmetry: Symmetry reads formal and calm; asymmetry feels playful and dynamic. Both are right—choose to match the wearer’s style.
Materials 101: What to Choose and Why It Matters
Every component affects look, feel, and wear. Understanding options lets you work smarter.
- Glass: Affordable, wide color range, consistent sizing in Czech and Japanese lines. Ideal for practice and finished work.
- Gemstone: Adds natural variation and weight; check hole size and hardness. Some stones need gentle handling when crimping nearby.
- Metal: Use plated or stainless findings for budget builds; upgrade to gold-filled or sterling for sensitive skin or heirloom pieces.
- Thread: Nylon is supple; braided poly is strong and abrasion-resistant; silk drapes beautifully with pearls.
- Wire: Nylon-coated steel for stringing; artistic wire for wrapped loops; memory wire for coils; headpins/eyepins for charms.
- Hardware (findings): Clasps, jump rings, crimps, ear wires—the “architecture” of your jewelry. Quality findings instantly elevate a simple design.
Step-by-Step: Your First Finishes Done Right
Attaching a Toggle Clasp to a Necklace
- Slide a crimp and a wire guardian onto the beading wire.
- Hook the guardian onto the clasp loop, then pass the wire back through the crimp.
- Snug the beads so there’s enough flexibility at the clasp for movement, then flatten the crimp.
- Cover with a crimp cover, thread the tail back through the first 2–3 beads, and trim.
Secure Elastic Knot for Stretch Bracelets
- Pre-stretch elastic several times.
- Tie a surgeon’s knot (overhand, then another overhand passing the end through twice), tighten slowly.
- Add a tiny drop of flexible glue; let it set and hide the knot inside a bead with a larger hole.
Wrapped Loops on Headpins
- Make a 90° bend just above the top bead.
- Use round-nose pliers to form a small loop; grasp the loop with chain-nose pliers.
- Wrap the tail 2–3 times neatly down the neck; trim flush and tuck the end.
Troubleshooting: Common Issues and Quick Fixes
- Gapping in beadwork: Increase thread passes or step down a needle size for tighter control. Keep your durability mindset—two or three passes in stress areas extend life.
- Wire kinks: Work slowly, straighten gently with nylon-jaw pliers, and avoid over-bending at the clasp.
- Frayed thread: Condition the thread lightly. If fraying persists, switch to a stronger braided line.
- Uneven earrings: Count rows and beads per fringe. Lay pieces flat and compare lengths as you go.
- Visible crimps: Add crimp covers or use decorative beads near the clasp to hide mechanics.
- Elastic breaks: Use fresh, brand-name elastic and correct diameter. Check bead holes for rough edges.
Comfort, Fit, and Wearability
Jewelry that looks good but feels awkward will stay in a drawer. Test fit during construction.
- Bracelet ease: Add a little room for movement, especially with stiff beads or large beads that reduce interior space.
- Earring weight: Keep total weight light—swap heavy glass for acrylic accents if needed.
- Necklaces: Ensure clasp access on the preferred side and smooth edges near the neck.
- Health and ergonomics: Take breaks to rest hands and eyes. A cushioned mat and good posture prevent fatigue.
Mini-Lessons in Pattern Building
Quick Symmetry Pattern
Try this for a neat bracelet: spacer, 2 small beads, 1 medium bead, 2 small beads, spacer—then repeat. Insert a contrasting bead every third repeat for a subtle pulse.
Simple Gradient
Arrange beads from light to dark, repeat the gradient twice per bracelet length, and mirror around the center to accentuate a focal bead or charm.
Beginner Geometrics
In square stitch or even-count peyote, alternate two colors for a checkerboard. Once comfortable, step to stripes or a chevron by increasing and decreasing rows.
Care, Storage, and Presentation
- Care: Wipe with a soft cloth after wear; avoid prolonged moisture and chemicals. Store elastic pieces flat and away from heat.
- Storage: Clear boxes with small compartments keep projects separate. Label by size (e.g., 8/0) for quick retrieval.
- Gifting: Use kraft jewelry cards or tiny fabric pouches. Include a handwritten tag with materials and care tips.
- Photography: Indirect daylight, neutral backgrounds, and a simple prop like a ceramic dish make details shine.
Eco and Budget Tips
- Upcycle: Repurpose broken necklaces into charm clusters, or harvest beads from thrift-store finds.
- Buy by project: Select only what you need for two builds to avoid overwhelm and waste.
- Metal choices: Stainless is hypoallergenic and durable; brass patinates beautifully and is cost-effective.
- Natural accents: Wood, shell, and seeds add warmth and reduce cost while keeping weight down.
Project Builder: From Idea to Done in a Day
Use this simple framework to move swiftly from concept to completion.
- Pick one focal (pendant, charm, cabochon) and two supporting beads (one small, one medium).
- Choose a base technique: stringing for speed, brick stitch for earrings, elastic for instant wear.
- Define length/size and note it on a sticky note near your mat.
- Lay out a test pattern, then string or stitch half the length. Evaluate balance and adjust before finishing.
- Secure ends cleanly, check for rough edges, and wear-test for five minutes.
Beyond Today: Next Steps and Skill Growth
Once you’ve completed a few quick wins, you can scale up gracefully while keeping sessions enjoyable.
- Upgrade finishes: Try wire guardians, French wire, and higher-grade clasps for longevity.
- Try a loom: Small loom bands create crisp patterns suitable for bracelets or hat bands.
- Explore mixed media: Combine bead embroidery with felted shapes or fabric appliqué for brooches and patches.
- Plan sets: Make coordinated earrings, bracelet, and pendant using the same core motif for a cohesive ensemble.
Timing Guide: How Long Will It Really Take?
- Stretch bracelet: 20–40 minutes depending on complexity.
- Memory-wire cuff: 30–60 minutes including trimming and loops.
- Brick-stitch fringe earrings: 60–90 minutes for the pair.
- Ladder-stitch ring: 45–75 minutes depending on width.
- Pendant necklace: 30–45 minutes with neat crimped ends.
- Mini brooch: 90–120 minutes with careful edge finishing.
Block time in short sprints—15 to 25 minutes—so you can pause and return with fresh eyes. Many crafters find that a short break leads to cleaner finishing and better proportion decisions.
Quality Checks Before You Call It Done
- Run a fingertip test over all edges and crimps—nothing should snag.
- Gently tug test clasp assemblies and elastic knots.
- Hang earrings to ensure they face forward and sit at matching lengths.
- Confirm measurements against your notes; adjust with a spacer bead if needed.
Glossary Snapshot
- Bead mat: A fuzzy pad that stops beads from rolling and cushions your workspace.
- Crimp: A small metal tube or bead flattened to secure beading wire to a clasp.
- Headpin/Eyepin: Pre-cut wires used to create dangles and connectors.
- Ladder/Brick/Peyote: Common stitches for off-loom weaving with distinct textures and uses.
- Toggle clasp: A bar-and-ring closure that’s easy to fasten and decorative.
A Final Nudge to Start
Choose one of the projects above, pull a small palette, and give yourself an hour. The magic of beading is that progress is visible immediately, and every finish builds confidence for the next idea. With a few foundational skills, mindful material choices, and attention to small details, you’ll create pieces that are comfortable, durable, and unmistakably personal—each one a tiny, wearable celebration of your craft.