Craft fairs are a rare opportunity to place handmade jewelry into real hands, under natural light and among the hum of conversation. A booth is not just a place to set down trays; it is a miniature shop, a stage, and a conversation starter compressed into a few square meters. With a thoughtful plan, even a modest table can become an inviting, profitable space that reflects the soul of your craft. The following guide brings together practical techniques and artistic sensibility so your display does more than look pretty: it builds trust, communicates value, and converts curiosity into lasting relationships.
Know Your Audience and Define Your Purpose
Every great display begins long before the canopy goes up. It starts by clarifying whom you want to serve and what you want your booth to accomplish. A minimalist silver line aimed at young professionals will call for different props, colors, and price cues than ornate gemstone pieces designed for collectors. When you know the values of your audience—adventure, status, romance, eco-consciousness—you can choose materials, messaging, and forms of interaction that resonate.
Research the event
- Visit the fair’s social profiles and past event photos. Note crowd demographics, booth styles, and the overall mood.
- Ask organizers about booth sizes, provided furnishings, power access, and rules on displays, signage, or demonstrations.
- Walk the venue if possible. Sightlines, sun exposure, and foot-traffic patterns will influence layout and lighting choices.
- Identify anchor attractions: live music, food trucks, kid zones. These shape dwell time and how you lure people off the main path.
Clarify success metrics
Sales are essential, but not the only measure. Decide ahead of time whether this fair is for revenue, market testing, press exposure, or wholesale leads. Define specific targets: number of qualified conversations, email sign-ups, custom order inquiries, or social follows. Set these in writing, then build your display to support them—sign-up stations, conversation prompts, try-on mirrors, sample boards, and clear takeaways.
Craft a Cohesive Design Language
Your booth should feel like an extension of your jewelry. Spareness or opulence, rustic or modern—the same adjectives should apply. Select a palette of two to three key colors and one accent; choose display materials that echo your craft. For example, brushed plywood for matte metal jewelry, linen for pearls, slate for high-contrast gold, or reclaimed wood for earthy stones. Keep props functional, not theatrical, unless theatrics are your brand.
Visual hierarchy and focused composition
Shoppers scan before they see. Guide their eyes using height, contrast, and rhythm. Create a strong focal point at eye level—your best sellers or signature pieces—then lead downward with mid-height risers and low trays. Think in triangles and staggered levels to create a pleasing composition that avoids a flat, cluttered plane. Limit the number of pieces per tray to reduce visual noise; negative space is part of design, not wasted space.
Material contrast and color logic
- Dark stones and oxidized metals pop on light surfaces; bright metals often need matte, mid-tone surfaces to reduce glare.
- Keep one surface texture dominant. Too many textures fight for attention and dilute your brand language.
- Use color to cluster collections or price tiers. Subtle color-coding helps browsing customers self-navigate.
Consistent branding touchpoints
Repeat small details: the same linen tone in risers and pouches, the same card stock across tags and care guides, the same accent color in ribbons and signage. Consistency signals care and reliability, making even low-cost props look luxe. Place your logo and brand promise in three places that photograph well: the back wall, the checkout zone, and a removable sign for detail shots. This is where coherent branding turns a temporary stall into a recognizable micro-store.
Layered lighting for sparkle and comfort
Jewelry lives and dies by light. If the fair permits, combine a broad, flattering wash with targeted accents to bring gemstones and facets to life. Position fixtures so light grazes across textures rather than blinding visitors. Consider clamp lamps with warm LED bulbs for gold and cooler balanced LEDs for silver. Invest in portable, dimmable options to adapt to weather changes. Thoughtful lighting boosts perceived value and helps your pieces photograph well for social posts during the event.
Signage that answers questions before they are asked
Fear of embarrassment stops people from engaging. Solve this by answering common questions—materials, care, hypoallergenic details, pricing bands—through clear, attractive signage. Use short lines, large type, and durable materials. Place small placards near collections rather than one dense poster. Add care cards to help customers imagine owning and wearing the piece beyond the booth.
Build Flow: Layouts That Invite and Guide
The best layouts give browsers permission to enter and enough structure to linger without blocking others. Design a simple path: a focal greeting area, an exploration zone with mid-height displays, and a defined checkout corner with packing materials and business cards. Aim for a body-friendly dance: pause, step closer, reach, try on, ask, decide.
Choose a layout style
- Front-facing table: fast setup, good for narrow aisles. Add height at the back to create presence, and a small side pedestal to pull people in.
- U-shape: encourages immersion and supports multiple conversations. Keep the open mouth generous so visitors do not feel trapped.
- L-shape: ideal for corner booths. Place highest-impact pieces at the bend where sightlines converge.
- Island: costly but powerful. Use anchor towers and a low center to keep eyes moving and hands exploring.
Ergonomics and accessibility
Design for comfort. Keep heavy items and mirrors at a shoulder-friendly height, leave ample knee space under the front edge for seated customers, and ensure wheelchair access through a 90 cm minimum gap. Provide a stable try-on surface and a small waste bowl for earring backs. Thoughtful ergonomics reduce friction and increase time spent with your work.
Flow control and security
- Angle trays slightly toward the aisle to invite, then guide deeper with a mid-booth focal display.
- Set checkout off to one side to prevent line blockages. A small rug can visually define the payment zone.
- Use tethered mirrors and subtle display lips to discourage accidental drops. Keep high-value pieces closer to your body position.
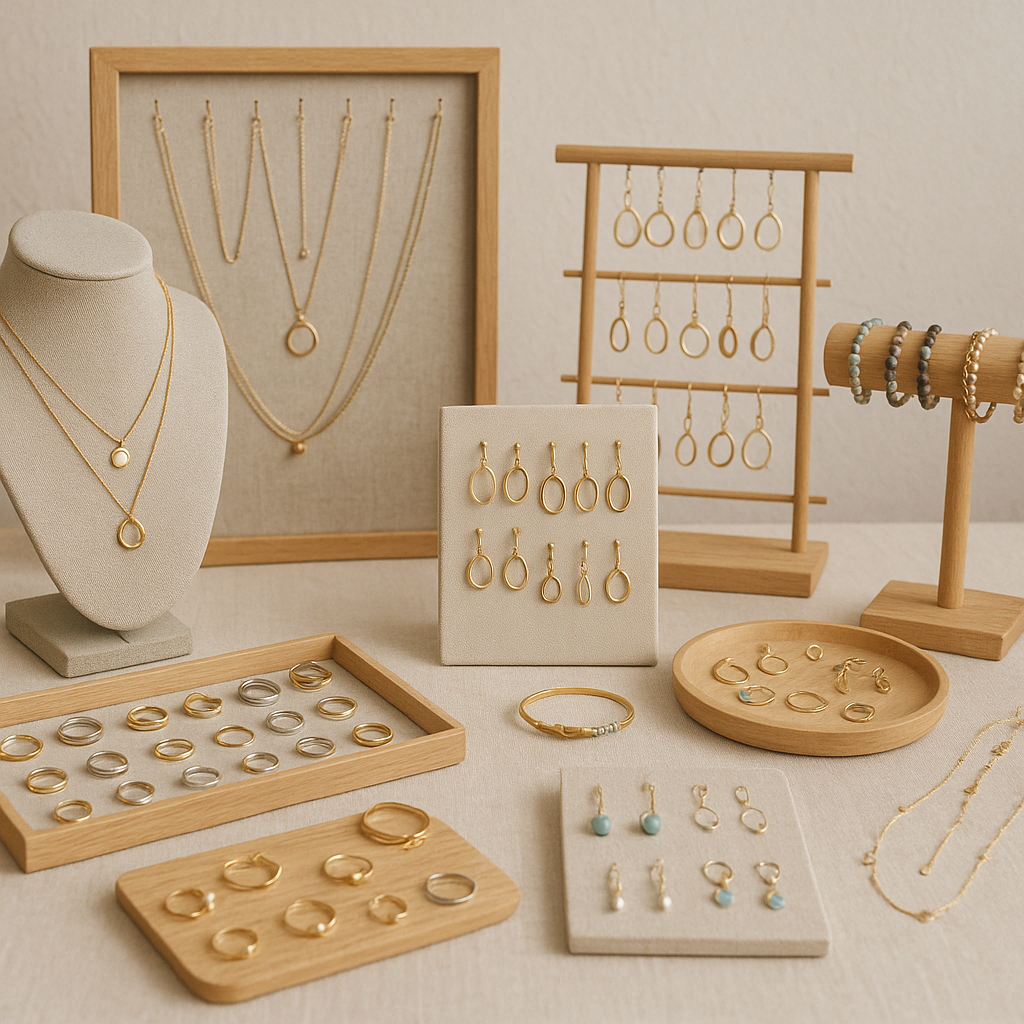
Display Techniques for Different Jewelry Types
Each jewelry category benefits from specific props. The goal is to make choice easy while elevating perceived value.
Necklaces and pendants
- Use graduated busts or T-bars to reflect chain lengths. A clear progression encourages multi-length purchases.
- Place a flat lay behind busts to show layering options. Include small cards explaining stack combinations.
- Use discreet pins or micro hooks to keep pendants centered; symmetry reduces the urge to touch constantly.
Earrings
- Organize by closure type or occasion: studs, drops, statement. This mirrors how customers think and shop.
- Elevate long earrings on airy stands so they move slightly with air currents; motion catches the eye.
- Offer a single sanitized try-on sample per style with clear hygiene protocols and alcohol wipes within view.
Rings
- Use ring cones or stepped trays. Size labels visible from above save time and make shoppers self-sufficient.
- Provide a discrete sizer and a mirror, plus a note about resizing options and turnaround time.
- Group rings into price bands or stone families to speed decisions and encourage stacking sets.
Bracelets
- T-bars are practical; vary heights and thicknesses to keep from reading like a clothing rack.
- Use small vignette boards with a bracelet, earrings, and necklace pairing to model full looks.
- Offer a simple try-on ritual: a stool, a mat, and an easy way to remove bracelets without snagging clothing.
Surface choices and care
Avoid flocked fabrics that shed fibers onto pieces. Opt for tightly woven linen, coated boards, or sealed woods. Keep microfiber cloths on hand to lift fingerprints quickly, and rotate display pieces with back-stock to avoid overhandling. Include small care cards; they set expectations and reduce returns.
Brand Story, Materials, and Meaning
In a sea of booths, narrative transforms an object into a keepsake. Tell customers why you choose certain stones, why a clasp is built the way it is, and how your life shows up in your patterns. Authentic storytelling earns attention, but keep it concise and actionable: one sentence near each collection and one memorable line at the entrance. Display a process board with photos of sketches, wax carvings, or bench work. A small tray of raw materials—wire coils, rough stones—helps people connect technique to result.
Language that resonates
- Trade jargon for plain descriptions: instead of stating alloy percentages, explain comfort, durability, and skin friendliness.
- Give names to collections that reflect mood or place. Names create recall and make it easier to ask for a piece later.
- Add maker presence: a friendly headshot and a one-liner about your values beside your business name.
Create Sensory Presence and Ambiance
Beyond visuals, aim for a calm, inviting sensory experience. Soft textures under hand, a gentle color gradient across displays, and restrained scent (if any) encourage people to linger. Curate a quiet soundscape if the fair allows small speakers, and keep noise sources—tumbling props, clattering stands—under control. A cohesive ambiance can be the difference between a glance and a conversation.
Mirrors and micro-moments
- Place mirrors where people naturally pause. Light them well and keep them spotless.
- Offer a small seat for thoughtful decisions. Comfort signals that you value the buyer’s time.
- Give a tiny ritual: a velvet pad, a warm greeting, and a no-pressure line that invites questions.
Interactivity, Demos, and Engagement
Activity attracts attention. If you can safely demonstrate a technique—wire-wrapping, simple soldering, texturing—do it within a tidy, well-lit station. Keep it brief; aim for loops of two to five minutes. Provide a nearby placard explaining what viewers are seeing and how the technique affects durability or price. Plan your demo around peak and lull times so you maintain conversations without creating a bottleneck. Thoughtful customer engagement often leads to higher dwell times and deeper trust.
Try-on protocols
- Use sanitized samples for earrings and a clearly labeled tray for try-on pieces versus new inventory.
- Keep alcohol wipes and a small waste bin visible to reassure cautious shoppers.
- Offer assistance without hovering: a light touch to encourage and a clear path to browse alone.
Interactive prompts
- Place a one-question poll on a mini easel: favorite stone, preferred metal, or wrist size ranges. This sparks conversation and yields data.
- Use QR codes for a lookbook, commission request form, or care guide download that also collects emails with consent.
- Encourage selfies at a branded backdrop with good light; provide a subtle hashtag to amplify reach.
Pricing Signals and Conversion Tools
Price is a communication tool as much as a number. Organize pieces into clear tiers so buyers know where to start. Use clean tags and small, legible menus rather than hidden prices. Buyers relax when they can self-assess before talking to you, and transparent pricing builds trust.
Psychology and ethics
- Anchor with a few high-value showpieces to frame the rest of your range, but keep them honest, not decoys.
- Create bundles with a clear advantage: stacking rings, earring plus necklace sets, or build-your-own charm clusters.
- Offer a modest show special without turning your brand into a discount bin; value perception must remain intact.
Calls to action
- Place small signs: custom sizing available today, complimentary polishing with purchase, limited-edition stones this weekend.
- Use loyalty cards or a repair discount on the next visit to encourage repeat encounters.
- Display a tiny, elegant card about your warranty and repair policy to reduce hesitation at the point of decision.
Props, Fixtures, and Portable DIY Solutions
Effective displays do not require expensive fixtures. Many of the best are lightweight, modular, and handmade, just like your work. Aim for tool-free assembly, nesting components, and protective bags that double as table risers.
Risers and platforms
- Use nesting boxes wrapped in consistent fabric. Stash back-stock or packing materials inside them.
- Bring a collapsible pedestal or lightweight crates for height and storage.
- Apply non-slip mats under plates and trays to prevent sliding during crowd surges.
Trays, pads, and boards
- Magnetic display boards with micro hooks keep earrings aligned and make teardown swift.
- Replace acrylic reflections with matte acrylic or frosted glass for softer highlights.
- Label boards subtly; avoid busy text that competes with fine details.
Transport and protection
- Use hard cases with foam inserts for fragile stones and set a teardown order so nothing gets forgotten.
- Carry a repair kit: pliers, jump rings, ear wires, polishing cloths, glue, and spare chains.
- Keep weather covers, clamps, and gaffer tape in a small emergency pouch.
Operations: Payments, Packaging, and Pace
A beautiful booth loses value if transactions feel chaotic. Build a checkout ritual that is clear, calm, and quick. Keep your POS device fully charged, with a backup battery and offline mode ready. Offer multiple payment options and test them on-site as early as possible.
Packaging that extends the experience
- Use sturdy boxes or pouches that match your textures and colors. Add a care card and a personal thank-you.
- Seal with branded stickers rather than fragile ribbon in windy conditions.
- Include your social handles and a cue to share photos for a chance at a small future perk.
Pacing your day
- Prep change, receipt setups, and gift wrap zones before the doors open.
- Stage water and snacks to avoid leaving the booth during rushes. Plan breaks with a trusted neighbor.
- Keep a short script for key scenarios: greeting browsers, explaining custom orders, and handling price objections.
Sustainability as Strategy
Many jewelry buyers care about origin and impact. Let your booth reflect this where authentic. Use reclaimed wood, recycled card stock, and reusable cloth liners. In signage, explain metal and gemstone sourcing in plain language. Offer repair and trade-in programs. Responsible sustainability is both an ethical and a design choice that can differentiate your brand in a crowded lane.
Low-waste practices
- Replace single-use bags with sturdy, reusable pouches.
- Print small, scannable cards that direct to digital care guides and receipts.
- Collect and sort packaging offcuts to reuse as padding during teardown.
Photography and Social Leverage
Design your booth for the camera. Neutral backgrounds, a branded element within frame, and clean sightlines help visitors take flattering photos. Shoot your own quick vignettes during lull times for future marketing. Encourage customer photos at the mirror and ask permission to repost. A fair can yield months of content if you plan for it.
Build a tiny studio corner
- Place a small board with good natural light for on-the-spot product shots.
- Keep lint rollers and a polishing cloth nearby to prep pieces.
- Use consistent angles and include a fingertip or coin for scale when appropriate.
Checklist: Before, During, After
A clear checklist frees your mind for real conversations. Use the following as a starting point and tailor it to your craft and venue.
Before the fair
- Inventory with SKUs, prices, and categorized trays; back-stock labeled and reachable.
- Booth map with mockup photos from a home rehearsal; pack in reverse order of setup.
- Signage: logo, price menu, materials, care, special offers, social and email subscription QR codes.
- Power plan: lights, extension cords, surge protectors, batteries, zip ties, tape.
- Comfort: stool, anti-fatigue mat, weather gear, water, snacks, sunscreen.
- Administrative: permits, insurance, cash float, receipt system, repair kit.
During the fair
- Greet promptly with a warm hello, then give browsing space; be ready with micro-stories about featured pieces.
- Refresh displays as items sell so the booth never looks picked over; move focal pieces forward.
- Collect emails with explicit consent through a simple tablet form or a QR code; offer a useful incentive like a care guide.
After the fair
- Record sales data, questions asked, and pieces most handled; these reveal future collection opportunities.
- Follow up with leads within 48 hours; reference the conversation, attach a photo, and suggest next steps.
- Post-process photos and share a thank-you post featuring happy moments from the event.
Measure, Learn, and Iterate
Improvement is a craft. Photograph your booth from multiple angles at the start, mid-rush, and near closing. Note where people pause and where they hesitate. Track average order value, conversion rate from try-on to purchase, and the impact of each special offer. Change only a few variables per show—height arrangement, focal product, or sign copy—so you can isolate what worked. Over time, your portable store will become a refined instrument built around how your specific customers move, look, and decide.
Small experiments with big payoff
- Swap one prop material to change contrast and test whether sparkle and photography improve.
- Relabel a collection with a feeling-based name and measure dwell time and questions.
- Introduce a mid-range hero piece to see if it lifts sales across the tier below.
Confidence, Presence, and the Human Element
In handcrafted jewelry, your presence is part of the product. Stand comfortably, breathe, and let your love of the craft show. Keep your hands quietly busy between greetings—polishing a piece, sketching a design—so you appear engaged without pressure. Offer genuine compliments that help shoppers visualize how a piece fits their life. Listen as much as you explain. Your warmth and calm competence become the final reassurance that turns browsing into buying.
A Simple Three-Word Plan
With all the details, it helps to keep a mantra. Let it be Plan, Test, Iterate. Plan your layout with a clear story and purpose. Test the booth at home and in diverse lighting. Iterate after each fair based on observations and data. Layer in one improvement at a time and keep what works. Over a season, your small, well-considered changes produce a booth that feels inevitable: obvious, welcoming, and right for your work.
Final Notes on Resilience and Joy
Craft fairs are dynamic. Weather shifts, crowds ebb, and surprises happen. A resilient display—modular, calm, and clear—will serve you through the chaos. When your booth reflects your craft values and supports both you and your customers, selling becomes the natural outcome of a good conversation. Pack a sense of humor, leave room for serendipity, and remember that each interaction plants a seed. Whether someone buys today or a year from now, your small world of metal, stone, and story can travel with them long after the tents come down.