Buttons carry stories. They slip from old coats, spill from sewing tins, gleam on military dress, and hide in the hems of ballroom gowns. Vintage findings—clasps, filigree stampings, chain, bails, and pin backs—are the quiet architecture of jewelry, designed to hold, hinge, or fasten. Bringing these two worlds together is more than a clever hack; it is a tactile conversation with history, an homage to resourcefulness, and a way to wear your values on your sleeve. Making DIY jewelry from buttons and vintage findings invites you to assemble memory, technique, and style into something intimate and fresh.
The allure of buttons and findings: materials, ages, and stories
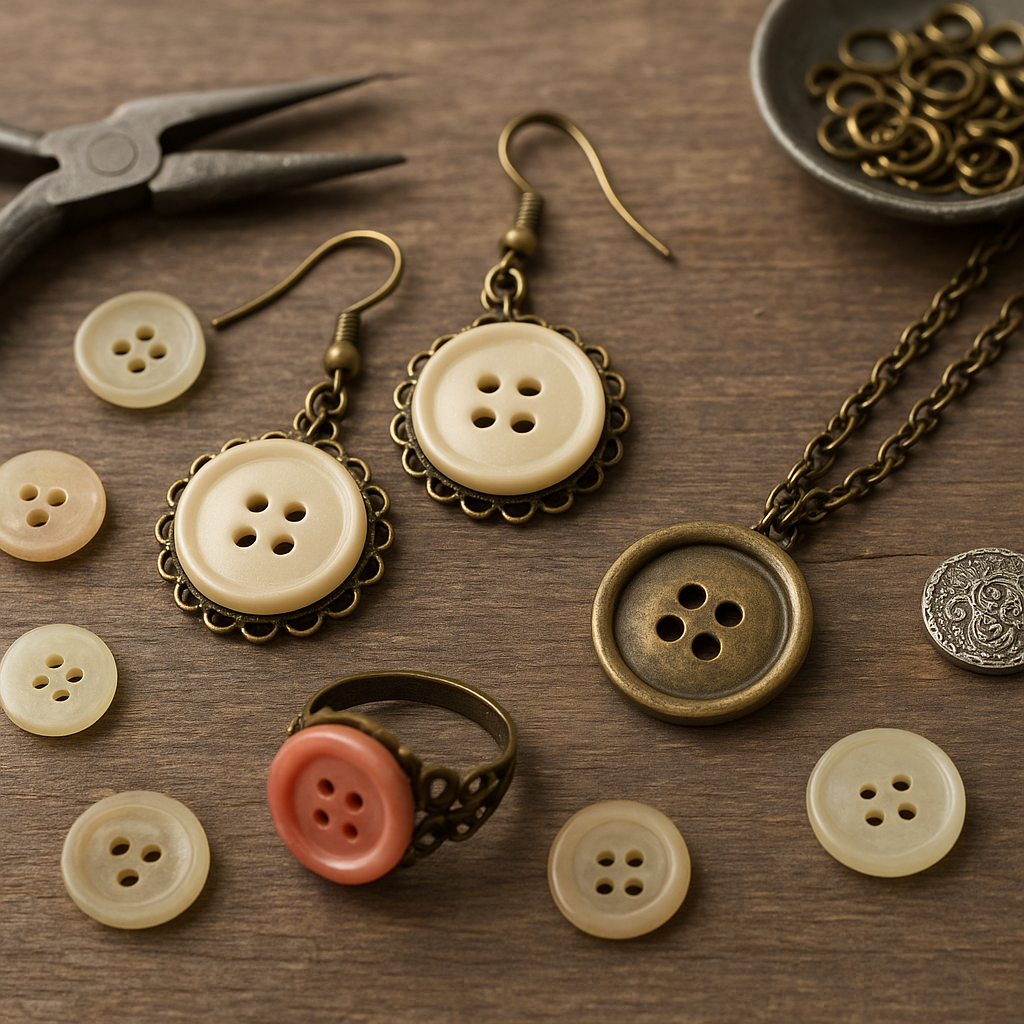
From carved bone discs in early garments to iridescent mother-of-pearl accents on 19th‑century shirts and shimmering rhinestone buttons of Hollywood’s golden era, buttons have always served as both function and ornament. They act as small canvases of technology and taste: glass pressed in antique molds, hand-etched shell, bakelite swirls, enamel domes, embossed brass eagles, or jet roses from mourning attire. Every button hints at provenance—where it came from, who wore it, why it mattered. Vintage findings are the counterparts that turn these mini-sculptures into wearable pieces: filigree wraps to cradle a round button, bails to suspend a pendant, cones to gather chains, lockets to hide photos, and box clasps that click shut with a satisfying whisper.
Styles help you date and design. Georgian and Victorian buttons may feature cut steel or jet, Edwardian sets lean delicate and floral, Art Deco showcases geometric brilliance in glass and chrome, while mid‑century bakelite and celluloid revel in playful color. Buttons from uniforms or school blazers carry crests and mottos; tailor’s samples offer color suites; haberdashery stock cards preserve untouched multiples perfect for earrings. The aging on metals and shell—its soft glow and softened edges—forms a cherished patina you can celebrate rather than erase.
Sourcing and selecting: where to find, what to choose, and why it matters
Hunting is half the joy. Flea markets and car boot sales yield mixed tins. Estate sales often hide sewing boxes in closets. Thrift stores collect unsold garments with salvageable buttons. Old haberdashery stock, millinery lots, and costume departments occasionally release buttons on original cards. Online marketplaces can be fruitful, but buy from sellers who show clear close‑ups and the backs of buttons. Look for entire sets when you want symmetry, but do not overlook loners—they make spectacular rings or pendants.
Quality is in the details. Turn buttons over to inspect shanks and holes for cracks. Test metals with a magnet to distinguish steel from brass; examine edges for plating wear. Feel the weight: glass and stone feel cool and heavy; plastic is warmer and lighter. Vintage plastics vary—celluloid is thin and can warp; bakelite is denser, often with marbling and a distinct smell when warmed. Mother-of-pearl glows from within; abalone flashes peacock colors. Rhinestone buttons should have tight prong settings and consistent sparkle under light. When choosing findings, prefer solid brass or sterling components for longevity; a well-made clasp transforms the way a necklace feels and functions.
Ethics and intention inform your palette. Repurposing orphaned buttons rescues beauty from storage. Removing buttons from museum-worthy garments is frowned upon; instead, harvest from damaged clothing or purchase loose lots. Consider sustainability as a guiding principle: mend and reuse, avoid waste, and keep heirloom design in circulation. Upfront, decide whether you want identical pairs for earrings, graduated sets for necklaces, or a single showstopper. Think in terms of upcycling and conservation—every choice extends an object’s life and curbs new resource extraction.
Tools, adhesives, and a comfortable bench
Setting up a small, efficient station will reward your hands and your schedule. A trio of pliers—chain‑nose, round‑nose, and flat‑nose—handles most wire tasks; nylon‑jaw pliers protect delicate finishes. Flush cutters deliver clean wire ends; small files or a cup bur deburr sharp edges. A bench block and light hammer help flatten wraps. An awl, pin vise, or micro drill lets you introduce holes into soft materials like wood, leather, or some plastics. A jeweler’s saw is helpful for trimming filigree or cutting slots. A rotary tool with low-speed control can shape metal backings or sand rough glue lines, but test heat-sensitive plastics first.
Adhesives deserve careful choice. Two-part epoxy excels at gap-filling and survivability; cyanoacrylate (super glue) grabs quickly but can fog glass or rhinestones. Flexible industrial adhesives can work, but read safety data and allow ample cure time. UV resin offers clarity for dome effects but requires good ventilation and a curing lamp. Whenever possible, design for mechanical connection—wire wraps, rivets, bezels, or threaded shanks—so the adhesive acts as a helper, not the sole support. Comfort counts too: arrange tools within easy reach, add task lighting with a daylight bulb, and protect your tabletop with a cutting mat. Proper ergonomics will keep long sessions pleasant and precise.
Design principles: turning small circles into strong statements
Good layout is not an accident. Treat each button as a shape, a texture, and a color swatch. Think about composition—balance heavy pieces with airier chain, contrast glossy enamel with matte filigree, echo a motif across the design. Play with scale: cluster several small sew‑through buttons into a bouquet, or isolate a large glass dome as a pendant focal. When stacking buttons, alternate materials to create visual breaks, and align holes vertically to transform them into design lines. Satisfying designs often work in threes or fives, but asymmetry can feel modern and lively if your visual weights are intentional.
Movement is a hidden luxury. Hinged drops on earrings, a cluster that sways near the collarbone, or a multi-strand bracelet that slides lightly on the wrist will always feel more alive than a rigid block. Match hardware color to the dominant tone of the buttons—warm brass with tortoiseshell plastics and shell, cool silver with crystal and chrome, antiqued finishes with aged glass and fabric-covered buttons. Consider the wearer’s lifestyle: smooth backs and rounded edges prevent snagging knitwear. Weight distribution matters; heavy focals deserve sturdy chains or ribbon ties. The goal is a piece that is beautiful in stillness and comfortable in motion, offering genuine versatility for different outfits.
Techniques for transforming buttons into wearable art
Understanding backs: shank vs. sew-through
Shank buttons have a loop on the back. They readily become pendants or charms: slide the shank onto a jump ring or attach a bail through the loop. Sew‑through buttons have two or four holes. Hide them by stacking another button or by mounting onto a filigree backer; alternatively, celebrate them by threading decorative wire or seed beads in a contrasting color across the face.
Cold connections and friendly mechanics
- Wire-wrapped bails: Create a neat loop around a button shank, wrap the neck, and finish with a tidy coil. Use 20–22 gauge wire for pendants; 24–26 for delicate drops.
- Button bezels: Stitch a peyote seed-bead bezel around a smaller button or use a pre-made lacey filigree to fold prongs over the rim.
- Riveting: For metal-backed buttons and thick findings, mini tubular rivets or Chicago screws create permanent, glue-free bonds. Always countersink lightly to avoid cracking.
- Backer plates: Adhere or rivet buttons to a thin metal or leather backer. This creates a flat surface for brooch pins or ring blanks.
- Cluster wiring: Use thin wire to lash multiple buttons to a central frame or to each other, forming wreaths, bouquets, or constellations.
Adhesive tips that last
Lightly scuff contact areas with fine sandpaper for grip. Clean with isopropyl alcohol and let dry. Use sparing amounts to avoid ooze; any squeeze-out can be trimmed after partial cure with a blade. Clamp gently; too much pressure starves the joint. Cure fully—often overnight or longer—before stress testing. Remember that adhesive joints age differently depending on environment; a final mechanical catch (a hidden wire tie through a buttonhole) ensures quiet durability.
Step-by-step projects to learn and adapt
1) Mother-of-pearl cascade necklace
Materials: graduated mother-of-pearl buttons, antiqued brass filigree crescents, 20–22 gauge brass wire, small jump rings, lobster clasp, fine chain, two split rings, epoxy.
- Plan a gentle V shape with the largest button at center, flanked by medium and small sizes.
- Position filigree crescents as under-plates to hide sew‑through holes. Mark where holes align.
- Mix epoxy and adhere each button to a filigree. While curing, thread a short U of wire through each button hole from the front, bringing tails to the back through filigree gaps; twist once to create a safety tie.
- Form small wrapped loops on the wire tails to serve as connectors along the necklace line.
- Join pieces row by row with jump rings, building the cascade. Add chain to both sides and finish with clasp and split rings for security.
- Adjust length so the focal rests below the collarbone and lies flat when worn.
2) Deco glass button cocktail ring
Materials: large faceted glass or rhinestone button (shank preferred), adjustable bezel ring blank, 24 gauge sterling or brass wire, two-part epoxy, optional thin leather circle.
- Flatten the ring blank’s bezel slightly to match the button’s back curve. Line the bezel with a thin leather cushion if the button bottom is uneven.
- Pass a short length of wire through the shank; twist firmly underneath to form an anchor that sits within the ring bezel.
- Test fit; the button should not rock. Mix epoxy and embed the wire twist in the bezel, pressing the button down. Wipe any stray resin before set.
- Allow a full cure; polish the glass with a soft cloth. The hidden wire acts as a fail-safe if the adhesive is stressed.
3) Heritage charm bracelet from mixed metal buttons
Materials: assorted uniform and blazer buttons (varied sizes), heavy cable chain, large jump rings (16–18 gauge), sturdy toggle clasp, file, microcrystalline wax.
- Sort buttons by color tone and weight; keep the heaviest near the clasp to balance dangle.
- Attach each shank to a thick jump ring. For sew‑through buttons, create a U‑shaped wire link through two holes and wrap closed, then connect to jump ring.
- Space charms evenly along the chain, leaving 1–2 links between each to prevent crowding.
- Seal raw brass with microcrystalline wax to slow oxidation while preserving surface detail.
4) Chandelier earrings from rhinestone buttons and vintage chain
Materials: two matching rhinestone buttons (with shanks), fine vintage chain, 24–26 gauge wire, earring hooks, small teardrop beads (optional).
- Wrap each shank with a snug wire coil culminating in a top loop for the ear hook.
- Cut three chain lengths per earring—staggered for a tapered silhouette.
- Attach chain to the back wire coil or to small loops added along the lower rim using discreet wire stitches.
- Finish with bead drops for sparkle. Check that both earrings match in length and swing.
5) Story brooch from layered fabric-covered buttons
Materials: three fabric-covered buttons, oval filigree plate, brooch pin back, fabric glue, needle and strong thread, little charms (tiny key, initial tag).
- Stitch the button shanks to the filigree plate to create a secure, removable connection.
- Add small charms dangling between layers to introduce movement and narrative.
- Glue a brooch pin back onto the filigree; orient horizontally for sweater wear.
Caring for vintage materials: clean, seal, and respect
Vintage components reward gentle methods. Glass and metal clean well with mild soap and water, but avoid immersing glued assemblies. Use soft brushes to nudge dirt from grooves. Shell and mother-of-pearl dislike acids and ammonia; stick to damp cloths and immediate drying. Plastic varies: bakelite can be polished with specialized compounds, while celluloid is fragile and flammable—keep it away from heat and solvents. Rhinestones set with foil-backed cups should never be soaked; moisture can cloud the foil. When in doubt, test a hidden area.
Sealants can stabilize finishes. Renaissance wax or other microcrystalline waxes protect raw brass and bronze while keeping the aged glow; acrylic lacquers are more durable but less forgiving to touch-ups. If you enjoy the darkening of copper alloys, let them breathe and simply buff high points for contrast. Embrace craftsmanship by making finishing a distinct phase of your workflow: inspect edges for snags, close jump rings fully, file sharp ends, and hand‑polish before you call the piece done.
Safety, allergies, and ethical considerations
Know your materials. Older glass and solders may contain lead; cadmium can lurk in vivid yellow or red enamels. Use lead-check swabs to screen suspect items, especially if you sell your work. Nickel is a common allergen—choose nickel‑free ear hooks and backings. Ventilate when using solvents, epoxies, or UV resins; wear nitrile gloves and eye protection when cutting or drilling. Store adhesives out of sunlight and away from heat sources. If working with uniform or insignia buttons, understand cultural contexts and legalities; reproduction buttons are often the better option for saleable designs.
Stability under stress is a safety feature. Necklaces should have a robust clasp and optionally a short extender chain that doubles as a fail-safe. Earrings benefit from locking backs. Brooches should have a secure catch that will not open on thick fabric. Design with wearer behavior in mind; long pendants need abrasion-resistant cords, bracelets should not snag sweaters, and sharp filigree edges must be softened. Plan for longevity: redundancy in connections equals higher real-world durability.
Beyond basics: advanced tricks for professional finishes
- Hidden armatures: Build a thin brass or stainless wire frame behind a cluster to distribute weight and relieve strain on any single button.
- Convertible hardware: Use discreet hooks or screw-on bails so a pendant can double as a brooch—ultimate wardrobe versatility.
- Heat-free shaping: Carefully bend brass filigree with nylon pliers to cup dome buttons; no torch needed.
- Micro-rivets through sew-through holes: Insert 1 mm tube rivets where thread once lived; flare gently with a custom punch for a permanent hold.
- Textile supports: Mount button mosaics on velvet or wool felt for necklaces; the fabric absorbs micro-movements and reduces noise.
- Color unification: If a mixed lot feels chaotic, introduce a constant—repeating bead caps, spacers, or a ribbon collar—to tie elements together.
Troubleshooting common problems
- Adhesive failed: Reassess surface prep. Increase mechanical connection—a hidden stitch or wire tie—so glue is not the only bond.
- Piece flips face-down: The center of gravity sits too far forward. Add a small counterweight near the bail, or reposition the bail closer to the top edge.
- Earrings don’t match: Weigh components on a jeweler’s scale; substitute a lighter chain or a smaller charm on the heavier side.
- Green skin marks: That is copper transfer from brass. Seal backs with clear lacquer or wax, or use a barrier like leather pads.
- Cloudy rhinestones: Moisture or degraded foil. Replace stones if settings allow; otherwise, repurpose the button where sparkle isn’t critical.
- Wobbling ring focal: Build a custom shim with epoxy clay, then set the button again once cured and sanded flat.
Design stories: composing meaning with memory
Jewelry becomes unforgettable when it reflects a narrative. A grandmother’s shell buttons can graduate across a neckline like a family tree. A travel tin of metro tokens, cuff links, and souvenir buttons can morph into a bracelet of cities. Uniform buttons from different eras tell a lineage of service; replicate them with modern castings if originals are collectible. Write a tiny card with piece details: source, year estimates, and care tips. That story elevates perceived value and invites conversation.
Leverage color theory as you design. Analogous palettes—olive, brass, and tortoiseshell—feel calm and vintage; complementary pops—navy with orange bakelite—energize. Texture is color’s partner: pair smooth enamel next to faceted glass, or embroider thread through sew‑through holes for a fiber accent. Let negative space play a role: a single glossy button on a fine chain can be more striking than a crowded cluster. The best pieces reveal restraint and thoughtful rhythm, the silent virtues of good composition.
Microbusiness mindset: pricing, presentation, and continuity
If you share your work with customers, track your time and materials. A simple baseline is materials cost multiplied by a factor (2–3 for overhead) plus an hourly rate for labor. Unique lots complicate reproducibility; create product families rather than exact repeats: “Deco Glass Ring—Series No. 12.” Photograph against neutral backgrounds with one lifestyle shot to show scale and sheen. Include a care card that explains vintage materials and lists metal content to reassure sensitive skin customers.
Consistency amid one-of-a-kind inputs comes from signatures: a particular clasp you always use, a hallmark tag, a matte satin ribbon tie, or a recurring motif. Keep a small library of compatible chains, jump rings, and pin backs so replacements and repairs are straightforward. Document your sources and batches so you can speak confidently about provenance in markets or online listings. Customers value transparency, history, and the calm assurance of practiced craftsmanship.
Environmental and emotional dividends
Rescuing, mending, and reframing are creative acts with real-world impact. Each piece you craft reduces demand for newly mined metals and freshly manufactured plastics. In a culture of speed, considered making foregrounds slowness, touch, and skill. The language of sustainability becomes visible on the body—small circles of time carried into the future. Your jewelry can honor both ecology and intimacy, translating orphaned hardware into talismans of care.
Material identification quick notes
- Mother-of-pearl: iridescent layering; cool to touch; gentle soap only.
- Glass: weighty and cold; seams from pressing; avoid shocks and foil-backed water exposure.
- Bakelite: warm color depth; distinct scent when rubbed; polish with dedicated compound.
- Celluloid: thin, flexible; risk of degradation; keep cool and dry.
- Brass vs. gold tone: brass shows warm brassy wear; magnet test for steel imposters.
- Jet vs. glass: jet is light and warm to touch; glass is cold and heavier.
A closing invitation to experiment
Gather a handful of buttons—shell that whispers of sea light, glass pressed with sunbursts, a crest that speaks of service—and a sprinkling of vintage findings. Let your hands arrange, unmake, and rearrange until the parts begin to hum together. Add a bail, a rivet, a stitch; choose a clasp that feels like a promise. Your finished piece will carry more than decoration. It will carry memory, ingenuity, and the workmanship of your attention. Respect the patina, protect the story, and let your pieces travel—bright with versatility, strengthened by durability, aligned with sustainability, and composed with enduring craftsmanship.