Quiet lines and understated shine: thin-chain necklaces are the whisper of a wardrobe, the kind of jewelry you notice only when it catches a beam of light or frames a collarbone just so. They turn the tiniest motif into a statement of restraint, rely on negative space as much as on metal, and invite handcraft techniques that reward precision over force. This guide explores what makes minimalist necklaces compelling, how to build them with reliability and grace, and how to push thin chains to their elegant limits without sacrificing durability. Whether you’re crafting a single everyday staple or curating a layered story, you’ll find practical know-how and design insight to make your pieces look effortless—and last.
Aesthetic Foundations: Proportion, Negative Space, and Quiet Impact
Minimalist jewelry thrives on subtraction. Every decision—length, pendant scale, surface finish, clasp silhouette—carries more weight because there are fewer elements overall. The eye reads the space around a thin chain as part of the composition, so an extra millimeter or two can redefine balance. Understanding the body, clothing silhouettes, and light is essential to a design that feels intentional rather than sparse.
Proportion that flatters
- Lengths and landmarks: Common lengths include choker (14–15 in), collarbone (16 in), princess (18 in), and matinee (20–22 in). A thin pendant necklace placed at the suprasternal notch (the dip above the sternum) produces an elegant focal point with most necklines. Adjust by 0.5–1 in to account for height and neck circumference.
- Pendant scale: For a 1 mm cable chain, aim for pendants no wider than 15–20 mm if you want a visual whisper; for a 0.8–1.2 mm box or snake chain, a 6–10 mm bead or disc keeps things balanced. Work with a simple ratio: pendant width about one-third to one-half of the clavicle span where it will sit.
- Surface and light: Polished surfaces flash; brushed or satin finishes glow. Hammered textures scatter light into tiny facets that sparkle without bulk. Pair a high-polish pendant with a matte chain or vice versa to maintain clarity.
Minimalism is not emptiness; it’s focus. Center your design on one idea—line, dot, bar, or negative space—and let other choices support it. If there’s any doubt, remove the least essential element and reassess balance. The habit of editing is what distinguishes strong minimalist work.
Key concept anchors in this style include minimalism as a design ethos and precise proportion. Returning to these words throughout the process will help you refine rather than add.
Materials and Tools for Delicate Chaincraft
Comfort, longevity, and finish quality start with metal choice and chain construction. Thin doesn’t mean fragile if you match the right alloy to the task and treat stress points intelligently.
Metals and what they mean
- Sterling silver (92.5% silver) offers a bright, versatile sheen, takes texture beautifully, and is relatively easy to repair. It tarnishes over time; a gentle polish restores luster. Look for 925 hallmarks.
- Gold-filled wire and chain have a bonded, thick layer of karat gold over a brass core. They resist wear dramatically better than plated items, making them excellent for everyday, thin-chain pieces. Typical hallmarks include GF or 1/20 14K GF.
- Solid gold (10K–18K): Best for heirloom minimalism; higher karat yields richer color and softer workability. Requires careful technique but rewards with excellent longevity and low maintenance.
- Stainless steel: Highly durable, affordable, and low maintenance. Offers cooler color and can be more rigid. Ideal for clients with active lifestyles or for chains that see water and sweat.
- Titanium: Featherlight, tough, and reacts minimally with skin. Color differs from silver; more gray. Suitable for ultra-thin chain that must resist stretch.
- Brass and bronze: Warm tone, economical, good for practice or intentional patina. Can darken and may mark skin on humid days; sealers or lacquer can mitigate.
If skin sensitivity is a concern, choose metals advertised as hypoallergenic, such as titanium, niobium, higher-karat gold, or surgical-grade stainless steel, and source clasps that match the same standard to avoid weak links in comfort.
Chain styles and sizes
- Cable (0.9–1.5 mm): The quintessential minimalist choice; round or oval links with subtle sparkle. Easy to shorten and repair.
- Box (0.8–1.2 mm): Sleek, geometric, and strong for its width. Great with tiny pendants; resists kinks better than snake but still lies flat.
- Snake (0.8–1.2 mm): Fluid drape and continuous shine; gorgeous solo lines. Requires gentle handling to avoid kinks.
- Satellite (beaded) chain (1.0–1.5 mm with 1.5–2.5 mm beads): Adds quiet rhythm without a pendant; excellent for layering.
- Rolo/Belcher (1.0–1.6 mm): Round, uniform links; sturdy and classic, still delicate at small gauges.
- Figaro curb (fine): Offers subtle patterning for visual interest without adding a pendant.
When evaluating chain, check whether end links are soldered closed (better for longevity) and whether the final link accepts your clasp size. Keep spare matching end links; brand-to-brand tolerances vary.
Findings, wire, and small essentials
- Jump rings: 24–20 AWG are typical for thin chains; choose inner diameters of 2.5–4 mm depending on clasp and chain. Soldered or hardened rings significantly boost durability.
- Clasps: Spring ring (light, minimal), lobster (reliable), or discrete magnetic clasps (consider a safety chain for security). Match finish and metal.
- Headpins/Eyepins: 24–22 AWG for micro drops; choose wire temper that won’t crack during bending. For premium work, hand-make headpins from the same alloy.
- Crimps and wire guards: For beading wire extenders or fine stations; choose sizes that fit your material without slippage.
Tools for thin-chain finesse
- Chain-nose pliers and bent chain-nose: Smooth jaws to avoid marring. Wrap with nylon jaw covers or tape if necessary.
- Round-nose pliers: For forming loops; fine tips help with miniature work.
- Flush cutters: Sharp, fine-tip cutters are essential; reserve one pair for soft metals only.
- Crimping pliers: For precise crimps without over-squashing.
- Files and polishing papers: 600–3000 grit to soften cut ends and refine surfaces.
- Bench block and chasing hammer: For thinning, work-hardening, and adding texture to tiny bars or discs.
- Optional: Soldering setup for permanent joins; practice on scrap first if you decide to solder jump rings.
Core Techniques for Delicate Construction
Thin chains reward gentle, methodical movements. The following techniques form a foundation for consistent results and tidy finishes.
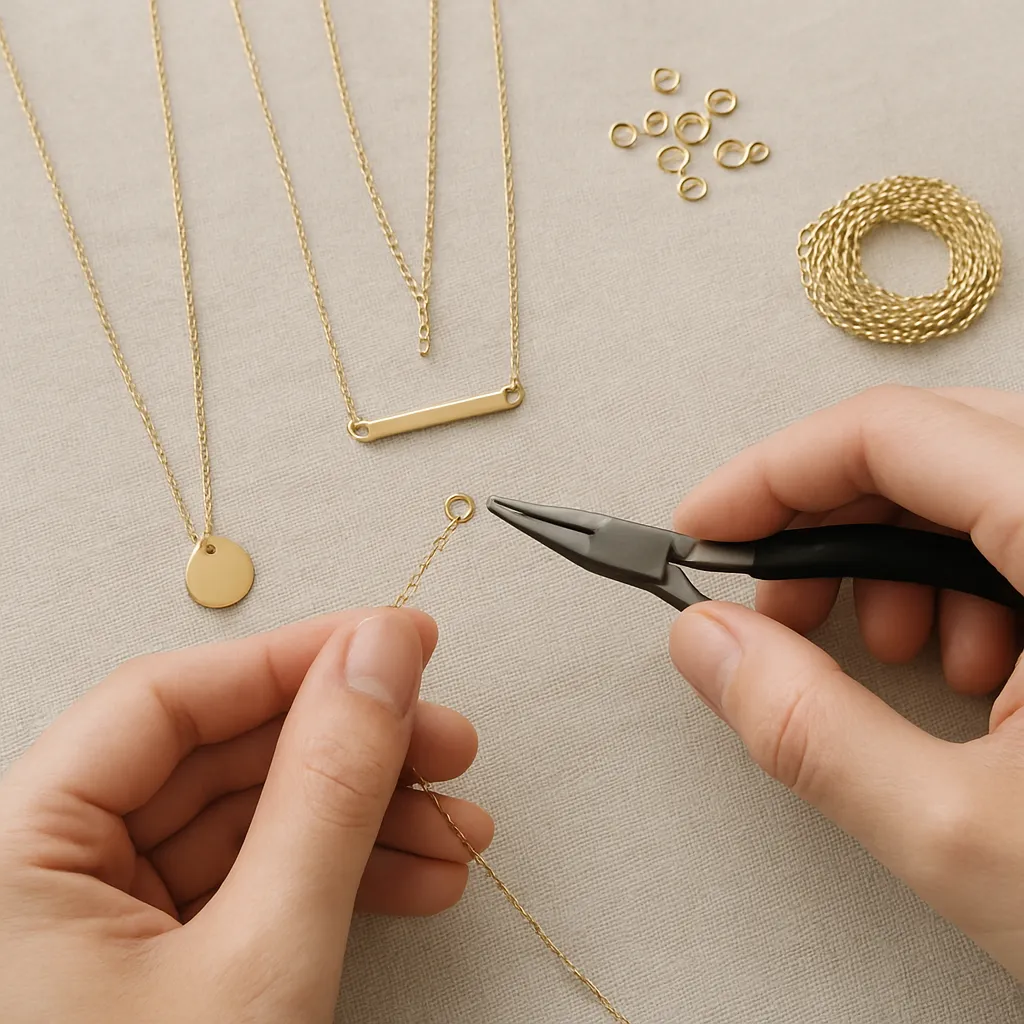
Opening and closing jump rings correctly
- Hold the ring at 3 and 9 o’clock with two pliers.
- Twist one side forward and the other back; never pull apart sideways. This maintains the round shape.
- Close with a slight over-correction and “wiggle” until you feel the ends click. A near-invisible seam is your target.
Attaching a clasp to thin chain
- Connect a small jump ring to a soldered end link, then attach the clasp to that ring. This isolates stress away from the chain’s last link.
- On the opposite end, add a 3–5 mm jump ring for the clasp to catch. Consider a 1–2 in extender if multiple lengths are desired.
- Work-harden by gently tapping closed jump rings on a bench block to reduce accidental opening (avoid excessive force).
Simple and wire-wrapped loops
- Simple loop: Create a 90° bend above your bead, roll a loop with round-nose pliers, trim flush, and close. Best for stationary components that won’t see heavy tugging.
- Wire-wrapped loop: Stronger for pendants. After forming a loop, wrap the tail neatly 2–3 times down the neck, trim, and tuck the end. Excellent for briolette drops and tiny gems.
Crimping for stations
- Use fine beading wire to create floating stations along a chain or standalone beading-wire necklaces that read as “threadlike.”
- Match crimp size precisely; flatten only enough to hold, then round with the second notch of crimping pliers for a clean barrel shape.
Stamping and texturing tiny pendants
- Use 1.5–3 mm steel letter stamps on 6–10 mm discs. Tape to align.
- Strike once with confidence on a hardened bench block. Overstrikes blur edges.
- Optional patina (for silver): Oxidize and polish high points for legibility. For brass, seal after antiquing to reduce skin transfer.
Safety basics without bulk
- Wear eye protection when cutting wire and opening jump rings.
- Deburr cut ends to prevent snagging knits or hair.
- When soldering, use ventilation and avoid lead-based solders for wearables.
Five Minimalist Necklace Projects (Thin-Chain Edition)
1) Single Gem Drop on 1 mm Cable
A micro pendant that hits the collarbone, perfect solo or as the first layer.
- Materials: 1 mm cable chain (16–18 in), 3 mm faceted gemstone bead or 6×4 mm briolette, 24–22 AWG headpin, 3 mm jump ring, small lobster clasp.
- Steps:
- Thread the stone onto the headpin; create a wire-wrapped loop.
- Slide the wrap onto a 3 mm jump ring; close cleanly.
- Attach the ring to the chain’s midpoint or let it float on the chain for subtle movement.
- Finish the chain ends with a clasp set as described above.
- Notes: For briolettes, support the fragile tip by keeping wraps snug and even. Consider gold-filled for better everyday wear.
2) Horizontal Bar in Satin Gold
A whisper-thin line that anchors open space at the neckline.
- Materials: 20–22 mm bar blank in 14K gold-filled or sterling, 1 mm box chain, two 3 mm jump rings, clasp.
- Steps:
- File edges round; sand to 1000+ grit for satin or polish to mirror.
- Drill or punch 0.8–1.0 mm holes 2–3 mm from each end (if not pre-drilled).
- Attach jump rings to the bar, then to the chain; ensure the bar lies horizontally without twisting.
- Finish with clasp and, if desired, a 1 in extender for layering flexibility.
- Notes: For zero twist, match ring sizes and keep both jumps on the same plane. A gentle hammer texture adds micro-facets.
3) Micro Disc Initial
Personal but discreet; stamp a 6–8 mm disc with a tiny letter.
- Materials: 6–8 mm disc in sterling silver or gold-filled, 1 mm satellite chain, 3 mm jump ring, letter stamp set.
- Steps:
- Mark center; tape the disc to a bench block.
- Stamp the initial with a single firm strike.
- Polish, then oxidize (optional) and repolish the high surfaces.
- Hang from a jump ring and thread onto chain; finish with clasp.
- Notes: Use a matte finish on the disc if you prefer a softer, modern tone that resists fingerprints.
4) Negative-Space Y Necklace
Eye-tracking vertical line with a drop that lengthens the neck visually.
- Materials: 16 in cable chain, 2 in drop chain (same style, 0.8–1.0 mm), 3–4 jump rings, small 3–4 mm bead or 8×5 mm teardrop, clasp.
- Steps:
- Create a center ring at the 16 in mark: add a 3 mm jump ring to the midpoint.
- Attach the 2 in chain drop to the ring; secure with a closed seam.
- Add a simple or wrapped bead to the bottom of the drop.
- Install clasp and try on; adjust drop length so it sits clear of neckline edges.
- Notes: Keep the center ring small to avoid overpowering the delicate lines; a soldered ring prevents distortion.
5) Three-Chain Layering Set (16/18/20 in)
A curated trio that reads as air, shimmer, and line—ideal for everyday wear.
- Materials:
- 16 in snake chain (0.8–1.0 mm), no pendant.
- 18 in satellite chain (1.2 mm), micro dot stations.
- 20 in cable chain (1.2–1.4 mm) with 10–12 mm hammered disc.
- Steps:
- Craft each necklace with its own clasp and a 1–2 in extender for fine-tuning.
- Test together: look for 1–1.5 in separation between resting lengths to reduce tangle and visual crowding.
- Optionally use a multi-strand clasp that holds each necklace in a staggered fall to minimize friction.
- Notes: Balance textures across the set—fluid snake, dotted satellite, hammered disc—so the eye experiences rhythm, not redundancy.
Throughout these builds, the concept of layering is both aesthetic and functional: spacing elements to avoid tangles while letting each chain bring a unique glimmer.
Designing Layered Looks That Don’t Tangle
Thin chains can behave like silk threads—beautiful, but prone to cling. Reduce friction and collision points, and plan for motion.
- Stagger weights: Heavier pendant on the longest chain, lightest chain at the neck. Heavier elements anchor motion.
- Mix profiles: Pair a snake (smooth) with a box (angular) and a satellite (punctuated) to prevent nesting.
- Use extenders intelligently: A shared 1–2 in range lets wearers fine-tune spacing for different necklines.
- Consider a U-shaped multi-connector: It spreads clasps along the back to keep chains from crossing.
- Test with movement: Simulate walking and turning. If tangling persists, shorten one chain by 0.5 in or change the pendant’s bail orientation.
Finally, honor negative space. Leave at least one tier pendant-free; it calms the composition and highlights the others.
Durability Without Losing Delicacy
Minimalist does not mean short-lived. Most failures occur at terminations and connectors, not mid-chain. Address stress points up front.
- Reinforce ends: Use wire guards where beading wire meets clasps; on metal chain, use a soldered end link or double-ring system.
- Choose the right clasp size: Too large overwhelms the line; too small is frustrating to use and stresses jump rings.
- Work-harden selectively: Lightly hammer tiny bars and wrap sections to gain strength without bulk. Avoid hammering the chain itself.
- Consider soldering high-wear joins: Closing and soldering the final jump ring can extend life significantly, particularly for everyday pieces.
- Load test: Gently pull to simulate snagging; if a connection opens easily, upsize the ring gauge or switch to a closed ring.
Finishes, Color, and Mixing Metals
Color temperature and finish communicate mood, especially when your canvas is minimal.
- Color families: Yellow gold warms skin tones; rose gold introduces romance; silver and steel skew modern and cool. Layering mixed metals can sharpen contrast while staying refined.
- Finish choices: High polish reads dressier; satin or brushed leans casual; hammered adds sparkle with restraint. Combine one bold finish with one quiet finish to keep clarity.
- Edge ethics: For a soft luxury feel, break sharp corners and polish bails and jump ring seams so fabric and hair glide.
Troubleshooting, Care, and Everyday Practicalities
Thin chains become heirlooms when well-kept. Small habits make a big difference.
- Tangles: Fasten clasps when storing; feed chains through a straw or zip bag with the clasp outside. If knotted, add a drop of light oil and tease apart with two pins under magnification.
- Tarnish: For silver, use a polishing cloth regularly; for stubborn oxidation, a mild silver dip followed by thorough rinsing and drying. Keep silica gel or anti-tarnish tabs in storage.
- Kinks (snake chains): Lay flat and warm gently in your hands; do not bend sharply. If a hard kink forms, professional repair may be needed.
- Broken links: Replace the damaged section with a matching link or insert a jump ring as an accent join. If many links fail, consider upgrading metal or chain style.
- Skin and cosmetics: Jewelry goes on last, comes off first. Perfume, lotions, and sunscreen can dull finishes and weaken plating.
- Water exposure: Gold-filled and solid metals tolerate water better than plated; dry thoroughly after salt or chlorinated water.
Sourcing, Ethics, and the Handmade Story
Minimalist design puts craft in the spotlight: the cut of a loop, the alignment of a stamp, the calm balance of a silhouette. The choices behind the work also tell a story.
- Recycled metals: Many mills offer recycled sterling and gold-filled stock without sacrificing quality. Labeling this choice supports sustainability and transparency.
- Gem provenance: Tiny stones still count; ask suppliers about sourcing. Laboratory-grown gems can be a bright, ethical option for minimalist accents.
- Local suppliers: Proximity reduces shipping footprint and offers faster access to matching components when you need a repair or duplicate.
- Upcycling: Vintage chains can become modern minimalism with a simple disc or bar; test strength, clean, then pair with updated findings.
- Packaging: Minimal, recyclable boxes and anti-tarnish paper align with the style and values of quiet luxury.
Measurements, Specs, and Quick Reference
- Standard lengths: 14–15 in (choker), 16 in (collarbone), 18 in (princess), 20–22 in (matinee). Extenders: 1–2 in.
- Chain widths for minimalism: 0.8–1.5 mm typical. Heavier pendants may require 1.4–1.8 mm for balance.
- Jump rings: 24–22 AWG for micro work; 3–4 mm OD commonly used at clasps. Soldered rings for best longevity.
- Headpins/Eyepins: 24–22 AWG; matched to bead hole size to avoid slop.
- Pendant scale: 6–12 mm typical for “barely there” focus points; 15–20 mm for a definitive but still minimal presence.
Subtle Personalization That Stays Minimal
Personal does not have to mean loud. The quietest gestures often feel most intimate.
- Micro initials or symbols: 2 mm stamps on 6–8 mm discs read as a secret for the wearer, not a billboard.
- Birthstone dots: One 2–3 mm gem set in a tiny bezel or hung as a light drop.
- Texture signatures: A specific hammer pattern or brushed direction can become your maker’s mark in practice, alongside a legal hallmark when required.
- Hidden engravings: Undersides of bars or back of discs hold short dates or coordinates for the wearer alone.
From Bench to Body: Testing and Iteration
The final test of a minimalist necklace is how it lives on a person. Try-on sessions reveal where theory meets reality.
- Movement check: Walk, turn, bend; ensure pendants don’t flip and chains don’t migrate into the same groove of the neck.
- Clothing test: Evaluate against T-shirts, blouses, and knits. Thin chains can catch on open-weave sweaters; round edges and closed joins mitigate snags.
- Light study: Assess under warm and cool lighting; finishes can shift presence dramatically. A hammered disc glows under soft light but may sparkle more than desired under direct LEDs—adjust texture density accordingly.
- Comfort audit: Hair tangles near clasp? Use smaller, rounded findings and tuck wire ends deeply. If a pendant feels “pokey,” dish its back with a cup bur for a soft contact patch.
When to Mix and When to Match
Consistency is calming; contrast is energizing. Thin-chain minimalism can handle both if you set a rule and follow it.
- Match metal, vary texture: All gold with alternating satin and mirror surfaces keeps unity.
- Mix metal, match form: A bar in silver paired with a disc in gold, both small and flat, reads intentional and modern.
- Limit palette: Two metals, two finishes, one motif family (dots, lines, or planes) is a reliable framework.
Selling or Gifting: Presentation and Care Cards
Minimalist pieces benefit from minimalist presentation. A neutral card with simple instructions adds value without clutter.
- Include length and metal details (e.g., 18 in, 14K gold-filled, 1 mm box chain).
- Offer a brief care note: Put on last, store fastened, polish gently.
- Provide a micro polishing cloth and an anti-tarnish tab for silver sets.
Advanced Touches for the Dedicated Maker
- Seamless bails: Micro-soldered or laser-welded bails allow pendants to swing without a visible join, keeping the line uninterrupted.
- Hardening cycles: For sterling components, controlled hammering or tumble-polishing with stainless shot can increase hardness slightly, improving wear.
- Station chains with micro-stops: Solder tiny beads as fixed stations on cable chain to create a custom satellite effect with perfect spacing.
- Safety chain with magnet clasps: Add a fine 0.6–0.8 mm secondary chain between ends so the necklace survives accidental magnetic detachment.
A Maker’s Mindset: From First Link to Final Polish
Thin-chain minimalism demands clarity of intention and care in execution. Each decision travels through the entire piece: the metal you pick colors the light, the clasp you choose sets the tone for daily ease, and the way you close a jump ring defines whether the seam disappears or announces itself. Build processes that honor small details, and your necklaces will seem to float—confident, quiet, and complete.
As you refine your practice, keep returning to a handful of compass points: material integrity in sterling silver and gold-filled options; reliable connections with well-closed jump rings; human-centered comfort via hypoallergenic choices; design clarity through proportion and minimalism; flexible styling via thoughtful layering; and long-view making rooted in sustainability. With these in hand, the smallest glint of metal can carry a whole story—no louder than a whisper, no less powerful for it.