There is a special thrill in translating a leaf’s veins, a seedpod’s ridges, or a twig’s growth rings into a wearable story. Nature casts let you borrow the micro-architecture of plants and preserve it as jewelry with all the spontaneity of the original. Whether you work at a kitchen table or a small studio bench, you can create organic-looking pieces using approachable techniques, simple tools, and a mindful eye for detail. This guide walks through the entire journey—from ethical foraging and smart material choices to professional-level finishing—so your work feels both grounded in the wild and refined on the body.
Why Nature Casts Captivate: Aesthetics, Story, and Sense of Place
Handcrafted jewelry is more than sparkle; it’s narrative. The quiet geometry of fern fronds, the spiral of a snail shell, or the matte bloom on an acorn cap all carry a place’s scent, season, and mood. When you capture these forms, you invite the wearer into a moment outdoors—dew at dawn, dry grass at dusk—without a single word spoken.
From an aesthetic standpoint, organic motifs embody asymmetry, variation, and what Japanese craft traditions call wabi-sabi: beauty that embraces imperfection. That imperfect line is precisely what makes a piece feel alive. In contrast to highly machined edges, the minute bumps of a lichen or the crisp cellular lattice under a maple leaf make the hand pause and the eye linger. Jewelry that documents these forms becomes a portable field journal, a record of time and place.
There is also a material dialogue at play. Polished metal against fibrous leaf vein, translucent casting next to opaque bark grain—opposites amplify each other. Once you understand how to amplify natural detail, you can curate compositions: a cluster of tiny cones set on a matte plate, a solitary blade skeletonized in bright silver, or a group of river stones molded and re-cast in warm alloys. Thoughtful selection plus the right texture treatment will make your pieces read as quietly luxurious rather than novelty.
Responsible Foraging and Selecting Botanical Originals
Ethical practice starts long before the mold box. Collect with respect for ecosystems, laws, and future foragers.
- Know your laws: Many parks prohibit collecting. Seek permission on private land. Public roadside ditches may also have restrictions.
- Harvest lightly: Take only what you need and avoid uprooting. Prefer windfall materials—shed bark, fallen twigs, seedpods after dispersal.
- Prioritize invasive or abundant species: English ivy, Himalayan blackberry, or plentiful eucalyptus seedpods are often excellent candidates.
- Avoid protected, rare, or sensitive species: If in doubt, leave it be.
- Choose forms with durable architecture: Thick-veined leaves (oak, magnolia), textured bark curls, small cones, acorn caps, ginkgo, sage, rosemary, succulents with prominent surfaces. Super-thin petals are trickier unless stabilized.
Preparation matters. Brush off dirt with a soft paintbrush. For delicate items, dry them flat between parchment or in a flower press for a few days. For flexible leaves, a light clear acrylic spray or shellac sealer can stiffen and reduce moisture before molding. Moisture can interfere with cure in some rubbers and resins, so pre-drying is a good habit.
Essential Tools, Materials, and Safety
You can assemble a compact kit that covers most home methods. Start basic; add sophistication as you grow.
Bench and Hand Tools
- Cutting: flush cutters, craft knife, shears
- Shaping: needle files, rifflers, sandpaper (220–3000 grit), sanding sticks
- Workholding: bench pin, mini vise, spring clamps, rubber bands
- Measuring: calipers, ruler, fine-tip marker
- Polishing: polishing motor or flex shaft (optional), hand-held micro-mesh pads, soft cloths
- Heat: small butane torch (for metal clay and simple soldering), heat-resistant surface, tweezers
Molding Compounds
- Two-part silicone putty (fast, great for impressions and small objects)
- Pourable silicone rubber (captures high detail; use for multi-part molds)
- Alginate or gelatin-glycerin molds (short-lived, budget-friendly, good for practice)
- Plaster bandage for rigid mother molds (supporting brush-on rubbers)
Casting Media
- Low-melt alloys: pewter is approachable with a hot plate and ladle
- Metal clays: fine silver, bronze, or copper clay for texturing leaves directly and sintering
- Resin: two-part epoxy or UV-curable for translucency, inclusions, color
- Wax: sculpting and injection waxes for lost-wax routes
Safety Essentials
- PPE: safety glasses, nitrile gloves, respirator appropriate to the material (organics for dust, cartridges for solvent vapors)
- Ventilation: especially for resins, patinas, and torch work
- Fire safety: metal tray, extinguisher, no loose synthetics near flame
Mold-Making: Capturing Detail Without Crushing the Original
The mold is the heart of surface fidelity. A good mold reads every vein, while a poor one stifles or tears detail. Choose your approach based on fragility, undercuts, and volume needs.
Fast Impression Molds with Silicone Putty
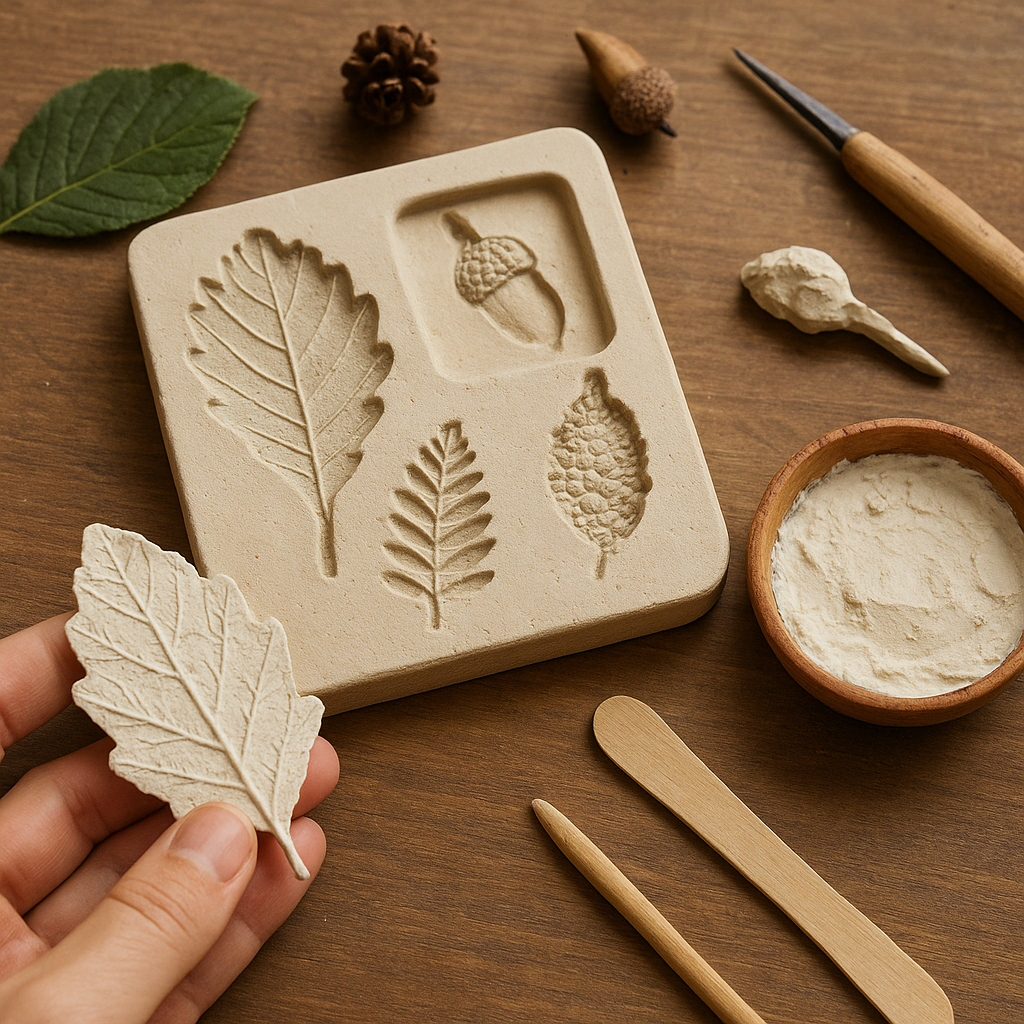
Silicone putty is ideal for flat or semi-flat botanicals. Mix equal parts until uniform. Roll into a disk on a smooth surface. Press your leaf into the putty with even pressure; let it cure (typically minutes). Pop out the leaf; you now have a negative capturing fine detail. For double-sided leaves, make a matched pair using registration keys (push in a pen cap to create dimples) so halves realign later.
Brush-On Silicone for Fragile or 3D Items
For textured seedpods or curled bark, paint on thin layers of pourable silicone over a release-coated original. Build up 3–6 layers to a sturdy membrane. Create a rigid shell (a mother mold) with plaster bandage or urethane shell to support it. Cut a zig-zag seam line to open, preserving alignment. This method reduces squeeze and protects fragile originals during curing.
Two-Part Block Molds
Build a small box from foam core or LEGO. Embed half the object in non-sulfur clay and press in registration keys. Pour the first half of silicone. After cure, remove clay, apply mold release, and pour the second half. The result: a durable re-usable mold for multiple pours with reliable parting and clean seams.
Moisture and Surface Prep
Dry your specimens. Moisture can inhibit some silicone catalysts and cause bubbles. Seal porous botanicals with a thin acrylic spray for easier release. Use a compatible release agent on the original when necessary, but avoid over-application that can blur detail.
Casting Options: From Kitchen-Table Friendly to Studio-Level
Once you have a mold, you can choose a casting medium that suits your tools, budget, and desired appearance. Think in terms of weight, color, translucency, and durability.
Epoxy and UV Resin: Light, Luminous, and Versatile
Resin is perfect for magnifying leaf veins or suspending tiny inclusions like heather flowers or moss. Use a slow-cure epoxy for clarity and fewer bubbles. Warm components gently to lower viscosity. Color with alcohol inks, mica powders, or resin tints. For crisp surfaces, overfill slightly and sand flush after cure. For domed gleam, add a final thin flood coat or UV dome layer. De-gas in a pressure pot if you have one; otherwise, toothpick bubbles and work warm.
- Mold release: essential on silicone that tends to bond with certain epoxies; test first.
- Venting: add tiny vent channels in complex molds to avoid air traps at tips of leaves.
- Embedding findings: insert a stainless eye pin mid-gel or drill and add a screw eye after full cure with a dab of epoxy adhesive.
Metal Clays: Silver Leaves with Fireplace-Level Tools
Metal clays are binders plus metal powder that sinter into solid metal when heated. Press a fresh leaf into moist clay to record its veins. Cut, refine edges, and dry thoroughly. Fire with a butane torch (for small fine silver pieces) or in a kiln (for copper/bronze, which need longer, reducing conditions). After firing, brush off binder residue with a brass brush and polish. You can achieve breathtaking botanical fidelity with minimal setup and no melt-pour stage.
Pewter Casting: Approachable, Soft-Metal Brilliance
Modern lead-free pewter melts around 240–260°C and can be poured into silicone molds designed for low-temperature metals. Pre-heat your mold slightly to reduce chill lines. Pour in a smooth, continuous stream; tap gently to help air escape. Cut sprues after solidification, then file and polish. Pewter’s gentle surface loves a soft satin finish or a delicate antiqued patina that highlights leaf veining.
Lost-Wax with Organic Burnout: Studio-Level Fidelity
Advanced but powerful: coat a dried botanical with thin wax (or build up wax around it), attach sprues, invest in plaster-silica, and fire on a burnout schedule to remove organics and wax. Pour molten metal (silver, bronze) into the cavity. This is a classic path to true one-offs. Mind that organics release vapor; robust vents and correct burnout are vital to avoid porosity.
Designing for Wearability: Composition, Balance, and Attachment
Nature’s forms are stunning, but not all are instantly wearable. Translate them into jewelry by respecting weight, balance, and skin contact.
- Scale and ergonomics: Leaf pendants look airy but can be surprisingly broad. Map sizes against the neckline. For earrings, keep each piece ideally under 6–8 grams to prevent earlobe strain.
- Edges and contact points: Round any sharp cast tips. The body notices edges far more than eyes do.
- Bails and connectors: Integrate the hanging solution into the design. A naturally thick leaf stem can serve as a hidden bail. Alternative: embed a hidden tunnel during molding.
- Sprue planning: In metal casting, place the sprue so you can later convert the cut stump into a bail nub or a decorative stem.
- Shrinkage allowances: Epoxy shrinks minimally; metal clays can shrink 10–20%. Prototype in wax or resin to confirm final size.
Surface Development: Polishing, Patinas, and Textural Contrast
Surface is the language of nuance. Lean into contrast: bright against dark, matte against gloss, smooth against tooth. After your rough cleanup, progress through sandpaper grits. For pewter and silver, a tripoli pre-polish then rouge finish creates a mirror; for a more natural effect, stop earlier for a satin sheen that reads like river-worn stone.
- Highlight detail: Brush on liver-of-sulfur for silver or bronze, then burnish the high points to leave darkened valleys—a classic relief patina.
- Seal and protect: Renaissance wax or microcrystalline wax preserves patina and reduces tarnish fingerprints.
- Resin finishing: Wet-sand through grits to 3000 or micro-mesh, then polish. A final UV doming layer can return clarity after sanding.
- Contrasts: Mask parts of a metal piece to keep them matte (scotch-brite) while buffing selected areas to a gleam.
Color, Light, and Translucency
When you work with transparent media, light is your collaborator. Consider painterly casts: a clear resin maple seed with a whisper of smoke dye at the tip; an oak leaf frozen in pale green with mica at the veins. In metal, heat colors on copper and bronze can echo autumn hues, while selective keum-boo (gold foil diffusion bonding) gilds a single vein like sunlight.
Mica powders dusted into a mold create interior pearlescence. Alcohol inks marbled with a toothpick can mimic stone. For stability, use colorants designed for your resin and add UV inhibitors if outdoor wear is expected.
Project Walkthroughs: Four Proven Builds
1) Fine Silver Leaf from Metal Clay
- Tools/Materials: fine silver metal clay, fresh leaf (fern or skeletonized leaf), roller, blade, drying surface, butane torch.
- Press leaf into clay; roll to embed vein structure. Peel away gently. Cut pendant shape leaving the vein impression clear.
- Dry fully. Refine edges with sanding sticks. Pierce a hole for a jump ring or sculpt a clay bail.
- Fire per manufacturer’s schedule. Quench, brass brush, then polish. Optional liver-of-sulfur to shadow the veins.
2) Pewter Twig Bangle via Silicone Brush-On
- Coat a textured twig with release; brush on silicone layers. Create a plaster mother mold.
- Cast a wax or directly cast pewter into the supported silicone. For a bangle, insert a steel rod core or use a wax ring mandrel to pre-shape.
- Cut gates, file, and blend the seam. Satin-finish the exterior; leave rawer pits highlighted for character.
3) Transparent Resin Seedpod Earrings
- Impression mold a seedpod half; cast clear resin with a hint of warm dye.
- Mid-cure, embed a pre-made eye pin. Cure fully, then sand the back flat and polish.
- Assemble with lightweight ear wires to keep comfort high.
4) Bronze Acorn Charm via Lost-Wax Burnout
- Seal a dried acorn cap lightly. Build wax sprue and vents. Invest in a flask with fine investment.
- Follow a burnout schedule suitable for organics to ensure clean ash-out. Cast bronze.
- Clip sprues, sand stubs, and patinate. Turn the sprue stub into a sculpted bail mimicking a stem.
Mounting and Connections: Cold and Hot Strategies
Organic forms rarely present perfect flatbacks. Learn a few mount strategies so you can adapt to each silhouette.
- Hidden tabs: Solder or epoxy a U-shaped tab behind a pod to accept a chain while leaving the front unblemished.
- Rivets: Mechanical connections are elegant and durable. Tube rivets through a leaf’s stalk attach it to a backplate without heat-sensitive stones.
- Bezels for translucent resin: A thin metal frame protects edges and makes the piece feel finished.
- Hybrid: Resin front with a metal backplate creates weight, polish, and a professional back view.
Studio Workflow: From Field to Finished Piece
Consistency makes artistry sustainable. Try a repeatable pipeline:
- Collect and catalog: Note location, date, and mood. Photograph originals for your records.
- Prepare and test: Dry, seal, and do a micro-mold to confirm cure compatibility.
- Mold master: Make extra keys and label halves. Store molds flat to preserve geometry.
- Prototype: First pour in wax or resin to test size and detail. Adjust vents or sprue positions.
- Final cast: Commit to your chosen medium. Track temperatures and timing in a bench notebook.
- Finish and assemble: Plan surface sequence before you start so you don’t over-polish texture you meant to keep.
Troubleshooting: Clean Casts, Crisp Details
- Soft detail or blur: Overused mold or excessive release. Remake the mold with fresh silicone and limit release to a fine mist.
- Trapped air at tips: Add micro-vents or reorient pour so air rises naturally out of the leaf tip.
- Resin tackiness: Off-ratio mix or cold environment. Mix by weight when possible and warm components.
- Pewter cold shuts: Mold too cold or pour too slow. Pre-warm the mold and pour in a steady stream.
- Surface tear on demold: Under-cuts too aggressive or cure incomplete. Switch to a softer durometer silicone or lengthen cure time.
- Porosity in metal: Inadequate venting or contaminated burnout. Improve gating and ensure complete burnout/clean investment.
Finishing Tools and Hand Skills That Elevate the Work
A sharp file and a patient hand can outperform flashy machines. Learn the feel of each grit, the pressure that cuts versus smears, and the angle that protects an edge. Sand in alternating directions with each grit change to spot scratches. Back your sandpaper with a firm pad for flat areas; use flexible foam for contours. Tiny bristle brushes bring up shine in recesses without erasing detail. On pewter or silver, a final hand-buffed wax layer deepens luster while protecting the surface.
If you do torch work, practice heat control on scrap. Tiny jewelry-scale flame control makes or breaks small attachments. Keep quench and pickle dedicated for specific metals to avoid contamination. And remember that even without flames, cold connections and adhesives can deliver museum-grade constructions that preserve delicate cast surfaces.
Patination and Sealing: Painting with Time
Patina is story. Liver-of-sulfur on silver can evoke lichens and forest floor shadows; ammonia fuming on copper adds raincloud blues; heat tints on bronze introduce sunrise oranges. Layer lightly, assess under multiple lighting conditions, and lock in with waxes or lacquer if the design calls for permanence. In resin, tint layers instead: a smoky underlayer, a clear cap, a dusting of mica directly in the mold to create internal glow. Remember that a controlled patina should direct the eye, not muddy the form.
Care, Wear, and Longevity
Advise wearers to store botanical cast jewelry away from direct sun and harsh chemicals. Silver likes occasional polish; pewter prefers gentle washing and wax. Resin appreciates soft pouches to prevent scuffing. For mixed-media pieces, note that moisture and cosmetics can creep into micro-gaps; recommend putting jewelry on last and wiping after wear. With simple, seasonal maintenance, organic-inspired pieces age beautifully, developing the kind of surface character that invites touch.
Sustainability and Storytelling: Ethics Make Objects Matter
Because you are literally casting landscapes, sustainability is part of the design brief. Use reclaimed metals where possible, document your foraging ethics, and minimize disposables by making durable molds instead of single-use. When selling, include a small card listing the species, location, and season of the original. People respond deeply to place-based narratives; it turns a pendant into a keepsake of a riverside walk or a memory of the first frost.
Scaling Up: Small-Batch Production Without Losing Soul
To grow from one-offs to thoughtful editions, standardize a few patterns (e.g., three favorite leaves in two sizes) and keep a master mold set in climate-stable storage. Track shrinkage rates and casting weights for pricing consistency. Batch steps—cast multiples at once, then dedicate a day to cleanup, a day to polishing, a day to assembly. Even at scale, leave micro-variation: hand-burnished highlights or selectively brushed finishes so each piece keeps its own voice.
Advanced Explorations: Hybrid Techniques
- Electroforming: Copper-coat a sealed organic form, then patinate and seal. This preserves even fragile lace-like structures.
- 3D scan and print: Digitize a botanical and print in wax-like resins for investment casting. Blend digital symmetry with organic source material.
- Enamel accents: Add vitreous enamel to metal-cast leaves for durable color that follows vein patterns.
- Inlay: Embed crushed stone or mother of pearl into carved recesses of a metal cast for mineral-organic interplay.
Creative Prompts to Build a Nature-Cast Collection
- Season set: Four pendants, each from a different seasonal find—spring fern, summer ginkgo, autumn oak, winter seedpod.
- Habitat trio: Riverbank pebbles, driftwood grain, and reed seeds to narrate a single shoreline.
- Taxonomy series: Conifers vs. broadleaf—cones, needles, and scales versus veins and petioles.
- Scale study: One motif interpreted three ways—resin translucency, pewter solidity, metal clay delicacy.
Practical Notes on Time, Cost, and Pricing
Entry costs can be modest: silicone putty, epoxy resin, a handful of hand tools, and simple PPE. Pewter setup adds a hot plate, ladle, and dedicated silicone molds. Metal clay introduces sintering but avoids full foundry gear. Record time spent on each phase (molding, pouring, cleanup, assembly) and material yield per mold. Use that data to price fairly: cover materials, labor, studio overhead, and a margin for growth. Customers are willing to invest when they understand craftsmanship and narrative.
Glossary: The Ten Words That Do Heavy Lifting
- texture: the minute surface relief that catches light and defines botanical identity
- patina: intentional surface coloration or oxidation that adds depth and contrast
- silicone: flexible rubber used to capture fine detail in molds
- casting: pouring a liquid material into a mold to solidify in shape
- mold: a negative cavity that gives form to cast material
- pewter: a low-melting, lead-free tin alloy suitable for home casting
- resin: polymer that cures to a clear or colored solid, ideal for translucency
- finishing: filing, sanding, and polishing steps that determine final surface quality
- soldering: joining metals with a filler metal using heat
- ergonomics: how a piece fits the body for comfort and balance
From Fieldwalk to Heirloom: Bringing It All Together
When your practice moves fluently from foraging to form, every walk becomes a sketchbook. You start to see hinge points where a pod suggests a clasp, or a leaf’s midrib becomes the perfect, built-in bail. Materials become collaborators: pewter for gentle heft, resin for glow, metal clay for botanical reliefs in precious metal. The workflow gets quieter and more exacting; the results get more personal. With patience, a careful hand, and respect for both the living source and the wearer, your nature casts will read like artifacts of place—grounded in the wild, refined by craft, and ready to gather new stories with every day they are worn.