Big earrings transform a look in seconds, framing the face and broadcasting personality before you even speak. Handcrafting them yourself brings an extra layer of meaning: you choose the materials, the scale, the texture, and the story each pair will tell. Whether you are a casual weekend tinkerer or a seasoned maker planning a small-batch release, DIY statement earrings are a rewarding blend of artistry and problem-solving. This guide explores materials, design logic, techniques, and detailed projects so you can create bold, comfortable, and resilient pieces that invite compliments wherever they go.
Why Statement Earrings Feel So Powerful
Statement earrings punch above their size because they sit close to the face, the most expressive canvas we share with the world. They guide the eye line, echo cheekbones, and can sharpen or soften features. Oversized shapes hint at confidence; long fringes suggest movement and rhythm; bold color fields turn the ear into a miniature gallery. Fashion history has repeatedly spotlighted big earrings during cultural moments of exuberance: from ancient metal discs hammered in Mediterranean workshops to lacquered hoops on mid-century runways and sculptural acrylics in contemporary streetwear.
There is also a practical reason they dominate outfits. Earrings add impact without competing with waistlines or hemlines, and they do not require precise sizing the way rings or bangles do. Makers appreciate that earrings are compact to store, ship, and gift, yet deliver instant drama when worn. For crafters who sell, they also present a friendly entry price for customers who want something handmade and expressive without committing to a large purchase.
Core Design Principles That Make Bold Earrings Work
Great statement earrings are not just larger; they are deliberate. Start with a clear visual goal and use classic design ideas to support it. Train your eye with small thumbnail sketches and quick paper prototypes before you touch the good materials. Pay attention to composition, balance, contrast, proportion, and texture. These fundamentals shape the piece long before polish or hardware go on.
Scale and silhouette: A clean silhouette reads from across the room, while interior details reward a closer look. Think in big shapes first: circles, crescents, arches, or ovals. If the edge shape is memorable, the earring will feel bold even in a single color.
Weight and comfort: Comfort determines whether a customer will actually wear a piece. Many people find 6–8 g per ear comfortable for all-day wear, up to about 12 g for short events. Test weight as you build. A simple method: weigh components on a small digital scale, or temporarily hang contenders from a paperclip on your earlobe for 60 minutes at home. Pay attention to ergonomics: smooth edges, distributed weight, and posts placed near the center of gravity matter as much as visual decisions.
Movement: Dangles add life. Jointed components swing and catch light, creating micro-animations as you talk. If you use hinges, jump rings, or fringe, consider how the motion will emphasize or soften facial lines.
Color and finish: Saturated hues and high-contrast pairings feel brave; tonal blends and matte finishes feel sophisticated. Gloss amplifies color; satin or sandblasted finishes show form and temper glare. Metallics mix easily—brass with cool stones, silver with bold enamel, or anodized aluminum for iridescence.
Hardware placement: The point where the post or hook meets the design profoundly affects droop and tilt. If a shape tips forward, move the post slightly higher or closer to the heaviest area, or add a small rear stabilizer disc behind the lobe.
Materials and Tools You Will Love
Statement earrings can come from almost anything that is light yet strong, from polymers to metal sheet to repurposed materials. The secret is informed choice and precise finishing.
- Metals: Brass and copper are friendly for texturing and patina. Aluminum is light and resists tarnish. Sterling silver is classic and excellent for ear wires. Stainless steel is strong but tough to cut by hand. Titanium is ideal for posts and hooks for sensitive skin.
- Polymer clay: Versatile, bakeable, and available in many colors. It takes surface effects like mica powders, alcohol inks, and silkscreening. After curing, it can be sanded, drilled, and sealed.
- Acrylic and acetate: Vibrant colors, patterns, and translucencies. Laser-cut pieces offer crisp edges; hand-cut sheets can be shaped with a jeweler’s saw and refined with files and flame polishing.
- Wood: Birch, walnut, or bamboo are light and carve nicely. Seal with oil, wax, or varnish to protect against moisture and makeup.
- Resin: UV or two-part epoxy allows you to embed botanicals, glitter, or pigments. Use molds or bezels to control geometry.
- Textiles: Cotton cord, embroidery floss, silk tassels, or macramé knots add softness, soundless movement, and color play.
- Beads: Seed beads, gemstones, or glass drops for fringe, brick stitch shapes, or structural components.
- Findings: Posts, hooks, leverbacks, jump rings, eye pins, and ear nuts. Favor stainless steel, niobium, or titanium for sensitive wearers, and advertise when hardware is hypoallergenic.
- Adhesives and finishes: Two-part epoxy for posts, flexible industrial jewelry adhesive, cyanoacrylate for spot fixes, UV resin for doming. Sealants include varnish for polymer, microcrystalline wax for patinas, and clear acrylic spray for wood.
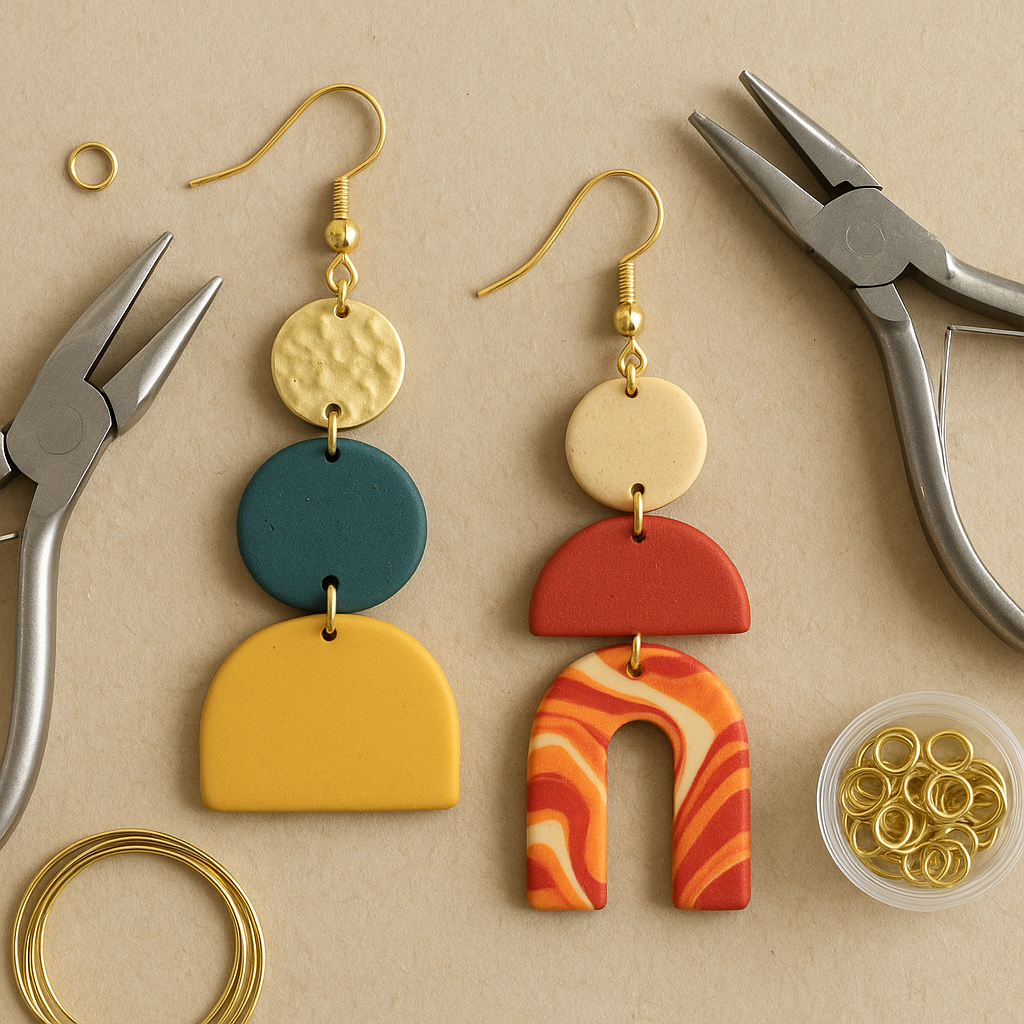
Essential tools include flush cutters, round-nose and chain-nose pliers, needle files, sanding papers from 400 to 3000 grit, a doming block, texturing hammers, a small drill or rotary tool with micro-bits, a bench pin or mat, precision blades, and a reliable oven thermometer if you cure polymer clay. A digital scale helps track weight and repeat designs across pairs.
Safety, Comfort, and Longevity
Good studio habits protect both the maker and the wearer. Ventilate when using adhesives, resins, or spray finishes. Wear a particulate mask while sanding polymer or resin, and eye protection when drilling metal. Label materials clearly and store blades in guards. For the wearer, choose skin-safe contact points and smooth any burrs at edges or holes; a cup bur or fine sandpaper can deburr ear wires. Aim for robust durability with reinforced joins, quality jump rings closed fully, and adhesives cured according to the manufacturer’s schedule.
Technique Library for Bold Styles
Polymer Clay: Scalable Statements Without Bulk
Polymer’s strength-to-weight ratio is fantastic for oversized silhouettes. Work on a smooth ceramic tile for easy transfer to the oven.
- Conditioning: Soften clay by kneading or running through a pasta machine. Fold and pass multiple times until smooth and streak-free.
- Slab patterns: Roll a base sheet 2–3 mm thick. Add chips for terrazzo, snakes for marbling, or stamped textures. Cover with parchment and re-roll to embed elements.
- Cutting: Use metal cutters or a craft blade. Clean edges with a silicone tool. Pierce holes with a 1–2 mm bit or drill after baking for crisper edges.
- Curing: Bake at the temperature specified by the brand, typically 110–135°C for 20–45 minutes. Use an oven thermometer for accuracy. Allow to cool on the tile to reduce warping.
- Refining: Wet-sand edges with progressive grits. Buff on a soft cloth wheel or seal with a satin varnish for a refined finish.
- Assembly: Bond posts with epoxy onto sanded contact patches. Reinforce with a thin clay cap if desired. Join components with 6–8 mm jump rings.
Metal Sheet and Wire: Drama with Light and Shadow
Metal adds crisp lines and satisfying sound. Start with 0.5–0.8 mm sheet (24–20 gauge). Trace shapes onto masking tape applied to the sheet, saw with a fine blade, and file to the line.
- Texturing: Planish with a ball-peen for sparkle, use cross-peen stripes for linear interest, or roll-print with paper texture.
- Doming: Lightly dish circles in a doming block to reduce apparent size and boost stiffness without adding weight.
- Patina: Darken copper or brass, then selectively polish high points to make textures pop. Seal with wax to slow tarnish.
- Cold connections: Use tiny wire rivets for layered elements; they read architectural and avoid soldering.
- Ear wires: Form from 0.8–1.0 mm silver or titanium, file the end, and harden with light hammer taps. Polish for comfort.
Acrylic and Acetate: Color Fields and Graphic Shapes
Bold geometric sheets offer instant pop. Hand-cut with a jeweler’s saw or design files for a laser service. Flame-polish edges of clear acrylic for glassy clarity; sand to matte for diffusion. Drill slowly to avoid cracks, and use cone burrs to break edge sharpness near holes.
Resin: Embedded Stories
Use UV resin for speed or two-part epoxy for depth. Dry botanicals thoroughly to prevent bubbling. Pour in thin layers to control heat and shrinkage; pass a heat gun quickly to release surface bubbles. Doming over cured polymer components adds dimension without much weight. Sand drips and finish with a polishing compound for a glassy face.
Beadwork: Swoosh and Fringe
Brick stitch atop a beading foundation (a row of ladder stitch) creates crisp triangles and fans perfect for fringe. Use size 11/0 cylinder beads for a refined grid or size 8/0 for chunkier presence. Fringe length changes the mood: 30–60 mm is flirty; 90–120 mm feels theatrical. Weave in multiple thread paths through top rows for reinforcement.
Textile Techniques: Tassels and Macramé
Mini macramé panels on small rings or bars yield airy, bohemian statements. Choose mercerized cotton or recycled PET cord. Seal cut ends with fray check or a tiny dab of clear glue. For tassels, wrap floss around a card, tie the head, snip the bottom, and steam to straighten. Comb and trim to a crisp, symmetrical hemline.
Five Complete Projects You Can Build
1. Terrazzo Arch Polymer Earrings
Time: 2 hours active + curing. Difficulty: Beginner. Weight: about 5–7 g per ear.
- Roll a white or pastel base slab to 2.5 mm. Cut tiny confetti flecks from contrasting colors and sprinkle across the slab.
- Cover with parchment and roll to 2 mm, embedding the flecks. Cut two arches (approx. 28 × 22 mm) and two small circles for studs (10–12 mm).
- Bake per clay instructions. Wet-sand edges and faces to reveal terrazzo chips cleanly. Optional: dome a thin UV resin layer for subtle gloss.
- Roughen back of stud circles with 220 grit, epoxy titanium posts, and cure fully. Connect arch to stud via a 6 mm jump ring.
Design tip: Place the arch hole slightly forward of center so the arch hangs upright rather than tilting.
2. Hammered Brass Crescents with Chain Fringe
Time: 3–4 hours. Difficulty: Intermediate. Weight: 8–10 g per ear depending on chain.
- Saw two crescents from 0.6 mm brass, approx. 35 mm wide. File and sand edges smooth.
- Texture with a ball-peen hammer, then dome lightly for stiffness. Punch five small holes along the flat edge, equally spaced.
- Cut fine cable chains into five lengths per earring (30–70 mm for a tapered waterfall). Attach with 3 mm jump rings.
- Pierce a top hole and attach a handmade ear wire. Patina and selectively polish high points. Seal with microcrystalline wax.
Comfort tweak: Add silicone stabilizer backs to keep the crescents from rotating on the lobe.
3. Ombre Brick Stitch Triangles with Long Fringe
Time: 4–6 hours. Difficulty: Intermediate beader. Weight: 4–6 g per ear.
- Create a ladder base of 8 beads using your lightest color. Brick stitch rows, gradually shifting through mid-tones to a dark apex, forming a 25–30 mm wide triangle.
- Add fringe strands from the bottom edge, varying length to create a central point about 90 mm long.
- Reinforce top rows with multiple thread passes and attach to a small metallic bar or ring, then to ear wires.
Detailing: Mix a couple of matte beads among gloss to give micro-level visual interest that reads rich up close.
4. Pressed Fern Ovals in UV Resin
Time: 2–3 hours including curing. Difficulty: Beginner–Intermediate. Weight: 3–5 g per ear.
- Place tiny dried fern segments in silicone oval molds (25 × 18 mm). Add a thin layer of UV resin to tack them in place, cure.
- Fill in two or three thin layers, curing between each to control heat. Dome the final surface slightly for a jewel effect.
- Drill a 1.5 mm hole after full cure, sand any burrs, and attach a decorative jump ring and leverback ear finding.
Clarity boost: Pre-seal botanicals with a mist of clear acrylic to minimize micro-bubbles along leaf veins.
5. Half-Moon Macramé Rainbows on Brass Frames
Time: 2–3 hours. Difficulty: Beginner–Intermediate. Weight: 6–8 g per ear.
- Use 30–35 mm half-moon brass frames. Lark’s head 10–14 cords along the bottom arc.
- Work rows of double half-hitches to form a soft rainbow of 4–5 colors, trimming cords into a smooth scallop.
- Steam, comb, and trim the fringe. Add ear wires through the top loop of the frame.
Neatness tip: Wrap a thin matching thread tightly around each cord bundle where it meets the frame to create a sharp color boundary.
Measuring, Fitting, and Testing
Prototypes save headaches. Cut shapes first in cardstock to test scale on the ear. For weight, aim to keep each earring under your target threshold by 10–15 percent to account for hardware. Balance test: Hang the component by a jump ring at the intended post location; if it tilts, adjust the hole or redistribute mass.
Consider skin compatibility. Offer clear silicone comfort backs for studs and note materials on packaging for transparency. If you use plated findings, state the base metal and plating type to build trust.
Sourcing, Sustainability, and Smart Budgeting
Bold does not mean wasteful. Harvest beauty from offcuts and found materials: acrylic scraps from sign shops, wood veneer remnants, or textile leftovers from a studio floor. This is not just eco-minded; it enriches design with stories. Prioritize upcycling where possible and communicate that value in your branding. For budgeting, track actual costs: materials, consumables, wear on tools, packaging, and time. Price to include a healthy margin for growth, not just survival.
Finishing Touches That Separate Hobby from Heirloom
Small details elevate the whole: perfectly closed jump rings, aligned patterns across a pair, smooth ear-wire tips, and a consistent sheen. Sand in progressive grits rather than jumping from coarse to fine; each step removes scratches from the previous one. Back your posts on slightly roughened surfaces and avoid over-gluing; thin, even epoxy layers outperform blobs. For wood, a light oil followed by wax creates a warm hand-feel; for metal, hand-polish final edges to avoid catching hair or scarves.
Troubleshooting: Rapid Remedies
- Earrings tilting forward: Move the post upward or add a larger clutch with stabilizer disc.
- Resin microbubbles: Warm resin prior to pouring and seal porous inclusions first.
- Polymer clay brittle edges: Underbaked or too thin. Increase thickness to 2 mm and verify oven temperature.
- Metal edges snagging: Use a fine file to break the arris, then polish with 1000–3000 grit and a buff.
- Fringe curling: Lightly steam and comb; apply a micro-mist of fabric stiffener and trim clean after drying.
- Jump rings opening in wear: Always twist closed past center, then back to center; consider soldered rings for stress points.
Styling and Trend Directions
Trends favor large geometric silhouettes, mismatched pairs, and modular constructions that convert from studs to drops. Color stories include citrus brights, oceanic teals with burnished brass, and earthy clays paired with ebony wood. Texture mixing is evergreen: matte clay next to glossy resin; hammered metal beside satin ribbon. Negative space is powerful—cutouts make bold shapes breathable and light, enhancing comfort without sacrificing size.
For portrait photographs and social media, style earrings with neutral necklines to spotlight their form. Include one close-up of finishing quality—clean backs, neat joins—because customers equate workmanship with daily-wear confidence.
Care, Maintenance, and Repairs
Provide care cards: avoid sleeping or showering in pieces, store in a pouch, and keep away from hairspray and perfume. Offer simple repair services: replace a lost ear nut, re-glue a post, or polish a tarnished surface. When you sell, keep a few spare findings and color-matched threads for quick fixes to protect your reputation and encourage repeat business.
Small-Batch Production and Quality Control
As designs become favorites, systematize. Create cutting templates, drilling jigs, and assembly bins. Batch like steps: cut all pieces, then drill, then sand, then assemble. Log exact materials and sources to maintain color continuity. Weigh one earring from each pair and compare; if imbalance exceeds 0.5 g, swap components for better parity. Finish with a visual checklist: no scratches in the focal area, perfectly aligned pairs, firm adhesive bonds fully cured, and smooth touch at every edge.
Ethics and Compliance
Disclose materials honestly. Avoid nickel-rich alloys where possible and test suspect components. Many regions regulate heavy metals in jewelry; align with applicable standards and note compliance on your product cards. Transparency builds trust and reduces returns, especially for buyers with sensitive skin who appreciate clearly labeled hypoallergenic options.
Expanding Your Creative Language
Ready to push further? Translate natural forms into lightweight layers: shell spirals rendered in thin domed brass, or leaf venation traced in openwork acrylic. Explore asymmetry: cousins rather than twins can feel editorial yet intentional if they share palette and motif. Try modularity: a stud that accepts multiple jackets or drops, letting the wearer rebuild their look from day to night. Collaboration also expands vocabulary—pair a woodworker’s offcuts with your beadwork, or embed a printmaker’s mini monotype under resin.
From Hobby to Brand
Give your pieces a consistent signature element—an edge profile, a hardware style, or a palette that customers recognize. Package with earring cards made of archival board; print material disclosures and a short origin note. Photograph on both model and flat lay with color-true light. Track feedback and iterate; the boldest pairs often become bestsellers after two or three small refinements to post placement or drop length.
Conclusion: Wearable Sculpture with Heart
Statement earrings condense design thinking into a few square centimeters: form against sky, color next to skin, movement framing a smile. They invite play and reward precision. With knowledge of materials, attention to comfort, and a willingness to test and adjust, your handmade pairs will move from good ideas to beloved favorites. Build boldly, finish carefully, and let your work speak at the ears of everyone who passes by.