Metal comes alive under light and hand when its surface is interrupted, dented, carved, swollen, or compressed. Texturing is the craftsperson’s way of turning a neutral plane into a landscape of highlights and shadows, a tactile language that tells where a piece has been and why it should be touched. From softly pebbled rings to dramatically corrugated vessels, adding texture can be as subtle as a whisper or as bold as a drumbeat. The methods below span hand tools, heat, chemistry, and controlled abrasion; with a small bench, careful planning, and an appetite for experimentation, you can develop surfaces that are unmistakably yours.
Why Texture Matters in Handicraft
Texture does more than decorate; it guides the eye, invites the hand, and gives resilience to a surface. A patterned metal faceplate hides the micro-scratches of wear. A grippy handle remains secure even when wet. A richly patterned pendant reflects light in many directions, creating sparkle without stones. Above all, texture encodes process—hammer scars, etched lines, and stretched ridges are visible time capsules of the maker’s choices.
Designers use texture to achieve three outcomes:
- Optical dynamics: By breaking a flat plane into facets and pits, you increase micro-contrast. Each micro-plane catches or rejects light, intensifying brilliance. A satin-matte adjacent to a high-gloss ridge creates scale contrast and hierarchy.
- Tactile intention: Jewelry needs to feel good against the skin, and tableware should feel secure in the hand. Microtextures reduce sticking and fingerprints, while bold textures add grip.
- Narrative and signature: A distinct surface links a maker’s hand across collections. Your punch marks, hammer faces, and pattern logic become recognizable.
Metals, Gauges, and the Logic of Work-Hardening
Texturing is a dance between plastic deformation and recovery. Nonferrous metals such as copper, brass, bronze, and silver work-harden quickly: they stiffen as you deform them. Periodic annealing resets the internal grain structure, restoring malleability. Mild steel and stainless behave differently; they require higher temperatures and, for most handcraft texturing, are used in thinner gauges or with heavier tooling.
Choosing gauges:
- Jewelry sheets: 18–24 ga (1.0–0.5 mm) accept most textures without buckling. Thinner than 24 ga may tear under deep impressions.
- Homeware and hardware: 14–20 ga (1.6–0.8 mm) provides the mass needed for aggressive forming and tool marks.
- Wire and rod: Round wire can be hammered square or faceted, then twisted to create helixes of reflected light.
Alloys react differently to heat and deformation:
- Copper: Extremely ductile; holds crisp impressions; patinates richly.
- Brass and bronze: Slightly springier; excellent for geometric hammering and press textures.
- Sterling silver: Work-hardens quickly; anneals easily; can be depletion-gilded to fine-silver skin for certain heat textures.
- Aluminum: Soft; marks easily; finish with care to avoid smearing edges of textures.
- Steel: Requires robust tools; scales under heat; wonderful for hammered and forged textures in blacksmithing scale.
Preparation: Clean Surfaces, Clear Goals
Texture is amplified by clarity. Before you begin, remove mill scale and grease. Scotch-Brite, pumice, or 600–1200 grit paper leaves a clean baseline so you can judge the effect. Plan for the sequence: when a technique requires multiple anneals, texture early; when a technique relies on crisp edges (e.g., sharp engraving), add it late and protect it during subsequent steps.
Build a reference system. Keep a drawer of sample tiles—metal type, gauge, tool used, pressure, annealing count, and finish. A physical library saves time and money, and it becomes the vocabulary sheet for your designs.
Cold Texturing: Direct Marks and Controlled Pressure
Texturing Hammers and Stakes
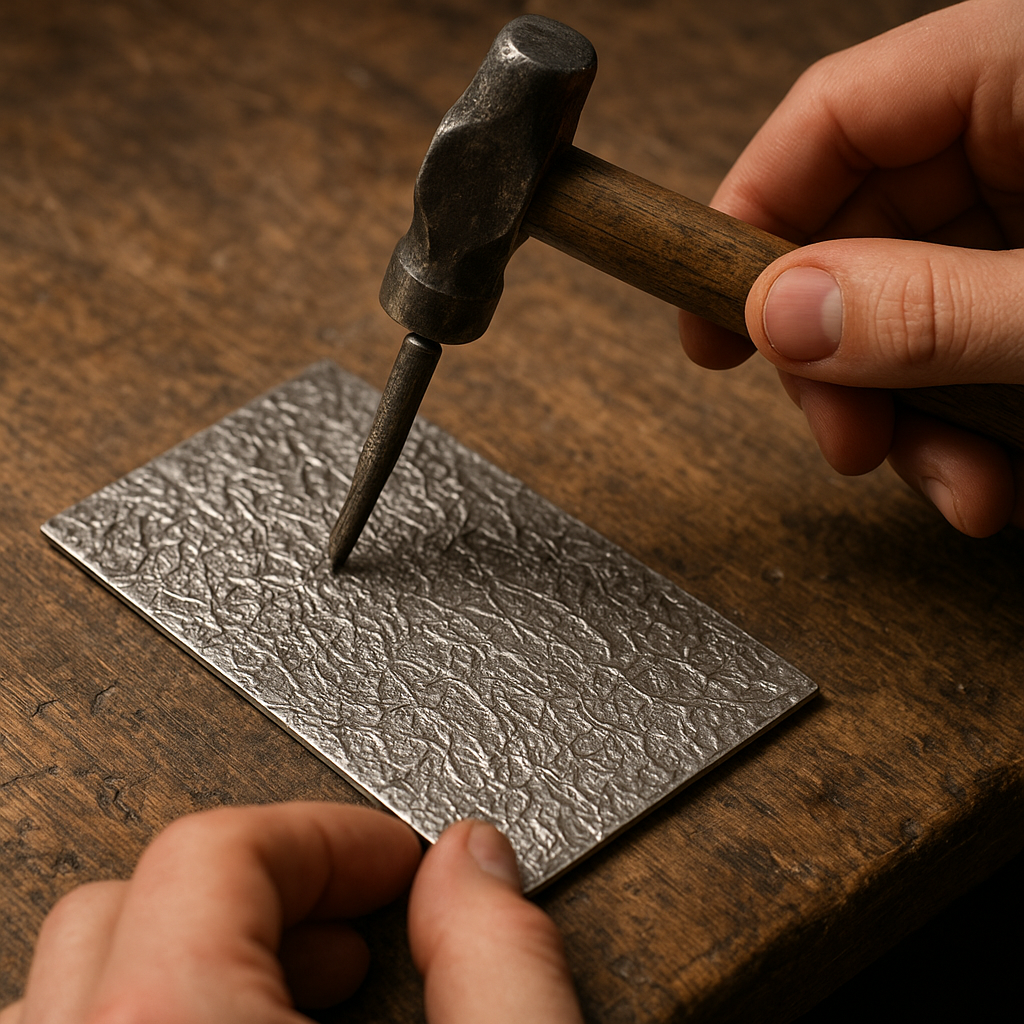
The most direct approach uses modified hammers, planishing hammers, and stakes. You can grind, file, and polish new faces onto inexpensive hammers to create pebbled, striated, or crosshatched surfaces. A lightly domed face creates soft dimples; a sharply peened face yields crisp stipple. Always radius and polish edges to avoid gouges unless you intend them.
- Support matters: Firmly support the metal on a flat anvil or mushroom stake to prevent spongy blow marks.
- Pattern logic: Work in passes. Establish an even “field” first, then add focal areas or gradients.
- Noise and ergonomics: Small, repeated blows are more consistent than heavy strikes; ear and eye protection reduce fatigue.
Punches, Stamps, and Stippling
Handmade punches offer infinite possibilities. Dome the tip for cratered dots, cut fine grooves for linear repeats, or shape triangular points for tessellations. A light twist as you strike produces a starburst. For borders, consider beading tools or knurling wheels guided along a straightedge. Keep a light lubricant on tool tips to reduce galling on softer metals.
Chasing and Repoussé
For raised and sunken relief, chasing and repoussé create depth without removal of material. Secure your sheet in warm pitch within a pitch bowl or tray. Using liners, embossers, and planishers, outline from the front (chasing), push volume from the back (repoussé), and refine contours in cycles, annealing as needed. Chasing favors controlled line and shading; repoussé builds topography. A firm, slightly flexible pitch supports crisp blows without rebound. This method is ideal for motifs like leaves, feathers, or topographic maps, where each ridge can be later patinated to reveal form.
Rolling Mill Impressions
A rolling mill can press textures from paper, fabric, lace, sandpaper, wire screens, or laser-cut patterns into annealed sheet. Dry your organic materials thoroughly; moisture can pit your metal and rollers. Use a sandwich: material, metal, and soft paper to protect the rollers. Tighten the gap until you feel resistance, back off a quarter-turn, and feed; adjust pressure in small increments to avoid over-thinning.
- High-contrast materials: 120–320 grit sandpaper, microexpanded metal mesh, or stiff engraver’s paper deliver crisp results.
- Avoid hard steel on steel: Don’t run hardened steel directly against steel rollers; use non-scratching carriers.
- Alignment: Mark grain directions and alignment notches on the sheet to control repeatability for set-making.
Rotary Tool Texturing
Foredom or Dremel tools fitted with carbide burrs, cup burrs, stone points, and abrasive discs can “draw” textures into metal. Use light pressure and keep the tool moving to avoid divots. Cup burrs create controllable dot fields; thin cut-off wheels scribe fine hatch marks; nylon-impregnated abrasive wheels produce satin sheens. Work under magnification for consistency.
Knurling and Engine Turning
Knurl wheels add functional grip along rings, knobs, or tool handles. Engine turning (circular graining) produces shimmering arrays of overlapping swirls using abrasive-tipped tools on a drill press or rose engine. Both methods generate consistent, machine-precise textures suitable for watchmaking, pens, and instrument hardware.
Heat-Driven Textures: From Skin Wrinkles to Bold Folds
Reticulation
Reticulation produces dramatic wrinkles by melting a metal’s interior while a higher-melting skin remains intact. Traditional reticulation silver (about 80% silver, 20% copper) or sterling that has been depletion-gilded to a fine-silver skin responds well. Cycle the sheet through pickle and heat repeatedly to build a fine-silver surface. Then heat evenly until the subsurface approaches liquidity. Gently move the flame to “push” patterns. The surface buckles into valleys and ridges that echo freeze-thaw terrain. Quench, brush, and pickle to clean. Expect variability: it’s a controlled accident, and that unpredictability is part of its charm.
Fold-Forming
Fold-forming turns sheet into ridges, veins, and corrugations by folding, hammering, and opening after anneals. Make a tight T-fold, hammer along the fold until work-hardened, anneal, and open the fold with a flexed edge or wedge. The compressed fold becomes a raised vein. Corrugation with corrugated stakes or rolling tools creates rhythmic pleats perfect for cuffs and handles. Combine small folds and large folds for hierarchical surfaces that feel organic yet structured.
Fusing Filings, Shot, and Wire
Sprinkle clean silver or brass filings on a base sheet, add snippets of thin wire or small shot, and heat with a neutral flame until the particles bond without full solder flow. The fused field is tactile and irregular; it takes patina beautifully. You can follow with light planishing to settle sharp points. Pair this with selective polishing to make the high points gleam.
Granulation
Granulation is the controlled attachment of tiny spheres to a metal surface. Historically used in Etruscan goldwork, granulation can be adapted to silver and gold alloys using hard solders or fusion with copper salts as a eutectic. Evenly sized granules arranged in patterns yield soft, light-catching fields. The texture is both durable and mesmerizing at wearable scale.
Fire Stippling and Flux Effects
On copper and silver, sprinkling borax-based flux unevenly and heating can cause micro-pitting or slightly orange-peeled surfaces. Practice on samples; results vary by alloy and flux formulation. Short, hot heats help avoid scale and excessive oxidation.
Chemical and Electrochemical Textures
Resists and Linework
Chemical etching removes metal selectively. Paint on asphaltum, nail polish, or acrylic paint as a resist; or apply vinyl stencils, toner transfers, or photoresist for fine detail. Scrape through the resist with a scribe for hand-drawn lines, then immerse in etchant.
Etchants by Metal
- Copper, brass, bronze: Ferric chloride is widely used and relatively manageable. Agitation speeds etch; warm solutions cut faster and deeper.
- Silver: Ferric nitrate is an option; it is hazardous and demands stringent ventilation and PPE. Many artisans prefer electrolytic methods to avoid high-toxicity acids.
- Steel: Ferric chloride and cupric chloride can texture carbon steels; stainless steels resist most common etchants unless chlorides and oxidizers are combined with care in industrial settings.
Electroetching
Electrochemical etching uses a DC power supply. Connect the workpiece as the anode (+) and an inert cathode (stainless plate) in a bath of copper sulfate or saline solution, depending on metal. The resist defines where metal remains. Low voltages (3–9 V) with agitation provide control; higher voltages can undercut your lines. Rinse, neutralize with baking soda, and dispose of spent solutions responsibly. This method produces crisp textures without fumes and can be scaled for large panels.
Abrasive, Impact, and Hybrid Textures
Sandblasting and Shot Peening
Sandblasting with aluminum oxide or glass bead produces uniform mattes or soft peening effects. Mask with vinyl for selective blasting to create relief-like patterns. Glass bead peening leaves a subtle satin that softens edges; angular media cuts more aggressively. Protect threads and joints with tape and plugs, and seal the result with wax or lacquer if the item will see heavy handling.
Tumbling Media
Vibratory or rotary tumblers can impart textures. Ceramic abrasive media leaves a subtle orange-peel matte; porcelain with compound burnishes; steel shot burnishes highs while darkening recesses if combined with an oxidizing pre-finish. Limit time to avoid over-rounding crisp details.
Color as Texture’s Amplifier
Light and dark define texture. Finishes and chemistry serve as amplifiers:
- Patina on copper alloys: Liver of sulfur, ammonium sulfide gels, or cupric nitrate generate browns, blues, and greens that settle into recesses and highlight peaks when lightly polished.
- Silver darkening: Sulfur-based solutions render grays to near black; polish back the ridges for dramatic contrast.
- Heat colors: Steel blues and bronzes, or titanium flame painting (though color, not texture) layer beautifully over textured fields.
- Enamel: Transparent enamels over engraved or hammered basse-taille trap light, deepening texture beneath a glassy skin.
Seal reactive patinas with microcrystalline wax for hand-worn items; consider clear lacquers for hardware and architectural elements. Test sealants to ensure they don’t flatten your intended sheen.
Design Integration: Sequencing, Scale, and Comfort
Texture affects fit and fabrication. A deeply impressed sheet grows in area; if you roll-print before forming a ring, pre-size your blank smaller to compensate. Aggressive textures can thin metal; start with heavier gauge. Consider where seams will fall; a repeating pattern might misalign conspicuously at a joint—design a border or transition zone to disguise it.
Edges matter. After texturing, gently break the edges with a fine file and rubber wheel. Skin-friendly surfaces matter for jewelry; avoid sharp burrs or high, pointy features in areas that contact the body. For utensils and hardware, align directionality with function: longitudinal striations enhance grip along handles; crosshatching resists twisting.
Three Core Workflows
A Roll-Printed Copper Cuff
- Prepare 1.2 mm copper, 30 mm wide. Anneal to dead soft and pickle.
- Select a high-contrast material—320-grit sandpaper with a lace overlay. Dry thoroughly.
- Make a sandwich: backing paper, lace, copper, sandpaper, backing paper.
- Roll-print in increasing pressure passes until the pattern saturates without thinning below ~0.9 mm.
- Deburr edges; planish lightly on a bracelet mandrel to re-flatten any bowing.
- Apply a warm brown patina; highlight with Scotch-Brite on raised areas; seal with wax.
- Form on mandrel; adjust curvature; clean final fingerprints.
A Reticulated Silver Pendant with Fused Filings
- Cut 0.8 mm reticulation silver. Cycle heat and pickle to build a fine-silver skin.
- Heat evenly until the surface “skins” and the interior surges; steer wrinkles with the flame.
- Rinse, brush, and pickle; then sprinkle fine filings selectively at the bottom third; fuse to tack.
- Drill for bail, saw outline, and refine edges.
- Oxidize to darken recesses; burnish high points with an agate or steel burnisher.
Electroetched Brass Tray Insert
- Cut 1.0 mm brass plate; sand to 600 grit.
- Apply vinyl stencil cut with motifs; seal edges with clear lacquer.
- Set up a copper sulfate bath; connect brass to positive, copper mesh to negative.
- Etch at 6 V with agitation for 20–40 minutes, checking depth. Rinse, neutralize, and remove resist.
- Scotch-Brite the highs; apply brown/black patina; seal with lacquer suitable for handling.
Troubleshooting Textures
- “My roll-printed pattern is faint.” Increase anneal frequency; dry materials completely; raise pressure gradually; start with softer alloys like copper.
- “Reticulation looks mushy, not wrinkled.” Your surface may not have a high-melting skin; increase depletion cycles or use reticulation silver; use a broader, softer flame.
- “Etch undercut the lines.” Lower temperature, lower voltage for electroetch, improve resist adhesion, and reduce time per pass with more inspections.
- “Hammer marks look random.” Create a grid lightly with pencil, then fill in methodically. Maintain consistent blow strength and rebound.
- “Texture vanished after polishing.” Use selective finishing: rubber wheels with fine grits, hand-sanding blocks, and avoid heavy buffing on textured zones. Protect textures with masking tape during high-gloss work on adjacent areas.
Safety and Stewardship
Texturing is joyous, but vigilance keeps the studio healthy. Wear eye protection for hammering, grinding, and blasting; use hearing protection for repeated impacts. Ventilate when heating metals, using fluxes, or applying patinas. Gloves are appropriate for chemicals and blasting but not near rotating equipment. Label all solutions; neutralize and dispose per local regulations—metal salts do not belong in drains. Keep brushes and cloths dedicated to specific chemicals to avoid cross-reactions.
Mind your tools. Clean rolling mill rollers after use; keep steel mesh and gritty materials away from unprotected rollers. Dress hammer faces periodically to remove dings that will telegraph to your work. Recondition stakes with fine abrasive and polish to the sheen you want to transfer.
Beyond the Bench: Casting and Hybrid Sources of Texture
Sand casting in Delft clay captures granular textures from the mold itself. Press coarse fabrics, carved wood, or botanical elements into the sand before closing the mold to embed relief. Water casting—pouring molten metal into water or damp straw—creates dramatic organic nuggets that can be soldered onto sheet as tactile accents. Mokume-gane billets reveal wood-grain-like patterns when carved and flattened; though advanced, small laminated stacks can be made with shop presses and patient heat cycles.
Building a Personal Texture Language
Keep notes like a chef records recipes. For every new technique, log metal, gauge, anneal count, tool settings, angles, pressures, and finishing steps. Photograph under consistent light. Recreate successes and study failures: an accidental crease may become tomorrow’s signature. Combine methods—roll-print, then chase; etch, then fold-form; fuse filings, then gently blast. Layered processes deepen the surface story and rarely look “factory-made.”
Texture is not merely a look. It is a feeling, a rhythm, a set of decisions carried in metal. Whether you are tapping dots with a homemade punch or steering molten skins with a torch, each choice rewrites the way light behaves on your work. Start a tray of test tiles today, aim for deliberate variation, and you will soon find that your metal speaks with a voice that’s undeniably yours—bright where it needs to be, quiet in the shadows, and alive wherever a fingertip pauses.
Quick Reference: Techniques at a Glance
- Direct hammering: Rapid, intuitive, no chemicals; great for organic textures.
- Chasing/repoussé: Deep relief with refined lines; requires pitch and patience.
- Rolling mill printing: Repeatable, fast; preserves softness if annealed correctly.
- Reticulation: High drama, low predictability; best on specialized alloys.
- Fusing/granulation: Rich microtexture; excellent patina response.
- Chemical/electroetch: Fine detail and large areas; needs careful resist work.
- Sandblasting/tumbling: Uniform matte control; ideal as a final or intermediate step.
Materials, Tools, and Minimal Setup
If you’re starting from a small bench, a thoughtful kit goes far:
- Metals: Copper and brass sheets in 18–22 ga; a few pieces of sterling for advanced trials.
- Hand tools: Ball-peen hammer, a custom-stipple hammer, basic files, beading tools, punches you grind yourself.
- Support: Small anvil or bench block, plasticine or pitch for light chasing.
- Heat: Propane/air torch capable of annealing sheet; soldering bricks.
- Rolling mill (optional but powerful): Even a compact model transforms your options.
- Chemistry: Mild etchants, resists, baking soda for neutralization, dedicated trays.
- Finishing: Scotch-Brite pads, rubber wheels, microcrystalline wax.
Care for Textured Surfaces in Use
Wear and cleaning shape a texture’s life. For jewelry, a satin or oxidized field hides everyday scuffs; occasional gentle brushing restores sparkle. For table hardware, a durable clear coat preserves relief from oils and moisture. Advise customers: avoid abrasive cleansers on intricate textures; use mild soap, rinse, and dry. A yearly re-wax can refresh depth and luster on copper and brass.
From Experiments to Signature Pieces
Develop a weekly ritual: make three tiles in one family of techniques, then combine one tile’s method with another’s. Over months, you’ll uncover combinations that resonate. Perhaps etched linework beneath light hammer planishing yields a hand-drawn look with durability. Maybe a fold-formed ridge, later chased and burnished, becomes your hallmark on cuffs and brooches. When a texture starts to recur in your experiments without effort, highlight it in a limited collection and photograph it under varied light to reveal its personality.
Closing Thoughts
The path to unique designs in metal is paved with small, repeatable acts: anneal, strike, listen; heat, watch, steer; mask, etch, reveal. Respect the material’s thresholds and the way your tools translate intention into relief. With the methods above—hand blows, the controlled pressure of a rolling mill, the alchemy of heat in reticulation, the fine control of etching, and the finishing power of patina—you have everything you need to make surfaces that catch both light and imagination. Let your textures carry your voice across bracelets, vessels, and hardware, and you’ll find that your work not only looks different—it feels unforgettable.