Fast-setting craft materials change what is possible in an afternoon studio session, and nothing embodies this better than UV resin. With a quick blast of light, a liquid surface becomes a crystal-clear solid, ornaments turn from concept to keepsake, and production workflows shrink from days to minutes. For hobbyists and small-batch sellers, the appeal is straightforward: minimal measuring, zero pot life stress, and truly rapid curing. This guide explains how it works, how to choose the right supplies, the exact steps for strong and glossy results, and how to troubleshoot like a pro—so your fast-cure projects look boutique-quality without boutique time.
What UV Resin Is and How It Works
UV resin is a single-component photopolymer that hardens when exposed to ultraviolet light in a narrow wavelength band (commonly 365–405 nm). It arrives pre-mixed, so you dispense it directly from the bottle, shape or color it, then cure it with a lamp or sunlight. There is no clock ticking after mixing, and that alone makes the material incredibly forgiving for detailed work, batch assembly, and multilayer designs.
Under the hood, the resin contains monomers, oligomers, and photo-initiators. When the initiators absorb UV photons, they trigger chain reactions that convert liquid material into a crosslinked network. Chemists call this process photopolymerization, and the efficiency of this reaction controls clarity, hardness, and cure speed. Because the cure depends on light energy, depth and opacity matter: thin layers and clear colors cure fastest; thick pours and heavy pigments require more time, stronger lamps, or staged layers.
Compared with two-part epoxies, UV formulations excel at speed and convenience. Epoxy can achieve thicker pours with long open time and lower overall shrink, but it requires precise ratios and waits of 8–72 hours. UV resin, by contrast, rewards small formats—pendants, bezels, cabochons, thin coatings—where seconds to minutes per layer is transformative. Jewelry makers, miniaturists, model builders, and nail artists exploit this speed to iterate quickly and to lock-in tiny arrangements without shifting.
Most craft-market bottles are rigid after cure, though flexible and rubbery options exist for applications like stamps, flexible gems, or domed decals. Be mindful that not all tints, inks, and mica packs are equal: some contain dyes or fillers that absorb or scatter UV, slowing or blocking cure. In practice, that just means you will work in thinner layers and adjust lamp time, or pick pigments labeled UV-safe.
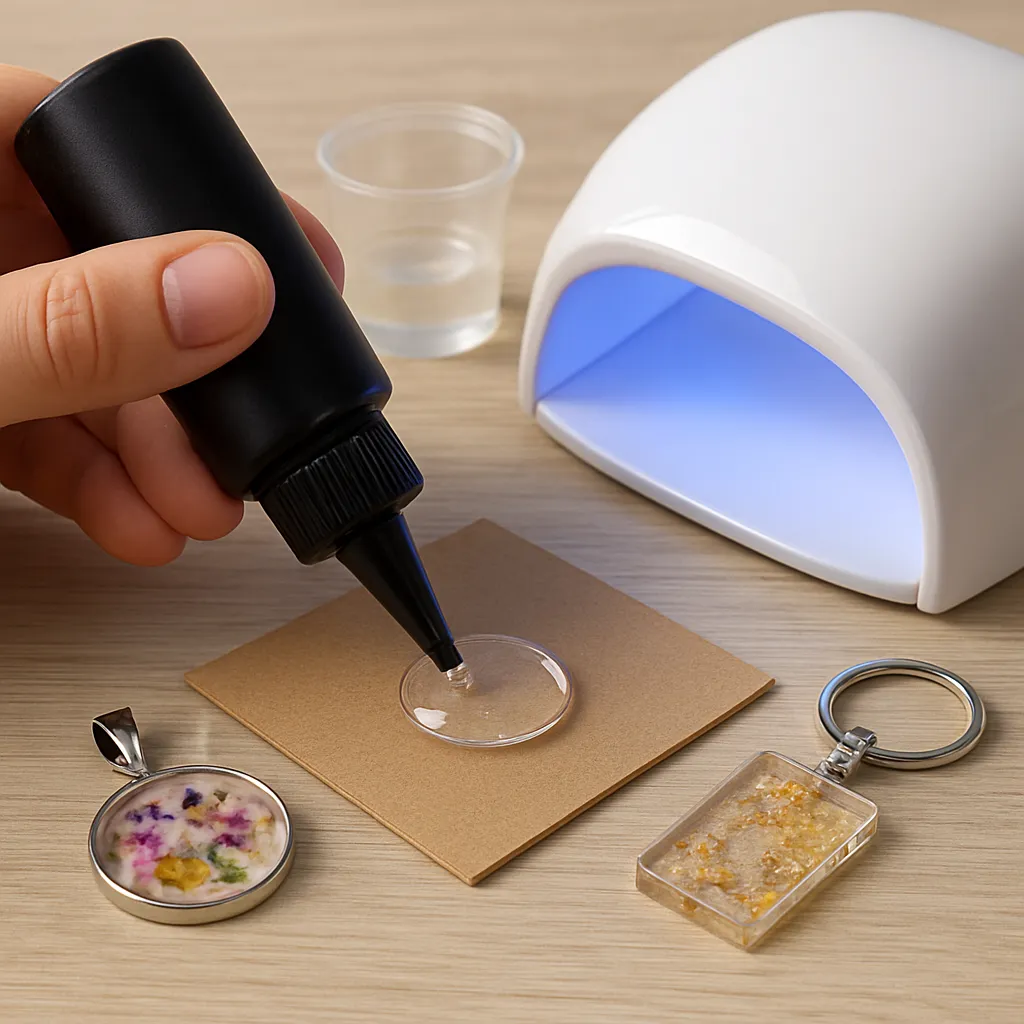
Tools, Workspace, and Personal Safety
Establishing a resilient workflow starts with the right gear and smart workspace habits. UV resin is user-friendly, but it remains a reactive chemical system: treat it with respect, and it will reward you with professional results and predictable performance.
Lighting Options
- Dedicated craft lamps (365–405 nm): Often with reflective chambers and time presets. Provide strong, even output, and reduce stray light.
- Nail curing lamps: Affordable, ubiquitous, and adequate for small items. Ensure the wavelength range matches your resin’s recommendation.
- Handheld UV torches: Great for spot-cures, pinning tiny parts in place, or chasing bubbles to the surface before a full cure.
- Sunlight: A free alternative on bright days. Works well for clear and pale layers; less consistent with heavy pigments or deep pieces.
Basic Supplies
- Nonstick work surface: Silicone mats prevent sticking and make cleanup simple.
- Applicators: Silicone-tipped tools, toothpicks, syringes, and microbrushes for controlled placement.
- Molds and bezels: Food-grade silicone molds for shapes; metal bezels for open-backed jewelry.
- Leveling aids: Bubble levels or simple shims keep pours flat for perfect domes.
- Detail tools: Tweezers, craft knives, and curved needles to position inclusions and pop bubbles.
- Polishing and finishing: Micro-mesh pads, polishing compounds, UV top coats for ultra-gloss.
Safety and Ventilation
Treat liquid and semi-cured material carefully. Wear nitrile gloves, keep a tidy station, and ensure good airflow. Cover liquids when not in use and keep lamps shielded to prevent accidental exposure to eyes and skin. If you sand or machine cured resin, use a particulate mask and wet-sand to minimize dust. Proper viscosity control also contributes to a safer, cleaner workflow: a resin that is too runny invites spills; too thick encourages overhandling while you coax it into edges.
Store bottles in a cool, dark place with caps tightly closed. A small desiccant pouch inside a storage bin helps with humidity swings. Always keep resins, pigments, and cleaners away from direct sunlight and from the reach of children or pets.
Planning Your Design for Speed and Quality
Rapid turnaround does not require compromising artistry. Success with UV resin comes from purposeful design choices: layer sequencing, judicious color, and staging detail so the light can reach every critical zone. In practice, break a design into 1–3 mm layers wherever possible, and approach opaque or metallic media as veneers rather than deep bulk fills.
Why Layering Works
Layers give you control. You can set a thin base, lock in glitter or dried flowers without drift, and then cap with a glassy dome. Each stage also doubles as quality control—if dust lands or a bubble sneaks in, you fix it before sealing the next layer. This layered mindset also curbs heat buildup, reduces shrink stress, and prevents trapped wet spots beneath opaque elements.
Doming and Edge Behavior
UV resin often forms a natural meniscus, which creates that coveted glass-like dome over pendants or stickers. To achieve a fluid dome, work on a flat, level surface. Place small, controlled drops, then guide the bead toward edges with a silicone tool. Stop a millimeter shy of overflow; surface tension will do the rest. Flash-cure for 5–10 seconds to freeze the dome’s geometry, then complete the cure to reach full hardness and durability.
Embedding: Tiny Worlds Under Glass
From watch gears to pressed florals, embedded objects are where speed shines. Pre-seal porous items (dried petals, paper) with a thin resin wash or a clear acrylic sealer to avoid bubble trails. Stage the composition on a lightly cured base, pin elements with a handheld torch for a second or two, then bury them under a clear cap layer. For metallic foils, tame edges with a minuscule gel medium or dab of resin to avoid floating and wrinkling during the final cure.
Step-by-Step: The Core UV Resin Technique
Think of this as your standard operating procedure—the template you’ll adapt for most projects from bezels to badge domes.
- Prep and protect: Cover your table, put on gloves, and dust your molds or bezels. Keep lint-free wipes and alcohol on hand for tools.
- Plan the stack: Decide base, inclusion, and top layers. Keep each layer under 3 mm for efficient light penetration.
- Dispense the base: Add a small amount and coax it evenly across the cavity. Use a toothpick to wick resin into corners.
- Degas lightly: Exhale across the surface or pass warm—not hot—air briefly to help bubbles rise. A quick dart with a flame can work but risks yellowing and dust attraction; warm air is safer.
- Flash-cure: 5–15 seconds under the lamp to set geometry without generating excess heat.
- Place inclusions: Tweezers for precise control. Spot-cure with a handheld UV torch to freeze positions.
- Build depth: Add subsequent layers, each time repeating bubble checks and short cures. Flip thin pieces halfway through to ensure even exposure on both sides.
- Dome and finish: Add a final clear layer to dome. Flash-cure to set, then full-cure per manufacturer guidance.
- Final cure: Even if the surface feels hard, give an extra 1–3 minutes to reach through-cure, especially with tinted layers.
When bonding resin to metal bezels, improve adhesion by lightly scuffing with 600–800 grit sandpaper and wiping clean. For open-back bezels, back them with high-tack tape or a silicone sheet, burnish the edge to seal, and remove after curing. A final glaze coat can erase micro-scratches and deepen clarity.
Color, Clarity, and Special Effects
One of the joys of UV resin is visual drama with minimal fuss. For clean color, use UV-stable liquid dyes sparingly—too much dye impairs curing. Powdered micas create a pearlescent shimmer but can sediment; suspend them in thin layers and stir thoroughly just before pouring. Alcohol inks produce vibrant gradients, but certain brands impede cure; test swatches first and use them as veils rather than bulk pigment. A clear topcoat restores transparency and locks in particulate effects.
Classic Effects to Master
- Galaxy: Navy or black base, micro-glitter nebulae, metallic flakes, and a clear starry topcoat.
- Beachscape: Sand-textured paste at the edge, teal transparent band, and white resin lacing for foam.
- Pressed flora: Sealed petals, whisper-thin layers to avoid trapped moisture halos, and a UV top to magnify detail.
- Faux opal: Holographic flake mix, milky tint, and a depth stack to emulate internal fire.
- Domed decals: Print on waterproof media, seal edges thinly, then apply a crystal dome for a cabochon look.
Controlling Viscosity, Heat, and Time
Temperature and light intensity govern flow and cure kinetics. Warmer resin flows more readily but also accelerates reactions; colder resin thickens and traps bubbles. Maintain bottles near room temperature for consistent handling. Longer-standing layers can continue to self-level; exploit this by letting a domed piece rest for 60–90 seconds before the final cure to relax minor ridges.
In continuous production, heat can accumulate within the lamp. Give pieces brief cool-down intervals between stages. Excess heat can warp thin items or exaggerate shrink stresses at edges. For thick cabochons, cure in multiple passes: flash, rest, flip, and repeat. This cadence keeps shapes true and reduces internal stress lines.
Finishing: Sanding, Polishing, and Topcoats
Even the best pour benefits from thoughtful finishing. If you see dust nibs, micro-waves, or small overflows, correct them after a full cure.
- Trim and shape: Use a sharp craft knife to shave drips. For larger adjustments, 400–800 grit wet-sanding on a flat block preserves geometry.
- Refine: Progress through 1000, 2000, then micro-mesh pads up to 8000–12000 for optical gloss.
- Polish: Plastic-safe compounds restore shine. Work lightly to avoid introducing heat.
- Re-glaze: A thin UV topcoat can erase fine haze and amplify depth. Cure thoroughly for a hard-wearing surface.
When attaching findings, scuff contact points and use a tiny amount of gel-based adhesive or a dot of resin cured in place. Avoid solvent-heavy glues that can frost clear surfaces. If drilling is necessary, use a micro-bit at low speed, cool with water, and finish the hole with a short UV glaze to toughen edges.
Troubleshooting: Sticky, Bubbly, or Cloudy?
Even seasoned makers encounter hiccups. Most issues trace to light access, pigment load, surface contaminants, or oxygen exposure.
- Sticky surface: Usually under-curing or heavy dye. Fix by wiping with alcohol, applying a thin clear coat, and curing again at close range.
- Soft core: Layer too thick or lamp too weak. Slice a test cross-section if possible; then re-cure from multiple angles, or sand back and rebuild in layers.
- Micro-bubbles: Warm resin slightly, stir gently, and pour thin. Pass warm air briefly or pause to let bubbles rise before curing.
- Cloudiness: Moisture in inclusions or incompatible inks. Pre-seal porous items and test ink brands. A final clear coat often restores clarity if the issue is superficial.
- Warping: Overheating or uneven cure. Flash-cure in stages, flip pieces mid-cure, and reduce lamp proximity if items are thin.
- Amine blush-like film: Some pigments leave a waxy residue. Clean with alcohol and topcoat.
Occasionally, surfaces exhibit inhibition—a thin tacky layer that resists full cure at the air interface due to oxygen or additives. The fix is simple: apply a very thin clear coat and cure, or block oxygen using a clear film pressed gently onto the surface during cure; then peel to reveal a glassy finish.
Project Ideas That Play to UV Resin’s Strengths
- Open-back pendants: Use high-tack tape to form a base, inlay botanicals, then finish with a deep clear dome.
- Photo cabochons: Seal inkjet prints, dome, and mount on bezels or magnetic backings.
- Glitter badges and pins: Layer color, glitter veils, and decals; finish with a scratch-resistant top.
- Keycaps and buttons: Cast in shallow molds, embed symbols or flakes, and finish with a protective glaze.
- Miniature dioramas: Build scenery in micro-layers to fix figures and maintain crisp parallax.
- Repair and coat: Seal fraying cord ends, coat tiny paper charms, or add a protective lens to watercolor swatches.
Material Compatibility and Smart Combinations
UV resin plays well with many craft staples, but pretesting saves headaches. Metals are generally excellent after scuffing. Plastics vary: polystyrene and acrylic bond decently; some polyolefins resist bonding without a primer. Paper must be sealed to avoid wicking and bubbles. Real flowers demand complete drying and sealing to prevent browning. Mica and glitter are straightforward; heavy loads, however, scatter light, so stick to thin layers or clear caps to finish.
Mixing chemistries—like topping epoxy with UV resin—can be effective if you allow epoxy to fully cure and then scuff, clean, and apply a UV glaze. The reverse (UV under epoxy) is also possible; just ensure the UV layer is fully cured and oil-free.
Workflow for Sellers and Batch Production
For market-ready batches, consistency is currency. Build a curing jig with slots for multiple pieces, each at a fixed distance from the lamp. Standardize layer thickness using measured droppers or syringes. Keep a log: lamp model, distance, time per layer, pigment ratios. Replace lamps or bulbs on a regular cadence; output degrades over months of use, which silently lengthens cure times and can reduce surface hardness.
Quality checks between layers—especially before final doming—prevent scrap. Train your eye for dust, hairline bubbles at edges, and minute tilt. A small digital scale can verify drop weights for uniform domes. To speed packaging, cure a final scratch-resistant topcoat and allow items to rest warm for 10–15 minutes; this lets any residual stresses relax before bagging or boxing.
Care, Longevity, and Customer Guidance
Finished UV resin pieces are robust day-to-day, but they appreciate gentle care. Advise buyers to avoid prolonged direct sun storage, harsh solvents, or abrasive cleaners. Mild soap and water suffice for cleaning; a microfiber cloth revives shine. Over time, all clear polymers can shift slightly in tone under intense UV exposure; choosing UV-stable resins and dyes, and applying a UV-resistant topcoat, slows this process dramatically and helps preserve color fidelity and surface gloss.
Sustainability and Waste Minimization
Small-batch crafting produces offcuts—drops, wipes, tape rings. Cure liquid residues before disposal; once fully cured, resin behaves like inert plastic. Keep a “catch mold” nearby to pour tiny leftovers into charms or cabochons, transforming waste into stock components. Clean tools with alcohol and wipe promptly to reduce disposable waste. Reusable silicone tips and palettes outlast wood sticks and paper palettes by a wide margin.
Storage, Shelf Life, and Lamp Maintenance
UV resin prefers cool, dark storage. Light leaks cure the bottle tip first, so cap promptly and park bottles upright. If the nozzle clogs, warm it briefly and clear with a pin rather than squeezing hard, which can inject bubbles into your next pour. As for lamps, dust the reflectors and covers; grime reduces intensity. Lamp health determines cure quality, and cure quality governs long-term adhesion and surface wear, so treat the light source as a core tool, not an accessory.
Advanced Techniques for Confident Makers
Once you master the fundamentals, experiment with hybrid builds. Combine resin with cold enamels for color blocking. Use masking fluids and vinyl stencils to define crisp windows. Create lenticular depth by stacking micro-scenes with slight parallax shifts. For edge lighting, embed micro reflective foils around the perimeter and cap with a water-clear layer; the internal reflections amplify sparkle without opaque glitter loads. To simulate water ripple, cure a thin layer, then add a whisper of resin and dimple with a silicone tool before a quick flash set—repeat to sculpt subtle waves.
For color blends without muddiness, pre-cure adjacent tints to a gel stage, then feather the boundaries with a drop of clear. The partial-gel state resists bleeding while still accepting texture. To reinforce mechanical points—like pendant holes—add a micro fillet of resin and cure; this distributes stress and reduces chipping.
Frequently Asked Questions
- How thick can I pour? Best practice is 1–3 mm per layer; stack layers for thicker parts.
- Which wavelength is best? Most craft resins respond to 365–405 nm. Match lamp specs to your bottle’s instructions.
- Can I sand then recoat? Yes. Wet-sand, clean with alcohol, dry fully, then apply a thin clear layer and cure.
- Why does my piece yellow? Excessive heat, inferior stabilizers, or torching. Use quality resin, moderate lamp distance, and avoid open flames.
- Is sunlight enough? Often for clear or light tints, but lamps deliver consistency and speed regardless of weather.
- How do I avoid dust? Cover curing pieces with a transparent dome or box; cure in a clean, low-draft area.
Putting It All Together
UV resin thrives on thoughtful constraints: thin layers, deliberate light, clean surfaces, and patient staging. Those constraints unlock rewards—precision, pace, and repeatability—that are rare in other craft chemistries. By balancing pigments with light, sequencing layers for optical depth, and honoring cure kinetics, you can generate boutique-grade finishes at hobbyist scale. With a modest toolkit and an attentive process, you’ll harness rapid curing to produce objects that feel coherent, tactile, and lasting—pieces that stand up to handling, gift-giving, and everyday delight while preserving the luminous quality that first drew you to this material.
Respect the chemistry, keep your station organized, and keep exploring. Fast does not have to mean rushed; in the UV studio, speed simply becomes another design parameter you can shape, refine, and master for results that look as if they took days—because the craft still does—only the clock no longer stands in your way. And as you extend your repertoire, make space for careful testing and robust safety habits; the combination of intention and light is where the real magic lives.