There is a distinct pleasure in transforming a small heap of clear resin, pigment, and found objects into a pendant that carries a story. This guide unpacks the craft from concept to polished jewelry, pairing practical technique with the subtle choices that make a piece feel personal. You will learn how to plan your design, choose the right materials, master the pour, and finish your pendant so it looks crisp, luminous, and durable. Whether your inspiration is a pressed wildflower, beach sand from a memorable trip, or a tiny galaxy of glitter and mica, the journey is accessible—with patience, preparation, and a mindful approach.
Understanding Resin and Project Planning
Before you open a bottle, set a clear intention for your pendant. Decide on the style (bezel or mold), the color palette, and the inclusions. A deliberate plan helps you mix the correct quantity, minimize waste, and work calmly within resin’s working time. Just as important, commit to safety: wear nitrile gloves, protect your eyes, ventilate the area, and keep food and pets away from the workspace. As with any liquid plastic, you’re handling a chemical system that rewards care and respect.
Resin jewelry typically uses room-temperature curing systems. The two most common are epoxy and UV-curable formulations. For a first pendant, epoxy is forgiving: it offers longer working time, predictable curing without special lamps, and exceptional clarity. UV resin cures quickly under a lamp, which is convenient for tiny layers and on-the-go fixes, but limited by the depth light can penetrate.
Resin types at a glance
- Epoxy resin: Two-part system (resin + hardener) mixed in a precise ratio by volume or weight. Pros: long pot life, excellent clarity, good bond with bezels. Cons: slower to cure, sensitive to mix errors.
- UV resin: Single component that hardens under UV light. Pros: rapid cure, great for tiny domes and micro fixes. Cons: limited depth, tacky finish if undercured, potential yellowing if formulation lacks stabilizers.
- Polyester resin: Strong and fast, but smellier and more hazardous for home craft; not recommended for beginners.
Choosing pendant formats
There are two major routes: cast in a mold or pour into a bezel. Casting in a high-quality silicone mold produces crisp shapes and easy release; pouring into a metal bezel creates a classic jewelry look and offers built-in hardware for assembly. Open-back bezels can showcase translucency if you seal the back with tape before pouring.
Design planning and inclusions
Gather objects that tell your story: tiny photos (sealed), pressed botanicals, metal flakes, glitter, crushed shells, or pigment-tinted swirls. Consider weight and thickness: the piece should be comfortable to wear, usually 2–5 mm thick for a light pendant. Think in layers; resin’s transparency lets you create foregrounds and backgrounds that add depth. Keep your palette simple—two or three hues are often more elegant than a full spectrum.
Tools and Materials Checklist
- Resin system: beginner-friendly epoxy resin and its hardener
- Mixing supplies: graduated cups, wooden stir sticks, silicone spatulas, disposable pipettes
- Measuring: digital scale (if mixing by weight) or clear volume-marked cups
- Protective gear: nitrile gloves, safety glasses, optional respirator suitable for organic vapors if ventilation is limited
- Workspace protection: silicone mat, parchment paper, and a dust cover box or container
- Heat and bubble tools: small butane torch or heat gun; optional pressure pot or vacuum chamber
- Molds and bezels: food-grade silicone molds, solid or open-back bezels, and strong tape for backing
- Inclusions and colorants: dried flowers, metal leaf, mica powders, alcohol inks (sparingly), resin-safe pigments
- Finishing tools: micro files, craft knife, wet/dry sandpaper (400–3000+ grits), micromesh pads, plastic polish
- Drilling and assembly: pin vise or rotary tool, fine drill bits (1–2 mm), bails, jump rings, chains, jewelry pliers, strong jewelry adhesive
- Cleaning: isopropyl alcohol, lint-free wipes, cotton swabs
Workspace setup
Resin behaves best between 21–24°C (70–75°F), with low humidity and a level surface. Lay down a silicone mat, arrange tools within reach, and set up a dust cover to protect wet resin. Pre-test your torch or heat gun at a safe distance so you know how warm the airflow feels. Place a spirit level on your work surface; a level pour prevents one edge from looking thin or slumped.
Step-by-Step: Casting Your First Pendant
Step 1: Prepare your inclusions
Ensure botanicals are thoroughly dried; moisture can create haze, bubbles, or inhibit cure. Flatten pressed flowers between parchment under heavy books for a few days or dry them in silica gel. Seal delicate paper or photos with a thin coat of clear-drying glue or spray sealant and let it fully dry, preventing bleed. If you plan to use a fine powder or glitter, decant a small pinch into a separate dish to avoid overloading the resin.
If your plan involves crystal-clear coats, consider pre-emptive degassing options: warming your resin bottles in a sealed bag in lukewarm water to reduce dissolved air, or—if you have access to one—using a vacuum chamber after mixing. Neither is required, but both reduce trapped air that can mar otherwise perfect clarity.
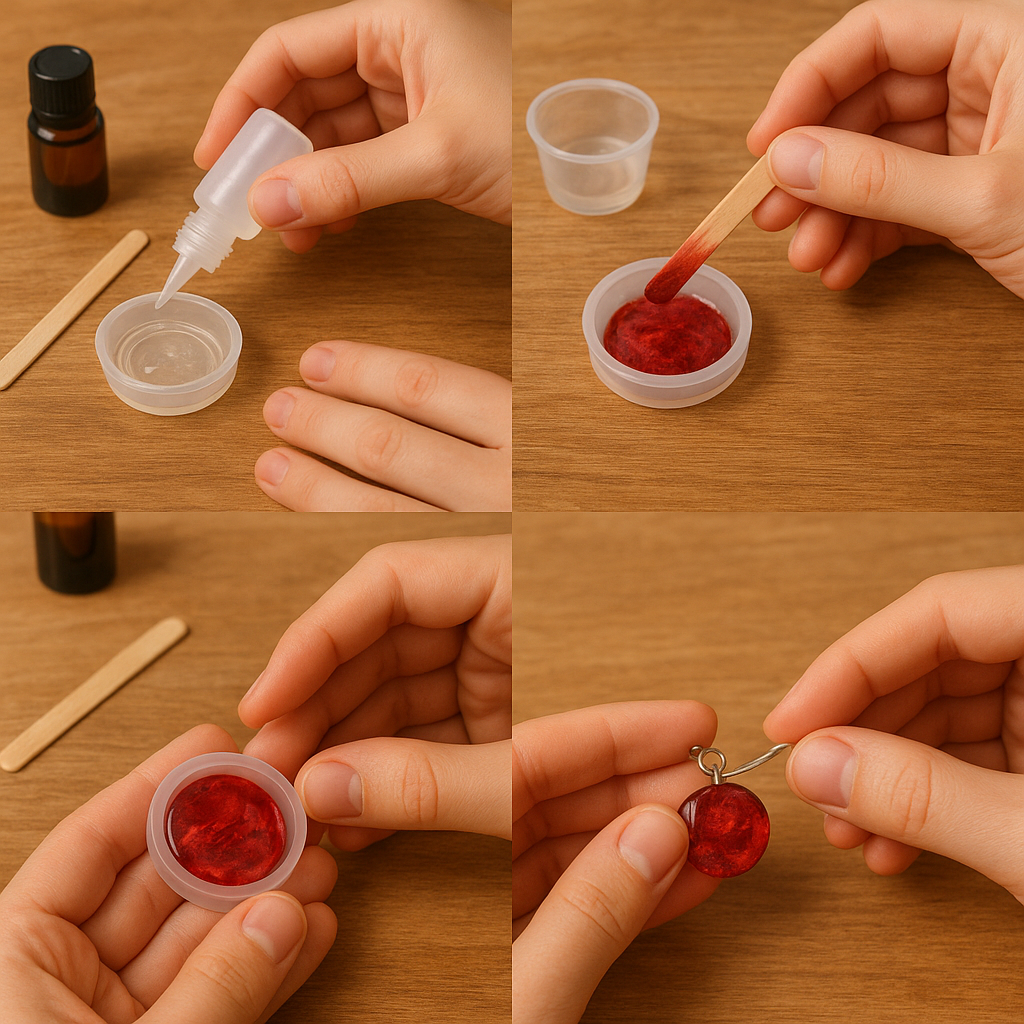
Step 2: Measure and mix the resin
Follow your brand’s specified ratio. If measuring by volume, pour slowly to the line; if by weight, rely on a precise scale. Mix for 2–3 minutes, scraping the sides and bottom of the cup and then transferring to a fresh cup for a quick second mix. This “double-cup” method helps eliminate streaks. Slight warmth or a water bath can lower viscosity and improve bubble release, but avoid hot water—excess heat accelerates the reaction and shortens working time.
Resin hardening is an exothermic chemical reaction. Larger batches trap heat, curing faster and potentially warping plastic molds or causing yellowing. If you feel the cup warming quickly, decant into a shallow container or pour into your bezel sooner, spreading the mass and slowing the runaway reaction.
Step 3: Tinting and special effects
Introduce color a toothpick’s worth at a time. Mica powder produces soft pearlescence; alcohol ink makes vibrant translucency; opaque resin colorants offer solid coverage. Keep color loads modest—too much pigment can inhibit cure. Swirl colors for marbling, or layer transparent and opaque elements to create depth. If you’re embedding a photo or botanical, start with a thin clear layer to “float” the element and maintain a glassy window above it.
Step 4: Pouring into molds or bezels
For open-back bezels, press strong tape under the bezel to create a leak-proof base and burnish the edges thoroughly. Pour a thin initial layer to lock the tape seam, then add inclusions. For silicone molds, a steady, thin stream helps minimize air introduction. Use tweezers to place inclusions precisely. If an inclusion tries to float, anchor it with a tiny drop of resin and wait until it gels before adding the next layer. Work from background to foreground so closer elements have pristine clarity above them.
Step 5: Bubble control
Use a quick, sweeping pass with a small torch or a heat gun to release surface bubbles; never linger in one spot. Avoid overheating metal bezels, which can transfer heat to the tape and cause leaks. Flick away stubborn microbubbles with a toothpick, or mist lightly with 91–99% isopropyl alcohol from a distance if your brand allows it. The gold standard, if available, is a pressure pot that compresses bubbles until they are invisible to the eye. Whatever your method, patient observation for the first 5–10 minutes pays off.
Step 6: Initial set and layering
Cover the piece with a dust box and let it reach a soft-gel stage. Some makers prefer to build depth with multiple thin pours, waiting until the previous layer is tacky before adding the next. This establishes strong bonds without sanding between coats. Respect recommended times: premature handling can fingerprint the surface or shift inclusions. As the piece moves toward curing, stop disturbing it—the last thing you want is dust or a stray hair marring the finish.
Step 7: Release and clean up
Wait the full cure window (often 24–72 hours for epoxy, faster for UV resin). When confident, proceed to demolding from silicone by gently flexing the mold and allowing air to slip between edges. For a taped bezel, peel the tape away slowly; if there’s a gummy residue, lift it with isopropyl alcohol or a swipe of citrus-based adhesive remover. Trim flash with a sharp craft blade, then wash the piece in mild soap to remove any surface film. Let it dry completely before sanding or topcoating.
Finishing Techniques That Elevate Your Pendant
Sanding for a glass-smooth edge
If you see a faint meniscus or uneven rim, refine it with wet sanding. Start around 600–800 grit and progress through 1000, 1500, 2000, and 3000+, keeping the surface wet with a drop of dish soap to float debris. Maintain even pressure and support the piece on a flat pad to avoid rounding corners excessively. Wipe clean between grits so you don’t reintroduce coarse scratches.
Polishing to clarity
Apply a plastic-specific polish with a microfiber cloth or a slow-speed buffing tool fitted with a soft wheel. Work lightly; heat builds quickly on small surfaces and can smudge the finish. After polishing, a thin coat of microcrystalline wax can add a subtle luster and make the piece more smudge-resistant.
Drilling and hardware attachment
If your pendant was cast as a solid cabochon, mark a drill point, secure the piece on a wood block, and drill a pilot hole with a pin vise at low speed. A dab of water cools and clears chips. Twist in a small screw eye with a drop of glue rated for resin to create a hanging point, or attach a glue-on bail with strong jewelry adhesive. For bezels, use jump rings to connect to your chain; twist rings sideways with pliers rather than pulling them apart to preserve their circular shape.
Doming for a jewel-like surface
A final topcoat can make your pendant look like it was dipped in crystal. This technique, called doming, relies on surface tension: apply a small amount of resin to the top and gently coax it to the edges with a toothpick until a soft dome forms. Work on a perfectly level surface and pop any new bubbles quickly. Cover the piece and allow it to cure fully before handling. A clean dome adds depth and can conceal hairline sanding marks.
UV protection and longevity
Choose formulas with UV inhibitors and store pendants away from direct sunlight when not worn. Colored tints can help disguise future yellowing, while clear pieces benefit from thoughtful storage. Avoid household solvents and perfumes directly on the pendant; a soft cloth with mild soap is the safest cleaning method.
Design Ideas and Variations
- Pressed botanicals: Layer a translucent tint behind a flower and a clear cap above to create a floating effect. A thin metallic halo leaf beneath enhances contrast.
- Beach memory: Embed a sprinkle of sand and a tiny shell in a gradient of ocean blues fading to clear, then finish with a high dome for a water-drop look.
- Galaxy swirl: Use dark navy or black resin, then swirl mica in blues and purples; add a few pinpricks of white pigment on a toothpick for “stars.”
- Minimalist negative space: Keep 70% of the piece crystal clear and reserve color for a geometric corner. The empty space amplifies the design.
- Layered depth: Build a three-layer scene: background tint, mid-layer inclusion (like a leaf), and a top clear window. Each layer adds parallax and dimension.
- Foil opal: Mix a scant amount of iridescent flake and white tint; the result mimics opal play-of-color when seen from different angles.
- Glow accents: Incorporate a whisper of glow powder for a subtle night-time surprise without overwhelming the daytime look.
Color and composition
Use a simple triad or complementary pair for harmony. If an inclusion is busy, keep the background calm. Scale matters: a large flower petal might overpower a small pendant; trim or choose smaller botanicals. Frame with a bezel color that complements the interior—for warm florals, choose gold; for cool ocean scenes, try silver.
Troubleshooting: What Went Wrong and How to Fix It
- Sticky or soft surface: Often due to incorrect ratio or under-mixing. Solution: allow extra time; if surface remains tacky after a full cure window, wipe with isopropyl and apply a thin, correctly mixed topcoat. For severe mix errors, sand back and re-pour.
- Cloudiness: Moisture in inclusions or high humidity can cause haze. Dry inclusions thoroughly and avoid water-based inks unless sealed. Warm bottles to reduce moisture condensation.
- Overheating and warp: Thick pours trap heat. Work in thin layers, keep batch sizes small, and avoid closed containers that retain heat during cure.
- Fish eyes or craters: Surface contamination (oil, silicone spray, or dust) repels resin. Clean surfaces with isopropyl alcohol and use lint-free cloths. If craters appear, let cure, scuff sand, and recoat.
- Trapped bubbles: Pour slowly, warm resin gently, and use controlled heat passes. For tiny stubborn pockets under inclusions, “wet” the inclusion with resin before placing it to avoid trapping air underneath.
- Edge lip after cure: Sand progressively and consider a dome topcoat to restore a uniform finish.
- Yellowing over time: Choose resins with UV stabilizers, add a hint of tint, and store away from sunlight. Clear displays should rotate away from direct windows.
- Tape leaks under open-back bezels: Burnish tape firmly, use high-quality non-porous backing, and seal the first micro-layer before the main pour.
Safety, Sustainability, and Storage
Build a habit of consistent, sensible precautions. Wear gloves and eye protection. Ventilate with cross-breeze or a fan pulling air away from you. Keep resin containers closed when not in use. Avoid skin contact; uncured resin can cause sensitization. Clean uncured drips from tools with isopropyl alcohol or let them cure and peel away.
To reduce waste, plan small mixes, collect leftover drops into a “scrap” mold for future keychains, and keep reusable silicone tools. Dispose of cured resin as regular solid waste; never pour liquid resin down drains. Choose suppliers who publish safety data and include UV stabilizers. Store resin in a cool, dark place; if crystals form in the hardener, warm gently in a sealed bag of lukewarm water until clear—do not overheat.
From Pendant to Wearable Jewelry
Assembly is the bridge from object to adornment. Match the pendant’s tone with the right chain: leather or waxed cotton for rustic botanicals, a fine cable chain for minimalist designs, snake chain for a modern gloss. Use jump rings sized to allow smooth movement without crowding the bail. If gifting or selling, package in a padded box with a care card advising gentle cleaning and storage away from sun and solvents.
Think about comfort and balance: heavy pendants sit better on shorter chains; small, light pieces can ride longer. If your pendant is transparent, back it with a softly colored card in the box to showcase details during presentation.
Project Planner: Timeline and Quantities
For a standard 25–30 mm pendant with light inclusions, plan approximately 5–8 ml of resin total. If layering, mix 3 ml for the first pass, 2–3 ml for the second, and a final 1–2 ml for the dome. Reserve 10–15% extra for contingencies. A sample schedule could look like this:
- Day 1 morning: Prepare inclusions, seal photos, set up workspace.
- Day 1 afternoon: Mix and pour base layer; place inclusions; bubble pass; cover.
- Day 1 evening: Pour second layer if the first is tacky and firm; quick bubble pass; cover.
- Day 2: Light sand if needed; apply final dome; cover and leave undisturbed.
- Day 3: Final polish, drill if required, attach hardware, photograph, and package.
Photograph your pendant in diffuse natural light to capture clarity without glare. A sheet of white paper as a reflector and a piece of black card for contrast can make colors pop.
Frequently Asked Questions
How do I avoid dust settling on my pendant?
Work clean and cover the piece immediately after each pour with a transparent container or a dedicated dust box. Pre-wet the inside of the box with a light mist of water to knock down airborne particles, and keep pets and fabrics away during cure.
Can I embed fresh flowers?
Fresh botanicals will brown and release moisture, causing clouding. Dry them thoroughly or use professionally preserved botanicals. A quick test: if a petal snaps cleanly, it is dry; if it bends, it needs more time.
Is a torch necessary?
No. A heat gun on low, warm resin, slow pouring, and patience can suffice. A torch is useful but optional. If you use one, keep it moving and never near alcohol or flammable materials.
What if I mixed too much resin?
Pour leftovers into a trinket mold or onto a silicone mat to cure flat, then punch small shapes later. Avoid leaving a large mass curing in a deep cup; spread it thinly to dissipate heat.
Why did my resin stay rubbery?
Likely ratio error, cold environment, or contaminated additives. Bring room temperature into range, verify mixing method, and ensure pigments are resin-safe. If the piece is only slightly soft, give it extra days; if it remains rubbery, remove and restart.
How can I get sharper edges without sanding?
Cast in a crisp mold and avoid overfilling. For bezels, dome carefully to the inner rim and stop. Use toothpicks to coax resin to corners while maintaining surface tension.
Bringing It All Together
Resin pendant making rewards precision and play. Prepare carefully, handle your materials thoughtfully, and trust the rhythm: mix, pour, refine, and finish. With each piece, you will sharpen your eye for proportion and your touch for timing—how viscous the mix should feel before placing a delicate petal, how long to wait between layers, when to stop heating and let surface tension work. What begins as a simple craft becomes a language of clarity, color, and light that you can speak through your own designs. When your pendant finally catches the sun on a neckline, all those quiet steps—planning, pouring, and polishing—shine within it.