Cold porcelain brings the grace of porcelain and the ease of air-dry clay into the intimate scale of jewelry. It is light, smooth, and remarkably expressive in tiny forms, making it ideal for earrings, pendants, brooches, and rings that showcase sculptural detail without the weight. It accepts color beautifully, dries without a kiln, and can be shaped into petals, beads, and cabochons that read as ceramic at a glance. With the right workflow—preparation, shaping, drying, refining, and protection—cold porcelain becomes a versatile medium for hobbyists and professional makers alike. Whether you’re gilding botanical motifs, crafting miniature sculptures, or building collections for a market stall, this material rewards patience with refined, wearable results.
What Is Cold Porcelain and Why Jewelers Love It
Cold porcelain is an air-dry modeling compound most commonly made from PVA (white school glue) and cornstarch (or cornstarch-based baby powder), plus small additions of plasticizers and preservatives. When properly cooked and kneaded, it forms a smooth, slightly elastic dough that can be rolled thin and sculpted finely. Unlike ceramic porcelain, it requires no firing. The name stems from its porcelain-like finish after drying—pale, satin, and slightly luminous—rather than any mineral composition.
What makes it attractive for jewelry are several attributes. First, the surface can be polished to a refined matte or gloss without specialized equipment. Second, the material’s lightness allows statement pieces to remain comfortable during long wear. Third, it accepts a range of colorants, from acrylics to pastels, inks, and powders, making gradient petals and realistic botanicals straightforward. Cold porcelain also offers pleasing translucency when formulated and conditioned correctly, giving petals and sea-glass effects a delicate realism that resin or polymer sometimes lacks at similar thicknesses.
It is not without quirks. The clay shrinks slightly as it dries, which can tighten around embedded components or warp thin forms if not supported. Humidity extends drying time and can affect the final strength. Still, with practice, careful design, and good finishing, cold porcelain jewelry can stand up to everyday use while reflecting a hand-crafted aesthetic that feels warm and intimate.
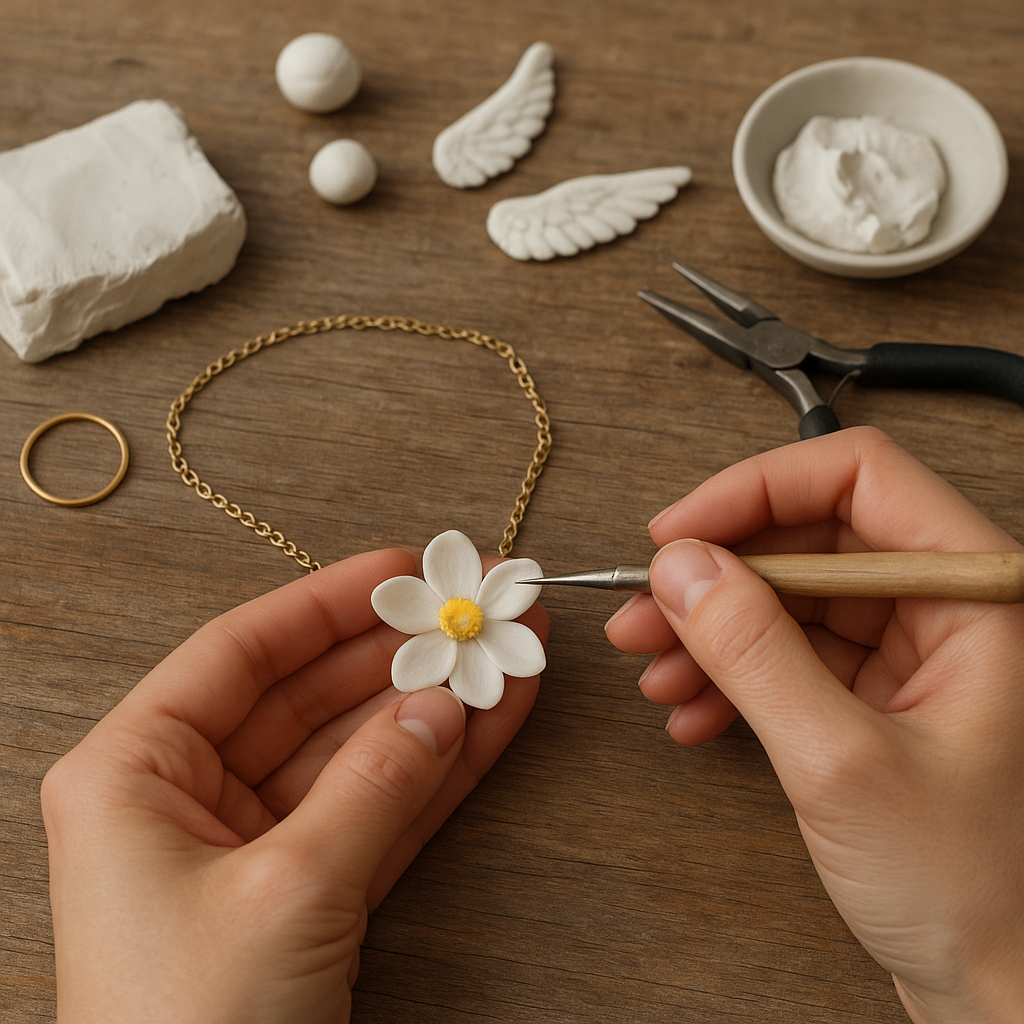
Materials, Tools, and Workspace
Working efficiently starts with a tidy bench and reliable tools. A clean, non-porous surface is essential; acrylic mats, glass plates, or silicone baking sheets help prevent sticking and allow easy cleanup. Keep the material covered when not in use to avoid skinning—zip bags or small lidded containers with a dab of hand cream inside keep moisture balanced.
- Core materials: ready-made cold porcelain or a homemade batch; cornstarch for dusting; PVA-based glue; glycerin; baby oil or petroleum jelly; a few drops of preservative (like white vinegar or a tiny bit of citric acid).
- Colorants and surface media: acrylic paints, oil paints, alcohol inks, watercolor pencils for fine details, soft pastels, mica powders, metallic leaf (gold, silver, variegated), and shell powders for pearlescence.
- Shaping and texturing: silicone shapers, ball tools, dental picks, fine scalpel, micro cutters, silicone molds, texture sheets (lace, leather, or botanicals), needle files, micro-drills, and cotton buds for smoothing edges.
- Forming and measuring: acrylic rollers, feeler gauges for consistent thickness, round dowels or doming tools to create curves, and small cookie cutters for repeated shapes.
- Attachment and metalwork: pin vises, small pliers, precision side cutters, and a variety of jewelry components—jump rings, crimp beads, bails, posts, bezels, and screw eyes.
- Finishing supplies: fine wet/dry papers (1000–5000 grit), micro-mesh pads, soft cloths, solvent-safe varnish or resin, and gentle adhesives compatible with PVA-based materials.
Finally, maintain a small humidity-controlled drying area. A lidded plastic container with tiny ventilation holes and silica packets can help pieces dry evenly without dust settling on them. Rotate pieces periodically to reduce warping—especially thin petals, leaves, and disks.
Making Your Own Cold Porcelain
While high-quality commercial clays are consistent, making your own gives control over consistency, strength, and curing speed. A baseline recipe includes PVA glue and cornstarch in roughly a 1:1 ratio by volume, plus 1–2 teaspoons of glycerin and 1 teaspoon of baby oil per cup of glue, and a small amount of preservative. Blend in a nonstick pot or microwave-safe bowl. Heat gently, stirring continuously until the mixture thickens into a cohesive mass that pulls from the sides. If using a microwave, heat in 15–20 second bursts, stirring between each, to avoid hot spots.
Once the dough gathers, transfer to a well-lubricated silicone mat and knead (carefully; it’s hot). Fold and stretch until smooth and elastic. If sticky, rest for a minute and knead again; overcooking can make it crumbly, whereas undercooking leaves it tacky and fragile when dry. Wrap the dough tightly in plastic film and rest it for 12–24 hours before use. This maturation step improves handling and reduces micro-bubbles.
Climate matters. In humid environments, add a touch more cornstarch or extend cooking slightly. In dry climates, increase plasticizer (glycerin) to retain workability. Always store the finished dough in small, well-sealed portions to avoid repeated exposure to air and moisture loss from the whole batch.
Coloring, Marbling, and Special Effects
Cold porcelain’s open surface takes color inside the clay and on top after drying. Intrinsic color is achieved by kneading acrylic paint, oil paint, or alcohol ink into the dough. Oil paints produce smooth gradients and maintain flexibility during drying, while acrylics offer fast, predictable tinting. Avoid overloading—which can weaken the clay—by adding color gradually and testing a thin swatch for strength after drying. On-surface color, such as watercolor pencil shading or pastel dust, adds depth to petals and leaf veins; fix these layers with a compatible, non-tacky varnish.
For marbling, twist and fold two or more colored pieces of dough, then roll and cut as needed. Subtlety pays; overmixing yields a flat color. Mica powders impart metallic flashes that catch light in earrings or pendants. You can also combine particulate inclusions—crushed shell, ultra-fine glitter, or micro confetti—sparingly for terrazzo-style beads. Mastering pigmentation makes it possible to match brand palettes or seasonal themes consistently across a collection.
Because cold porcelain can be rolled very thin, feathered edges on petals are achievable with ball tools and silicone shapers. If a semi-translucent effect is desired, tint lightly and avoid over-thick layers of paint on top; these obscure natural luminosity.
Sculpting Techniques for Fine Jewelry
Jewelry scale demands precision. Work smaller than you think you can; cold porcelain tolerates razor-thin edges if properly supported while drying. Use a roller and spacers to maintain uniform thickness, then cut shapes with micro cutters or a sharp blade. For botanical forms, press the clay into silicone flower molds lightly and refine edges by hand so the final result doesn’t look too “mold-made.” A slight asymmetry often reads as more organic and expensive.
Substructures are your friend. A hair-thin wire under a leaf or petal allows shaping and later attachment without piercing the clay after it dries. Micro armatures stabilize larger elements like sculpted blossoms or miniature figurative motifs. Embedding a fine armature early prevents cracking at stress points and makes assembly predictable.
Add texture with lace, linen, and natural leaves. Press gently to avoid distortion. For micro-beads, roll equal-sized pellets using a template or bead roller, then pierce carefully with a needle or micro drill while the clay is leather-hard; this minimizes deformation and gives a cleaner hole wall.
Designing and Building Jewelry Components
Cold porcelain stands in for stones, enamel, ceramic, or ivory-like inlays. Cabochons are straightforward: press conditioned clay into a cab mold or shape by hand on a nonstick surface; domed forms reduce edge chipping. After drying and finishing, set them in bezels with adhesive. For prong settings, ensure the clay piece is fully sealed and hardened before gently closing prongs over felt-padded jaws.
Earrings benefit from thoughtful attachment. For studs, embed a textured pad or mesh disc attached to a metal post while the clay is still soft, adding a small dab of glue when the piece is leather-hard for a mechanical and chemical bond. For dangles, form a neat channel or loop reinforcement; small screw eyes can be inserted, but ensure the surrounding clay is thick enough to accommodate stress and shrinkage.
Beads and connectors should account for shrinkage; make holes slightly larger than needed and test with sacrificial prototypes. Hinged components should be tested for free movement after sealing. Keep metal parts clean and lightly abraded for good adhesion. A strategic layout of findings—bails hidden within petals, micro jump rings embedded in beads—elevates the piece from craft to couture, both visually and structurally.
Drying, Finishing, and Protection
Drying is where pieces gain strength. Aim for slow, even curing. Elevated air circulation without direct heat reduces warping. Place delicate forms on soft foam or nest them in a shallow bed of cornstarch so edges don’t flatten. Flip gently at intervals. If a curve is desired—cupped petals or domed leaves—dry on curved molds or spoons to lock in the shape.
Once dry, refine the surface. Use ultra-fine abrasives and proceed slowly; cold porcelain can be abraded to a satin finish that mimics stone. Wet sanding reduces dust and minimizes heat buildup. After smoothing, remove all residue with a soft brush or tack cloth to prepare for protective coatings.
Protection is key for wearables. Choose a finish compatible with PVA-based clays. Waterborne acrylic varnishes provide a matte-to-gloss range; solvent-based options can offer tougher films but must be tested for tack and yellowing. Brush thin coats, allowing full off-gassing between layers to avoid surface stickiness. A thin epoxy or UV resin dome gives glass-like depth to cabochons and micro-illustrations, while flexible varnishes are better for thin petals. Thoughtful sealing guards against moisture, stains, and abrasion without masking delicate textures.
Durability, Care, and Wearability
When properly formulated, shaped, dried, and sealed, cold porcelain jewelry can deliver excellent durability in ordinary use. It remains lighter than ceramic and safer for daily wear around smartphones and other items sensitive to hard knocks. The material is not meant for showers or swimming; advise clients to remove pieces before contact with water, lotions, and harsh chemicals. If an item gets wet, pat dry and air-dry completely before storage.
Comfort matters. The low weight permits oversized silhouettes that still feel balanced. Consider distribution of mass when designing statement earrings or headpieces: adding counterweight beads near the ear, or keeping center-of-gravity close, improves ergonomics. On skin-facing surfaces, a smooth finish prevents irritation; nickel-free posts and hypoallergenic findings minimize allergic reactions. For longevity, include care cards with storage tips and instructions for gentle cleaning using a soft cloth and mild soap on sealed surfaces only.
Common Problems and Fixes
- Cracking at edges: Usually due to over-drying or insufficient plasticizer. Remedy by increasing glycerin slightly in future batches and maintaining even thickness. For minor cracks, fill with a tiny amount of soft clay and smooth with a damp tool before sealing.
- Warping or cupping: Caused by uneven drying or excessively thin edges. Dry on curved forms or rotate frequently. Use a supportive cornstarch bed for flat components.
- Sticky surface after varnish: Too-thick coats or incompatible finish. Strip gently with appropriate solvent if safe, or sand and recoat with thin layers, allowing long cure times between applications.
- Discoloration/yellowing: Overheating during cooking or using low-quality varnish. Cook gently and keep finishes out of direct sunlight during drying. Choose non-yellowing topcoats designed for artworks.
- Loose metal parts: Smooth metal offers poor grip. Lightly abrade, degrease, and use adhesives compatible with PVA-based material. Embed mechanical features (mesh, micro holes) to lock parts in place.
- Visible seams or mold marks: Clean up immediately at the leather-hard stage with a damp brush; later, refine with micro files and resurface with thin color washes.
Creative Project Ideas and Step-by-Step
Botanical Petal Studs
- Condition a pale-pink tinted dough. Roll thin with spacers and cut petal shapes.
- Refine edges with a ball tool, add subtle veins using a silicone shaper.
- Dry on a domed surface for a natural curl. Once leather-hard, embed a textured disc with a stainless stud post and a dab of adhesive.
- After full dry, smooth selectively and apply a satin varnish; dust the center with gold mica for warmth.
Sea-Glass Cabochon Pendant
- Tint clay with a drop of teal ink for a translucent look; keep color light.
- Press into a cab mold, release, and let edges relax. Dry slowly to avoid surface skinning.
- Refine with micro-mesh to achieve frosted luster; seal with matte varnish or a thin resin dome for wet look.
- Set into a bezel with strong adhesive. Add a minimal bail and fine chain to highlight the glassy feel.
Terrazzo Bead Bracelet
- Prepare a base clay in off-white. Mix tiny chips of pre-colored clay or safe micro confetti.
- Roll beads using a template for uniformity; pierce halfway from one side, then the other, to keep holes clean.
- Dry on skewers to maintain shape. Smooth and spot-seal to taste.
- String with elastic cord and add metal accents; pre-stretch the cord and knot securely in a hidden recess.
Advanced Effects and Mixed Media
Cold porcelain pairs beautifully with gold and silver leaf for luxe botanical veins or geometric inlays. Apply leaf over tacky adhesive on cured surfaces and seal lightly to retain leaf luster. For miniature paintings, cure flat plaques, paint with acrylic micro-layers, and finish with a thin resin dome. Inlays into wood or horn create tactile contrast—treat porous substrates with a sealing primer before embedding clay. For prismatic accents, press rhinestones or chatons into leather-hard clay, pull them out to leave precise seats, dry fully, then glue in stones after sealing to protect clarity.
Creative armatures unlock bolder volumes. Sculpt over lightweight cores like foam, cork, or crumpled foil wrapped in film, ensuring the clay layer is evenly thin. Sandwich silk or mesh fabric within layers to build lace-like structures that remain strong after drying. Micro-engineering hinges and magnetic closures allows lockets and brooches to perform like traditional metalwork, while still spotlighting the hand-formed clay.
Adhesives and Mechanical Connections
Adhesion depends on clean, keyed surfaces. Lightly scuff metal with fine abrasive, degrease with isopropyl alcohol, and use a strong jewelry adhesive tested on cured clay offcuts. In high-stress areas—earring posts, rings—combine mechanical and chemical bonds. Texture pads, perforated plates, and mesh reinforcements distribute forces over a larger area. For cable chokers or bangles, create channels in the clay where metal passes through, then glue after sealing; this prevents glue from wicking into unsealed clay and leaving stains.
Care of Tools and Storage of Clay
Wipe tools with a damp cloth frequently; dried residue can scratch delicate surfaces on the next pass. Keep separate brushes for varnish, adhesive, and color to avoid contamination. Sharpen blades often to prevent ragged edges that require unnecessary post-processing. Store clay in labeled portions, noting the batch date and recipe tweaks. If clay seems dry after weeks in storage, knead in a fingertip of glycerin or a micro-drop of baby oil; if too sticky, rest it wrapped overnight or cook a small corrective batch to blend.
Safety, Sustainability, and Material Ethics
Most basic ingredients in homemade cold porcelain are household-safe, but responsible practice still matters. Ventilate when heating; avoid overheating that can discolor or off-gas. Wear a dust mask for extended sanding sessions, and protect skin with barrier cream if you have sensitivities to adhesives or sealers. For sustainability, minimize waste by planning layouts and reusing offcuts for small beads or test swatches. Choose non-yellowing, low-VOC finishes when possible. Offer repair services to keep your work in circulation and reduce landfill.
Practice Plans and Skill Building
Consistent results come from structured exercises. Keep a swatch book of color mixes and varnish tests with notes on ratios and dry times. Practice rolling equal beads without a mold, sculpting three sizes of petals in under ten minutes, and building a simple cabochon from scratch with perfectly symmetrical edges. Time yourself to simulate production conditions. As you refine your style—botanical, geometric, folkloric—develop repeatable steps for each collection so you can scale thoughtfully without sacrificing quality.
Pricing, Presentation, and Care Cards
Factor in materials, bench time (including drying and finishing), packaging, and a margin for overhead. Lightweight, artful packaging protects fragile forms without crushing. Use foam inserts or custom-cut cards to immobilize earrings and pendants; include silica gel in humid seasons. Care cards should explain water avoidance, safe cleaning, storage away from direct sun, and how to contact you for repairs. Good labeling—materials used, metal types, finishes—builds trust and sets accurate expectations.
Troubleshooting Checklist for Production
- Batch consistency: Track glue brands and cornstarch types; minor changes can alter workability.
- Thinness control: Use spacer guides and record thickness for each design to standardize weight and flexibility.
- Drying logs: Note humidity and temperature; adjust schedule accordingly to prevent rush-related defects.
- Sealer compatibility: Always swatch new varnishes on scrap; check for tack, clouding, and dust attraction.
- Metal prep: Abrade, degrease, and test bond strength on samples before doing a run.
Design Language and Signature Details
Small, repeatable signatures distinguish your brand—carved back textures, a specific color gradient, micro-dots of metallic leaf, or a characteristic petal curl. Photographs should capture matte versus gloss finishes and demonstrate scale; macro shots reveal craft quality and help customers appreciate hand-worked nuance. As your collections evolve, document each technique so you can revisit a look seasons later with assurance and consistency.
Final Thoughts
Cold porcelain turns a humble mixture into refined, wearable art. It rewards attention to detail—clean edges, balanced forms, smart armatures, and patient finishing—with pieces that feel both contemporary and timeless. By mastering formulation, surface effects, and protection, you can create jewelry that carries the tactile intimacy of handmade work and stands confidently beside metal and stone. The medium’s light weight, color range, and fine-detail capacity make it a compelling choice for artisans building collections that are as comfortable as they are beautiful. With practice, your bench becomes a miniature atelier, where petals seem to float and every curve is deliberate, inviting the wearer to look closer and stay longer.