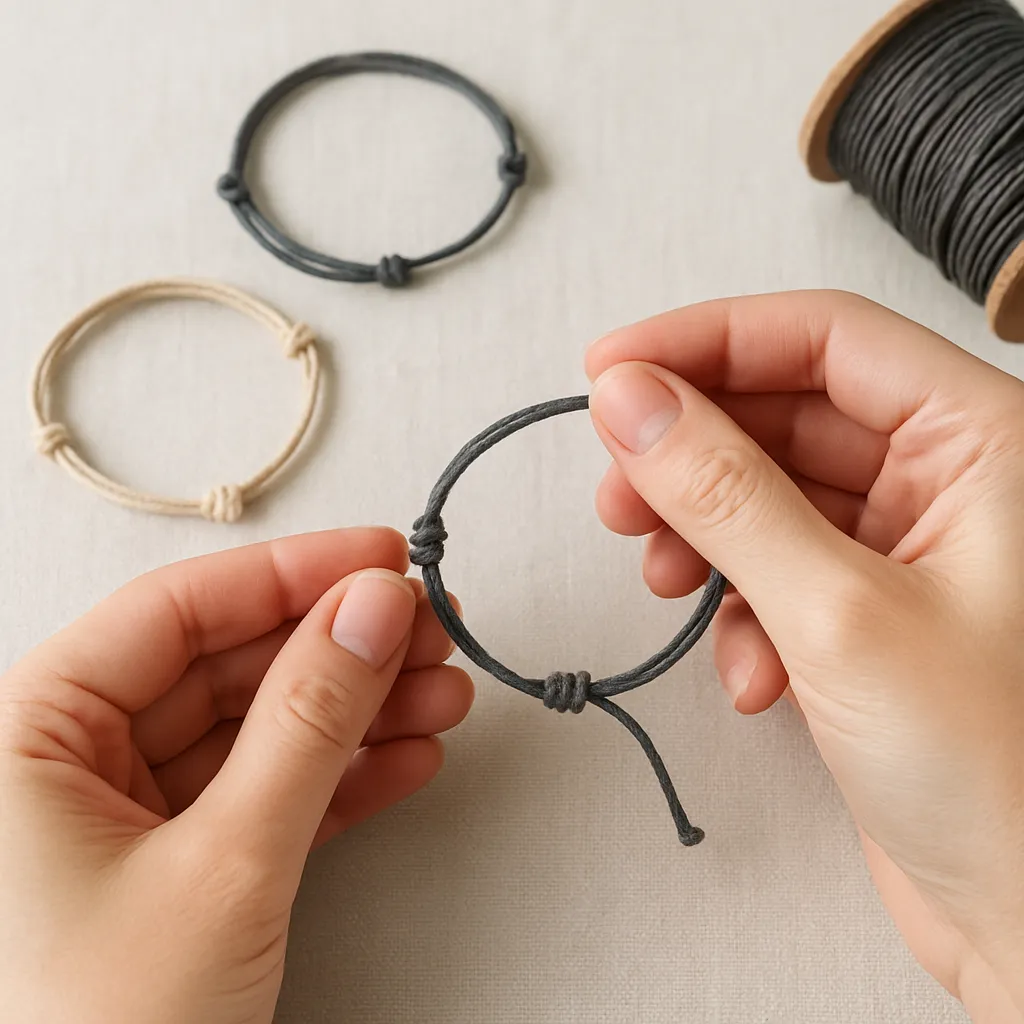
There is something quietly satisfying about a bracelet that relies on a single strand and a few confident movements of the hands. Minimalist bracelets stitched together with simple knots celebrate clarity of form, the warmth of handwork, and the pleasure of wearing something you built yourself. They can be pared-back and almost invisible, or carry a single focal detail that turns the eye; either way, they reward patience and attentive craftsmanship. This guide explores materials, core techniques, and refined design choices that let you make sleek, durable pieces you will want to wear every day or gift without hesitation. Whether you are new to handcraft or looking to sharpen existing skills, the following pages will equip you to tie with purpose, finish cleanly, and build a personal vocabulary of knots and proportions that read as quietly luxurious.
Why Minimalist Bracelets Feel So Right
A minimalist bracelet is more than a style; it is a disciplined approach to making where every element earns its place. There are no busy patterns to distract from the essentials—just line, surface, and movement. The result is a piece that pairs with anything from a linen shirt to a technical jacket, one that fades into the background when it should and speaks up in the simplest ways when the light hits or the wrist turns. Small, accurate decisions—how tight to pull, where to place a bead, when to trim—collect into an object that feels resolved.
This restraint also suits mindful making. Your hands repeat a sequence, your eye checks alignment, and your breath naturally slows to match the rhythm of tying. In a studio corner or at a café table, a single bracelet can become a meditative session: measure, cut, tie, test, refine. The economy of tools and materials expands access too; a single length of quality cord and a lighter or glue can carry you through many projects with professional finishes.
Materials, Tools, and Sizing That Matter
Cord Choices and Their Personalities
Each fiber has a voice. Choosing the right one shapes look, feel, and longevity:
- Waxed polyester or nylon: Clean, modern lines, great memory, resists fray, available in micro diameters (0.5–1 mm) for delicate work. Melts to finish.
- Micro paracord (Type I or 275): Sleek, sporty, slightly more structure. Good for adjustable sliders and unisex pieces.
- Cotton or linen: Soft matte finish, wonderful for earthy palettes. Ends do not melt; finish with glue or whip stitching.
- Silk rattail or braided silk: Fluid drape with gentle sheen. Excellent for single focal bead designs and elegant stacks.
- Leather lace: Rustic to refined depending on cut. Precondition with balm; avoid soaking.
- Hemp or jute: Natural vibe with visible grain; pairs nicely with wooden beads and recycled glass.
Diameter determines visual weight. For a whisper-thin line, go 0.5–0.8 mm. For a singular statement line, try 1.2–1.5 mm. For leather, 1.5–2 mm reads refined rather than bulky. As a rule, the thicker the material, the larger your beads and knot bodies will need to be, and the more room you should leave for adjustable closures.
Essential Tools and Helpful Add-ons
- Sharp scissors or thread snips for clean ends.
- Lighter or thread burner for synthetics to seal ends.
- Jeweler’s glue, flexible epoxy, or fabric cement for natural fibers.
- Ruler or tape measure; soft tailor’s tape is easiest at the wrist.
- Binder clips or washi tape to hold temporary tension points on a table edge.
- Needle or threader for small bead holes.
- Beads, tubes, or minimal findings as optional accents.
Wrist Sizing Without the Guesswork
Measure snug around the wrist’s narrowest point, then add ease based on closure type:
- Fixed-length bracelet with clasp: Wrist size + 1–1.5 cm for comfort.
- Sliding adjustable bracelet: Start at wrist size + 0.5–1 cm; the slider will handle the rest.
- Leather or non-stretch cords: Err slightly generous; you can always tighten a sliding knot later.
Track your measurements in a small notebook. Consistent fit builds trust if gifting or selling. You will also start to anticipate how different knots “eat” length—square knots consume more than overhands, for example—which refines your planning.
The Five Core Knots for Minimalist Bracelets
Master these, and you can build dozens of clean designs. Every step below uses common language rather than dense terminology, with an emphasis on repeatable tension and alignment.
Lark’s Head (also called Cow Hitch)
Purpose: Clean attachment to a ring, bead with a large hole, or to double a cord neatly.
- Fold cord in half to find the bight (loop).
- Pass the bight through your ring or under your anchor line.
- Bring the two free ends through the bight and pull down to snug.
- Check that both legs are parallel and even; symmetry at this start sets the tone.
Overhand Knot
Purpose: Tiny stopper, bead anchor, or subtle detail when repeated at intervals.
- Form a loop with the working end crossing over the standing line.
- Pass the end through the loop.
- Dress the knot by sliding it exactly where you want it, then pull both directions to set.
Figure-Eight Knot
Purpose: Slightly bulkier and more secure than an overhand; elegant as a terminal stop.
- Make a loop, then bring the end around the standing line and back through the loop from the original side, tracing a “figure 8.”
- Dress and set cleanly so the two curves sit without crossing.
Square Knot (Reef Knot)
Purpose: Flat, handsome tie for cord joins or as the core of macramé-style sections.
- With two working ends, tie left over right and under, then right over left and under.
- Snug evenly so the knot lays flat, not twisted.
- A short run of alternating square knots creates a textured, minimal band.
Sliding Adjustable Knot (Two-Ended Slider)
Purpose: Clasp-free closure that lets the wearer adjust fit across seasons and wrist sizes.
- Cross bracelet tails so they overlap by 4–6 cm.
- With the left tail as an anchor, use a short piece of the right tail to tie two or three tight half knots (or a tidy series of overhands) around the left tail only.
- Repeat mirror image on the other side.
- Trim and seal the tiny ends of the slider knots. The bracelet expands and contracts smoothly.
Alternatively, a double fisherman’s knot (two overhand knots sliding against each other) produces a compact, very reliable slider for round cords.
Three Minimalist Projects to Build Skill
Project 1: Pure Line Adjustable Bracelet
Look: A single unbroken line around the wrist with a discreet slider. Choose a matte nylon or silk for elegance.
- Cut 60–70 cm of cord for most wrists.
- Wrap around the wrist to test the path and mark where ends meet.
- Tie a small overhand near each end as visual anchors spaced symmetrically. Keep them 1–2 cm from the cut ends.
- Form the bracelet loop and overlap tails by 4–6 cm.
- Tie two compact sliding knots as described above, one on each side of the overlap.
- Test movement; adjust tightness until the slider glides but does not slip on its own.
- Trim, seal, and gently press the slider knots to a low profile while warm (synthetics) or after the glue sets (naturals).
Project 2: Single Bead Axis
Look: One focal bead or tube centered on a calm field of cord. Works beautifully with a ceramic disc, gemstone round, or a short metal bar.
- Cut 70–80 cm of cord.
- Thread the bead to the midpoint; add a figure-eight stop on each side, snugged closely to lock it in place.
- Optional: Add two evenly spaced overhands on each side for a cadence that draws the eye inward.
- Finish with a double fisherman’s sliding closure for a strong, discreet adjuster.
- Balance check: Lay the bracelet flat and verify equal lengths from bead to slider.
Project 3: Short Square-Knot Panel
Look: A 2–4 cm band of flat macramé at the crest of the wrist, tapering to simple tails and a slider.
- Cut one core strand to wrap the wrist and two working strands 3–4 times the desired panel length.
- Mount the working strands to the core with two lark’s heads so you now have four ends around the core.
- Tie alternating square knots across 2–4 cm, dressing each before moving to the next.
- Reduce bulk by tapering: Tie one final square knot, then trim inner working strands and seal close to the knot’s backside.
- Use the remaining core tails to create your slider closure.
Design Principles: Making Simple Look Intentional
Minimalist is not the same as plain. The effect depends on decisions about line, space, and contrast. Keep these ideas nearby when sketching or prototyping.
- Line weight and symmetry: Match cord diameter to wrist size and balance knots left-to-right. A 1 mm line on a small wrist can read elegant; on a larger wrist it may vanish unless stacked.
- Scale and proportion: If you add a bead, its maximum diameter should rarely exceed 1.5–2× the cord thickness for a restrained look. Panels of square knots typically work best at 10–20% of the bracelet’s circumference.
- Texture contrast: Pair a matte cord with a polished bead or vice versa. Leather next to brushed stainless creates subtle tension.
- Color discipline: Limit palettes to one hue, one neutral, and metal in a single finish. Monochrome reads sophisticated; two-tone can emphasize structure.
- Negative space: Intentionally leave clean spans of undecorated cord. The eye rests there, and the piece feels composed.
- Comfort and ergonomics: Any closure should sit away from the laptop-press zone on the underside of the wrist. Low-profile sliders prevent desk rash and snagging.
Finishing Techniques for Longevity
Professional results come from crisp ends and steady function. Finishing changes with fiber type; choose the method that suits your material and the bracelet’s expected wear.
- Synthetics (nylon, polyester, micro paracord): Cut close, melt swiftly, and immediately press with a metal tool’s flat to mushroom and lock the end. Practice on scrap to avoid soot and lumps.
- Natural fibers (cotton, linen, hemp): Use a tiny dab of flexible glue. Roll the end between fingers until smooth. For extra security, whip-stitch the tip with matching thread before trimming.
- Leather: Skive thick ends to a taper with a sharp blade, cement, then burnish with a scrap of canvas. A tiny dot of beeswax keeps edges sleek.
- Anti-fray habits: Always dress knots before final tightening, and set them with a positive pull in all directions to reduce creep.
- Hardware restraint: End caps and crimp covers can add polish, but keep sizes minimal so the bracelet still reads as clean.
Care, Wear, and the Patina of Time
Minimalist bracelets age well when you embrace honest wear. Nylon and polyester shrug off sweat and occasional splashes; leather deepens in tone and molds to the wrist; cotton softens attractively. Simple routines extend life:
- Rinse sweat salt with cool water, pat dry flat. Avoid hot dryers and harsh soaps.
- Leather: Wipe with a damp cloth, then condition sparingly. Allow to dry away from direct heat.
- Check sliders monthly. If a knot bed loosens, snug and reseal ends before fray sets in.
- Rotate pieces. Even synthetics benefit from off-days to recover shape.
Signs of respectful wear—faint shine at high-contact points, softened corners at a slider—often enhance minimalist pieces rather than diminish them, provided the structure remains sound.
Troubleshooting: Small Fixes, Big Improvements
- Uneven ends after tying: You may be pulling more with your dominant hand. Count your moves and adjust grip to equalize pull.
- Twisted square knots: Check that you alternate left-right consistently. If a panel spirals, untie the last two knots and redress.
- Slider too tight or too loose: Change the number of wraps or the knot style. Double fisherman’s gives firmer bite than overhand-based sliders.
- Bead off-center: Instead of chasing it, measure and commit: tie a stop knot at exactly the midpoint before adding the bead.
- Fray at cut tips: Fresh blade or snips only; dull tools crush fibers and invite fray. For synthetics, adjust heat time; for naturals, reapply glue thinly.
- Bracelet flips on wrist: Reduce hardware bulk, lighten the bead, or shorten the knot panel so gravity does not pull the crest under.
Quality Benchmarks for Minimalist Work
Because there is less to distract the eye, flaws can stand out. Hold yourself to an honest checklist:
- Are mirrored elements exactly mirrored? Spacing between stops identical on both sides?
- Do knots sit flat and aligned, with no crossing strands?
- Is the cut-and-seal invisible from conversational distance?
- Does the slider move smoothly yet hold its position?
- Is the wearer’s experience silent? No scratchy edges, no metallic clicks against a keyboard.
Ethics, Materials, and Responsible Making
Minimalism easily aligns with thoughtful sourcing. A small, carefully chosen kit of materials reduces waste and elevates every piece. Reach for recycled polyester cords, vegetable-tanned leather, or deadstock silk. Swap disposable plastic baggies for reusable tins in your kit. When you do add metal, choose stainless or brass that can be long-lived and recycled. This slow, deliberate approach strengthens both the story of the piece and its material sustainability.
Turning Skill Into Thoughtful Gifts or a Micro-Brand
Bracelets built from simple knots make powerful gifts because they carry time and intention. If you share or sell your work, consistency is your best marketing. Photograph pieces on neutral backgrounds with soft natural light, and include a sizing note. Build a palette—five colors, two metals, one or two bead shapes—so your range feels coherent. Pricing should respect your time: materials × 2–3 plus an hourly rate, then refine as you learn your market. Include a tiny care card and avoid unnecessary packaging; a cloth pouch is plenty and supports a quiet, minimal ethos.
Advanced Variations While Staying Minimal
- Hidden core: Run a fine wire or second cord inside a silk sheath for subtle structure.
- Offset focal: Place a bead one-third around the circumference for asymmetry that still feels intentional.
- Tiny repeats: Three micro beads separated by equidistant overhands create a dotted rhythm line.
- Bar segment: Thread a short metal tube and flank with two tight square knots, trimmed flush on the back.
- Reverse slider: Hide a micro slider under a short macramé panel for a clasp that disappears at first glance.
- Soft color-block: Transition from one hue to another at a square-knot seam, keeping saturation close to avoid shouting.
Sensory Qualities: What the Wrist Feels and Sees
Minimal bracelets succeed when they disappear until the wearer notices their presence with a small, pleasing cue: the matte drag of waxed cotton against skin, the clickless glide of a polished slider, the way a bead catches the low sun at a crosswalk. These are the micro-experiences you tune by testing on your own wrist. If a corner scratches, round it; if a knot stands proud, compress it with warm fingers or retie it with a gentler pull. Seek a silent bracelet—no dangling hardware, no chatter—so it tags along with the day rather than demanding attention.
A Note on Structural Reliability
Even the most delicate line should be fieldworthy. Test to failure on prototypes: yank the slider hard, soak and dry a piece, rub it against denim fifty times, and examine the results. Move your weak points to hidden, reinforced zones. If you ship bracelets, give them a quick pre-departure audit so surprises never reach a wrist. Because you have fewer elements than in ornate work, every remaining junction must perform. Quiet design still deserves loud durability.
Stacking with Intention
Minimalist bracelets shine alone, but stacking can add dimension without clutter. Think conversation, not argument. Mix one pure line bracelet with one bead-axis and one short panel. Vary finishes—matte, satin, gloss—but keep diameters within a close family so they nest. Limit metal tones to one per stack. The goal is to create a wrist story that reads as composed from arm’s length and rewarding up close.
Maintaining a Maker’s Mindset
Set aside scrap to practice twenty overhand knots in a row, all identical. Repeat the same square knot band with different cords until you can predict its final length. Keep notes: cord type, diameter, number of knots, finished circumference, closure style. Over weeks, these entries become a personal manual. What begins as a hobby turns into fluency; hands start to solve problems before your head names them. In this craft, mastery is cumulative and measured in quiet precision, steady fingers, and a reliable eye.
Common Material Pairings That Rarely Miss
- Black waxed polyester 0.8 mm + single brushed steel bead: city-clean, office friendly.
- Undyed cotton 1 mm + three recycled glass discs: beach calm with earth tones.
- Chocolate leather 1.5 mm + brass tube: warm, heritage feel.
- Slate paracord micro + knurled stainless slider section: modern utility.
- Ivory silk 1 mm + seed pearl accent: subtle dress option.
When and Where to Wear
The beauty of minimalist bracelets is their reach. They pass quietly under cuffs in formal settings, lend texture to casual fits, and survive active days when made from hardy synthetics. If you climb or lift, swap a bead-forward piece for a bare line and a low slider. If you type for hours, rotate the slider so it rests at the outer wrist. When traveling, carry one adjustable bracelet; it adapts to swelling from flights or heat. This is the essence of functional elegance.
From First Knot to Signature Style
As you tie more, small signatures emerge. Maybe you leave the tiniest distance between bead and stop, or your slider knots always align on the same axis, or your cut ends carry a trademark micro-dome for comfort. Lean into these recognitions. They are the difference between generic and authored work. Keep the library of classic techniques close, revisit fundamentals often, and stay loyal to what reads true on your wrist. Minimalism rewards restraint and curiosity in equal measure.
The Quiet Power of Versatility and Repair
Design with versatility in mind. A bracelet that can be tightened over a wetsuit cuff, loosened for hot days, or re-knotted after a year’s hard use invites a longer life. Offer simple repair paths: a spare length of matching cord, a link to a video of your slider method, or a written card with the two knots used. Pieces that can be renewed become companions rather than consumables.
Closing Encouragement
Tying a minimalist bracelet is a conversation with materials—no rush, no clutter, just deliberate action. Assemble a small kit, choose one of the projects, and commit to finishing with care. As your fingers learn the language of clean transitions and aligned strands, you will find that a few good decisions and a handful of classic moves can carry you very far. Over time, the bracelet on your wrist will not just mark hours spent; it will register attention paid, choices refined, and a deepening respect for simple forms done well.
Glossary of Quick-Use Ideas
- Anchor point: Tape your cord to a table to maintain clean lines while tying panels.
- Dress the knot: Adjust each component into final position before tightening fully.
- Bite: The way a knot grips its host line; stronger bite equals less slip.
- Mushrooming: Melting synthetic cord ends to a low, rounded profile that resists pull-through.
- Stack logic: Combine one feature piece with two supporting lines for balance.
A Minimalist Maker’s Checklist
- Plan: Wrist size, closure, focal (if any), final length.
- Prepare: Cut generous length, pre-select beads, clear workspace.
- Tie: Slow is fast—verify each step, keep lines parallel.
- Finish: Seal invisible, compress warm ends, remove any glue sheen.
- Test: Pull, slide, twist, wear for an hour. Adjust if needed.
- Record: Cord type, knot count, resulting size for repeatability.
Final Notes on Flow and Feel
When your fingers know where to go, your bracelets begin to carry a calm presence that matches their look. Repetition will get you there, along with attention to the small things: smooth edges at touch points, graceful curves where the cord arcs around the wrist, and an honest respect for material limits. Aim for clean lines that read composed from a distance and reveal small joys up close. In that space—between restraint and detail—minimalist bracelets find their best expression.
To recap the essentials you now carry into practice: choose appropriate materials, tie with consistent tension, respect symmetry and proportion, confirm durability, honor wearer comfort through good ergonomics, and build with an eye toward sustainability and long-term use. With these values on the table, simple knots become a language you can speak fluently, creating bracelets that quietly elevate the everyday.
