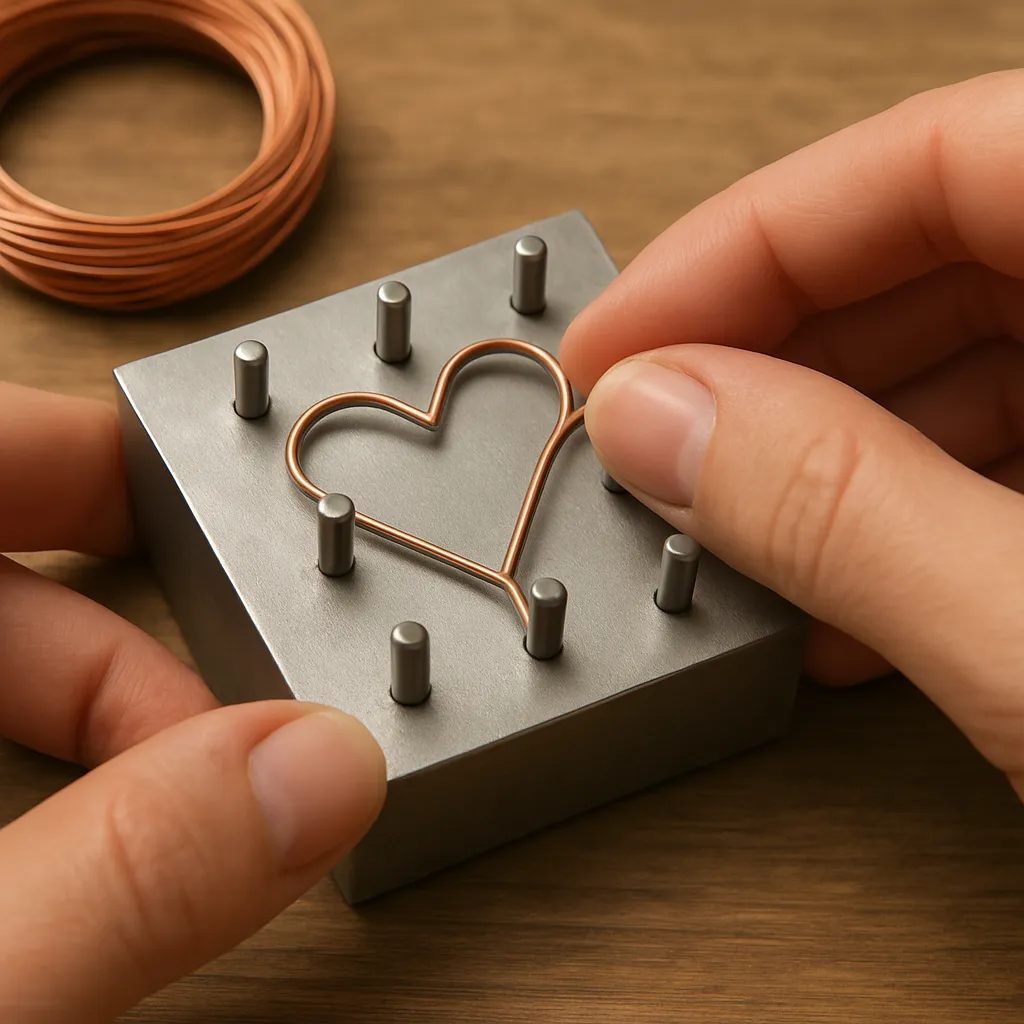
Wire jigs are small, ingenious tools that turn raw wire into repeatable components with clean geometry. Whether you craft earrings, sculptural mobiles, or hardware for leatherwork, a jig transforms the uncertainty of freehand bending into measurable, teachable technique. By transferring bends from your hands to pegs set in a grid, you control arcs, angles, and endpoints without guesswork. This guide explains how jigs work, how to choose and set them up, and how to integrate them into a studio workflow so your parts match from piece to piece with dependable consistency. You will learn practical setups, time-saving habits, problem-solving strategies, and design methods that scale from one-of-a-kind pieces to small production runs.
What a Wire Jig Is and Why It Matters
A wire jig is a flat base—often metal, hardwood, or acrylic—perforated with a regular grid of holes that accept removable pins or pegs. By arranging these pegs into a path, you “program” a specific shape: curves are defined by pegs acting as mandrels, while straight segments are the tangents between pegs. Because the pegs stay fixed while you guide the wire around them, your hands no longer determine each bend by feel alone; the jig enforces geometry. This produces shop-floor virtues such as precision, repeatability, speed, and less material waste.
Commercial jigs include: compact hobby jigs with plastic bases and steel pins; heavy-duty clockmaker-style jigs with hardened steel plates; and modular jewelry jigs with specialty pegs such as domed, conical, offset, or slotted pegs. Many makers also build DIY jigs from plywood or acrylic sheets drilled on a printed grid. The choice is less about brand and more about the type of shapes you make, the wire gauges you use, and how much production you expect.
Key advantages:
- Predictable results: Outputs look the same from unit to unit without constant measuring.
- Speed: After the first setup is dialed in, each subsequent form takes seconds rather than minutes.
- Design freedom: Complex shapes become manageable by building them from simple arcs and straights.
- Teaching/outsourcing: Shop assistants or students can produce identical parts following a peg map.
- Less strain: The jig carries most of the forming stress, sparing your fingers and wrists.
Think of the jig as a two-dimensional forming machine. It constrains bend radii, protects previously formed segments while you make the next bend, and provides landmarks you can record and reuse. For jewelry, this ensures matched pairs (ear wires, hoops, decorative links). For home decor or mobiles, it standardizes frames and connectors so assemblies hang square and move gracefully.
Tools and Materials: Building a Reliable Kit
Your jig is only as effective as the tools and wire you pair with it. Start with an honest assessment of what you make most often and assemble a kit tuned to those needs.
- Wire types: Copper and brass are excellent for learning; they’re malleable, affordable, and easy to finish. Aluminum bends easily but can mark and fatigue quickly. Stainless steel and music wire hold shape but require more force and robust pegs. Sterling silver and gold-filled are jewelry staples; treat them with care to avoid marring.
- Hardness: “Dead-soft” bends effortlessly and is great for intricate shapes; “half-hard” balances formability and resilience; “full-hard” is best reserved for strong, simple forms. You can soften some metals with heat (see annealing below).
- Wire size: Select wire by gauge or diameter appropriate to your project—for example, 0.8–1.0 mm for ear wires, 1.2–1.6 mm for structural hooks. Thicker wire needs larger bend radii and sturdier pegs.
- Pegs: Have a variety—cylindrical pegs of several diameters, domed and conical pegs for different radii, and rectangular “fence” pegs for straight segments. Hardened steel pegs last longest; nylon-coated pegs protect precious metals.
- Pliers and mandrels: Flat-nose and chain-nose pliers, round-nose for non-jig work, nylon-jaw pliers for gentle straightening, and ring or dowel mandrels for calibrating larger rounds.
- Striking and support: A smooth bench block or anvil, a rawhide or nylon mallet for non-marring persuasion, and a small chasing hammer for planishing and strengthening.
- Cutting and finishing: Flush cutters, a jeweler’s saw for thick wire, needle files, abrasive pads (400–2000 grit), a cup bur for rounding ends, and polishing compounds.
- Layout aids: Low-tack tape, fine-point permanent marker, scribe, graph paper, and a caliper for measuring critical dimensions.
- Safety: Eye protection, finger cots or thin gloves when appropriate, and good lighting.
Matching tool quality to task pays for itself. For example, if you work stainless frequently, lower-quality pegs will mushroom or seize in the base plate. If you make silver ear wires, nylon jaw pliers and smooth pegs prevent surface scars that are hard to polish out later.
Setting Up the Jig for Accuracy
Before forming, treat jig setup as a miniature machine setup. You are defining datums and stops so each part begins at the same place and ends at the same place.
- Reference corner: Choose one corner of the jig as origin. Always align your pattern relative to that corner. This habit accelerates pattern reuse and helps during calibration after you swap pegs for another project.
- Peg selection: Choose peg diameters that match desired radii. Remember that tighter radii increase stress and potential surface marks; larger pegs produce gentler curves that age better in daily wear.
- Stop system: Add a fence peg or a taped-on stop for the wire tail to butt against; this locates the starting end without constant measuring.
- Path planning: Place pegs so bends flow in a continuous path from start to finish. Avoid sharp zig-zags that force you to remove and re-seat the work mid-process.
- Test strip: Do a short run in scrap wire to verify sizes and fit with components like beads, chains, or clasps.
- Marking: Put a discreet dot near the origin hole and keep a sketch or photo of your peg map. This improves future registration and reduces setup time if you revisit the design.
A good setup has ergonomic flow: your dominant hand pulls the wire while the other hand guides and keeps it flush to the base. The sequence should minimize hand changes and avoid covering up the next peg with your fingers or with excess wire.
Fundamental Techniques: Clean Bends and Crisp Lines
Technique on a jig is deceptively simple: keep the wire flat, guide it around pegs without twisting, and maintain steady tension. The nuance lies in how you approach each peg, how you account for material behavior, and how you handle the exit from each bend.
- Approach and wrap: As you come into a peg, ensure the wire lies flat on the plate. Wrap around the outside, keeping it snug to the peg without crossing. If you see daylight between wire and base, apply gentle pressure with your thumb to seat it.
- Lead and lag: Bends tighten more smoothly when you “lead” the curve by pulling the free end while your off hand “lags” just behind the peg, controlling the arc.
- Allow for springback: Metals rebound after bending. Plan a slightly tighter initial curve; on release, it will open to the target radius. The heavier and harder the wire, the more pronounced the effect.
- Avoid twist: Watch the wire’s edge. If it rotates, you’ll see reflections change or a seam line move. Correct immediately with nylon-jaw pliers before the twist is locked in by subsequent bends.
- Sequencing: Bend the smallest-radius features first while the long tails offer leverage, then form larger radii and straight segments.
- Protection: Slip a small piece of masking tape or a strip of PTFE tape over areas that might scuff against pegs during later bends, especially on soft precious metals.
After forming, evaluate flatness by placing the part on your bench block. If it rocks, correct with a rawhide mallet or by re-seating the piece on the jig and applying measured pressure at high spots. Finish by checking mirrored parts against each other—your eye is a sensitive comparator.
Step-by-Step Examples: From Simple to Complex
Use these walk-throughs to build muscle memory and confidence. Adjust measurements to taste and to your wire size.
Classic Ear Wires (Shepherd Hooks)
- Wire: 0.8–1.0 mm half-hard sterling or gold-filled.
- Setup: One medium peg for the ear arc, one small peg for the front kick, and a fence peg as a stop for length.
- Process: Cut two equal lengths. Mark 10 mm from one end. Seat the short tail at the fence; wrap the long tail around the arc peg 180–220 degrees. Form the front kick around the small peg, then trim and round the tail with a cup bur. Harden lightly with a mallet on a bench block and tumble if desired.
- Tip: For matched pairs, flip the second piece before forming the front kick so left and right mirror properly.
Figure-Eight Connectors
- Wire: 0.8 mm dead-soft copper to learn the motion; upgrade to sterling.
- Setup: Two equal pegs set about 6–8 mm apart.
- Process: Start in the center, wrap half-turn around the first peg, cross the center, wrap half-turn around the second peg, then cut and close the crossing point with flat-nose pliers. Soldering is optional for permanence.
- Tip: Slightly over-bend each loop to counter opening when you release it from the jig.
S-Hook Clasp
- Wire: 1.2–1.5 mm brass or sterling for strength.
- Setup: Two pegs of different diameters offset to create an S. A fence peg sets stock length.
- Process: Form the first curve around the larger peg, then the second curve around the smaller peg in the opposite direction. Planish lightly at the apexes for stiffness. File and round ends; optionally texture the outer faces.
- Tip: Add a micro-notch near each end with a file to capture jump rings more securely.
Heart Pendant Frame
- Wire: 1.0–1.2 mm copper or sterling.
- Setup: Three pegs—one central point for the bottom, two for the lobes. Position the lobe pegs slightly above the bottom so the curves meet gracefully.
- Process: Start at the bottom point, wrap one lobe, cross the center, form the second lobe, and meet back at the bottom. Bind the joint with fine wire and solder or wrap for a cold connection. Hammer gently along the outer edge to strengthen.
Geometric Triangle Link
- Wire: 1.0 mm stainless or brass for crisp edges.
- Setup: Three fence pegs arranged as triangle corners; optional straight peg along each side as a guide.
- Process: Form each corner by pulling wire taut along a fence, pivoting around pegs to create sharp transitions. Sharpen corners later with planishing on a stake if desired.
Metal Behavior: Adjusting Technique for Different Alloys
Different metals reward different handling. Learn to recognize how each feels under your fingers and adjust your technique accordingly.
- Copper: Soft and forgiving. It mars easily but polishes well. If it work-hardens mid-project, perform a quick annealing cycle: heat to a dull red (in low light), then let air-cool or quench as the alloy allows; pickle and rinse before continuing.
- Brass: Slightly stiffer than copper; takes crisp bends and holds shape better. Watch for stress whitening at tight radii; move up one peg size if you see it.
- Aluminum: Very malleable but prone to surface scratches; protect with tape or nylon pegs. It can crack if overworked; avoid excessive re-bending.
- Stainless/music wire: Demands strong pegs and firm grip. Plan for more springback. Pre-bend by hand around a larger mandrel before final forming on the jig to reduce stress.
- Silver/gold-filled: Treat the surface gently. Deburr before forming to prevent scratches. Harden after shaping through planishing, tumbling, or targeted work-hardening.
Finishing: From Jig to Wearable or Structural
After forming, finishing determines comfort, longevity, and the perceived quality of your work. The steps below take minutes and elevate results significantly.
- Deburr: Use flush cutters to nip tails cleanly. File cut faces with a fine needle file, then soften edges with a cup bur or abrasive pad.
- Surface refine: Progress through abrasives (400 to 2000 grit) to remove handling marks. For brushed finishes, stop at 800–1000 grit and stroke consistently in one direction.
- Strengthen: Planish curved sections lightly with a small hammer on a bench block to align grain structure and stiffen without distorting the form.
- Polish: For jewelry, tumble-polishing with steel shot both hardens and brightens. For architectural pieces, wax or lacquer may preserve a raw patina.
- Final alignment: Check that paired parts are mirror images. If not, correct by seating them back on the jig or by hand on a mandrel.
Troubleshooting: Diagnosing and Fixing Common Issues
- Inconsistent loop sizes: Verify peg diameters and starting stop position. Use a caliper to measure critical distances on a finished master and adjust peg spacing accordingly.
- Surface marring: Switch to nylon-coated pegs or add protective tape. Inspect for burrs on pegs and polish them if needed.
- Twist in the plane: You likely lifted the wire off the base during a bend. Re-seat the piece and use nylon-jaw pliers to counter-rotate until reflections align.
- Gaps at joints: Overcompensate for springback by bending slightly past the target. Alternatively, add a micro-offset peg to preload the last bend.
- Parts don’t lie flat: Spot-high points by rocking on a flat plate. Correct with mallet taps at the apex of the rock, or re-form around the relevant peg.
- Pegs drifting: If pegs loosen, wrap their shanks once with Teflon tape for a snug friction fit; for threaded systems, tighten gently to avoid strip-out.
Maintenance and Customization of Your Jig
Well-kept jigs produce better parts and save time. Treat them as precision tools, even if they’re homemade.
- Cleanliness: Wipe the base plate and pegs after each session. Dust or abrasive grit will imprint into soft metals.
- Peg care: Polish pegs periodically with fine compound to remove micro-scratches. Replace bent or mushroomed pegs; they will transmit defects to your work.
- Lubrication: A trace of paste wax on a metal base reduces friction without contaminating finishes. Avoid oils that attract dust.
- Storage: Keep pegs organized by diameter in labeled trays or tubes. Label peg lengths too; short pegs are better for tight formations, tall pegs for leverage.
- Custom bases: Make specialized jigs from acrylic sheets drilled on a printed grid. For repeat production, add fixed fences and a hinged pressure bar that holds wire flat during forming.
- 3D-printed accessories: Print collars, spacers, or custom peg heads that snap onto standard pegs to create unique profiles.
Ergonomics and Safety: Craft Longer, Hurt Less
Ergonomic habits prevent fatigue and maintain accuracy over long sessions.
- Bench height: Set the jig so your forearms are roughly parallel to the floor when working; this reduces shoulder strain.
- Hand alternation: For repetitive runs, alternate hands for low-precision steps or switch tasks every 20–30 minutes to avoid overuse.
- Grip: Use relaxed, consistent grip pressure. Over-gripping reduces tactile feedback and makes it harder to sense when a bend is complete.
- Eye protection: Always; ends can snap unexpectedly, and wire fragments from trimming can fly.
- Lighting: A shadow-free task light reveals twist and surface defects early, when they’re easiest to correct.
Design: From Idea to Peg Map
A good jig design starts on paper. Sketch silhouettes, noting target dimensions and intended wire diameter. Translate the sketch to a peg map by overlaying a grid and locating tangent points where curves begin and end. Aim for a sequence that minimizes backtracking and hand changes.
- Abstraction: Reduce complex motifs to primitives—arcs, straights, and S-curves—before assigning pegs.
- Symmetry: For mirrored parts, decide whether to flip the workpiece or mirror the peg layout. Flipping the work usually preserves handedness without moving pegs.
- Negative space: Consider the voids inside your forms; they carry as much visual weight as the wire itself.
- Prototypes: Make a master in base metal first. Once you like the proportions and fit, replicate in precious metal.
- Documentation: Photograph the peg map with a ruler for scale. Record peg diameters, hole coordinates, and wire length so re-setup is swift.
Scaling Up: Batch Production Strategies
When your design proves itself, small-batch production becomes a matter of process control. Treat your jig as a station in a lean workflow.
- Cut lists: Pre-cut wire to exact lengths and deburr both ends before forming; this removes a variable from the jig stage.
- Kitting: Prepare trays with the correct number of pre-cut wires, pegs, and any protective tapes. This reduces mid-run interruptions.
- Sequence cards: Write a short step list and tape it near the jig. Consistent sequences produce consistent parts, even across different operators.
- Inspection: Use a simple go/no-go template (a laser-cut card or 3D print) to check critical spans quickly.
- Tool rotation: For long runs in hard wire, rotate pegs periodically to even out wear; swap in spare pegs before dimensions drift.
Creative Applications Beyond Jewelry
Wire jigs serve many crafts:
- Textile hardware: Consistent S-hooks, D-rings, and decorative fasteners.
- Leatherwork: Reinforcement frames for bag corners, strap keepers, and ornamental monograms.
- Home decor: Armatures for air plant holders, candle cages, or geometric wall hangings.
- Mixed media: Wire frames that accept beading, weaving, or resin inlays.
- Kinetic art: Balanced connectors for mobiles and wind sculptures.
Blend jig-formed elements with freehand textures: hammer a leaf vein pattern after forming, twist a straight segment for sparkle, or wrap a bead on a peg so its spacing is identical across a series.
Sustainability and Smart Material Use
Consistency is green: fewer rejects mean less scrap. You can push sustainability further with thoughtful habits:
- Nesting: Design patterns that maximize yield from standard wire lengths.
- Scrap management: Collect trimmings by alloy; many refineries buy clean scrap by weight.
- Tool longevity: Peg polishing and base cleaning prolong tool life and keep surfaces from transferring defects.
- Design for repair: Clasps and connectors shaped on a jig are easy to duplicate years later.
Advanced Tips: Multi-Layer and Hybrid Jigs
Once you’re comfortable, expand what a jig can do.
- Stacked forms: Bind two or three wires and form them as one; separate and finish each later for perfectly matched multiples.
- Two-stage jigs: Do tight bends on a small grid, then move the part to a second jig with larger pegs for sweeping curves.
- Height control: Slip spacers under pegs to raise wires at certain steps, creating subtle z-depth without leaving the jig’s plane.
- Heat-assisted forming: For thick copper or brass, a brief, safe preheat (below discoloration for jewelry) reduces force required on tight radii.
- Mixed media fixtures: Add temporary pegs that hold beads or tubes in place while you wrap wire around them, ensuring consistent spacing.
Frequently Asked Questions
- How do I choose peg size? Start with a peg whose diameter is 1.5–2× the wire diameter for gentle curves; tighten only if the design demands it.
- Why do my bends open after removal? Springback. Over-bend slightly on the jig or choose a larger peg, then planish to lock in the shape.
- Can I make my own jig? Yes—drill a grid into 6–10 mm acrylic or hardwood and use drill rod as pegs. Deburr holes thoroughly.
- How do I avoid scratches? Use smooth, polished pegs, nylon sleeves, and clean hands. Deburr wire before any forming.
- What’s the best wire to practice with? Dead-soft copper: it’s inexpensive and honest about your technique.
- How do I mirror parts? Either flip the workpiece after the first major bend or mirror the peg layout; flipping the piece is faster and error-proof.
Glossary of Useful Terms
- Base plate: The perforated surface holding peg holes.
- Peg: A removable pin or mandrel around which wire is formed.
- Fence: A straight-edged peg or stop used to set consistent lengths and straight segments.
- Datum: A reference point or edge from which you measure and align your setup.
- Planish: To smooth and slightly harden metal with light hammer blows.
- Work hardening: Hardness and brittleness that increase as metal is repeatedly deformed.
- Anneal: To soften metal by heating and allowing its crystalline structure to reset.
- Springback: The tendency of metal to return partially toward its original shape after bending.
- Tangent: The straight segment between two curves or pegs.
Putting It All Together
Wire jigs reward methodical setup, deliberate technique, and small, thoughtful refinements. Start by defining your origin and stops, choose pegs that respect your material’s limits, and work in a sequence that keeps the wire flat and under control. Adopt inspection habits—calipers for key spans, flatness checks on a bench block, and side-by-side comparisons for mirrored parts. Over time, you’ll build a library of peg maps and fixtures that turn challenging shapes into routine operations. The result is not only better-looking work but also fewer surprises, faster production, and a deeper understanding of how metal moves—knowledge you can carry into every corner of your craft.
