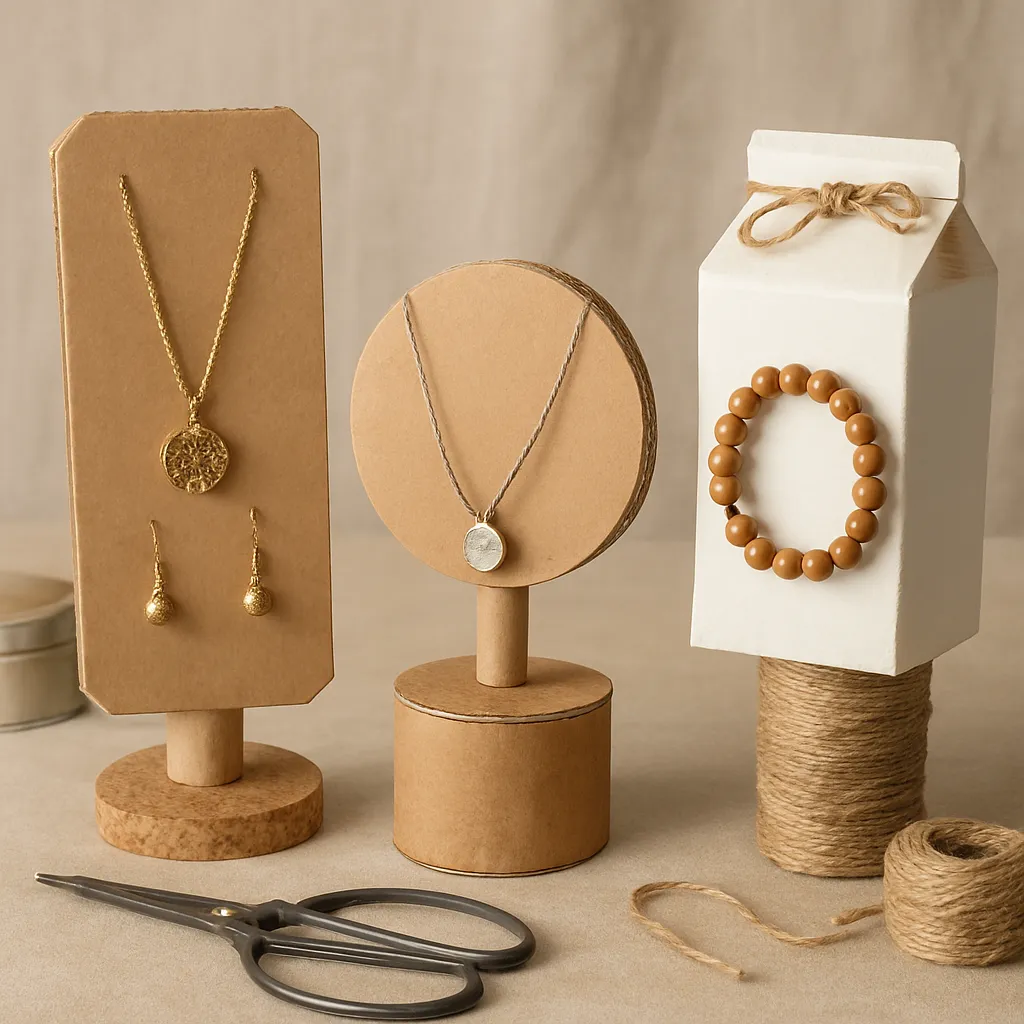
Jewelry deserves a stage that is as thoughtful and handcrafted as the pieces themselves. Building displays from recycled materials is more than a budget-friendly workaround; it is a creative practice that sharpens your eye for form and texture, reduces waste, and gives your booth or studio a distinctive story. With a few hand tools, attention to proportion, and an appetite for experimentation, you can turn everyday castoffs—cereal boxes, paper tubes, fabric offcuts, wine corks, and shipping crates—into professional, portable, and customizable displays that make your work shine. Along the way, you’ll also send a compelling message about sustainability, craftsmanship, and the surprising elegance of humble materials.
Design Principles for Standout Eco-Displays
Before picking up a knife or glue brush, pause to define how you want customers to experience your jewelry. A successful display clarifies your brand identity, speeds up decision-making, and invites touch. Recycled materials offer a wide vocabulary—matte paper, worn denim, corrugated edges, soft burlap—allowing you to build a cohesive palette across multiple stand types.
Visual Hierarchy and Flow
- Think in layers: foreground for small, high-value items; midground for everyday staples; background for signage and tall forms. A tiered path leads the eye from left to right and top to bottom.
- Group by color, metal tone, or collection theme to reduce decision fatigue. The goal is clean sightlines with purposeful focal points.
- Use triangular compositions to anchor the scene: a tall necklace bust at the apex, rings and studs forming the base.
Sketch thumbnail plans and label heights for each element. Consistency in scale creates rhythm; dynamic variation prevents monotony. As you place objects, study negative space and avoid clutter. You’re not only arranging products—you’re composing a narrative, which is why a sensitive sense of composition matters as much as craftsmanship.
Texture, Color, and Material Honesty
- Lean into material truth. Cardboard edges can become a deliberate stripe; denim grain can echo corded chains; linen supports flatter matte stones.
- Choose a restrained color palette so jewelry remains the hero. Neutral bases with one accent hue keep attention on metalwork and gemstones.
- Build subtle contrast: smooth beside rough, light against dark, warm near cool. The interplay of textures enhances perceived value.
Function First
- Stability and easy reach are non-negotiable. Displays should be light, strong, and quick to reset between shows.
- Adaptability is key: aim for a modular system where parts nest, stack, or fold for transport and reconfigure on different tables.
- Mind ergonomics: typical standing eye height ranges from 150–160 cm (59–63 inches). Keep your best work inside that zone and avoid awkward reaches.
Sourcing and Preparing Recycled Materials
Recycled inputs are everywhere once you start looking. Collect methodically and test for clean cuts, structural integrity, and finish compatibility.
Where to Find Materials
- Cardboard and chipboard: grocery stores, bookstores, craft-paper offcuts, moving boxes, cereal and cracker cartons.
- Paper tubes: mailing tubes, paper towel cores, fabric bolt tubes from sewing shops.
- Fabrics: thrifted linen shirts, worn denim, burlap coffee sacks, upholstery remnants, outdated swatch books.
- Wood and crates: fruit boxes, pallet slats (avoid chemically treated pallets; look for HT heat-stamped), cigar boxes.
- Corks and tins: wine corks, tea tins, cookie tins for weighted bases.
- Hardware: old wire hangers, binder clips, magnets from defunct fridge calendars, screw posts from discarded folders.
Cleaning and Prepping
- De-label with a soak in warm water and mild soap; citrus-based cleaners help with adhesive residue.
- Flatten boxes with a bone folder; laminate thin cartons into slabs using PVA or wheatpaste for stiffness.
- Neutralize odors by sunning materials outdoors or sealing with a water-based varnish.
- Pre-seal porous paper surfaces with a diluted glue wash to prevent fuzzy edges when sanding.
Tools, Adhesives, and Finishes
- Cutting: craft knife with fresh blades, metal ruler, self-healing mat, fine rasp or sanding block.
- Shaping: awl, bone folder, clamps or binder clips, simple miter box for square edges.
- Adhesives: PVA (bookbinder’s white), wheatpaste or starch paste for paper, low-temp hot glue for spot tacking, contact cement (water-based) for fabric-to-cardboard bonds.
- Finishes: water-based varnish, homemade gesso (chalk + PVA), diluted acrylics, natural wax. Opt for plant-based or low-VOC options when possible.
Favour adhesives and finishes that cure hard, resist humidity, and protect the display’s durability without overwhelming the material’s feel.
Project: Cardboard Necklace Bust Wrapped in Fabric
Materials
- Corrugated cardboard (double wall for strength), or multiple layers of chipboard
- Fabric scraps (linen or denim), batting or felt padding (optional)
- PVA glue, brush, masking tape, pins or clips
- Knife, ruler, sandpaper, pattern paper
Steps
- Draft a profile: Draw a classical bust silhouette—neck, trapezius slant, and a gentle chest curve. Add a tab at the bottom to slot into a base.
- Cut the core: Transfer the profile to cardboard and cut two identical shapes. For a 28–35 cm (11–14 in) tall bust, add a central “spine” strip 4–6 cm (1.6–2.4 in) wide to create depth.
- Laminate: Glue layers with grain directions crossing for rigidity. Clamp or weight overnight on a flat surface.
- Edge sculpting: Sand edges to smooth stair-steps. Round the neckline slightly so chains drape naturally.
- Base: Cut a rectangle slightly larger than the neck tab. Slot-fit the bust into a slit and reinforce with glue triangles beneath.
- Padding: Add thin batting across the chest and neck for a gentle dome that prevents chain slippage.
- Fabric wrap: Cut fabric with 3–4 cm (1–1.5 in) allowance. Brush glue thinly, smooth fabric from center outward, clip around curves, and overlap neatly at the back.
- Detailing: Create a removable neck cushion (a fabric tube stuffed lightly) to hold chokers high without pinching.
Variations
- Paper-laminate skin: Layer kraft paper strips with wheatpaste to achieve a leather-like surface that accepts stamping.
- Metallic glint from waste: Apply the reflective interior of chip bags as a thin inlay line along the neckline.
- Flat-pack version: Split the bust into two interlocking pieces that travel flat and assemble on site.
Project: Bracelet and Watch Stand from Paper Tubes
Materials
- Thick mailing tube (5–7 cm/2–2.75 in diameter)
- Two short dowels or chopsticks, scrap wood or heavy cardboard for feet
- Old sweater felt or denim for padding and cover
- Low-temp hot glue, PVA, knife, sandpaper
Steps
- Cut the main bar to 25–30 cm (10–12 in). Sand edges smooth.
- End caps: Trace circles from chipboard for each end. Add a small tab to pull caps free if needed.
- Stand: Create a T-style support from laminated cardboard or scrap wood. Insert a dowel through a tight hole in the support and into the tube’s underside as a peg.
- Padding: Wrap the tube with thin felt; then cover in denim or linen, folding and gluing at the backside seam.
- Feet: Glue wide, low-profile feet to prevent tipping. If necessary, glue a tea tin filled with sand beneath the base for ballast.
- Finish: Edge-paint with diluted acrylic or cover seams with a narrow fabric tape for a tailored look.
Pro Tip
Make two heights for layered presentation. Use subtle color contrast between bars so the eye separates product families quickly.
Project: Earring Cards and a Rotating Counter Display
Earring Cards from Cartons
- Flatten cereal boxes; cut standard cards (for studs: 5 x 7.5 cm / 2 x 3 in; for dangles: 6 x 9 cm / 2.4 x 3.5 in).
- Laminate the printed side into the interior, leaving an unprinted kraft face.
- Punch holes with an awl at measured positions; add a center slit for shepherd hooks.
- Seal lightly with matte varnish; stamp your logo and a care note about upcycling.
Rotating Stand from a CD Spindle
- Base: Upcycle an old CD spindle as a lazy-susan core. If unavailable, stack two tins with marbles between for rotation.
- Tiers: Cut circular corrugated discs that fit the spindle post. Glue chipboard walls around each disc to hold cards.
- Spine: Slide tiers onto the spindle post, spacing them with cardboard spacers.
- Weight: Add washers or pebbles inside the base to prevent wobble.
- Finish: Wrap outer rims with fabric tape; add a small top cap as a sign holder.
Project: Ring Cones, Slots, and Trays from Cork and Paper Pulp
Ring Cones
- Roll tight paper cones from kraft strips; glue and trim bottoms flat. Alternatively, shape cones from homemade paper pulp pressed into funnel molds.
- Coat with gesso; sand for a ceramic-like surface; stain with tea for warmth.
- Attach to a base board with removable museum putty for flexible layouts.
Cork Slot Rails
- Slice wine corks lengthwise into half-rounds; carve a shallow V-groove along the flat side.
- Mount rows onto a tray; rings nest securely while labels sit above the groove.
Soft Trays from Cartons
- Use shallow produce cartons; line with a thin layer of batting and linen.
- Add removable dividers from folded chipboard wrapped in matching fabric.
Project: Tiered Risers and Shadow Boxes
Fold-Flat Wedge Risers
- Score and fold heavy chipboard into triangular prisms with locking tabs.
- Face with kraft paper for consistency; label underside with height for quick booth setup.
- Nest risers inside one another for compact packing.
Shadow Boxes from Book Covers
- Harvest hardback covers from damaged books; build side walls from corrugated strips.
- Line interiors with linen or sheet music for character. The result frames pendants and brooches like small artworks.
Surface Treatments and Texture Techniques
- Tea, coffee, and iron acetate (vinegar + rusty steel wool) yield warm, wood-like tones on paper and card.
- Dry-brush with diluted white to mute loud colors and unify mixed materials.
- Stencil subtle motifs with leftover house paint; emboss paper with lace as a resist before staining.
- Wax finish: Buff beeswax and oil for a soft sheen that repels dirt while remaining touch-friendly.
For metal accents or reclaimed hardware, celebrate natural patina rather than chasing a flawless polish. The lived-in surface harmonizes with rescued materials and quietly underscores your values.
When choosing sealants, consider compostable, biodegradable options where feasible, or at least water-based coatings with low emissions. Let finishes cure thoroughly so textiles and papers remain clean to the touch.
Building a Cohesive, Portable Display System
Standardize Sizes and Connections
- Adopt uniform base footprints—say, multiples of 10 x 20 cm (4 x 8 in)—to mix and match components.
- Use magnets, tabs, and slots for tool-free assembly; color-code edges to speed up setup.
- Design parts to invert or stack so they function in multiple orientations.
Transport and Protection
- Pack displays into two or three rigid totes; line with old towels or felted sweaters to prevent scuffs.
- Keep a small repair kit: glue, spare cards, clips, extra signage, and a mini brush for dust.
- If traveling on foot, integrate handles and strap points directly into riser bases.
Lighting Considerations
- Matte surfaces reduce glare under LEDs. Test colors beneath warm and cool lights; neutrals often balance best.
- Add reflectors from white card behind pendants to lift shadows without extra fixtures.
Maintenance, Repairs, and Longevity
- Edge wear: Touch up raw card edges with matching paint pens or burnish with wax.
- Fabric care: Spot-clean linen with mild soap; use a lint brush before each show.
- Structural checks: Inspect seams and feet monthly; re-glue delaminated layers with PVA clamped between boards.
- Rotation: Swap fabrics seasonally to refresh the look and extend life; keep a spare bust cover in your kit.
Durability is a design choice made in layers: thoughtful lamination, reinforced joints, and finishes that shrug off moisture. A short routine—wipe, inspect, and repair—multiplies durability and keeps your booth looking intentional.
Pricing, Labels, and Storytelling
Recycled displays carry narrative power. Use it to enhance your identity and gently educate customers about your process.
- Price tags: Cut from old maps or music sheets; stamp with a simple logo. Keep fonts readable at a glance.
- Micro-stories: On the back of earring cards, add a one-line note about material provenance—“Bust wrapped in linen from a 1980s tablecloth found at the river market.”
- Signage: A small tabletop card explaining your reuse choices invites conversation without preaching.
- Consistency: Align colors and textures with your jewelry’s voice; let the display echo forms in your pieces.
Every touchpoint—from the riser color to the shape of a ring cone—contributes to your branding. Keep messages short, friendly, and specific. Customers remember details they can retell.
Advanced Techniques: Joinery, Paper Engineering, and Weighting
- Laminated honeycomb: Alternate corrugation directions to create strong yet light plinths.
- Slot-and-tab joinery: Design interlocking bases that assemble without glue; label with symbols to avoid mix-ups.
- Hidden ballast: Epoxy pebbles into hollow cavities or under risers for stealth stability.
- Magnetic accents: Embed small magnets to hold pins and brooches, or to snap signage into place.
Experiment on scraps first. Record measurements and outcomes so you can reproduce successful modules consistently across future builds.
Booth Layout Strategies That Sell
Zoning and Flow
- Create a “new this week” zone, a “gifts under $50” zone, and a “statement” zone. Clear zones shorten browsing time and increase conversions.
- Place impulse-friendly studs near the payment area; keep delicate, high-value items at mid-chest height, slightly back from the aisle.
Color and Contrast
- Use a single accent color to thread displays together—perhaps a thin stripe around tray rims or a dyed twine wrap.
- Quiet backgrounds make metal gleam; if your work is dark and matte, consider pale, cool linens to lift it.
Sustainability and Cost Considerations
- Material impact: Diverting packaging from landfill can cut your environmental footprint and differentiate you in markets that value conscious craft.
- Budget: Most projects cost little more than glue, blades, and finish; keep receipts and time logs to quantify savings.
- End-of-life: Design for disassembly. Use mechanical connections (tabs, screws) when you can so parts can be replaced or composted.
Communicate choices simply—small notes about reused textiles, reclaimed wood, or low-VOC finishes subtly reinforce your ethos without overshadowing the jewelry itself.
Troubleshooting Common Issues
- Wobble: Increase base width or add hidden ballast. Cross-brace with an extra tab or subtle back strut.
- Sagging fabric: Use a light batting layer to even surfaces; rewrap with fabric cut on the bias to ease curves.
- Delamination: Reactivate with fresh PVA and firm pressure between flat boards; let cure fully.
- Visible seams: Camouflage with a narrow fabric tape, painted edge, or an intentional inlay stripe.
- Color mismatch under lights: Test sample swatches under your market’s lighting; keep a portable LED clamp light for consistency.
Quick Builds for Last-Minute Markets
- Postcard risers: Fold heavy postcard stock into Z-shapes; tape inside folds for strength; great for lightweight pendants.
- Can-plinths: Cover tins with kraft paper; weight with sand; top with a fabric pad.
- Hanger earring tree: Bend a wire hanger into a rectangle; add crossbars; mount in a block of scrap wood wrapped in linen.
- Book stack plinths: Wrap worn books in neutral paper; secure with a removable band—fast, classic, and photogenic.
Care Cards and Customer Experience
Slip a tiny care card into each box, explaining cleaning tips and the origin of your display materials. It’s a conversation starter and a gentle reminder of the values behind your work. Keep tone positive, celebrate resourcefulness, and invite customers to share their own reuse stories online with a booth hashtag. This fosters a feedback loop that can inspire future display iterations.
Case Study: A Weekend Table Makeover
Friday evening: you sketch a 90 cm (36 in) table plan, pull three double-wall boxes from recycling, a retired linen shirt, two wine corks, and a mail tube. Saturday: you laminate cardboard into two necklace busts, a T-stand for bracelets, and a trio of wedge risers. You cut earring cards from cereal cartons, stamp them, and hole-punch. Sunday: you wrap busts and risers in linen, stain riser edges with tea, and assemble a rotating earring stand from a CD spindle. By Sunday night, everything nests into a single crate layered with the shirt sleeves as padding.
Cost outlay is minimal. The result feels cohesive, tactile, and unmistakably yours—not just a way to show products, but a visual diary of making that turns browsers into buyers.
From Prototype to Signature System
As you refine your set, keep a build journal: materials, cuts, adhesives, drying times, and packing diagrams. Replace one element at a time so your look evolves without chaos. Over months, you’ll grow a flexible kit of parts that adapts to indoor craft fairs, outdoor markets, and gallery shelves alike. When time allows, produce duplicates of your most effective risers and busts; redundancy eases stress during busy seasons.
Most importantly, let your displays reflect the same care you pour into your jewelry. The textures, tones, and gentle improvisations of reclaimed materials quietly mirror the intimate scale of handwork. They prove that good design doesn’t depend on virgin inputs or costly fixtures—it thrives on curiosity, patience, and a maker’s hands.
