There’s a distinct joy in hearing the gentle click of seed beads sliding into place and watching a plain hoop bloom into a tiny, circular tapestry. Beaded hoop earrings are a compact lesson in creativity: a limited circumference challenges you to work with rhythm, color, and balance, and the result is wearable art that can shift from casual to elegant with only a few design decisions. This guide will show you how to craft them at home—whether you’re customizing a pair to match a favorite outfit or building a wardrobe of color-coordinated sets. Along the way you’ll learn the language of wires and beads, how to plan sequences that make visual sense, and how to adapt methods for speed or intricacy. With mindful choice of materials, smart tools, and patient technique, your earrings will feel comfortable, look refined, and last for years.
Essential Tools and Materials
Beaded hoops are straightforward to make, but that elegance depends on having the right foundation. Quality components reduce frustration, improve wearability, and make your work look crisp rather than improvised. Think of this section as your toolkit primer; you don’t need everything at once, but understanding each component will help you spend wisely and experiment effectively.
Core Tools You’ll Use Constantly
- Round-nose pliers: For forming neat loops on ear wires or when finishing a wrap. Their tapered jaws allow precise control over curve diameter.
- Chain-nose or flat-nose pliers: For gripping, holding, and making sharp bends without marring. Smooth jaws reduce scratches on soft metals.
- Flush cutters: Essential for trimming wire cleanly. A flush cut minimizes burrs that might catch on hair or skin.
- Nylon-jaw pliers: Useful for straightening and work-hardening soft wire without leaving marks.
- Awl or beading reamer: To gently widen bead holes and remove interior burrs in glass or stone beads.
- Bead mat or felt: Prevents rolling and cushions delicate finishes; improves visibility and order as you work.
- Ruler or calipers: For consistent measurements, especially if selling or replicating pairs.
Wire Choices for Hoops and Stitching
Two kinds of wire are commonly involved: the hoop wire (the structure) and the stitching wire or thread (what holds beads to the hoop). For hoop structure, consider:
- Base metals (copper, brass, bronze): Affordable, easy to shape, and patinate beautifully. They can leave mild skin discoloration for some wearers unless sealed or plated.
- Stainless steel: Springy, highly resilient, and hypoallergenic for many people. Harder to form and cut; best for thin, minimal hoops.
- Sterling silver or gold-fill: Fine to work with, luxurious look, and better long-term wear. Ideal for gifts or heirloom pieces.
- Memory wire: Pre-tempered steel that holds shape; great for lightweight, round hoops. Requires special memory-wire cutters.
Wire hardness matters: dead soft is easy to shape but can deform; half-hard holds a hoop circle better but is stiffer to manipulate. Selecting the right gauge balances strength with bead-hole size. For most beaded hoops, 20–22 gauge for structure and 26–28 gauge for stitching strikes the right compromise.
Threads and Cords for Stitching
Instead of fine wire, you can stitch beads onto the hoop with specialized bead threads:
- Nylon beading thread (e.g., Nymo, S-Lon): Flexible and comfortable; needs conditioning to reduce fray and memory.
- Polyethylene fiber (e.g., FireLine, PowerPro): Very strong and abrasion resistant; slightly translucent and low stretch.
- Silk: Traditional and elegant, but less durable against friction; better for pearl embellishments rather than dense wraps on metal hoos.
Match thread thickness to bead hole diameter and expected friction. If you plan dense wraps with crystalline beads, favor abrasion-resistant fibers.
Bead Types and What They Offer
- Seed beads: The foundation of most hoop designs. Choose Japanese brands for consistency (e.g., size 11/0 or 8/0). Uniformity helps maintain circular alignment and smooth edges.
- Cylindrical beads (delicas): Extremely regular and crisp; excellent for graphic patterns, chevrons, and color blocking.
- Faceted glass and crystals: Add sparkle and light play but can abrade thread; use shorter spans or wire stitching.
- Gemstone rounds or chips: Bring natural texture and weight; check balance so earrings don’t pull forward.
- Metal spacers and heishi: Introduce gleam and punctuation in patterns; beware of rough edges that can cut thread.
- Drops, daggers, and fringe beads: Ideal for movement along the outer hoop perimeter.
Findings and Finishing Bits
- Ear wires: French hooks, lever-backs, or posts. Always smooth or polish the tip; comfort is part of perceived quality.
- Jump rings: Connectors that allow earrings to hang neutrally if the hoop doesn’t have an integrated loop.
- Crimp beads or tubes: Used with thread or cable to secure ends; select matching sizes and use quality crimpers.
- Wire guards and bead tips: Protect thread where it meets metal; small details that extend longevity.
Understanding the Hoop: Shape, Closure, and Balance
A hoop is a deceptively simple form. The circle offers stability, but its integrity depends on even pressure and careful closures. Understanding how stress distributes around the hoop will inform where and how to attach beads without warping or creating gaps.
Hoop Types and When to Use Them
- Pre-formed hoops with built-in closure: Convenient and fast. You thread beads directly onto the hoop and snap or hook it closed. Best for minimalist bead lines and light embellishment.
- Hand-formed wire hoops: Maximum control over diameter and loop orientation. You can shape ovals, teardrops, or perfect circles. Requires basic metalworking skill, but looks refined.
- Base hoops with exterior stitch: A simple wire circle becomes a frame for ladder, brick, or net stitches that sit outside the wire. Great for texture and lace-like effects.
Closures and Comfort
Closures should be intuitive to operate with one hand. Lever-backs shine for security; French hooks offer quick on/off but may need stoppers. If you form your own closure, ensure the tip is filed smooth and aligns precisely—micro misalignments are surprisingly noticeable during wear.
Diameter, Weight, and Center of Gravity
Common diameters: 20–60 mm. Larger hoops permit more elaborate patterns, but add leverage and movement. If you include heavy beads or dense fringe, keep the mass close to the lobe line or distribute evenly to maintain symmetry and comfort. Aim for pairs to match within a tenth of a gram if possible; small weight differences are perceptible to sensitive wearers.
Wire Work-Hardening and Memory
After forming, gently work-harden hoops by tapping with a rawhide mallet or passing through nylon-jaw pliers. This sets the circle and reduces future deformation. If using memory wire, avoid bending beyond its elastic limit; cut with proper cutters to preserve the clean edge.
Planning Your Design
Good earrings begin long before the first bead is threaded. Planning clarifies color hierarchy, spacing, and how the pattern sits relative to the closure. A solid plan prevents backtracking and creates a deliberate, signature look.
Color and Light
- Contrast: Pair light and dark to sculpt the circle; high contrast reads from a distance, subtle blends reward close inspection.
- Finish types: Matte, lustre, opaque, transparent, AB coating—mixing finishes adds complexity even within a tight palette.
- Skin undertones and metals: Warm metals complement earth tones and corals; cooler metals uplift teals, violets, and icy neutrals.
- Rule of three: Limit to three dominant colors plus metallic accent to avoid visual overload on small canvases.
Sequencing and Repeats
Plan a bead path that repeats predictably around the hoop. Odd-numbered repeats often land the seam at the top or bottom; even-numbered repeats help mirror left and right earrings. Sketch on paper or lay beads along a string to assess rhythm before committing. Count how many beads fit per centimeter on your chosen wire or thread; this informs both pattern scaling and overall circumference.
Texture Hierarchy
Combine smooth seeds with a sprinkling of facets or metallic spacers. Make one element the star—crystals, gemstones, or a fringe row—then support it with quieter beads. Texture without hierarchy can read noisy on small earrings.
Functional Aesthetics
As you plan, integrate practical choices. Where will the seam hide? How will you secure tails? Is the hoop thick enough for your bead holes? Constrain your ambition slightly on your first few pairs; clarity beats clutter, and a cleanly executed simple pattern looks more professional than an ambitious tangle.
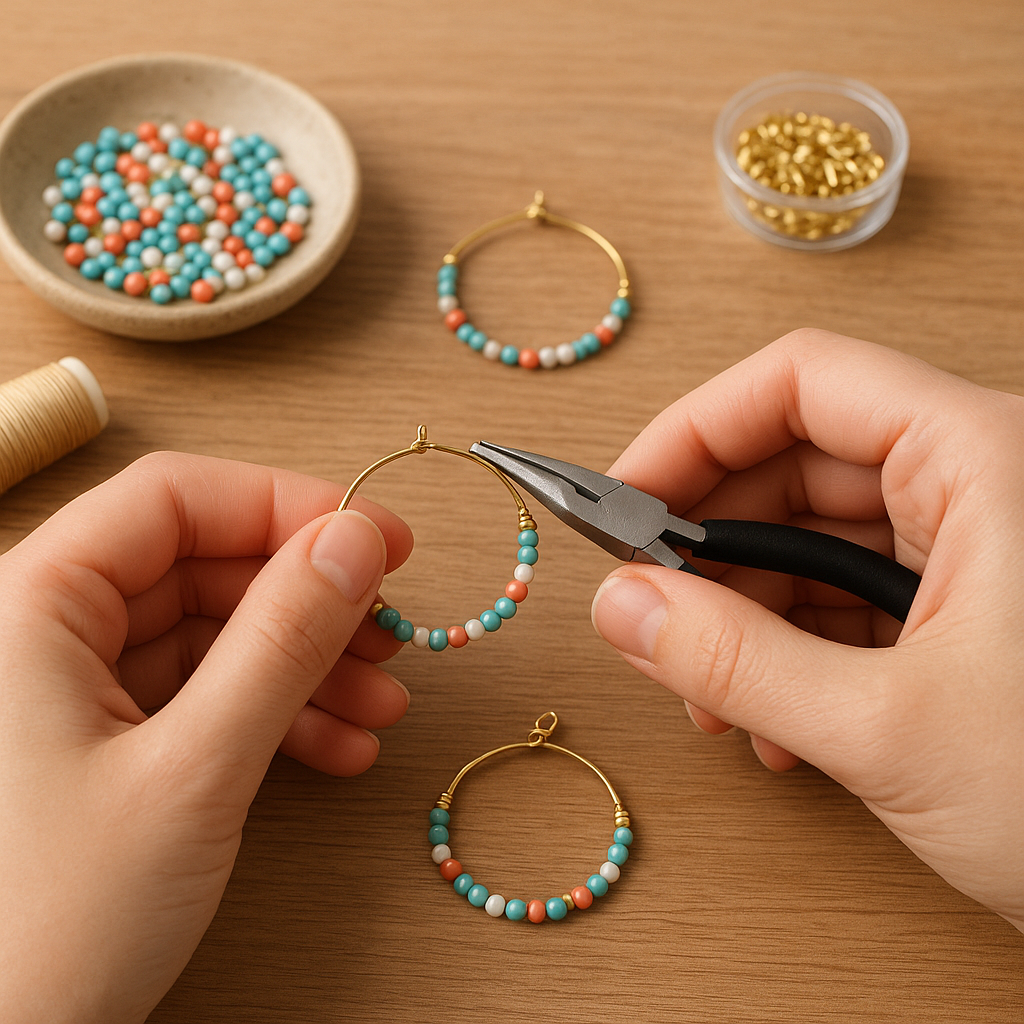
Step-by-Step: The Classic Threaded Bead Line
This foundational method produces a tidy row of beads sitting directly on a pre-formed hoop. It’s ideal for ultralight everyday earrings and fast to customize for color sets.
Materials
- 1 pair pre-formed hoops (25–40 mm)
- Seed beads size 11/0 or 8/0 in chosen palette
- Optional small spacers or crystals for accents
- Ear wires if hoops don’t include integrated hooks
- Fine file or emery board
Process
- 1. Prepare the hoop: If the end that passes through your ear also holds beads, lightly file any burrs to avoid scratching beads and skin. Test the closure for alignment.
- 2. Dry-fit the pattern: Lay out beads on your mat in the planned sequence. Thread them onto a scrap of wire to preview spacing. Adjust counts so the seam will fall at the top beneath the ear wire.
- 3. Thread beads: Slide beads directly onto the hoop. Rotate them gently to distribute and check for tight spots. If a bead sticks or grinds, remove it—internal burrs can chew wire or thread over time.
- 4. Manage tension: Fill the hoop so beads sit snugly without buckling. Overfilling warps the circle; underfilling leaves gaps. For a perfect fit, aim for bead counts that are just shy of complete circumference, allowing minimal play.
- 5. Close cleanly: Engage the closure. If the hoop uses a hook-and-catch, tighten the catch slightly so it snaps with confidence. With lever-backs or separate ear wires, add a small jump ring to orient the hoop perpendicular to the ear wire for a front-facing display.
- 6. Quality check: Look for even spacing, pattern continuity, and matching lengths between the pair. Run a fingertip along the beads to catch any rough edges that need replacing.
Customization Ideas
- Add a spacer every three or five seeds to create a heartbeat rhythm.
- Place a crystal quartet centered at the bottom for a drop of sparkle.
- Use alternating finishes (matte next to lustre) to build micro-contrast within a single color.
Step-by-Step: Wrapped Hoop with Fringe
This technique anchors a foundation wrap around the hoop, then adds a playful fringe row. It showcases motion, catches light, and looks intricate without advanced skills.
Materials
- Hand-formed or pre-formed hoops (30–50 mm), half-hard wire preferred
- 26–28 ga stitching wire or strong beading thread
- Seed beads (11/0), accent drops or daggers for fringe tips
- Round-nose and chain-nose pliers, cutters
- Optional bead stops or tape
Process
- 1. Anchor the stitch: Form a tiny coil of two or three wraps around the hoop near the top, leaving a short tail that you’ll later tuck under. Ensure the coil is tight and flat.
- 2. Build the foundation: Add one seed bead, pass the wire around the hoop, and snug it so the bead sits on the outer rim. Repeat. The beads create a beaded ladder hugging the hoop’s perimeter. Maintain steady wrapping direction.
- 3. Control spacing: Every few beads, pause and compress gently to keep rows tight. Consistent spacing is the difference between handmade and hand-finished. Steady, moderate tension prevents wobble.
- 4. Start the fringe: After a full loop, step down from the top by one or two beads. Exit through a seed on the foundation, string a sequence (e.g., 3 seeds + dagger + 2 seeds), then pass back through the originating bead to form a dangle. Skip one foundation bead and repeat for even spacing.
- 5. Shape the curve: Longer fringe near the bottom, shorter toward the sides, creates a graceful arc echoing the hoop. Keep left and right earrings mirrored.
- 6. Secure the end: At the top, coil three neat wraps, trim flush, and press the cut end flat with chain-nose pliers. If using thread, take multiple half-hitch knots around the frame and add a tiny drop of jeweler’s glue, avoiding beads.
- 7. Hide tails: Tuck wire ends beneath nearby wraps. For thread, weave through adjacent beads before trimming.
Refinements
- Graduated color fringe (ombre) reads softly and elevates the design.
- Alternate faceted crystals only at the center five fringe points for a spotlight effect.
- Add micro-spacers on the foundation every fourth bead to create shadow lines.
Advanced Techniques and Structural Elegance
Once you’re comfortable with basic wraps, try building architectural texture. These methods broaden your vocabulary and give your hoops a signature look.
Brick Stitch on a Hoop
Brick stitch can be worked off a wire frame by establishing a ladder base. The resulting beadwork sits just outside the metal, producing a crisp, lace-like ring. Keep the first row extremely uniform; any inconsistency multiplies outward. Cylindrical beads excel here for graphic clarity.
Pico Edge and Netting
A pico trim every third or fourth bead on an outer row adds a delicate crown. For netting, work diagonals that connect one outer bead to another with a seed bridge; this captures light and creates negative space, making even large hoops feel airy.
Mixed Media and Embellishment
- Wire coils and spirals: Tiny accent coils add metallic glints and reinforce stress points.
- Textile accents: Wrap a segment with silk ribbon or waxed linen before beading for a color block.
- Charms and drops: Suspend a single focal stone at the center bottom via a jump ring. Ensure the jump ring size allows free swing without crowding.
Precision Wire Work
If you prefer metal-dominant hoops with bead accents, master clean coils and consistent loop sizes. The vocabulary of wire-wrapping opens design doors: briolettes on wrapped loops, station accents along the rim, or micro-wrapped bead clusters that look like berries. Consistency is persuasive; measure once, repeat twice.
Troubleshooting, Finishing, and Long-Term Care
Polished work is as much about how you solve small problems as it is about creativity. Train yourself to spot and fix issues early; the last five percent—a crisp finish—often determines whether a design feels boutique or beginner.
Common Issues and Fixes
- Gapping between beads: You’ve underfilled, or bead sizes vary. Add one or two slightly larger beads, or rethread with a consistent batch.
- Hoop warping: Too much local pressure or overfilling. Remove a bead or two, or anneal and reform if working with dead-soft wire.
- Fraying thread: Abrasive bead edges or excessive friction. Switch to tougher thread, use wire guards, or lightly ream beads to smooth holes.
- Uneven pair: Weigh and measure. Recount pattern repeats and confirm seam alignment; tiny deviations magnify when mirrored on the face.
- Scratched metal: Polish with a soft cloth or micro-abrasive pad; for plated findings, polish gently to avoid thinning the finish.
Finishing Principles
- Hide cuts: Tuck wire ends under existing wraps, never leave a raw tag. For thread, weave at least three direction changes before trimming.
- Secure seams: If the bead line closes near the ear wire, ensure no bead presses against the lobe; a slight spacer break helps comfort.
- Protective coatings: Microcrystalline wax on bare copper or brass can slow patina. For pieces meant to age, note care instructions for the wearer.
Care and Cleaning
- Storage: Lay flat or hang to avoid kinks in fringe; keep pairs together and away from abrasive metals.
- Cleaning: Wipe after wear. For glass and metal, a mild soap rinse is fine; avoid soaking thread-heavy designs.
- Repairs: Offer lifetime tune-ups if gifting or selling; replacing a few beads keeps loyal fans, and you learn about real-world durability.
Ergonomics, Safety, and Sustainable Choices
Crafting should be comfortable for both maker and wearer. Consider the body—the hands forming loops, the ear carrying weight, and the skin touching metal—and consider the planet’s resources behind your components.
Maker Ergonomics
- Posture: Elbows near body, shoulders relaxed. Elevate your work surface to eye level to prevent neck strain.
- Tool grip: Use soft-grip pliers; alternate tasks to avoid repetitive stress. Stretch hands every 20–30 minutes.
- Lighting and magnification: Neutral, diffused light reveals true color; a magnifier reduces eye fatigue for small-gauge work.
Wearer Comfort
- Weight: Keep each earring under 6–8 grams for all-day wear; lighter for sensitive lobes.
- Allergies: Nickel-free findings reduce irritation. Gold-fill and niobium are reliable choices.
- Balance: Center mass near the lobe to prevent forward tilt; test hang from a stand.
Sustainability
- Responsible sourcing: Seek recycled metals and transparent supply chains for gemstones and beads.
- Repairability: Design for easy component replacement; modularity reduces waste.
- Longevity: High-quality thread, smooth beads, and smart engineering mean fewer throwaway pieces.
Style Play, Gifting, and Small-Batch Selling
Beaded hoops adapt to any wardrobe. The same structural plan can look bohemian with matte terracottas and brass, or minimalist with icy delicas and clean silver. Your personal signature emerges as you repeat what you love and refine details that others notice only subconsciously.
Styling Ideas
- Monochrome sets: Create three hoops in the same color family—small, medium, large—for stackable looks across a week.
- Metal-forward minimalism: Bare hoop with a short center fringe of crystal clears for a whisper of light.
- Pattern echoes: Match a garment’s motif by abstracting its rhythm—stripe counts, dot spacing—into bead repeats.
- Event pieces: Amp diameter slightly and add symmetrical fringe for dynamic movement under evening light.
Gifting Touches
- Include a tiny care card and a soft pouch.
- Offer an extra pair of silicone stoppers for French hooks.
- Add a swatch of matching beads for future repairs.
Small-Batch Selling Considerations
- Consistency: Document bead counts, wire sizes, and fixture measurements so each batch matches.
- Photography: Shoot earrings on simple backgrounds with a size reference; show both front and side angles.
- Comfort testing: Wear-test prototypes for a full day to assess real-world behavior—snagging, balance, closure feel.
- Pricing: Factor not only components but labor, overhead, and prototype time. Limited runs justify premium pricing.
Frequently Asked Practical Questions
How do I choose the right diameter?
Start with 30–35 mm for versatile everyday wear. Scale up to 45–50 mm when your pattern needs more repeats or you want dramatic fringe. Ensure the wearer’s hair length and style won’t constantly snag detailed edges.
What if my beads don’t slide over the hoop wire?
Either step down to a smaller hoop wire or step up to larger bead sizes. Alternatively, switch to an exterior stitching method that doesn’t require beads to pass over the structural hoop.
Can I mix metals?
Absolutely. Mixing warm and cool tones adds depth. Keep one metal dominant and use the second as a limited accent. Repeat the accent in at least three places so it feels intentional.
How do I keep thread from showing?
Use bead colors that mask the thread (e.g., gray or smoke for cool palettes). Work snug, consistent stitches, and avoid large gaps in the outer rows. If unavoidable, treat the thread as a design line and lean into the graphic effect.
From First Pair to Signature Work
Every beautiful set of beaded hoops contains the same essentials: a true circle, clean joins, and control over tension and spacing. With practice, you’ll begin to choreograph light and shadow, refine edges, and iterate patterns that become unmistakably yours. Keep notes on what works—how many beads per centimeter on a given hoop, which combinations of finishes read best from across a room, and how different closures affect the way a hoop faces forward. Over time, your eye will sharpen; you’ll instinctively choose the right bead size to steady a curve, or the exact place to swap matte for shine. That’s the heart of craft: one careful decision after another, until a circle of color and light hangs from the ear as if it were meant to be there all along.
Quick Reference: Decision Checklist
- Metal and wire hardness chosen for circle stability
- Diameter set for balance and pattern scale
- Bead palette limited and hierarchical (star vs support)
- Stitch method matched to bead holes and desired texture
- Closure smooth, aligned, and easy to use
- Ends hidden, tails secured, edges comfortable
- Left/right pair mirrored precisely
- Wear test passed for a full day without snags or tilt
When in doubt, simplify. A restrained palette, a disciplined count, and attentive handwork will carry you further than a bag of tricks. Keep your pliers clean, your wraps deliberate, and your curiosity open, and your hoops will tell your story in a perfect, portable circle.