Handmade wire rings have a special kind of immediacy: you can sit down with a short length of metal and, in under an hour, shape a personal object that lives on your hand. This craft balances precision with play, and it welcomes absolute beginners as warmly as it challenges seasoned makers. With a few well-chosen tools, some practice in control and pressure, and a sense for proportion, you can create pieces that stack, mingle, and mirror your style—minimalist, rustic, or ornate. The learning curve is friendly; the possibilities multiply quickly.
What Makes Wire Rings a Perfect Beginner Craft
Wire jewelry rewards curiosity. You start with straight stock—often copper, brass, aluminum, or sterling—and by bending, coiling, and planishing, you coax structure from line. Rings are a great entry point because they’re small, portable projects that teach you the core skills you’ll use across jewelry: clean cuts, smooth edges, consistent curves, and tasteful surface finishes. They also provide instant feedback: if a ring pinches, snags, or slips, you’ll feel it, and the fix teaches you something valuable about comfort, fit, and finishing.
Beginners love wire rings for their low barrier to entry. You can make your first pieces with a handful of inexpensive tools and a couple of meters of base metal. There’s little risk, little waste, and high room for experimentation—change a curve, flip a spiral, add a bead, and the entire feel transforms. Most importantly, every piece teaches hand pressure: grip too tightly and you’ll scar the metal; grip too lightly and joints wander. With practice, muscle memory emerges, and that’s when your work begins to look intentional rather than accidental.
Metal choice influences everything from sheen to skin sensitivity. Copper is forgiving and warm-toned; brass is springy and bright; aluminum is super light and easy to shape but can mark; sterling is classic, durable, and sellable; gold-fill combines longevity with cost efficiency. Stainless and titanium are tough to form for beginners and may frustrate early attempts. If you’re exploring color, anodized aluminum and niobium open creative doors; if you like mood and depth, chemical patina or heat coloring on copper and brass can bring a ring to life without gemstones.
Tools and Materials: Building a Simple, Smart Kit
Good work begins with the right kit. You don’t need a studio; a stable table, a small tray to catch bits, and a collection of efficient hand tools are enough.
Essential tools
- Round-nose pliers: for forming clean loops, spirals, and curves.
- Chain-nose or flat-nose pliers: for holding, straightening, and making crisp bends without introducing deep tool marks.
- Flush cutters: to trim wire ends flat, reducing your filing time.
- Nylon-jaw pliers: to straighten and harden wire without biting into it.
- Ring mandrel: a tapered steel or wood form marked with sizes; essential for sizing and shaping.
- Rawhide or nylon mallet: for shaping without stretching or texturing the surface.
- Chasing hammer and steel bench block: for planishing textures and controlled work-hardening.
- Files and/or cup bur: for rounding and smoothing cut ends.
- Fine sandpaper (600–2000 grit): to refine edges and prep for polish.
- Ruler or calipers and a fine marker: to measure precise lengths.
- Ring sizer: for measuring fingers and finished rings.
- Polishing cloth: for a quick finish on copper, brass, and silver.
Choosing your wire
Wire comes in different metals, tempers, shapes, and diameters. For most beginner rings, round wire in dead-soft or half-hard temper works best. Diameter is expressed in gauge (AWG in many regions, SWG elsewhere): lower numbers are thicker. A safe starting range is 16–20 AWG (1.3–0.8 mm). Heavier gauges (16–18) create sturdier bands that resist deforming; lighter gauges (20–22) make delicate wraps and decorative coils. Square and half-round profiles are excellent for structured, layered bands that sit comfortably, but they’re a bit less forgiving to beginners than round.
Consumables and finishes
- Base metals: copper and brass are affordable and great for practice.
- Sterling silver or gold-filled: for wearable, gift-ready rings that resist tarnish and wear.
- Beads, cabochons, and small crystals: for accents. Look for consistent hole sizes and smooth edges to protect your wire.
- Patina solutions (like liver of sulfur) and sealants: for color and protection, used with ventilation and gloves.
- Microfiber cloths and mild soaps: for regular cleaning without scratching.
Core Techniques You’ll Use Again and Again
Cutting and clean ends
Always cut with the flush side of your cutters facing the keep side of the wire. After cutting, soften edges with a file or a cup bur. Smooth ends are a comfort issue: an unrefined cut can snag fabric or scratch skin. Take the extra minute—it sets the tone for your craftsmanship.
Forming on the mandrel
Place your pre-measured wire on the ring mandrel at least half a size smaller than your target size. As you shape and refine, the ring tends to open slightly and grow. A mallet allows you to form without stretching; a chasing hammer on a bench block spreads metal, strengthens it, and can increase the inner diameter slightly. Plan for springback: many beginners discover their perfect shape is a touch large after removing it from the mandrel. Test, refine, repeat.
Work-hardening for durability
Wire starts softer than a finished ring should be. Repeated bending aligns grains and stiffens the metal, but uncontrolled flexing can introduce kinks. Intentionally strengthen wearable areas by planishing with a hammer on a steel block or by using nylon-jaw pliers to compress curves. This is called work-hardening, and it helps your rings hold shape, especially if they’re adjustable designs.
Spirals, loops, and wraps
Spirals add visual interest and provide adjustable ends that won’t poke. Start with a small loop using round-nose pliers, then wind the wire around that loop in loose, even arcs. Keep tension consistent; if one side flares, back up and re-tension. Loops can also serve as decorative stops at the ends of open bands, limiting snagging and adding character. For stone settings without solder, you’ll rely heavily on neat wrapping and tight coils to hold components in place.
Hammer textures
Texture does more than add beauty—it subtly increases stiffness. A light planish across the band yields a reflective, dappled surface; cross-peen taps produce fine linear grain. Always support the ring on the edge of the bench block or a ring mandrel designed for hammering to keep it round while you texture.
Annealing and when to use it
When wire work-hardened too much during shaping, you can reset the grain with controlled heat, a process called annealing. This makes the metal softer and more workable. For copper and sterling, gentle, even heating to a dull red followed by air cooling or quench (depending on the metal) can restore malleability. Beginners often skip this until larger or more complex projects, but knowing that softening is possible encourages experimentation. Observe safety: heat in a ventilated area with proper tools and quench protocols.
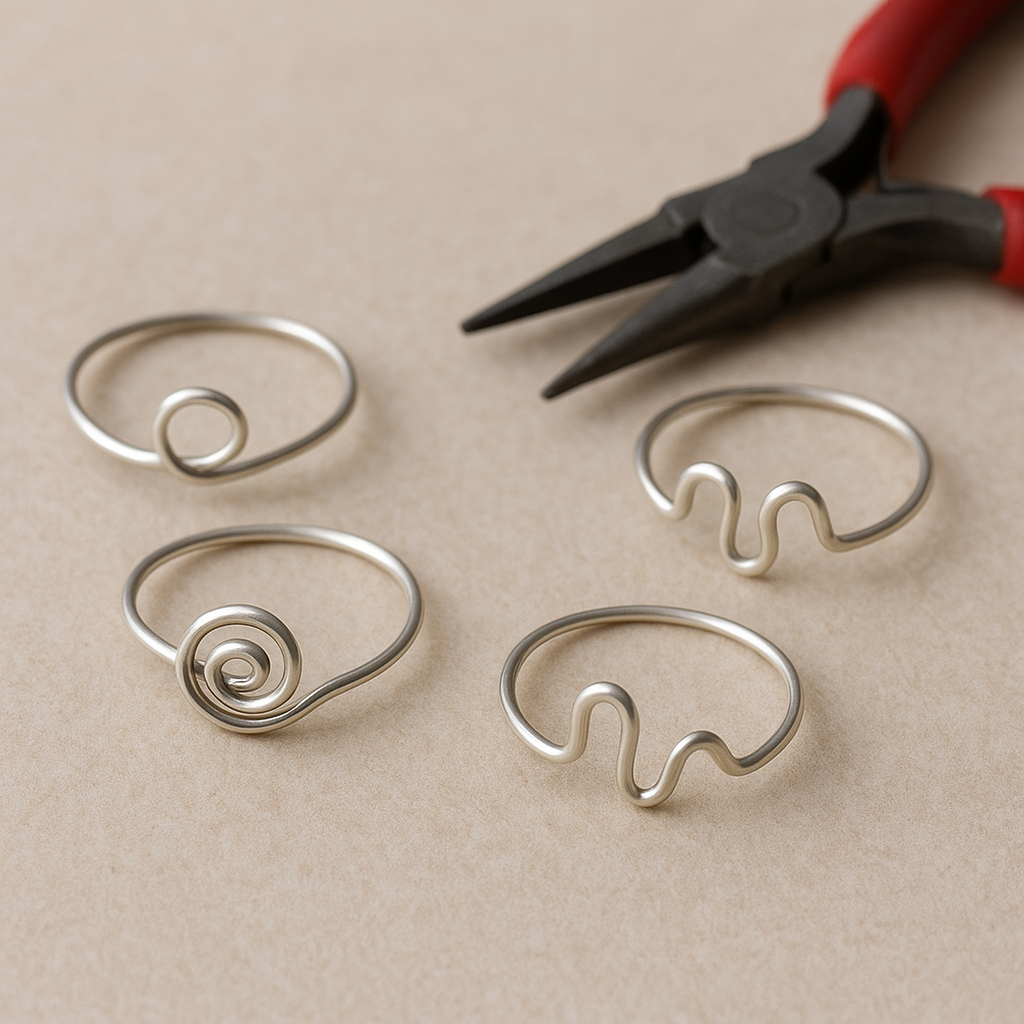
Five Starter Projects with Step-by-Step Instructions
1. Open-ended wrap ring
This is a classic beginner’s project: elegant, quick, and forgiving.
- Materials: 18 AWG copper or sterling, about 20–22 cm; files; mandrel; mallet; polishing cloth.
- Measure and cut: For a slim band with two decorative open ends, start with about 20 cm. File both ends round.
- Form: Place the center of the wire at half a size smaller than your goal on the mandrel and cross the ends around until they overlap once.
- Finish ends: Curl each end into a small loop or spiral so they sit flat on the band rather than protruding.
- Harden and refine: Lightly planish the band area on the bench block, checking size and roundness frequently.
- Polish: Smooth any tool marks, then buff to a shine.
Variation: Taper the look by planishing only the top arc for a leaf-like profile.
2. Beaded orbit ring
Add a single bead that appears to orbit the finger.
- Materials: 20 AWG wire, 1 bead (3–6 mm) with hole sized for your wire, two small stopper beads if needed, round-nose pliers, mandrel, cutters.
- String the bead onto the wire’s center. If the hole is large, add seed beads as stoppers on each side.
- Form on mandrel so the bead sits at the apex of the ring.
- Cross the wire ends under the bead and wrap them once around the shank to lock the bead in place.
- Trim, tuck, and smooth the ends; light planish to harden.
Tip: Choose a bead with smooth holes; sharp edges can saw against metal over time.
3. Sculpted spiral adjustable ring
A statement ring that adjusts gently while keeping ends safe.
- Materials: 18 or 16 AWG wire; round-nose and chain-nose pliers; files; bench block; chasing hammer.
- Create two opposing spirals at each end of a 22–25 cm length.
- Place the midpoint on the mandrel and sweep the spirals around so they rest like decorative shields on top of the finger.
- Planish the band, not the spirals, to add stiffness without flattening your motifs.
This design showcases fluid line and also teaches control over symmetrical forms.
4. Hammered stackers set
Makes three coordinating slim bands that shine together.
- Materials: 20 AWG sterling or brass; mandrel; mallet; chasing hammer; bench block; fine sandpaper; polishing cloth.
- Cut three lengths at 6–7 cm each for minimal overlap; file the ends.
- Form each into a closed circle, butting the ends snugly; lightly tap on the mandrel to round.
- Texture each band differently: one planished, one cross-peened, one left smooth.
- Refine sizes on the mandrel and polish.
Worn together, the varied surfaces catch light and visually thicken the set.
5. Cage-set cabochon ring (solderless)
A wire-only approach to hold a small dome cabochon securely without a torch.
- Materials: 18 AWG base wire for the frame; 22–24 AWG binding wire; 6–10 mm cabochon; mandrel; files; pliers.
- Create a simple band in 18 AWG with a flat, slightly widened area at the top (achieved by light planishing).
- Form a cradle: shape a small “U” of 18 AWG to fit the cabochon’s curve and lash it onto the band’s top using neat coils of the thinner wire.
- Seat the stone and add two or three cross-lashes over its shoulders, tightening gently so the stone cannot escape.
- Tuck and file all wire tails meticulously; test the setting with firm finger pressure.
Though not a traditional metal-set bezel, this cage method is reliable for small stones if executed with snug, even tension.
Measuring, Sizing, and Fit
Comfort and accuracy define good rings. Use a ring sizer to measure the intended finger toward the end of the day, when hands are slightly larger. If you don’t have a sizer, measure an existing ring’s inside diameter and consult a standard chart, or wrap a narrow paper strip around the finger and mark the overlap without pulling tight. Remember that wide rings feel tighter than slim ones; add a half-size for bands 6 mm or wider.
When cutting straight lengths, allow for springback and any texture you’ll add. Hammering stretches metal, increasing inner diameter slightly. For a basic band from 18 AWG, many makers start a half size small on the mandrel, then texture up to the target. Always test multiple times during shaping to avoid overshooting.
Adjustable designs are friendly for gifting, but they demand thoughtful end treatment: a small loop or spiral at each end keeps things safe and comfortable. If a ring will be gently opened and closed often, planish the shank to increase longevity, and consider slightly thicker wire for resilience.
Surface Finishes and Color
Finish transforms a simple ring. A soft satin comes from scuffing with fine abrasive in a single direction; a mirror polish requires patient progression through grits and a final buffing. Hammer textures add sparkle and strength, while brushed textures hide small scratches and suit an understated aesthetic.
Color patination on copper and brass deepens character. Liver of sulfur produces grays to inky blacks; ammonia fumes with salt encourage turquoise blues and greens. Seal porous patinas with microcrystalline wax or a jewelry-grade lacquer to protect skin and preserve tones. Sterling can be oxidized and then selectively polished to brighten high points, helping patterns pop.
Comfort, Durability, and Daily Wear
Wearability lives in the details. Every cut end must be rounded and tucked; any crossover should be smoothed so it doesn’t print into the finger. If a design features upward coils or prongs, ensure they’re low-profile to avoid snagging sweaters and hair. A minute spent stroking the ring across fabric and skin before calling it finished can save you a lot of rework later.
Durability depends on thoughtful hardening. If your rings distort during normal wear, planish the shank more thoroughly, step up to a thicker wire, or shorten adjustable gaps so there’s more overlap. For stackers, consider a light texture on contact points to mask micro-scratches that naturally occur when bands rub together.
Skin chemistry matters. Some people get green marks from copper or brass; this is harmless oxidation, not a stain on your craftsmanship. To minimize, coat the inside of the ring with clear sealant or suggest sterling or gold-filled alternatives for daily wear, especially in warm climates or during activity.
Troubleshooting: Common Issues and Simple Fixes
- Ring out of round: Place it back on the mandrel and gently mallet around the circumference, rotating as you go. Avoid over-hammering single spots.
- Ends won’t lie flat: Re-cut with flush cutters, then refine with a file before shaping. Trying to fix messy ends after final forming is harder.
- Size drifted too large: Lightly planish the inner edge at one point to reduce diameter, or re-shape at a smaller mandrel mark and recheck.
- Visible tool marks: Wrap plier jaws with tape or upgrade to polished tools; buff marks with fine abrasives before final polish.
- Stone wiggles in a cage: Add a subtle under-bead of thin wire, then tighten cross-lashes. Confirm that pressure holds the stone without cracking it.
- Wire snapped while bending: Likely overworked; next time, shape in fewer, smoother bends. If you have a torch, consider quick annealing mid-project.
- Open ends snag hair: Soften the arc and roll the tips into tiny closed loops or shallow spirals, tucking them into the ring’s profile.
Safety, Ergonomics, and Workspace Tips
Metal shavings and tiny cutoffs are sneaky; work over a tray and sweep frequently. Wear eye protection when cutting or hammering, and keep long hair tied back. If experimenting with chemical patinas, ventilate well and wear nitrile gloves; label and store solutions safely, and never dispose of them down sinks without following local guidelines.
Ergonomics affect consistency as much as comfort. Rest your forearms on the table edge to reduce grip strain. Let the tool do the work: tight white-knuckle pressure creates scars and fatigue. Keep tools sharp and polished; dull cutters distort wire, and rough plier jaws mar surfaces.
Design Language: From Line to Sculpture
Wire is line made tangible. Think of your ring as a drawing that loops into the round. Thick lines feel bold and architectural; thin lines feel lyrical and airy. Repetition—three nested loops, paired coils, echoed arcs—creates rhythm. Contrast—one hammered area beside a mirror-polished curve—creates focus. Negative space is as important as metal; the gaps in an open band can be as expressive as a gemstone.
Consider the hand as a canvas. Rings talk to each other when stacked: combine one textured band, one smooth, and one with a small focal bead for a balanced trio. Mix metals thoughtfully: copper warms brass; silver cools them both; a single gold-filled accent makes even base metals feel luxurious. Small stamped motifs or a brushed interior can add subtle sophistication.
Wire Choices and Metallurgy Basics for Artists
Understanding metal behavior elevates your craftsmanship. Copper is exceptionally formable and a great teacher; brass has more spring and may require firmer bends; sterling moves beautifully but work-hardens at a moderate pace, allowing crisp details with fewer kinks. Aluminum bends easily but dings; its softness makes it ideal for mockups. Gold-filled offers a thick, bonded gold layer over a base metal core; unlike plating, it withstands years of wear when edges are smoothly finished. Niobium and titanium permit vibrant color through anodizing but are resistant to traditional cold connections; they’re best reserved for decorative elements rather than structural bands early on.
Temper choices matter. Dead-soft wire takes shape with minimal tool marks but needs more finish hardening. Half-hard holds detail more readily and springs back a bit, helpful for secure adjustable gaps. For cage settings or wraps, pair a stronger base wire with a finer binding wire to keep bulk low and control high.
Finishing Workflow: From Bench to Shine
Adopt a repeatable sequence to improve results:
- Plan and cut: decide on size and length, then cut clean ends.
- Pre-finish: lightly sand and file before forming; it’s easier while the piece is flat.
- Form: shape on the mandrel, rechecking often.
- Lock and detail: add loops, coils, or lashes; keep them tight and consistent.
- Work-harden: planish structural areas on the bench block with controlled taps.
- Surface: apply chosen texture or leave smooth.
- Polish: progress through abrasives, then buff; finish with a treated polishing cloth.
- Clean: warm water with a drop of mild soap removes polishing residues.
Maintenance and Care for Long-Lasting Wear
Rings live hard lives compared to pendants. Encourage gentle habits: remove rings when lifting weights, gardening, or handling abrasives. Store them individually to prevent rub scratches. Wipe with a soft cloth after wear to minimize tarnish. For oxidized surfaces, polish only the highlights you want bright; a full dip cleaner will strip your deliberate shadows. Replace any protective sealant on base metals when it wears thin on the inside of the band.
Scaling Up: Turning a Hobby into a Micro-Business
Wire rings are ideal market pieces: quick to make, easy to size on the spot, and visually compelling on a small display. Create families of designs—three variations on a theme—to make choosing easy. Offer adjustable options alongside fixed sizes; keep a mandrel and mallet at shows for minor tweaks. Photograph rings on clean hands and simple props to communicate finish and fit. Track your materials cost and time per ring to price sustainably; your skill and consistency are part of the value, not just the gram weight of metal.
Packaging can be simple and thoughtful: a small recycled box, an anti-tarnish tab for silver, and a card with care tips. If you patina, mention that color may deepen slightly with wear, which many customers love. Consider seasonal colorways—warm autumnal coppers, bright summer stacks—to keep displays fresh.
Advanced Pathways: From Wraps to Solder and Beyond
Once comfortable, you might explore fusing and soldering to create seamless bands and more elaborate settings, or move into stone-setting fundamentals. Even within cold connections, you can add complexity: woven wire patterns, multi-wire laminations, and hybrid shapes that combine square and half-round profiles for clean, low-bulk bands. Texturing expands too: stamping, roller-printing (with a rolling mill if you have access), or chasing small motifs to build relief.
Heat coloring, torch patina, and controlled quench techniques unlock dramatic surfaces on copper and brass. For sterling, explore depletion gilding to raise a fine silver skin before applying selective oxidation. These processes dovetail with your foundational skills; you’re not starting over—you’re deepening the same vocabulary of line, pressure, and time.
Practice Routines to Build Skill Fast
Repeat focused drills to improve consistency:
- Loop ladder: make 20 identical loops from scrap wire; aim for even diameters and cut-free ends.
- Spiral study: create spirals from 1 cm up to 3 cm in even increments; practice tension so each arc lies flush.
- Texture swatches: hammer five short bands with different patterns; note how each affects size and stiffness.
- Speed rounds: time yourself making three simple stackers from cut to polish; track improvements across sessions.
Keep a sample board of finishes and textures. It becomes a library for future designs and helps clients choose quickly if you sell your work.
Ethics and Sustainability in Small Metals
Scrap is part of the process; treat it as a resource. Keep separate containers for copper, brass, and silver. Many suppliers accept silver scrap for credit, and even base metals can be upcycled into new work—tiny coil spacers, jump rings, and decorative granules. Seek recycled-content wire when possible and support suppliers with transparent sourcing. Thoughtful material choices and durable, repairable designs are the heart of responsible craft.
Putting It All Together: A First Collection
Design a mini-collection around one idea—say, circles: a hammered circle stacker, a beaded orbit ring, and a sculpted double-spiral. Keep metal consistent across the set so pieces harmonize. Photograph them as a trio and individually. Name them for clarity and story: Orbit, Echo, Halo. Story adds memory to metal; people remember how a ring made them feel and what it suggested long after they forget technical details.
As your hands learn, you’ll notice new decisions becoming automatic: when to shift from mallet to hammer, how far to push a spiral before it buckles, where to place a coil so it looks intentional. Expect to remake your first ideas cleaner and tighter; improvement in wirework is visible and satisfying.
Quick Reference: Smart Habits for Great Wire Rings
- Measure twice, cut once, and always pre-finish cut ends.
- Size small on the mandrel, then grow into final size with texture and refinement.
- Use nylon-jaw pliers for straightening and gentle hardening without scars.
- Planish structural areas; protect decorative details from stray blows.
- Adopt a consistent finishing sequence to avoid skipping steps.
- Test comfort on fabric and skin before calling a piece done.
- Document lengths and sizes for your favorite designs to duplicate success.
Inspiration and Community
Join maker groups, follow bench jewelers, and swap techniques freely. What you create in your first month will look different from month three, and that’s the joy. Wire rings are sketchbooks you can wear: day by day, they capture experiments in curve, texture, and proportion. One day you’ll stack a handful of your own rings, notice how the edges align, and realize your hands now speak a fluent language of metal.
With a few meters of wire, a ring mandrel, a reliable hammer, and patient practice in neat wrapping, you’ll build everything else: sensitivity to pressure, an eye for negative space, and the confidence to try new forms. That’s the real gift of this craft—each piece is both adornment and lesson, a small circle that teaches you how to make the next one better.