A great jewelry-making session can happen on a train seat, a picnic bench, a waiting room chair, or the corner of a café table—if your kit is designed for true portability. Building a portable jewelry-making kit is not just about shrinking your studio; it is about curating only what you need, arranging it so it works at any scale, and protecting delicate components from travel stress. Whether you bead, wire-wrap, knot, or assemble mixed-media pieces, a well-planned kit turns found time into finished work, ideas into prototypes, and small moments into creative momentum. The following guide blends craft know-how with field-tested organization so your tools, materials, and ideas move with you—and keep up with you.
The Making Mindset: Principles That Shape a Travel-Ready Kit
Before choosing boxes and pliers, think in terms of constraints. A portable kit thrives under clarity: clear goals, clear projects, and clear boundaries. If you only assemble earrings on the go, you need a different loadout than a wire-weaving artisan developing a complex cuff. Define your portable scope—repairs and quick makes, or full builds and small-batch production—and let that inform every selection.
Start with a minimalist aim and expand with intention. Techniques share certain cores, but each adds its own accessories. One way to align choices is to adopt guiding principles:
- Function per gram: Every item earns its weight by enabling multiple tasks or removing friction from a primary task.
- Small, not fiddly: Scaled-down tools should remain hand-friendly and precise; never accept a tool so tiny you lose leverage or control.
- Preventive packing: Pack for the problems that always happen: bent jump rings, fraying thread, dull cutters, runaway beads.
- Visual discipline: At-a-glance organization speeds set-up and clean-up and prevents lost components.
These principles crystallize into practice when you emphasize smart modularity (separate pouches or pods for each technique), real ergonomics (handles, lighting, and posture that preserve hands and eyes), practical durability (cases and tools that withstand drops and weather), and creative versatility (materials and findings that mix and match across projects). With those anchors, your kit becomes an agile companion rather than a compromised substitute for a full bench.
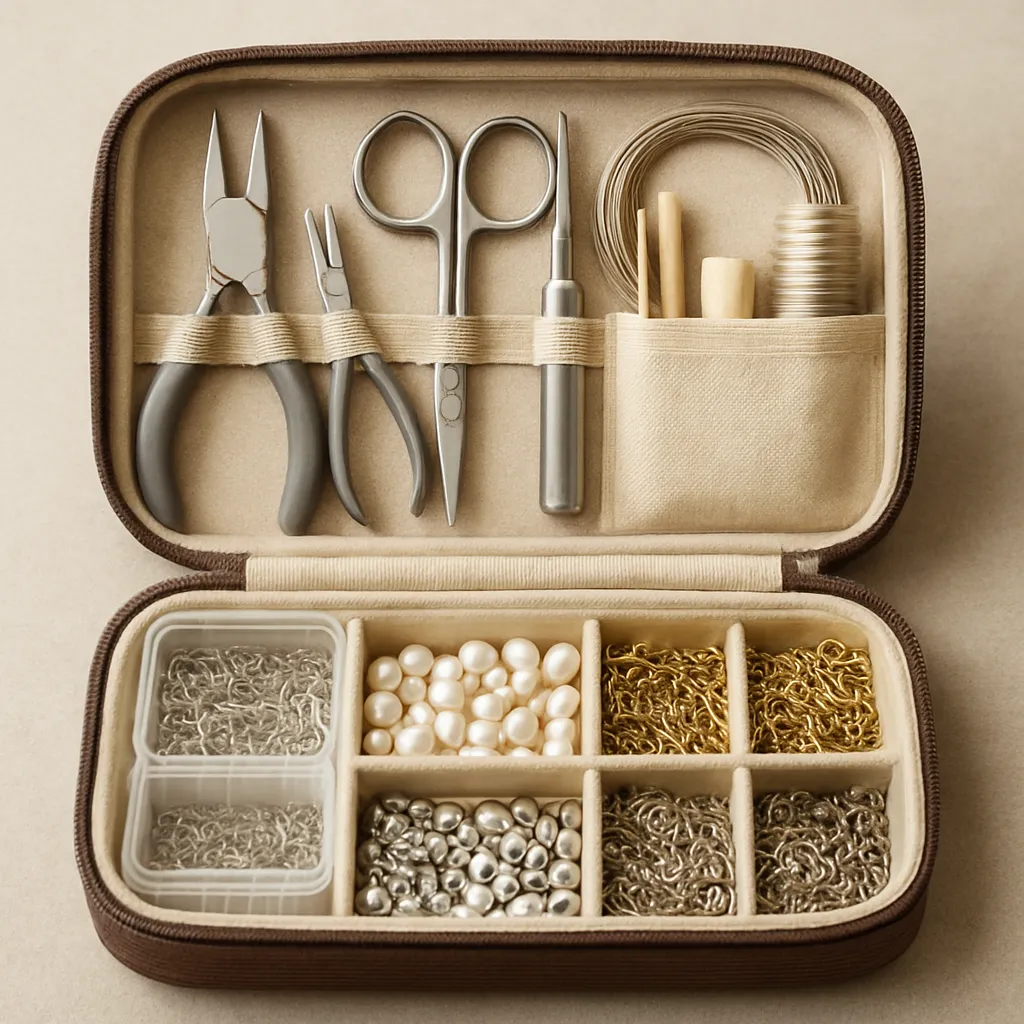
Core Tools: Pack Light, Work Well
Most jewelry techniques rely on a compact common set: gripping, cutting, shaping, measuring, and finishing. The difference between a delightful portable session and a frustrating one is the quality and appropriateness of these basics.
Pliers and Cutters That Do the Heavy Lifting
- Chain-nose pliers: Choose a fine, tapered tip for accessing tight spaces and holding jump rings. Box joints and smooth jaws reduce marring; add a small square of leather or nylon jaw covers for sensitive finishes.
- Round-nose pliers: Opt for a model with clearly marked taper; you can DIY reference marks with a permanent pen or heat-shrink tubing to repeat loop sizes on the go.
- Flat-nose or bent-nose pliers: A second gripping tool is essential for stabilizing work when opening rings or forming angles. Bent-nose variants improve clearance in confined travel setups.
- Flush cutters: Prioritize steel quality and cutting geometry. True flush cutters save time on cleanup and are invaluable for fine-gauge wire and soft beading wire. Consider a protected tip version for safe packing.
- Optional mini tools: A small nylon mallet and 2–3 inch bench block help with hardening loops and flattening components, but skip them if weight is critical. A collapsible ring mandrel or short stepped mandrel doubles as a forming aid.
Beading and Stringing Essentials
- Bead needles and threader: Pack sizes 10–12 for seed beads and a collapsible-eye needle for quick stringing.
- Thread options: Nylon or polyester beading thread for general work; gel-spun polyethylene for strength; silk for traditional knotting. A beeswax or microcrystalline conditioner minimizes fray.
- Wire for stringing: 0.014–0.019 inch coated beading wire covers most necklace and bracelet builds; bring matching crimp tubes (use quality 2×2 mm microtubes) and crimp covers for a refined finish.
- Bead stoppers: Reusable spring stoppers beat makeshift tape, preventing strand dump-outs during travel bumps.
- Adhesives: A precision-tip cement for knot security and a flexible-contact adhesive for mixed materials. Store in a small zip pouch with a swab and foil to catch drips. Observe transport rules where applicable.
Wirework Kit
- Gauges and tempers: Dead-soft 20–24 ga for wrapping, half-hard 18–20 ga for structural loops and ear wires. Pack short coils and use spool tamers or silicone ties to prevent tangles.
- Smoothing tools: A cup bur or hand reamer rounds ear-wire ends; a small jewelers file handles rough cut points.
- Forming aids: A miniature stepped mandrel, a short length of knitting needle, or pen barrels help with consistent coils and jump rings.
- Binding: Fine-gauge wire for lashing, micro zip ties, or painter’s tape for temporarily holding assemblies during fitting.
Findings, Beads, and Palette Strategy
- Metals: Choose one primary metal tone (e.g., stainless, brass, or sterling) plus a complementary tone for contrast. Cross-compatibility reduces decision overload.
- Seed beads: A core set in 11/0 and 8/0 sizes carries designs far; include metallics, matte neutrals, and a few accent colors aligned to a seasonal mini-palette.
- Clasps and connectors: Lobster clasps, spring rings, toggles, and lever-backs in small quantities, paired with matching jump rings and wire guardians.
- Feature beads: Limited trays of stones or glass focals ensure personality without bulk; consider flat-backed components you can bezel or wrap later.
- Anti-tarnish tabs: Slip a piece into metal compartments; rotate every few months.
Measuring, Marking, and Finishing
- Flexible tape and mini ruler: A 15 cm (6 inch) metal rule is rugged and fits small cases; add a soft tape for wrists and necklines.
- Calipers: A pocket caliper (plastic or aluminum) helps size beads and thicknesses quickly.
- Marking tools: Mechanical pencil for temporary marks; ultra-fine permanent pen for metal or template marks.
- Polish cloth: A treated cloth for brightening metals; a small microfiber to clean stones and glasses.
Support Tools for Comfort and Accuracy
- Bead mat: A cut-down silicone mat or foam-backed cloth mat keeps beads from rolling and provides a discreet workspace overlay in public settings.
- Lighting and magnification: A clip-on USB light and a folding loupe solve dim cafés; a power bank keeps your lamp and phone alive.
- Safety: Low-profile safety glasses, finger cots, and a compact bandage kit protect hands and eyes when you’re working in unfamiliar environments.
Containers and Layout: Order That Travels
Your container shapes your process. It governs how fast you set up, how relaxed you feel while working, and how easily you clean up. Think in layers: outer shell for protection and carry, inner modules for function, and micro-containers for parts control.
Choosing the Outer Shell
- Soft roll or zip folio: Excellent for commuters; lies flat, provides quick access, and tucks into a messenger bag. Add a thin cutting board or stiff insert to create a portable lap desk.
- Compact hard case: Camera cubes, technician cases, or sturdy lunch boxes protect tools and provide stackability. Consider water resistance and corner padding.
- Hybrid tote: A messenger with a removable insert or pouch system works if you also carry a laptop or sketchbook.
Inner Modules: Technique Pods and Daily Drivers
Segment your loadout by action: a “pliers and cutters” pod, a “stringing and crimps” pod, and a “wirework” pod. Each module should open without spilling and show parts at a glance. Clear lids, color-coded labels, and shallow trays prevent digging.
- Micro boxes and vials: Tic-tac boxes, gem jars, or watchmakers tins organize beads and findings. Foam inserts prevent rattling.
- Magnetic strip or sheet: Keep steel needles and small tips corralled, but avoid strong magnets near electronics and magnetic closures you intend to use in jewelry.
- Labeling: Use icons or abbreviations so labels remain legible at small sizes. Date-sensitive tags for adhesives and cords remind you when to replace.
An efficient kit marries clarity with control. Track your inventory lightly but consistently: a pen dot on a label when you pull the last packet of jump rings, or a tally in a pocket notebook. When you return to your main studio, these signals tell you exactly what to restock.
Bead Containment Strategies
- Work corral: A small silicone tray or a fabric mat with stitched edges prevents roll-offs and simplifies cleanup.
- Spill response: Carry a mini lint roller and a small paintbrush for fast bead recovery; a telescoping magnet rescues wayward steel findings.
- Moisture and tarnish control: Silica gel packs and anti-tarnish slips live in compartments with metals and tools; avoid PVC plastics that off-gas and tarnish metals.
Hygiene, Safety, and Care for Your Kit
Your hands, tools, and materials deserve intentional care, especially when you lack the safety net of a full bench. Prioritize predictable safety and streamlined cleanup so you can work confidently in public or outdoors.
- Hand and surface wipes: Non-alcohol or low-residue wipes clean hands and work mats without damaging finishes. Stash a small microfiber cloth for dust and smudges.
- Sharps discipline: Cap your cutters and keep needles in a labeled vial with a small rare-earth magnet to park active needles safely between steps.
- Adhesive etiquette: Keep glues in a secondary containment pouch with cotton swabs and a mini foil square as a mixing/parking surface. Replace clogged tips rather than forcing pressure that causes surprise floods.
- Personal protective items: Low-profile safety glasses, finger guards, and a fingertip bandage or two prevent minor injuries from becoming session-ending events.
For earrings and body-adjacent pieces, basic on-the-go sterilization is wise: sealed alcohol pads for posts and ear wires, plus a clean storage cell to keep sanitized components separated until assembly. At the tool level, periodic cloth-and-wipe cleaning prevents buildup that can mar delicate materials. Create a tiny care kit: cotton swabs, toothpicks, a micro-brush, and a drop of tool oil in a leak-proof vial for hinge maintenance.
Finally, embed a gentle maintenance routine into your week: deburr your cutters on a scrap wire test, wipe pliers jaws, refresh anti-tarnish tabs, and retire worn cords. Proactive upkeep protects both your work and your hands.
Workflow Anywhere: From Sketch to Finishing Touch
Good travel making feels like a dance: you set up quickly, keep a rhythm, and break down without searching for missing pieces. A compact “start-to-finish” pipeline reduces clutter and mental load.
- Idea capture: A small dot-grid notebook and pencil travel better than loose paper. Add a fold-out measurement cheat sheet for common bracelet, necklace, and earring lengths.
- Pre-kitting projects: Before you leave home, bag small project sets—matched beads, findings, and any focal—so you can grab-and-go and produce finished pairs or strands in short sessions.
- Session staging: Lay out tools to your dominant side, place findings at 12 o’clock on your mat, and keep a catch tray on the far side of your working hand so off-cuts and scraps land safely.
- In-progress parking: Use tiny binder clips or labeled mini bags to store half-finished pieces without tangling.
- Finishing and packaging: Include a few anti-tarnish baggies and earring cards; a fine-tipped pen handles quick labeling and pricing if you sell.
Consistent workflow makes small windows of time productive. Open your case, unroll the mat, set the lamp, place the pliers, and go—no decisions required beyond creative ones.
Travel Realities: Commuting, Flights, and Outdoor Making
Your kit has to behave on buses, planes, park benches, and folding tables. Anticipate rules and environments so nothing surprises you mid-project.
- Transit etiquette: Choose quiet tools that don’t click loudly; contain sharp ends immediately; keep your footprint small and your mat clean. Offer a friendly smile if a neighbor looks curious—creativity is contagious.
- Air travel considerations: Many jurisdictions allow small hand tools under a certain length, but rules vary and discretion applies. Pack questionable items—flush cutters, sharp awls, and adhesives—in checked baggage when possible. Carry printed descriptions or store receipts if you need to explain specialty tools.
- Weather and light: For outdoor sessions, pack a cap with a brim to shade eyes, clips to secure your mat against wind, and a sealable bag to protect your work from sudden drizzle.
- Digital support: Keep a few reference photos or pattern notes offline on your phone. A slim power bank keeps lights and devices reliable when outlets are scarce.
Finally, remember security: mark your tools discreetly, avoid flaunting expensive gemstones in public, and never set open containers on ledges or shared seating. A compact cable lock can tether a bag to your chair at a café or trade show, and an AirTag-style tracker helps if a bag wanders.
Three Proven Loadouts You Can Build Today
Pocket “Altoids” Kit for Emergency Repairs and Simple Earrings
- Mini chain-nose pliers (slim profile), micro flush cutters (capped), and short round-nose pliers.
- Jump rings in two sizes and one metal, a few pairs of ear wires, a dozen headpins/eyepins.
- Assorted small accent beads and spacers in a strip of gem jars.
- Bead stopper, alcohol pad, and a 10 cm ruler tucked under the lid.
- Micro polish cloth square and two anti-tarnish tabs.
Day-Bag Kit for Beading, Stringing, and Wire Wrapping
- Soft zip folio with removable bead mat, two micro trays, and an inner zipper pouch for tools.
- Pliers trio, flush cutters, bead needles, thread, beading wire, crimps, and crimp covers.
- Wire coils in 20–26 ga, cup bur, file, mandrel, and a small forming jig.
- Palette: one neutral core, two accent colors, and a few focal pieces. Each project pre-bagged.
- Clip-on lamp, folding loupe, microfiber cloth, wipes, and a compact notebook.
Event or Workshop Kit for Small-Batch Production
- Compact hard case with foam dividers; modules for “stringing,” “wire,” “findings,” and “tools.”
- Backup cutters and an extra set of pliers to avoid downtime if a hinge strains.
- Bulk findings in labeled watch tins; color dots indicate metal tone and size.
- Sales and presentation: earring cards, bags, price stickers, and a simple display cloth.
- Comfort: a travel stool cushion and finger tape for long sessions.
Design Depth in a Small Footprint
Constraints can be creative fuel. Within a travel kit, pursue coherence: a limited color story, repeating textures, or a signature silhouette. Choose a few design “moves” you can execute reliably in any setting—wrapped-loop earrings with subtle dangles, crimped necklaces with extension chains, or seed-bead fringe variations—then explore those moves with changing materials. This approach prevents option paralysis and builds a recognizable style even when you work from a compact selection.
Templates help too. Carry a simple wrist sizing strip (paper or plastic), a ring size chart, and paper bead board outlines you can draw on and re-use. A short list of standard lengths keeps custom orders consistent, and a “fix list” in your notebook reminds you how you solved common problems last time.
Material Choices and Ethics on the Move
Lightweight does not mean low quality. Consider recycled metals, reputable gemstone sources, and hypoallergenic findings. Stainless and titanium ear wires travel well, resist tarnish, and please sensitive ears. Brass and bronze offer affordable warmth; pair them with sealed or lacquered finishes to reduce patina surprises during humid travel. Keep a note of metal content and vendor details if you sell; this avoids guesswork when customers ask.
Packaging can be sustainable too: reuse vials and tins, refill small glue bottles, and collect micro-scrap wire for recycling. When you can, replace single-use plastic sleeves with glassine or paper alternatives—protective yet planet-friendly.
Troubleshooting in the Field
- Crimp slippage: Confirm tubing size-to-wire match; use a proper crimping profile rather than flattening if strength is critical. Add a wire guardian when attaching clasps to reduce friction wear.
- Wire kinks: Straighten with nylon-jaw pliers or by running wire through a soft cloth pinch; if a kink work-hardens, cut it out.
- Fraying thread: Condition lightly, rethread through the last few beads, and secure with a discreet half-hitch before trimming.
- Bead holes too small: Use a hand reamer gently; wrap the piece in a cloth to control chips and capture dust.
- Glue clog: Park a drop on foil and use a pin to reopen the tip; wipe threads before recapping to prevent future locks.
Where to Spend and Where to Save
Invest in the tools that touch your work most: pliers and cutters with aligned jaws, smooth finishes, and reliable springs. Quality needles and a comfortable light pay dividends in reduced fatigue and cleaner results. Save on containers by repurposing durable household items—camera inserts, spice tins, and stationery cases—then upgrade selectively once your preferred layout is clear.
As for materials, buy findings in the metals you actually use; resist the bargain bin of “maybe someday” stock. Build a lean library: small-batch accent beads, a dependable chain in two weights, and clasps that suit your audience’s preferences.
Checklists and Reset Rituals
- Pre-departure: Confirm project bags (x3), pliers and cutters, needles and thread, wire gauges, crimps and findings, mat, light, wipes, notebook, and a snack. A quick tap-test of your case ensures nothing rattles loose.
- Session wrap: Count tools back into their pod, return parts to labeled cells, and log any supply that hit its last packet.
- Studio restock: Move your notebook tallies into a shopping list, drop silica and anti-tarnish refreshers into the kit, and replace damaged bags or labels.
A tiny ritual pays off: a sixty-second reset now prevents twenty minutes of sorting later and keeps your future self smiling when inspiration strikes at a bus stop or during a lunch break.
Ergonomics and Comfort for Long Sessions Away from the Bench
Portable doesn’t have to mean uncomfortable. Choose a chair with back support when possible, and keep wrists neutral by elevating your mat with a slim board. If you tend to grip tightly, wrap plier handles with silicone tape for added cushion. Rest your eyes with the 20-20-20 rule: every 20 minutes, look at something 20 feet away for 20 seconds. A tiny bottle of eye drops belongs in your pouch if air-conditioned spaces dry your eyes.
Protect your neck with a light scarf in overly cold rooms and bring finger tape for hotspots during long wrapping sessions. Even small comforts produce cleaner, more confident work when you’re far from home base.
Leveling Up: Modular Expansions
Once your foundation is dialed, add technique-specific modules that clip in and out:
- Seed bead weaving pod: Pattern cards, extra needles and FireLine, micro tubes for colors, and a narrow bead tray with a lid.
- Metal accents pod: Hole punch pliers, tiny letter stamps, and blank tags; store in a hard mini-case to protect edges.
- Resin accents pod: If you work with UV resin, consider it for checked travel only. A pocket UV lamp, silicone cups, and swabs fit a small tin; cure outdoors with care and protect pieces from dust.
Treat these like attachments to your core rather than standalone kits. That keeps your system coherent and prevents duplication.
Putting It All Together
A reliable portable jewelry-making kit is a blend of intention and iteration. Start with the essentials, run real-world tests—on a commute, in a café, at a friend’s kitchen table—and adjust ruthlessly. If something slows you down or sits unused for a month, remove or replace it. If a small tool saves five minutes per session, celebrate it with a permanent slot.
Ultimately, the right kit feels like a trusted collaborator: protective yet nimble, focused but adaptable, and ready whenever inspiration shows up. Pack for the work you love most, keep your touchpoints simple, and let your craft move with you—bead by bead, loop by loop, in pockets of time that add up to a body of beautiful, wearable art.