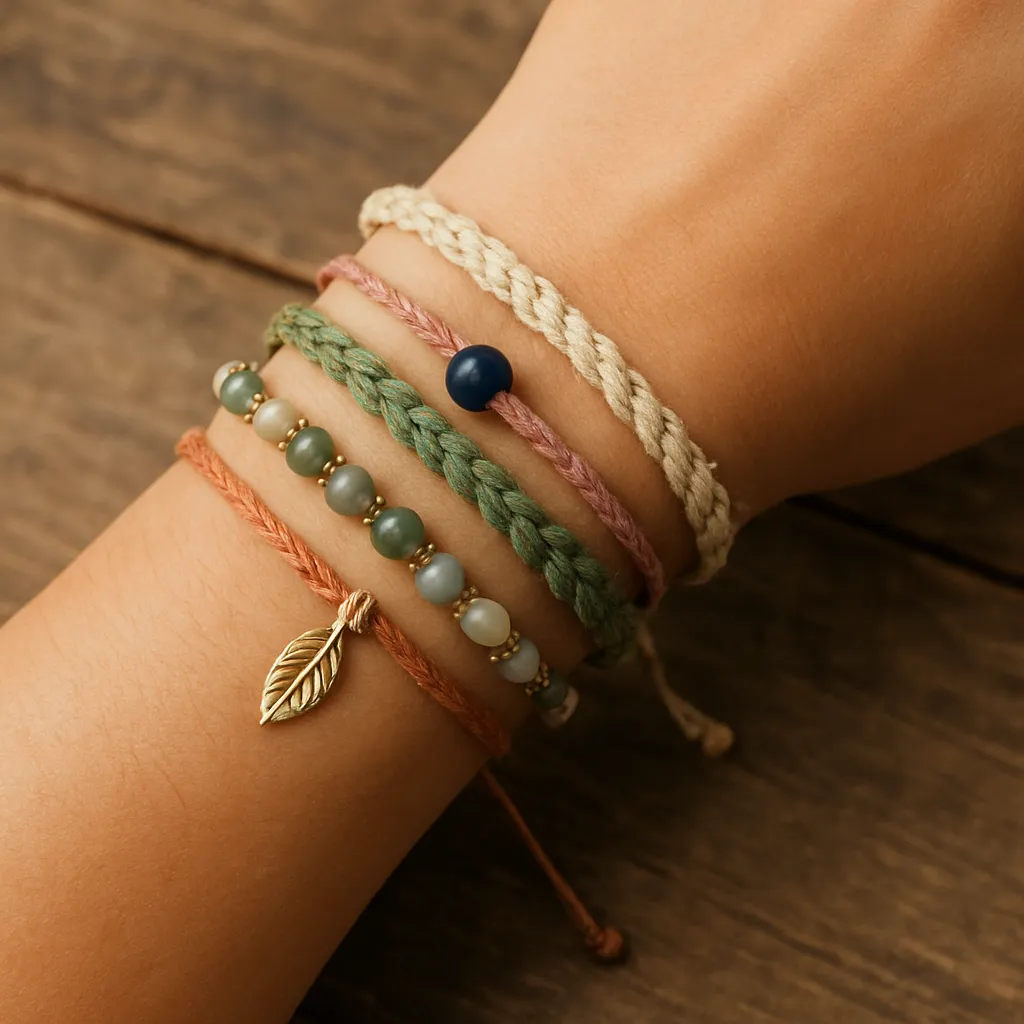
Mismatched bracelets celebrate the freedom of making with your own hands. They invite play, welcome irregularities, and turn everyday materials into wearable stories. Instead of following a strict pattern, each strand, bead, knot, or charm can head in its own direction, then come together on your wrist as a small, portable gallery. The power of this approach lies in personal voice: you can combine flea‑market finds with heirloom buttons, silk threads with sailing cord, polished gemstones with seeds gathered during a walk. In doing so, you practice deliberate craftsmanship—a way of thinking through materials, touch, and time, where your decisions show up as texture, weight, and movement each time your hand lifts a cup or waves hello.
What Makes Mismatched Bracelets So Compelling
The charm of mismatch is not chaos; it is carefully guided freedom. When you set out to create a stack of bracelets that differ from each other, you start listening closely to nuances: how a matte bead calms a metallic glint, how a rough fiber sets off a smooth glass disk, how an earthy brown anchors a lively coral. These are sensory conversations—visual, tactile, and even auditory, since certain stacks make a faint chime when you move.
Mismatched stacks are deeply wearable for several reasons:
- They adapt to mood. One day you may wear three slender cords and a single bronze charm; another day you might add a chunky wooden bangle or a wire‑wrapped stone.
- They honor memory. Each component can mark a person, place, or day: a bead from a favorite shop, a shell from a beach, a pendant from a friend.
- They invite reuse. Unlike a single, precious piece, stacks evolve. You can remake strands, repair, or redesign without losing the spirit of the set.
- They resist fast fashion. Making your own reduces waste, teaches material literacy, and helps you support small suppliers or reclaim overlooked resources.
Most of all, mismatched bracelets teach you to see. You begin noticing subtleties that can feel like micro‑lessons in design: the way light sits on satin cord versus waxed linen, or how a brass spacer can temper a neon hue. The practice is meditative, and the results feel delightfully alive.
Materials and Tools for DIY Success
Core Materials
- Threads and cords: cotton, silk, nylon, waxed linen, embroidery floss, micro macramé cord, and leather lace. Each has different hand feel, stretch, dye uptake, and knot security.
- Beads: glass seed beads, gemstone chips, wooden rounds, hammered metal beads, ceramic tubes, shell and bone, resin shapes, and recycled paper beads. Mix finishes: matte with gloss, transparent with opaque, frosted with mirrored.
- Findings: clasps (lobster, toggle, magnetic), jump rings, crimps and covers, cord ends, bead tips, end caps, and split rings. Workhorse hardware makes reconfiguration painless.
- Wire: copper, brass, sterling, niobium, enameled craft wire. Choose gauges: 20–24 for linked components, 26–28 for wrapping small beads, and 16–18 for structural shapes.
- Ornaments: charms, small pendants, coins with holes, stamped tags, talismans, buttons with character, and carved focal pieces.
- Surface accents: fabric scraps, sari silk ribbon, lace trims, suede fringe, heat‑shrink tubing in colors, and hand‑painted wooden slivers.
Essential Tools
- Cutters: flush cutters for wire, sharp embroidery scissors for threads, heavy shears for leather.
- Pliers: chain‑nose for gripping, round‑nose for loops, flat‑nose for straightening, crimping pliers for secure terminations.
- Needles: beading needles in sizes 10–13, collapsible eye needles for thicker cord, tapestry needles for ribbon and yarn work.
- Measuring and marking: soft tape measure, calipers for bead sizing, a ceramic or self‑healing mat with a grid.
- Adhesives and sealants: flexible jewelry glue, fabric glue, microcrystalline wax for thread ends, and clear nail topcoat for emergency sealing.
- Heat tools: lighter or thread zapper for nylon cord ends; always work carefully and away from flammable fibers.
Design Principles: From Instinct to Intent
Great mismatch stems from intention. You do not need a rigid recipe, but a handful of design lenses will help your choices cohere and sing. Think in moves rather than rules, and let these guide your hands.
Asymmetry With Purpose
Start by embracing asymmetry. A stack feels lively when lengths, bead sizes, and visual weight shift across the wrist. Let one bracelet carry a bold focal; let another whisper with small seed beads. Allow one strand to run nearly monochrome, and another to feature sharp contrast. The interplay makes each part more interesting than it would be alone.
Color as a Connector
Study color theory lightly as a compass, not a cage. Anchor the set with one or two hues you love, then add near‑neighbors on the color wheel for subtlety, or complementaries for pop. Repetition ties the group together: the same teal bead showing up in three different strands can be enough to unify a wild assortment. Transparencies and tints add dimension; muted or earthy notes keep brights from feeling shouty.
Material Contrast
Texture is the secret handshake among components. Pair slick glass with woven hemp; put hammered metal against velvet ribbon; nestle a rough lava stone near a polished agate. Name what you feel with your fingertips—grainy, silky, springy, cool—and balance those sensations across the stack. The pleasure of mixed texture multiplies with wear.
Weight, Scale, and Rhythm
Think like a composer working in beads. Alternate small and large, light and heavy, matte and lustrous to create rhythm. Consider composition across the entire wrist: perhaps two slim cords flank a central, weightier piece; perhaps three medium strands are interspersed with metal accents that echo down the line. A simple way to check flow is to photograph the stack in black and white and look for a satisfying distribution of dark and light.
Balance Without Uniformity
You are aiming for dynamic balance, not mirror‑image repetition. If one strand is visually loud, calm the neighbors; if a clasp is ornate, let nearby beads rest. Curate negative space as well: a plain leather cord can act like silence in music, making the surrounding details more resonant.
Techniques to Build Distinct yet Cohesive Bracelets
Stringing Basics (Beading Wire and Thread)
Stringing is fast and forgiving. Use flexible beading wire for weighty beads and nylon or silk thread for lighter, drapey strands. Start with a stopper bead or bead clamp on one end, test a few sequences on the mat, then commit to crimping once satisfied. Crimp covers create a polished look and prevent scratchiness at the clasp.
Macramé and Knotting
Square knots, half hitches, and lark’s heads bring structure and an artisanal feel. A basic adjustable slider knot lets you avoid clasps, ideal for casual cords. Micro macramé supports intricate patterns, while chunky sailor’s knots read nautical and bold. Knotting between beads protects gemstones from chipping and adds elegant spacing.
Braiding and Weaving
Three‑strand braids are simple; try five‑strand or kumihimo braids for complexity and a round profile. Weaving seed beads on a loom yields crisp geometry; off‑loom peyote or brick stitch offers flexible shapes that hug the wrist. Combine a beaded panel with leather ties to soften and humanize the structure.
Wire Wrapping and Linking
Wire lets you make custom connectors, bead cages, and looped chains. Practice consistent loops: mark round‑nose pliers with a permanent pen to standardize diameter. Wrap a freeform pebble to create a focal charm; link a series of small gemstone rondelles for a delicate, glimmering strand.
Textile Approaches
Wrap strips of sari silk around memory wire for fast cuffs, or couch embroidery floss onto leather with saddle stitches. Add seed‑bead fringe to fabric edges for motion. Stitch beads onto felt, then back with ultrasuede for a soft touch on the skin.
Three Step‑by‑Step Projects for a Cohesive Mismatch
1) Quiet Seed Strand With a Subtle Spark
- Cut 30 cm of fine beading wire. Add a bead stopper on one end.
- String a repeating sequence: 8 matte seed beads, 1 tiny faceted metallic bead, 8 matte seeds.
- After reaching desired length, slide on a crimp, a wire protector, and a small jump ring. Return the wire through the crimp and two beads.
- Crimp neatly; add a crimp cover. Repeat on the other end with a matching ring and a slim lobster clasp.
- Check drape by curving the strand on the mat before final trimming. The minimal sparkle supports bolder neighbors without competing.
2) Adjustable Macramé Cord With a Center Knot
- Cut two lengths of waxed cotton: one 30 cm holding core, one 120 cm for knotting.
- Center the long cord under the short; tie square knots for 12–16 repetitions.
- Slide on a single ceramic focal bead; continue with another 12–16 square knots.
- Finish ends with tight overhand knots and a dab of flexible glue. Create a sliding closure by overlapping tails and tying alternating half hitches around both cords.
- Melt or seal nylon ends with a thread zapper, or trim cotton cleanly. The friction‑fit closure adapts across seasons and wrist sizes.
3) Wire‑Wrapped Pebble Charm Chain
- Select a smooth, flat pebble with character. Use 24‑gauge wire to create a harness: wrap around the stone’s perimeter twice, crossing in back for grip.
- Form a neat bail above the stone using round‑nose pliers; secure with two or three wraps.
- Create a short chain of wire‑linked small beads (about 10 cm), integrating the charm at center.
- Terminate with a small toggle; toggles add visual punctuation and are easy to fasten one‑handed.
Worn together, these three pieces tell a quiet‑to‑bold story. The seed strand whispers, the macramé cord hums, and the pebble charm sings lead.
Closures, Connections, and Professional Polish
Closures dictate daily joy. Choose hardware that fits both style and use: toggles for a sculptural look, magnetics for ease (with safety chains if heavy), sliders for adjustability, and classic lobsters for versatility. Protect thread or wire at stress points with wire guardians or French wire. Add split rings rather than open jump rings if the wearer is active; they resist accidental openings. Test every connection with gentle tugs before first wear.
Sizing, Comfort, and Long‑Term Wear
Get the size right by measuring at the wrist bone, then adding ease based on style: 0.5–1 cm for snug braided pieces, 1–1.5 cm for bead strands, and more for chunky cuffs. Balance weight distribution so the heaviest bracelet does not constantly spin to the underside. Consider ergonomics in clasp choice and placement: right‑handers often prefer the clasp to sit slightly toward the pinky side for easier fastening. Keep any scratchy elements—open wire ends, burrs on metal beads—away from skin. Back stamped tags with a drop of clear sealant or microcrystalline wax to reduce catching.
For durability, bury knots between beads, double back through the last few, and secure with the smallest necessary amount of flexible glue. Soft solder is not typically used on mixed‑media stacks worn daily, but cold connections—wraps, crimps, rivets—perform reliably when tidy. Thoughtful finishing elevates even humble materials.
Personal Meaning: Charms, Codes, and Storytelling
Bracelets are perfect for carrying quiet messages. Numeric sequences can encode important dates via bead counts; color can signal causes or teams; textures can mark places or seasons. Tiny stamped tags can hold initials or single letters from a favorite line of poetry. Stones and symbols carry cultural lore; even a found washer can transform into a talisman once wrapped and worn. Use symbolism sparingly but deliberately to keep the overall design from feeling literal. Let one strand hint while another elaborates; it keeps the narrative layered and interesting.
Sustainable and Ethical Making
Resourcefulness is part of the appeal. Practice upcycling: rescue beads from broken jewelry, repurpose old zippers into textured cords, turn denim seams into wrapped cores, or slice bicycle inner tubes for matte black bands. Seek locally made components, fair‑trade beads, or reclaimed metals. When purchasing new, buy small quantities until a design proves itself. Save offcuts in glass jars by color or material; the odd bead you remove today may become tomorrow’s perfect counterpoint.
Mind environmental impacts: avoid solvent‑heavy glues when a mechanical connection suffices, collect wire trimmings for metal recycling, and filter rinse water if you work with patinas or dyes. Caring for your making space—ventilation, good lighting, safe storage—protects you and your materials.
Styling a Mismatched Stack for Any Occasion
- Workday refinement: limit the palette to two neutrals and one accent, keep noisy charms to a minimum, and select low‑profile clasps that do not snag on sleeves.
- Weekend ease: mix in fabric and leather for softness, let a few strands dangle longer, and welcome patina and scuffs as part of the charm.
- Evening drama: introduce faceted stones, metallic threads, or a single oversized focal; tighten the rest of the stack to avoid visual clutter.
- Seasonal moods: linen cords and shells in summer, wool braids and oxidized brass in autumn, frosted glass and silver in winter, enamel brights and waxed cotton in spring.
- Mixing metals intentionally: repeat a metal at least three times across the stack—tiny spacers count—to make the blend feel chosen rather than accidental.
Color Pathways That Rarely Fail
- Mineral calm: slate grey, soft teal, pale limestone, and a hint of copper.
- Garden harmony: leaf green, petal pink, soil brown, and dew‑clear glass.
- Sunset heat: terracotta, burnt orange, wine, and a kiss of gold.
- Ocean depth: indigo, bottle green, driftwood, and abalone shimmer.
- Monochrome play: black through smoke grey to pearl, with one high‑shine metal to punctuate.
Care, Maintenance, and Quick Repairs
Clean beads with a soft brush; avoid soaking wood, bone, and porous stones. Wipe metal with a treated cloth; if you like patina, skip aggressive polishing and simply seal sharp spots. Store stacks in breathable pouches, not airtight plastic, to prevent trapped moisture. Keep silver away from sulfur sources like rubber bands.
For field repairs, carry a mini kit: a few jump rings, a small clasp, two crimps, a collapsible‑eye needle, and one meter of waxed thread. A strand that snaps at a venue can be restrung on the spot well enough to enjoy the rest of the day, then finished neatly back at the bench.
Teaching, Gifting, and Community
Mismatched bracelet sessions are ideal for groups because everyone succeeds. Set out bowls by color and material, invite people to pick a handful that speaks to them, and encourage trading. Provide multiple closure options so beginners can finish confidently. When gifting, include a small tag describing components and care; it turns the present into a conversation and encourages future customization.
Common Pitfalls and How to Avoid Them
- Overcrowding: if the wrist looks overwhelmed, remove one busy element and replace it with a quiet spacer or cord.
- Single‑point failure: do not rely on one thin thread to carry a heavy focal; add wire or double string through stress areas.
- Color scatter: if hues feel random, repeat a dominant color in at least three locations across the stack.
- Clasp annoyance: if a clasp flips or digs, swap its position or use a low‑profile slider.
- Skin irritation: seal raw metal edges, avoid nickel‑heavy components for sensitive wearers, and back rough charms.
Advanced Play: Pattern Within Chaos
Designers often bake a hidden structure into apparent randomness. Try rules such as every third bead must be matte, or each bracelet repeats one motif exactly four times but in different places. Vary interval spacing—a short, short, long rhythm—across materials. The brain senses the order even when the eye cannot articulate it, producing a satisfying, layered effect.
Photography and Documentation
Photograph your stacks flat and on the wrist under diffused daylight. Capture side views to check volume and silhouette under sleeves. Keep a simple log: materials, lengths, sources, and sketches. Documentation helps with repairs, commissions, and teaching notes, and it becomes a personal archive of evolving taste.
From First Bead to Daily Ritual
Wear teaches what the mat cannot. After a week, you will know which strand catches hair, which clasp feels friendliest, which scale best suits your gestures at a desk or in a studio. Iterate. Swap the clasp. Shorten the macramé. Add one bead of contrast to break a monotone. Over months, your stack becomes a lived‑in companion: scuffed in the right places, supple where it bends, quietly stronger at the joins.
Beyond the Wrist: Coordinated Mismatch Across Accessories
Extend the idea to earrings, necklaces, anklets, or bag charms. A pair of earrings might share a metal and a stone family but vary in length and dangle shape; a necklace can echo a bracelet’s focal with subtler beads along the chain. Keep one repeating element—color, metal, or motif—across pieces to signal kinship without uniformity. Even a watch can join the party: replace the strap with woven cords and flanking strands for a soft cuff effect.
Ethos and Joy
DIY mismatched bracelets remind us that making is not about perfection but conversation—between hand and material, vision and constraint, art and everyday life. They celebrate curiosity, patience, and the courage to try again. A humble strand built from beach finds and attic buttons can share space with a carefully wire‑wrapped gemstone; both are honest, both belong. When you step out the door wearing your stack, you carry not only color and form, but a portable record of choices—small, loving decisions that turn the ordinary into the felt and seen. Keep learning, keep noticing, and keep letting your materials suggest the next move. Over time, your work will develop a voice that others recognize, and that you can feel every time your bracelets settle into place.
