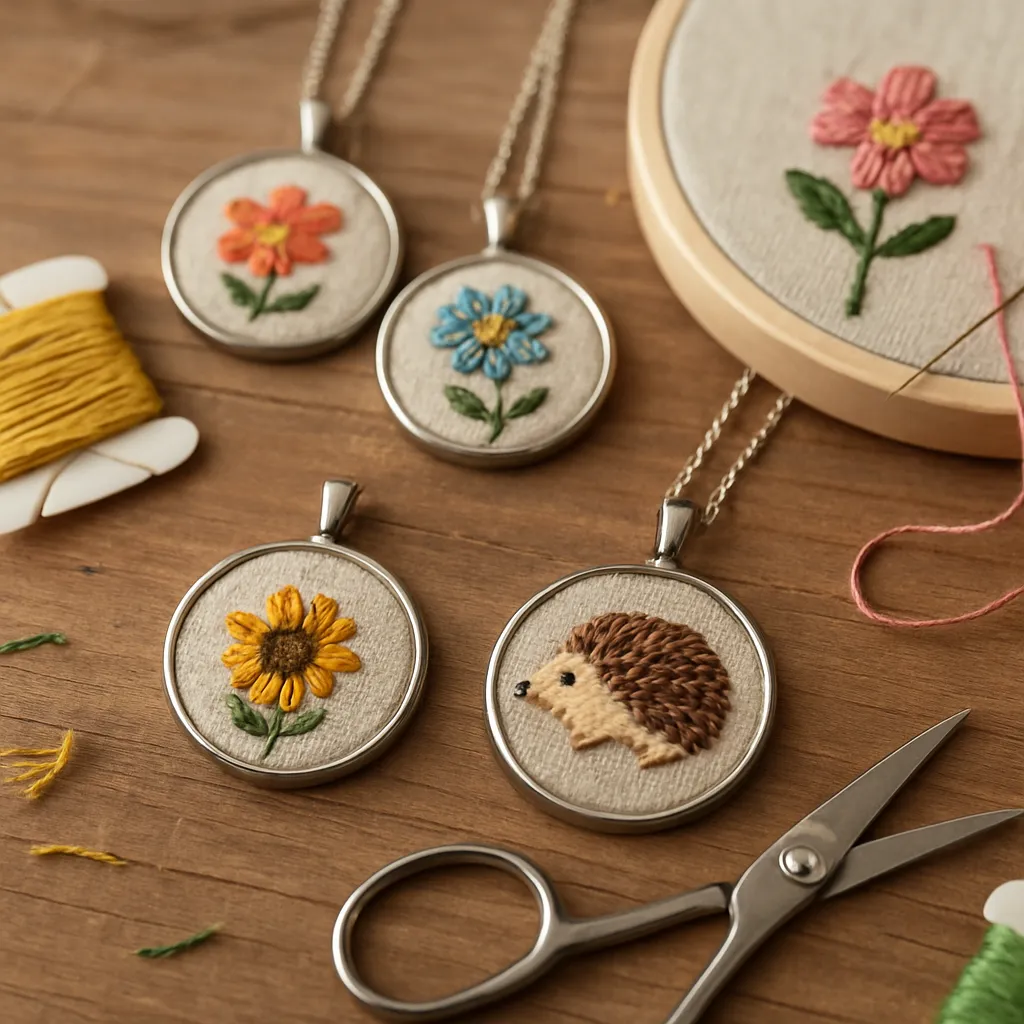
Wearing a tiny landscape, bouquet, or constellation around your neck is a reminder that art can live in motion, breathing with every step and catching the light in fleeting ways. DIY embroidered pendants bring together the intimacy of threadwork and the poise of jewelry, distilling tradition into something personal and portable. They celebrate the patience of handicraft, the rhythm of embroidery, and the charm of miniature art, while offering endless room for experimentation. Whether you crave a meditative stitch session or a meaningful keepsake, these small-scale pieces invite you to translate memory, place, and story into delicate, wearable form.
The Allure of Embroidered Jewelry
Embroidered jewelry has a special magnetism because it sits at the intersection of textile art and ornament. A pendant frames softness within metal, contrasting textures in a way that feels simultaneously vintage and modern. Unlike wall hoops that hang still, a pendant moves—glinting in sun, slipping behind hair, resting against a collarbone. This movement lets color and stitch direction catch light differently, so your design feels alive.
There is also the fondness of scale: shrinking a motif forces you to focus on essentials, to imply rather than declare. It’s a chance to explore restraint in color and stitch while still achieving richness. Finally, these pieces are approachable: you can complete one in an evening, revisit techniques on a small canvas, and gradually build a curated jewelry box—or a generous gift drawer—of fabric treasures.
Materials and Tools You’ll Love
Choosing thoughtful supplies will elevate your results and make the process smoother from the first stitch to the last press.
- Fabrics: tightly woven linen, cotton lawn, poplin, or smooth wool suiting. For luxe versions, try silk dupioni or velvet (with extra care). Avoid loose weaves that fray and swallow tiny details.
- Threads: stranded cotton (1–2 strands for miniature work), silk for sheen, or fine wool for a matte, painterly look. Metallic filament can add glints but demands gentle tension.
- Needles: pick a fine needle (e.g., sizes 9–10 for sharp embroidery needles) to keep holes minimal and lines crisp.
- Stabilizers and interfacings: lightweight fusible interfacing or a sliver of non-fusible cotton behind the ground cloth adds body and discourages shadowing from the back.
- Hoops and frames: a small hoop (4–6 inches) ensures good tension without straining delicate fabrics. Mini “snap” frames work too.
- Jewelry settings: bezel trays, open-back frames, lockets, or wire-wrapped frames. Choose hypoallergenic metals if skin sensitivity is a concern.
- Backings: wool felt, ultrasuede, cork, or leather to cover the back neatly and cushion stitches.
- Adhesives and resins: jewelry-grade epoxy or clear-setting resin for cabochons; archival craft glue if you prefer a non-resin approach. Test on scraps first.
- Tools: fine snips, precision tweezers, awl for careful placement, burnishing stick for bezels, soft cloth for polishing, and a small ruler or calipers for clean measurements.
- Conditioners and finishes: beeswax or thread conditioner to prevent tangling; optional protective sprays designed for textiles (always test for discoloration).
- Lighting: a bright, cool lamp and a magnifier if working with very fine details or dark fabrics.
Design Planning in Miniature
Start by defining mood and message, then translate that idea into a motif that reads clearly at small scale. Miniatures reward clarity: favor clean silhouettes and purposeful negative space. If you personalize, keep letterforms simple and blocky; if you depict flora, simplify petals into strong shapes; for landscapes, choose a few layers (sky, horizon, foreground) and work in tonal bands.
Consider color strategy: a triad or analogous palette will control chaos, while a restrained two-tone scheme can look timeless. Thread sheen is part of color; silk amplifies brightness, matte cotton mutes it. Value contrasts (light vs. dark) matter as much as hue in small compositions, so test swatches to check legibility from arm’s length.
Transfer methods should be crisp and removable: water-soluble pens, light table tracing, or a graphite transfer. For intricate motifs, print the design at final size, then trace minimal guidelines (key contours and anchors) rather than every detail, leaving room for intuitive stitching.
Essential Stitches for Tiny Details
Small work benefits from high-control stitches that curve cleanly and pack color efficiently. Master a handful and you can render almost anything.
- Backstitch: the backbone of neat outlines. Because each stitch links snugly to the last, backstitch creates smooth curves and precise letters.
- Split stitch: a textured line that softens contours, great for botanical stems and hair.
- Satin stitch: for gleaming petals, leaves, or monograms, satin fills provide solid color and directional sheen. Practice tension to avoid ridges.
- Long and short shading: painterly gradients with soft transitions; reduce stitch length in tiny pieces to avoid snagging.
- French knots: dot flowers, stars, or pupils. Use a single wrap for consistency in miniatures.
- Lazy daisy (detached chain): petal clusters and leaflets, tidy and dimensional.
- Seed stitch: confetti texture for meadows, skies, or fabric-like shading.
Mind your thread economy: one or two strands keep edges sharp. Keep the back as flat as possible; bulky carries may shadow through the front when the fabric is compressed into a setting.
Step-by-Step: From Sketch to Wearable Piece
- Choose your setting: measure the inner diameter or trace its profile to create a template. Mark the exact live area; note any lip that will hide outer millimeters.
- Prepare fabric: cut a square with at least 2 cm allowance around the template. Back with lightweight interfacing if the weave is thin.
- Transfer design: draw only anchor lines to avoid crowding the surface with marks. Keep details bold enough to survive scaling down.
- Tension the fabric: place it in your hoop evenly. It should feel drum-tight but not distorted. Retension during work if needed.
- Stitch with intention: start with outlines (backstitch or split), then fill larger areas (satin, long and short). Work from the center outward to prevent warping, and occasionally rest the workface down on a soft cloth to relax thread memory.
- Refine highlights: add knots, couch a fine metallic for veins or borders, or dot the eye of a bird. Less is usually more at this scale.
- Secure thread ends: weave tails under neighboring stitches rather than tying bulky knots. Trim neatly on the back.
- Test-fit: lay the stitched fabric over the setting’s template; confirm that key elements sit within the visible window. Adjust with a few stitches if balance feels off.
- Mount: for bezel trays, lightly glue a felt or card disc inside as a filler if depth is excessive. Center the embroidery, then gently press into place using a burnishing tool and protective cloth. For domed glass or resin, ensure the fabric is completely dry and free of lint before sealing.
- Finish the back: line with ultrasuede or felt, cutting a tidy disc and adhering it with a thin, even layer of glue. Press under a book wrapped in parchment until set.
Framing and Professional finishing Touches
How you frame and close your pendant defines its longevity and comfort in wear. If using open-back bezels, line both sides neatly to prevent stray light from exposing the reverse. If your setting has prongs, seat the fabric evenly and bend prongs gradually from opposite sides to keep tension balanced. Glass cabochons magnify texture—delightful for dense satin—but they can also trap moisture; dry thoroughly before sealing.
Consider the chain: delicate designs shine on fine cable or snake chains; rustic botanicals may suit ribbon or waxed cord. Match metals and findings to your design language: brushed brass for vintage warmth, polished silver for cool clarity, or blackened steel for contemporary contrast.
Before calling it finished, perform a comfort test. Run the pendant gently across your inner wrist: if any edge snags, sand or burnish it; if the bail creaks, tighten or replace the jump ring. Package with a soft cloth and a brief care card to elevate the gift experience.
Creative Variations to Explore
- Monochrome elegance: a single hue in multiple values creates sculptural depth without color complexity.
- Gradient gardens: fade from dusk blues to dawn pinks across a mini horizon using long and short shading.
- Metallic accents: couch a hair-thin filament for halos, veins, or constellations—just a hint to capture light.
- Beaded botanicals: one or two seed beads at a flower’s center add dimension; keep proportion modest.
- Negative-space silhouettes: leave the subject unstitched and shade the background; the eye completes the form.
- Double-sided lockets: mirror or complement a motif on the back panel; secret messages, dates, or coordinates work beautifully.
- Miniature landscapes: compress sky, land, and foreground into stacked bands with a strong horizon line.
- Texture play: combine split, seed, and couching to mimic bark, moss, or woven cloth.
Care, Wear, and Long-Term durability
Textile jewelry is resilient if treated thoughtfully. Keep pendants clear of perfume and lotions, and store them away from direct sun to protect dyes. If the front gathers lint, roll a clean kneaded eraser gently across the surface and brush with a soft spoolie. Should a thread snag, don’t pull; massage it back with a fine needle tip and coax the loop to the reverse.
Humidity control matters, especially with natural fibers and metal settings. If you live in a damp climate, include silica gel in storage. For pieces sealed with resin, avoid prolonged heat that may soften the dome. Gentle handling and occasional inspection—tightening a jump ring or refreshing a cord—will help the pendant age beautifully.
Symbolism and Storytelling in Motifs
Wearable art gains power when it carries a story only you know. Consider the language of flowers (forget-me-nots for remembrance, rosemary for fidelity), migratory birds marking a journey, or wave lines for resilience. Abstract geometry can reflect the mathematics of your craft, while constellations tie to a birth date or decisive night sky. Stitching initials with a hidden sign—a tiny star, a number of petals equal to siblings, a color borrowed from a childhood room—turns the pendant into a talisman.
Responsible Sourcing and sustainability
Thoughtful material choices make small projects kinder to the planet. Upcycle fabric from heirloom handkerchiefs, well-loved shirts, or thrifted blouses with fine weaves. Seek organic cotton or peace silk when possible, and favor metal settings made from recycled alloys. Natural dye threads (indigo, madder, weld) bring subtle hues and a connection to craft traditions.
Buy tools that last—good snips, stable hoops, and refillable pens—then care for them so you replace less. Save thread offcuts for stuffing pin cushions or color tests, and share remnants with local makers. Packaging can be beautiful and minimal: kraft boxes, cotton ribbon, and a reusable polishing cloth.
Troubleshooting: Common Pitfalls and Quick Fixes
- Fabric puckers in the bezel: the cloth may be too thick or unevenly tensioned. Trim interfacing, restretch in the hoop, and consider clipping tiny relief cuts outside the visible edge before setting.
- Blurry outlines: choose a finer strand count and shorten stitch length. Switch to backstitch for curves and anchor stitches more frequently.
- Visible back shadows: add a thin backing layer; avoid long thread carries; keep the reverse tidy with woven-in ends.
- Adhesive bleed: use sparingly with a toothpick, apply to the setting rather than the fabric edge, and allow partial curing for tack before pressing.
- Resin fogging: ensure zero moisture; warm the resin part bottles gently (per manufacturer guidance) to reduce bubbles, and dome in thin layers.
- Uneven glass magnification: align the cabochon carefully and select flatter domes for highly detailed designs to prevent distortion.
- Metal tarnish rubbing off: pre-polish, seal when appropriate, or choose stainless or plated findings designed for frequent skin contact.
Small Business and Gifting Tips
Presentation shapes perception. Mount pendants on simple cards printed with care instructions and the story of the motif. For online shops, photograph at multiple angles: a clean product shot, a lifestyle image showing scale on a neck form, and a detail close-up that reveals stitch direction. Natural window light and neutral backdrops flatter texture.
Pricing should account for design time, stitching hours, materials, and overheads; track your averages across projects to avoid guesswork. Offer personalization (initials, birth flowers, coordinates) within defined parameters to streamline workflow. Provide gentle care guidance to reduce returns and nurture collector loyalty.
Project Ideas That Spark the Imagination
- Birth flower series: twelve blooms in a consistent palette, one for each month.
- Night-sky medallions: zodiac shapes in backstitch constellations over a gradient indigo ground.
- Travel talismans: tiny landmarks or contour maps from meaningful places.
- Family initials: a cluster of small pendants on one chain, each letter in a different stitch texture.
- Seasonal botanicals: four pendants that rotate through the year—buds, full bloom, seed heads, bare twigs.
- Mini fauna: whales, moths, and songbirds in monochrome silhouettes with a single accent color.
- Heirloom remixes: stitch onto a scrap from a grandparent’s garment, adding dates or a phrase along the curve.
Ergonomics, Accessibility, and Joyful Practice
Comfort increases consistency. Sit with shoulders relaxed, elbows supported, and work close enough that you’re not craning forward. If eyesight or fine motor control is a concern, consider a clip-on magnifier, high-contrast fabrics, and larger, bold motifs with fewer color changes. Break sessions into short, deliberate bursts; tiny pendants invite a pace that suits body and mind.
Mindful habits—thread waxing, short cuts of floss, parking needles in a magnetic minder—reduce frustration and keep your rhythm. A small tray with a lip prevents runaway beads and jump rings. Keep a notebook nearby for thread recipes and diagrams, so you can recreate a perfect leaf months later.
Beyond Necklaces: Expanding Your Mini Textile Jewelry
Once you master pendants, the same techniques adapt elegantly to brooches, rings, tie bars, cufflinks, and hair slides. Rings demand extra reinforcement and low-relief stitches to avoid snagging. Brooches benefit from sturdier backings and locked stitch paths. Key fobs and bag charms let you scale designs slightly larger and play with bolder contrasts. With each format, reassess friction points and choose stitches that balance beauty with function.
Historical Threads and Contemporary Flair
Textile adornment stretches across centuries—from embroidered amulets in ancient cultures to Victorian sentimental jewelry housing needlework and hair. You’re part of a lineage of makers who carried love and memory as wearable proof of care. Modern twists—neon palettes, graphic abstraction, and digital-to-analog pattern conversions—prove that tradition and innovation aren’t opposites but dance partners.
Mind the Details: Scale, Contrast, and Clean Edges
Three principles keep miniature pieces convincing. First, scale: reduce motif complexity as size shrinks, privileging silhouette. Second, contrast: use value and texture changes to separate elements when color alone won’t. Third, edges: crisp outlines, smooth satin, and invisible thread tails frame the story decisively. Train your eye by photographing the piece at different distances; if the design reads clearly as a postage-stamp thumbnail, you’ve nailed it.
Ethical Metals and Skin-Friendly Choices
For wearers with sensitivities, choose stainless steel, titanium, niobium, or gold-fill findings. If working with brass or copper, seal contact areas with a jewelry-safe lacquer or pair them with cords that keep metal off skin. Recycled silver and brass are widely available; look for makers who provide traceability. Over time, build a palette of go-to settings that match your aesthetic and values.
Why Pendants Make Perfect Keepsakes
Pendants travel with their owners through ordinary and exceptional days. They’re the right mix of visible and intimate: close enough to touch, yet elegant from across a room. The act of stitching a keepsake—choosing colors that echo a memory, hiding initials in a leaf vein, matching chain length to a wearer’s favorite neckline—imbues the piece with care that machines can’t replicate. Small doesn’t mean simple; it means distilled, concentrated meaning in a jewel-sized canvas of thread and fabric.
Glossary Glimpse for Confident Making
- Bezel: the metal rim or tray that frames and protects your embroidery.
- Bail: the finding that connects the pendant to a chain or cord.
- Cabochon: a domed glass or resin piece that covers and magnifies.
- Couching: laying a thread on the surface and securing it with tiny stitches.
- Undercutting: trimming fabric close to a curve without nicking stitches, to reduce bulk under a bezel lip.
A Gentle Workflow You Can Repeat
Developing a repeatable process transforms a charming idea into a polished practice. Batch tasks: cut multiple fabric blanks at once, pre-fuse interfacing, sort thread palettes in small tins, and prepare setting trays with measured fillers. Stitch two pieces while the glue on a third cures. Keep a simple checklist by your workstation—measure, transfer, hoop, outline, fill, detail, secure, fit, mount, back, polish—so even a late-night session ends with tidy steps.
Closing Thoughts: A Tiny Canvas with Big Possibilities
DIY embroidered pendants are an invitation to work slowly in a fast world, to turn quiet hands into storytelling engines. With only a few supplies and a pocket of time, you can craft artifacts that feel like secrets and declarations at once. Start with a single motif that matters to you, mind the scale and sheen, and trust that each small stitch compounds into beauty. When a friend asks where you found it, you’ll smile—because you made it, thread by thread, and the world is better for it.
