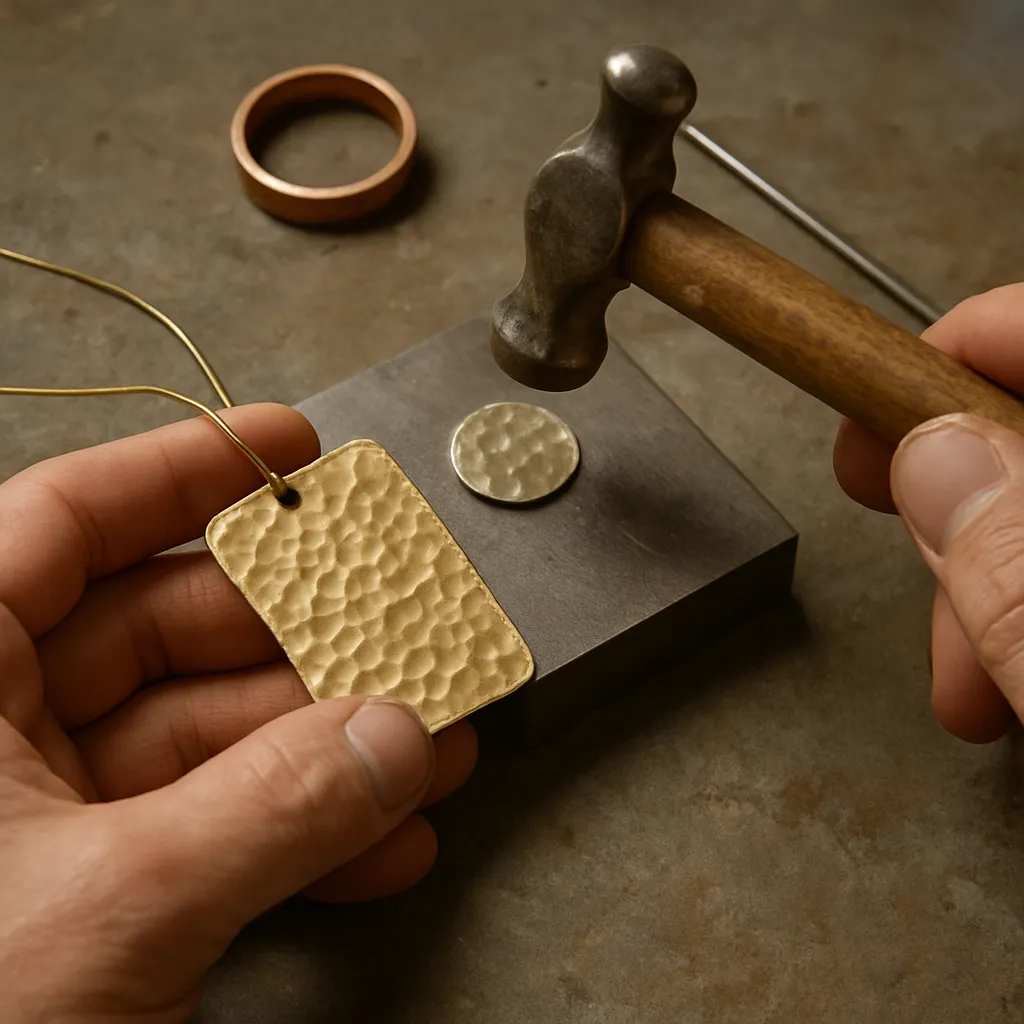
Hammered metal jewelry speaks to the hand and the eye at once: every strike records a moment of intention, every facet catches light in a way machines can’t replicate. Whether you are new to metalwork or refining an existing practice, developing hammered effects will expand your vocabulary of form and surface, letting you produce pieces that feel alive, balanced, and distinctly your own. This guide explores the tools, techniques, and design thinking behind hammered textures, from simple dimples to dramatic forged tapers, and shows how to finish, protect, and present your work with confidence.
Why Hammered Metal Captivates
Hammering does more than decorate. It hardens and shapes metal, altering how a piece moves on the body and how it reflects light across small planes. Hammered facets can be crisp and glittering, or soft and velvety like pebbled river stones. The surface records time and touch, making even minimalist designs feel human and intentional. Historically, hammered ornament appears in nearly every metalworking culture: ancient cuffs with rhythmic peen marks, planished bowls whose delicate undulations tell of weeks at the anvil, and architectural fittings whose struck edges diffuse glare to protect the eye. The resulting visual language blends utility and aesthetics in a way that continues to resonate.
At a technical level, a hammered effect can guide the viewer’s gaze, emphasize line and silhouette, and hide minor wear from daily use. For the maker, it fosters repeatable methods: by choosing a particular hammer face, strike angle, and spacing pattern, you create a texture signature that ties a collection together. Beyond form and finish, hammering deepens your connection to craftsmanship, inviting you to develop dexterity, rhythm, and sensitivity to feedback from the bench block.
Essential Tools and Workspace Setup
You don’t need a full metal shop to create beautiful hammered textures, but a few dedicated tools make a big difference. Choose quality where it counts—hammer faces and the striking surface—then add incrementally as your ambitions grow.
Hammers and Mallets
Each hammer face leaves a distinct imprint. Common types include:
- Ball-peen hammer: One flat face and one hemispherical face. The dome creates dimpled, starlike facets and is ideal for organic sparkle.
- Cross-peen and straight-peen hammers: Narrow, rounded faces that compress metal in one direction, producing linear textures and subtle directional flow.
- Planishing hammer: Broad, slightly crowned faces for refining and evening surfaces after heavier shaping.
- Texturing hammers: Interchangeable faces or pre-patterned heads for quick, repeatable effects (stipple, stripe, waffle).
- Rawhide or nylon mallet: Moves or flattens metal without marring; useful for straightening or work over forms.
Prepare hammer faces: sand and polish out defects so you don’t stamp unintended scratches onto your metal. A mirror-smooth face yields crisp high shine, while a satin face creates a softer gleam.
Striking Surfaces and Supports
- Steel bench block or small anvil: Provides the rebound and resistance you need. Place it on a leather sandbag or dense mat to dampen noise and absorb shock.
- Stakes and mandrels: Bracelet mandrels, ring mandrels, and mushroom stakes support forming and truing circular shapes without introducing kinks.
- Texture plates and stamps: Optional tools to expand your surface vocabulary.
Cutting, Shaping, and Finishing Tools
- Jeweler’s saw with 2/0–6/0 blades for intricate shapes; metal shears for straight cuts.
- P files (flat, half-round, needle files) for smoothing cuts and refining profiles.
- Sandpapers (320–2000 grit), Scotch-Brite pads, and polishing compounds for finishing.
- Rotary tool or flex shaft with abrasive and polishing bits, used thoughtfully for edges and selective shine.
- Tumbler with steel shot for burnishing and work-hardening delicate components.
Safety and Ergonomics
- Eye protection: Always. Tiny chips, wire ends, or abrasive dust can fly unpredictably.
- Hearing protection: Repeated strikes on steel are loud; protect your ears, especially in small rooms.
- Dust control and ventilation: Wet-sand when possible; ventilate for patina chemicals.
- Body positioning: Keep wrists neutral, shoulders relaxed, and strikes controlled to protect long-term ergonomics.
Choosing Metals and Gauges
Non-ferrous jewelry metals are forgiving and widely available. Each responds to hammering in a slightly different voice:
- Copper: Soft, affordable, and great for practice. Accepts heat and chemical patinas beautifully.
- Brass: Slightly harder than copper, golden hue, takes bright textures well.
- Nugold/Jewelers bronze: Warm gold-like color without plating.
- Sterling silver: Traditional choice with excellent working properties and luster.
- Fine silver: Very soft, takes exquisite textures but can distort easily without reinforcement.
- Gold-filled: Surface behaves like karat gold; avoid filing through the clad layer; texture gently.
- Aluminum: Light, won’t tarnish easily; choose jewelry-safe alloys; avoid deep hammering that can split edges.
Gauge determines feel and durability. For earrings and small pendants, 24–20 ga (0.5–0.8 mm) works well. For cuffs and bangles, 18–14 ga (1.0–1.6 mm) offers sturdiness and resilience. Thicker stock supports deeper textures and shaping without buckling.
Understanding Metal Behavior
Metal changes as you strike it. Repeated deformation aligns and compresses crystals, creating work-hardening that stiffens and strengthens thin parts. Hardening is helpful—ear wires and thin bangles gain spring and durability from it—but it also increases brittleness, which can cause cracking if you push too far without relief. To reset, use annealing: controlled heating that softens the metal by returning crystals to a more relaxed state. Alternate cycles of shaping and softening let you go farther with less risk.
On a practical level, watch for signs that metal is resisting: your hammer bounces sharply, loudness increases, and progress slows. That’s your cue to soften or change tactics. Additionally, avoid striking near unsupported edges; they may curl or ripple. If distortion occurs, straighten using a rawhide mallet on a flat block before continuing.
The face of the hammer and the angle of impact shape the texture. A flat face dialed to neutral produces even, reflective facets. Tilt it slightly and you’ll create elliptical marks that lead the eye. With a peen, parallel lines compress one axis, subtly lengthening the other—a useful move when you want visual flow along a bracelet or feather out a ring shank.
Preparing Stock: Cutting, Flattening, and Edge Care
Begin with clean, flat stock. Mark shapes using a fine scribe or permanent pen, then cut with a jeweler’s saw for curves or shears for straight lines. Deburr edges carefully: first with a file to remove sharpness, then with 400–600 grit paper to round corners. A comfortable edge matters for pieces that contact skin and also prevents accidental cuts during hammering.
If sheet arrives slightly bowed, flatten it on a bench block with a rawhide mallet before texturing. Your goal is a true, even surface that will record hammer marks consistently. Wipe off oils and fingerprints so they don’t interfere with patina or polishing later.
Core Hammered Effects
Ball-Peen Dimples
Use the dome face to create a field of circular facets. For a sparkly effect, keep spacing tight and strikes light; for rugged terrain, vary force and overlap slightly. Practice on scrap to learn how changing the angle, pressure, and sequence changes the visual rhythm.
Planished Facets
With a slightly crowned flat face, deliver consistent, medium-strength taps in a grid. Rotate the work between sets to even out directionality. This technique refines surfaces after forging and produces a crisp, mirror-bright shine when polished, thanks to minute planes that catch light. It’s also a way to introduce controlled stiffness; gentle planishing can true a bent ring or stabilize a thin disc.
Cross-Peen Lines and Directional Flow
Use a cross-peen to swipe elongated marks. Parallel lines create a satin grain like brushed fabric; crisscross layers yield a twill or basket weave impression. Direction matters: following the length of a cuff can visually lengthen the wrist; working across can add width and substance.
Stipple and Waffle Patterns
Texturing hammers stamp dense, fine patterning. The results are quick and consistent, excellent for backgrounds or to disguise wear on high-contact pieces like rings.
Edge Forging and Tapers
Striking just inside the edge compresses metal inward and thickens the rim, creating a subtle bevel or a pronounced lip. On wire or strip, rhythmic edge blows can draw a graceful taper toward a clasp hook or earring drop. This is where artistry meets controlled forging.
Technique: Striking, Rhythm, and Control
Hold the hammer near the end of the handle for better control with less effort. Use your wrist and a small arc rather than lifting from the shoulder. Keep your non-dominant hand steady on the workpiece, fingers safely tucked away. Aim for consistent cadence: identical distance, angle, and force per strike. When creating even textures, work from one edge to the other in systematic passes; for organic looks, vary spacing and rotate the piece frequently.
Mark a light pencil grid on beginners’ projects to learn uniform spacing. Over time, you’ll feel and hear when you’re hitting true—the ring changes when the face lands flat.
Shaping Projects: Earrings, Rings, and Cuffs
Hammering doesn’t just decorate; it forms jewelry in three dimensions. A thin strip can become a rigid hoop; a simple disc, a gently domed pendant; a length of wire, a springy ear hook.
- Earrings: Hammered ear wires remain slim yet resilient. Discs, leaves, and strips gain visual interest and stiffness from texturing, preventing bend-and-dent mishaps.
- Rings: Textures hide daily scuffs and add grip. Use a mandrel for roundness and to adjust size after hammering.
- Cuffs and bangles: Edge forging gives presence and a professional profile; directional textures reinforce flow around the wrist.
Project: Minimal Hammered Disc Earrings
This speedy project highlights core skills: cutting, texturing, doming, and finishing.
- Cut two 16–20 mm discs from 22 ga sheet (copper, brass, or sterling).
- Deburr and sand edges to 600 grit.
- Lightly dome on a dapping block with a nylon punch to create a soft curvature.
- Place each disc concave side down on the bench block and use a ball-peen to apply even dimples across the face. Rotate often for random sparkle.
- Punch or drill a 1–1.5 mm hole near the rim; deburr carefully with a countersink.
- Polish to taste: tumble for all-over gloss or hand-buff for mixed sheen.
- Attach handmade hammered ear wires for cohesion.
Project: Textured Stacking Rings
These slim rings are comfortable, stylish, and perfect for exploring pattern variation.
- Cut three strips of 18–20 ga sterling or brass: each length equals inner circumference plus 2.5–3 mm for filing and joining (if soldering) or plus overlap for a cold rivet joint.
- Pre-texture each strip flat: one planished, one cross-peen linear, one ball-peen dotted. Keep ends untextured for clean joints.
- Form around a ring mandrel, bringing ends flush.
- If soldering, join and pickle/clean, then refine texture lightly to blend. If using a rivet, drill matching holes and set a tiny tube or wire rivet.
- True on the mandrel with controlled taps; lightly texture again to crisp edges.
- Finish with a brushed or glossy polish; oxidize recesses if desired for contrast.
Project: Forged Cuff with Graduated Texture
A wider canvas showcases direction and depth.
- Cut a 14–16 ga strip, 15–18 mm wide, 150–165 mm long (adjust for wrist size).
- Round and smooth ends; mark a light centerline and quarter points.
- Using a cross-peen, create denser strikes near the ends, spacing that opens toward the center to produce a gradient effect.
- Edge-forge slightly along both long sides to thicken and bevel, avoiding distortion by alternating sides each pass.
- Anneal if resistance becomes high, then continue refining.
- Form on a bracelet mandrel with a rawhide mallet, checking fit and oval shape.
- Finish: brushed exterior with polished edges, or deep patina with highlighted rims.
Finishing: From Satin Glow to Mirror Brilliance
Finishing amplifies your texture. A high polish on a planished surface produces scintillation as tiny planes act like mirrors; a matte finish on a dense stipple yields a soft glow. Consider these strategies:
- Hand sanding progression: 400 → 600 → 800 → 1200 → 2000 grits, always changing direction between grits to remove previous scratches.
- Scotch-Brite or radial bristle discs for controlled satin, preserving crispness.
- Tumbling with stainless shot for all-over burnish and gentle work-hardening on delicate shapes.
- Selective polishing: high shine on edges, matte on fields, to frame the pattern.
Coloring and Protective Coatings
Surface color deepens character:
- Sulfur-based patina on silver and copper alloys adds dark contrast in recesses; polish raised facets to sparkle against shadows.
- Heat color on copper and brass produces straw-to-plum hues. Quench strategically to freeze colors, then seal.
- Sealers: microcrystalline wax or clear lacquers help preserve finishes and slow tarnish, especially on brass and copper.
Cold Connections and Decorative Accents
When you want to add stones or additional elements without heat, lean on cold techniques:
- Rivets: wire or tube rivets permanently lock layers. Plan texture before drilling; countersink lightly to seat cleanly.
- Tabs: cut from the base sheet, bent over to capture components; texture tabs to integrate visually.
- Jump rings and wraps: add movement and modularity; hammer rings lightly to harden and give a faceted outline.
Design Thinking: Rhythm, Balance, and Wearability
Strong hammered jewelry balances shape, scale, and surface. Use repetition and variation to create rhythm—repeat a peen mark, rotate orientation every few rows, then introduce a counterpoint region for interest. Consider contrast: rough next to smooth, dark against bright, dense pattern beside open field. Above all, prioritize comfort. Smooth edges, even weight distribution, and articulated connections keep pieces wearable for long days.
Give attention to composition: treat the body as a landscape where jewelry draws lines and punctuates space. Long hammered bars elongate the neckline; wide cuffs ground the wrist; petite studs offer sparkle without distraction. Build a coherent collection by standardizing certain elements—hammer type, edge bevel, or finish—so different pieces speak the same visual language.
Troubleshooting Common Issues
- Warping or Oil-Canning: If sheet domes unintentionally, you are striking more on one side than the other or too close to unsupported edges. Flatten, anneal if necessary, and resume with lighter, more evenly distributed blows.
- Mushroomed Edges on Wire: You’re striking directly on the end or at a steep angle. File square, chamfer slightly, and strike just inside the perimeter.
- Inconsistent Texture: Your cadence varies. Slow down and work in passes. Consider marking light guide lines or using a metronome to train rhythm.
- Over-Hardened Metal Cracking: Alternate stages of forming with anneals. Watch for springy rebound and a higher, sharper sound as signals to soften.
- Dents or Unwanted Marks: Polish hammer faces and keep the bench block immaculate. A single burr can stamp itself onto your piece repeatedly.
- Ring Size Drift: Hammering on a mandrel can enlarge a ring. Start a quarter size small, then texture and true to final size.
Sourcing and Sustainability
Choose reputable suppliers that disclose alloys and, when possible, offer recycled content. Keep a dedicated scrap container by metal type; many refineries buy clean scrap, closing the loop. Small offcuts become charms, studs, and test blanks. Durable tools last decades if maintained—another quiet investment in sustainability.
Tool Care and Noise Management
Maintain hammer faces with fine emery and polish. Reface as needed to keep strikes clean. Keep the bench block oiled lightly to prevent rust, and dress any nicks with a stone. To manage noise, set your block on a leather bag, cork, or rubber pad; clamp the base if possible, and use hearing protection for longer sessions.
Expanding Your Technique Set
Once comfortable, explore mixed processes that complement hammered effects:
- Chasing and repoussé for sculpted relief that can be refined with planishing.
- Roll-printing textures on annealed sheet, then accenting with peen marks for depth.
- Keum-boo on fine silver surfaces, followed by selective planishing to embed and brighten gold foil highlights.
- Reticulation on high-silver alloys for dramatic, wrinkled terrain under crisp hammered borders.
Experiment with sample tiles. Record variables: hammer type, face prep, strike density, angle, metal, gauge, and finishing sequence. Building a personal library trains your eye and hand faster than sporadic notes.
Workflow: From Idea to Finished Piece
A reliable sequence helps you produce consistent results:
- Sketch silhouettes and texture maps to plan rhythm and negative space.
- Cut and prep blanks; deburr and round edges.
- Texture flat where possible for even impressions.
- Form and true using mandrels and mallets, alternating with anneals as needed.
- Refine edges and surfaces; add patina or polish selectively.
- Protect with wax or lacquer; assemble findings; final quality check for sharp spots and symmetry.
Presentation, Care, and Client Education
Present hammered surfaces under diffused, raking light to reveal facets and fine detail. Provide care cards explaining how to clean and protect finishes. For oxidized pieces, recommend mild soap, soft cloths, and occasional wax rather than aggressive polishing. For bright finishes, suggest treated cloths and airtight storage. Clear guidance improves longevity and trust.
Artistic Voice and Practice
Technique is a means to an end: expressing your voice with confidence. Consider what draws you—subtle shimmer, rugged terrain, architectural lines—and build a family of patterns that share that sensibility. Practice with intention: set aside time for drills (spacing, cadence, angled strikes), then apply them to small objects you can complete in an hour. Repetition at manageable scale produces faster growth than sporadic complex projects.
Keep a small notebook of discoveries—how a slightly domed hammer face transformed glare into glow, how a cross-peen gradient suggested movement, how altering bevel width changed the perceived mass of a cuff. Over time, you’ll internalize these cause-and-effect relationships and navigate them fluently, a hallmark of mature metallurgy knowledge expressed through the hand.
Glossary of Useful Terms
- Bench block: Hardened steel surface for striking and support.
- Peen: The non-flat end of a hammer (ball, cross, or straight), used for specialized marks.
- Planish: To refine and smooth with light, even hammer blows over a firm support.
- Anneal: To heat and soften metal, relieving stresses accumulated during forming.
- Work-harden: Stiffening that results from plastic deformation (hammering, rolling, bending).
- Bevel: Angled edge formed by filing or forging; visually frames a piece and increases perceived thickness.
- Rivet: Mechanical fastener that holds components without soldering.
- Patina: Controlled color change via chemicals or heat to accent surface and texture.
Putting It All Together
Hammered jewelry rewards curiosity and patience. Start with a clean striking surface, a prepared hammer, and a simple shape. Attend to cadence and angle; observe how each blow alters light, stiffness, and contour. As your muscle memory forms, push further—edge-forge a bangle into sculptural elegance, layer textures for visual complexity, and tune finishes to guide the eye. With a disciplined yet playful practice, you’ll create pieces that feel elemental and modern, as comfortable on a gallery wall as on a favorite wrist.
In the end, the magic lies not only in tools or techniques but in how you orchestrate them. Like any art rooted in material, hammered metal jewelry becomes a dialogue between intention and response: your hand sets the pulse; the metal answers with shimmer, strength, and story. Let that conversation evolve, and your work will carry an unmistakable signature—quietly confident, richly tactile, and deeply aligned with the enduring values of handwrought design.
May your bench ring with steady rhythm, your edges shine, and your surfaces sing. With practice, a mindful workflow, and attention to the smallest detail, you’ll transform simple sheet and wire into wearable landscapes that reflect light, movement, and your growing mastery of the hammer.
As you continue, revisit fundamentals often: consistent strikes, clean tools, thoughtful finishing. These basics multiply your results more than any single specialty technique. And remember: the most powerful detail can be one word’s worth of intention—the way you place each mark. In that spirit, let the next piece be a study in restraint, or in exuberance, but always in clarity. The hammer is a pencil, the bench block your paper; write your designs with purpose, and your jewelry will endure.
With these principles in mind—surface variation, structural integrity, and refined finishing—you’re equipped to move from practice blanks to cohesive collections. Each project will teach something new, whether about springback in a narrow ring, the subtlety of a peen’s edge, the life added by a softened bevel, or the nuance of a sealed patina over satin facets. Keep learning, keep iterating, and let the joy of hammered metal guide your evolving craft.
As your portfolio grows, share process photos and texture libraries with your audience. Educating clients adds value and deepens appreciation for what sets handcrafted work apart. Align your making pace with your vision, and protect your creative energy with a tidy bench and reliable habits. With every piece, your sensitivity to the material increases—an upward spiral anchored in skill, intention, and the living surface that only a hammer can draw.
In this evolving practice, clarity meets tactility: the play of light across struck planes; the quiet authority of a beveled rim; the way a cuff’s gradient suggests motion. Keep returning to the essentials—clean strikes, even support, deliberate finishing—and you will find new breadth inside the simple act of marking metal. Over time, your textures become vocabulary, your shapes syntax, and your finished jewelry a sentence in the language of handworked adornment—eloquent, durable, and uniquely yours.
Before you put down the hammer for the day, note what worked, what needs refinement, and one experiment to try next session. Perhaps rotate the cross-peen 15 degrees to alter grain, or swap to a slightly domed planishing face to reduce glare. Small tests accumulate into insight, and insight into signature. With patience and delight in the process, hammered metal will continue to reward you—with shimmer under soft light, lasting strength on the wrist and finger, and a growing sense of mastery at the heart of your practice.
Finally, trust your hand. The most compelling hammered effects arise from a balance of constraint and exploration. Give yourself structure—measured spacing, consistent sequences—then allow variation to breathe life into the pattern. In that balance, you’ll find the sweet spot where technique supports expression, and expression turns metal into wearable art that feels simultaneously modern and timeless.
From your first textured discs to complex forged cuffs, the path is the same: prepare well, strike with intention, refine with sensitivity, and finish with care. The tools are simple, the possibilities vast, and the results—when thoughtfully made—carry the unmistakable grace of hand and hammer.
What begins as an exploration of surface often grows into a way of seeing: watching how raking light reveals facets, how a bevel reads as strength, how a gradient of marks suggests movement. With every piece, you clarify your preferences and sharpen your skills. The reward is more than an object; it’s a practice, a way of working that connects mind, material, and the rhythm of the hammer into something quietly luminous.
Return to the bench, gather your blanks and hammers, and let the next series unfold—guiding line and light with the persistent gentleness of your hand and the precise, musical persuasion of the strike. In the interplay of control and surrender lies the enduring beauty of hammered metal jewelry, a testament to attentive making and the elegant simplicity of good tools well used.
May your textures reflect your voice, your finishes honor your forms, and your methods remain adaptable. Keep refining. Keep exploring. And let every piece carry a touch of the essential: calm intention, structural clarity, and the vivid presence that only the hammer can write into metal.
Along that journey, knowledge accumulates in your fingers: the sound of even contact, the feel of a square edge well-burnished, the resilience added by a final pass of light strikes. Carry those lessons forward, and your work will speak with conviction—sparkling under gallery lights, resilient in daily wear, and resonant with the quiet authority of handwrought adornment shaped by deliberate, artful blows.
When you pause to reflect on your path, remember the unassuming heroes: a polished hammer face, a flat bench block, good lighting, and an ordered sequence. These make the difference between struggle and flow. Cultivate them, and you’ll have a foundation strong enough to support any technique you choose to add, from subtle edge-forging to layered textures and beyond.
One last thought as you expand your repertoire: variations in scale dramatically change perception. The same ball-peen pattern on 6 mm studs feels like scintillating frost; on a 25 mm pendant it becomes a woven galaxy. Explore scale shifts within a collection to create dynamic families of pieces that feel related yet distinct, anchored by your chosen tools and your sharpened sense of surface.
With steady practice, attentive observation, and a willingness to experiment, hammered metal ceases to be merely a finish and becomes a language for shaping light, form, and meaning. In that language, your work will find its audience and its place—alive with detail, tempered by technique, and unmistakably made by a thoughtful hand.
Let that hand continue to search and refine, guided by the interplay of resistance and response—the small revelations that happen with each strike. In doing so, you create not just jewelry but a body of work that embodies skill, sensitivity, and the enduring allure of the hammered surface.
From bench to body, each piece completes its journey when worn, catching daylight on the street or lamplight at dinner. The facets you struck now speak in motion, their cadence matching the wearer’s steps. This is the reward of hammered jewelry: alive in use, expressive in rest, and anchored in the time-honored dialogue between maker, material, and light.
And as that dialogue matures, your identity as a maker becomes unmistakable—that subtle curve you favor, that balanced gradient you return to, that precise edge you’ve learned to forge. Keep that thread, refine it, and let it guide your collections forward. In the hands of a dedicated maker, hammered metal remains endlessly fresh, precise, and evocative—an elegant convergence of technique and touch.
With the hammer as your instrument and the bench as your stage, continue composing pieces that shimmer with intention and endure with grace. Your next strike begins another story.
As your practice evolves, you will know when to shift from exploration to refinement, from wide experiments to narrow focus. That timing is part of your voice, and it grows from experience: the sweep of a peen that finally feels right, the way a bevel settles into harmony with a form, the perfect balance between matte field and polished rim. Hold onto those moments. Let them chart the course of your craft and help you build a legacy of work that is honest, resilient, and exquisitely alive with light.
In that spirit, let the hammer lead you forward—steady, patient, and always attentive to the conversation in metal.
May the journey reward you with clarity of intent, depth of skill, and pieces that carry the unmistakable resonance of thoughtful, hand-shaped design.
And may each surface you strike become a small field of meaning, a place where material, motion, and mind meet—where the quiet authority of good tools and deliberate method leaves its signature in facets that catch the light just so.
That is the enduring promise of hammered metal jewelry: simplicity of means, richness of result, and a practice that remains endlessly generative, from your first careful dimple to your most ambitious forged composition.
When you step back from the bench and the light skims across your latest piece, you’ll see not only marks in metal but the map of choices that shaped them—choices grounded in understanding, honed by repetition, and elevated by intent. Carry that knowledge into the next piece, and the next; let it refine your touch and expand your range; and trust that, in time, your work will shine with a voice that is unmistakably yours.
With these tools, ideas, and methods at hand, you’re well equipped to create jewelry that is strong in structure, resonant in surface, and deeply satisfying to wear. The conversation between hammer and metal awaits; step into it, listen closely, and make something that feels inevitable when finished, as though it could only ever have been made this way—by your hand, one deliberate strike at a time.
