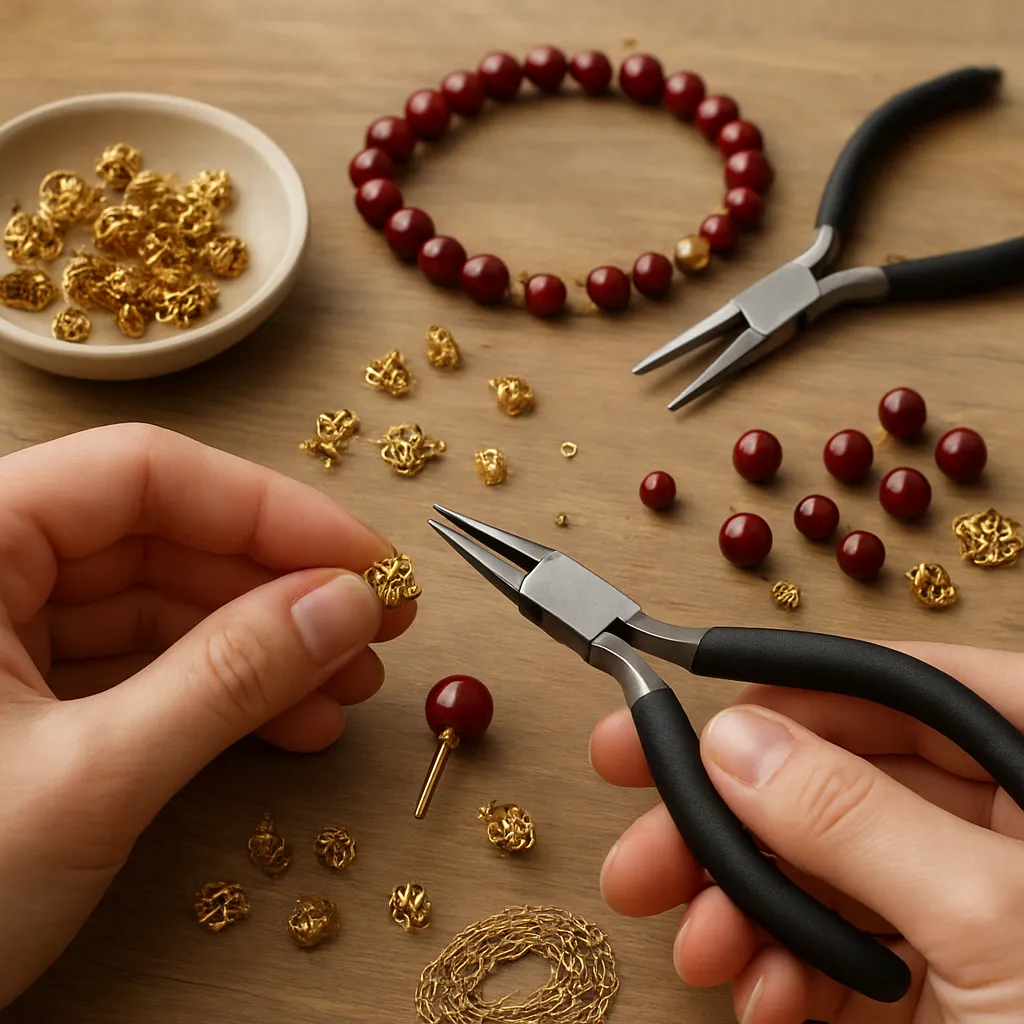
Bead caps are small metal or non-metal findings that hug a bead like a tiny crown, transforming a simple sphere or cylinder into a finished component with personality. They can suggest botanical forms, vintage elegance, geometric rigor, or bohemian flair, all while solving practical needs such as hiding knots, reducing friction, or stabilizing stacked elements. Whether you’re aiming for heirloom-level craftsmanship or playful weekend makes, this guide shows how to choose, size, and combine bead caps for earrings, necklaces, bracelets, tassels, and more—plus the techniques that bring these details together cleanly and securely.
What Bead Caps Are and Why They Matter
At their simplest, bead caps are shaped cups with a central hole. They sit at one or both ends of a bead to frame it, protect it from adjacent components, and give the eye a clean start and stop point. Bead caps range from whisper-thin filigree to solid, architectural domes. Form follows function: a cone cap can gather multiple strands into a tassel; a domed cap can visually anchor a delicate gemstone; a flared cup can echo a floral motif. Even a minimal cap adds definition, creating rhythm across a strand and elevating otherwise plain components.
Common varieties include:
- Cup caps: Hemispherical or shallow dishes that gently cradle the bead, ideal for round, oval, and rondelle shapes.
- Cone caps: Tapered forms for tassels, multi-strand terminations, or elongated beads; also useful for hiding knots or crimps.
- Filigree and lace caps: Pierced, light, and decorative—great when you want ornamentation without much weight.
- Petal and floral caps: Organic shapes that look especially good with pearls and natural stones.
- Geometric caps: Hex, stepped, or hammered designs that suit modern, minimal styles.
Materials run the gamut: brass, copper, sterling silver, gold-fill, stainless, bronze, aluminum, pewter, plated alloys, and even carved wood, horn, resin, or clay. Each brings weight, color, and surface response: sterling brightens cool gemstones; aged brass warms earthy palettes; stainless resists tarnish and holds up to heavy wear. Surface textures—smooth, hammered, granulated, stamped—create micro-contrasts in light and shadow that amplify perceived detail and texture.
Essential Tools and Materials
To make jewelry with bead caps, you don’t need a full metalsmithing bench. A small toolkit and a few consumables cover most needs:
- Pliers: Round-nose for forming loops, chain-nose for gripping and opening jump rings, and flat-nose or nylon-jaw for straightening wire without marring.
- Cutters: Flush cutters for clean wire ends; keep a second, older pair for cutting tougher base metals or memory wire.
- Measuring tools: Ruler and inexpensive digital calipers help with cap/bead sizing and repeatability.
- Bead reamer or awl: To gently widen or de-burr bead holes so caps sit flush.
- Files and burnishers: Smooth sharp wire ends; a cup bur polishes loop tips for snag-free wear.
- Stringing media: Beading wire (e.g., 7–49 strand stainless nylon-coated), silk or nylon threads for knotted strands, elastic for stretch bracelets.
- Findings: Headpins, eyepins, jump rings, crimps, crimp covers, clasps, and chain.
- Adhesives and sealants: Flexible jewelry glue for cord ends, microcrystalline wax or lacquer for protecting patinas.
Stock a small variety of cap sizes and finishes. A practical starter set might include: 4, 6, and 8 mm cup caps in brass and sterling, 10–12 mm cone caps for tassels, and a few statement filigree caps for focal beads. Add caps with different hole sizes to accommodate thread, wire, or multiple strands.
Design Principles That Make Bead Caps Sing
Great bead-cap design goes beyond matching sizes. It’s about guiding the eye and balancing forces—visual and physical—so the piece feels inevitable and right. Consider these principles:
- Symmetry vs. asymmetry: Capping both ends of each bead creates formal order; capping only one end or alternating sizes introduces surprise and lightness.
- Proportion: A cap should reference the bead it crowns. Start with a cap diameter roughly 60–80% of the bead’s widest point for cups; for cones on tassels, size to the total bundle thickness plus a small margin.
- Balance: Mix heavy and light moments. Use larger, denser caps near the focal and taper to smaller caps toward the clasp so the necklace drapes comfortably.
- Contrast and repetition: Repeat a cap shape to establish rhythm, then break the pattern with a distinctive focal cap to create emphasis.
- Color and finish: Combine matte caps with polished beads for tactile contrast; pair antiqued caps with stones that have visible inclusions to echo an organic mood.
- Directional cues: Cones point the eye. Aim their tips toward a pendant or away from the face to lengthen the neckline visually.
On the practical side, remember that caps can hide knots, compress frayed cord ends, and protect gemstones from hard metal neighbors. When you design with purpose, the aesthetic choices also solve engineering problems—leading to fewer repairs and a more durable piece.
Fitting and Sizing Bead Caps to Beads
Good fit is non-negotiable: a cap that’s too small will ride up and expose gaps; too large will wobble. Use calipers to measure a bead’s maximum diameter (D). Aim for these guidelines:
- Cup caps: Cap diameter ≈ 0.6–0.8 × D for subtle framing; 0.8–1.0 × D for dramatic coverage. Domed caps can be smaller because they bite into the curve.
- Flat or shallow caps: Favor the higher side of the range to avoid a “satellite dish” look on very round beads.
- Cones for tassels: Inner diameter at the base should exceed the bundled strands’ diameter by 0.5–1.0 mm to allow clean insertion and glue flow if needed.
- Hole sizes: Ensure cap hole ≥ your wire or cord plus bead-hole tolerance. For 0.46 mm beading wire, a 1.0–1.5 mm cap hole is typical; for 20–22 ga headpins, most standard cap holes are sufficient.
Test fit with a mock-up: slide cap-bead-cap onto a scrap headpin and evaluate from multiple angles under strong light. Look for flush contact; if you see daylight or rocking, try a deeper cap, a slightly larger size, or a bead with a less extreme curve. A gentle ream of the bead hole can sometimes improve alignment and fit without changing the cap.
Techniques You’ll Use Again and Again
Simple loops on headpins and eyepins
Perfect simple loops and you’ve unlocked a world of capped dangles, earrings, and charm clusters.
- Slide cap, bead, cap onto a headpin. Leave 6–8 mm of space above the top cap for your loop.
- Bend the wire 90° using chain-nose pliers right where it exits the cap for a tight seat.
- Trim tail to ~8–10 mm. Use round-nose pliers to roll a neat loop back toward the cap. Aim for a loop centered over the bead hole.
- For eyepins, start with a pre-made loop and attach to chain or ear wire before closing the second loop to lock orientation.
Closed and wrapped loops for durability
Wrapped loops are stronger and look professional on heavier beads.
- After the 90° bend, shift to round-nose pliers and form a partial loop.
- Hold the loop with chain-nose pliers and wrap 2–3 tight coils down to the cap.
- Trim and tuck the tail with care so it won’t snag fabric.
Crimping and cap integration on strung pieces
When you’re stringing a full necklace, bead caps can mark segments or guard delicate beads from metal spacers.
- Slide a crimp, a wire guardian or crimp cover, then your clasp. Return the wire through the crimp and a few adjacent beads.
- Seat caps against beads before crimping to lock their positions.
- Use a crimping tool for a folded then rounded crimp, or a sturdy chain-nose plier squeeze for small projects.
Stacking multiple caps
Nest smaller caps inside larger ones to build “architectural” fittings. Filigree over domed solid, or petal over hammered cup, adds depth. Ensure inner cap holes are large enough for the stack and that the outer cap doesn’t hide the loop.
Step-by-Step Projects to Learn by Doing
1) Classic bead-cap earrings
Materials: two matched focal beads (8–12 mm), four cup caps, two decorative spacers (optional), two headpins, ear wires.
- Assemble headpin: cap–bead–spacer–cap.
- Form a wrapped loop, ensuring the top cap is snug with no wobble.
- Attach to ear wires. Make the second earring, matching loop size and dangle length.
Tip: For perfect twins, measure wire tails before wrapping and count wraps—usually two and a half around 22 ga wire looks refined.
2) Layered pendant with filigree cap
Materials: large round gemstone (14–20 mm), one deep filigree cap, one domed solid cap, heavy headpin (20 ga), bail or large jump ring.
- Stack domed cap under the bead and filigree cap on top.
- Check sightlines: if the filigree covers too much stone, downsize or choose a taller, narrower filigree.
- Finish with a strong wrapped loop sized to your bail. Add a short length of chain or leather cord.
3) Strung necklace with capped stations
Materials: 3 focal beads with pairs of caps, smaller accent beads, beading wire, crimps, clasp, jump rings.
- Layout: small beads for 2–3 cm, then cap–focal–cap station. Repeat three times, spaced evenly.
- String and check drape on a bust or your palm: the caps should face outward to catch light.
- Crimp ends, cover crimps for a polished look.
4) Cone-capped tassel pendant
Materials: cone cap (10–16 mm base), chain or silk tassel, strong glue (if using cord), headpin, accent bead.
- Gather tassel strands with a temporary tie, test-fit into cone. Trim if needed for clean taper.
- If using chain, attach chains to a small jump ring that sits inside the cone; for cord, glue and insert.
- Add an accent bead above the cone and create a wrapped loop to attach to a necklace.
5) Charm bracelet with capped dangles
Materials: chain bracelet, a selection of small beads with tiny caps, headpins, jump rings, clasp.
- Make 10–20 capped dangles with simple loops.
- Space them along the chain, balancing colors and weights so the bracelet doesn’t twist.
- Test on wrist; adjust placement so charms lie flat.
6) Rosary-style wire-wrapped chain with bead caps
Materials: small rounds (4–6 mm), petite caps, 22–24 ga wire, clasp.
- Make a capped bead unit with wrapped loops on both sides.
- Before closing the second wrap, hook onto the previous unit.
- Continue to desired length, attach clasp with small, secure jump rings.
7) Bead-cap flowers for brooches or hairpins
Materials: petal-style caps, small pearls or crystals, thin headpins, filigree base or hairpin finding.
- Invert petal caps to become “flowers.”
- Place a tiny bead inside each cap and create a loop on short headpins.
- Wire or stitch several onto a filigree base; cluster to create dimension.
Mixing Metals, Finishes, and Surface Interest
Metal mixing adds life to bead-cap work. Combine warm brass with cool silver, or dark gunmetal with rosy copper. Keep one finish dominant (about 70%) and use a second for accent so the palette doesn’t fragment. Consider tactile variation: polished caps next to matte beads, hammered next to smooth. If you antique or oxidize components, plan the whole piece: an isolated dark cap can look accidental, but repeated along the strand it reads intentional.
Finishing Touches: Patinas, Sealing, and Polishing
Surface finishing allows you to tune the mood of your caps and unify mixed sources. A light patina on bright caps can settle them into earthy designs; gentle polishing on oxidized caps reveals high points and leaves recesses dark, emphasizing detail.
- Oxidation: Sulfur-based solutions darken silver and copper alloys. Clean, degrease, patinate, then neutralize and rinse. Polish highlights with fine steel wool or a Sunshine cloth.
- Sealants: Use microcrystalline wax for a natural feel, or a clear lacquer for stronger protection on raw brass or copper. Test on a spare cap to ensure the sheen suits your piece.
- Tumbling: Stainless shot in a rotary tumbler can work-harden and shine metal components before assembly. Avoid tumbling soft stones or porous beads.
If you’re mixing plated and raw metals, seal raw surfaces to slow tarnish and minimize galvanic contrast. For components that touch skin frequently (earrings, bracelet edges), soft-buffed finishes feel luxurious.
Troubleshooting and Common Pitfalls
- Wobbly caps: Either the cap is too large or the bead curve is too steep. Try a deeper cap, a smaller diameter, or insert a tiny spacer bead inside the cap to shim the angle.
- Gaps between cap and bead: Ream bead holes slightly so the cap sits deeper; alternatively choose a cap with a narrower aperture or a domed interior.
- Plating wear: Use caps with thicker plating or switch to solid metal for high-friction points like bracelet charms.
- Misaligned loops: Start the 90° bend exactly at the cap exit point. Check from all sides; adjust before wrapping to preserve geometry.
- Twisting necklace strand: Distribute heavy capped stations symmetrically or taper sizes from center to clasp. Add a small extender chain to improve drape.
- Sharp wire tails: File or cup-bur every cut end. Tuck with chain-nose pliers, feeling with a fingertip for snag-free finishes.
Care, Wear, and Longevity
Pieces with bead caps last longer when the engineering supports the design. For bracelets, favor wrapped loops over simple loops; for necklaces, use strong crimps and consider wire guardians to protect the cable at the clasp. After wear, wipe with a soft cloth to remove skin oils, which accelerate tarnish. Store silver and copper pieces with anti-tarnish strips. Keep soft stones away from harsh cleaners—polish the metal, not the bead. Re-string frequently worn strands annually if they see heavy stress, especially if caps press against fragile beads like turquoise or pearl.
Sourcing Smart: Quality, Budget, and Sustainability
Bead caps are small, but their quality is visible. Choose clean castings with crisp detail and consistent holes. When buying online, examine macro photos; look for uniformity across multiples, since variation can disrupt patterns. Sample small quantities from several suppliers—order swatches in different sizes and finishes. Solid metals cost more up front but polish and age beautifully.
For budget builds, plated findings are fine in low-abrasion contexts like earrings and pendants. Reserve solid or thickly plated caps for bracelets and key friction points. Stretch your budget by mixing premium caps at focal areas with simpler caps elsewhere.
Upcycling is both economical and aligned with sustainability: harvest caps from broken vintage jewelry, re-plate tired pieces, or antique bright surplus to harmonize mismatched batches. Consider local craft fairs and small-batch makers for unique, hand-fabricated caps that become signatures of your brand.
Style Play: Aesthetics Across Eras
Caps can shift a piece’s era instantly. Pair baroque pearls with ornate, oxidized caps for a Victorian whisper, or match clear quartz with brushed stainless cups for a Bauhaus minimalism. In boho designs, scatter petite petal caps like wildflowers along a beaded meadow. For menswear or unisex looks, opt for industrial cones and hammered cups with stone like onyx or lava.
Advanced Variations
- Negative-space crowns: Use oversize filigree caps that float beyond the bead’s edge, creating air and shadow.
- Reversed caps as spacers: Seat a cap upside down between beads to create saucer spacers that lighten a dense strand.
- Cap-on-cap architecture: Stack 2–4 caps with alternating profiles for miniature totems; stabilize with tight wraps.
- Fiber hybrids: Insert leather, silk, or macramé bundles into cone caps for mixed-media tassels.
- Cold connections: Rivet caps to flat elements (e.g., coin pearls on a metal backplate) for statement brooches.
- Clay cores: Polymer or air-dry clay domes formed inside a cap can create a custom-fit seat for irregular stones.
Ergonomics and Wearability
Don’t let ornate caps make pieces uncomfortable. Scan for edges that could catch hair or knitwear. In earrings, keep the center of gravity close to the ear by using lighter caps or hollow filigree. For necklaces, ensure the heaviest capped segment sits at the sternum and that tapering prevents the strand from flipping. Round sharp interior edges of caps that meet silk or elastic so they don’t saw through over time.
Color and Material Pairings That Work
- Brass with turquoise, carnelian, wood: golden warmth complements earthy tones.
- Oxidized silver with moonstone, labradorite: dark metal heightens glow and schiller.
- Bright sterling with pearls and faceted crystal: classic luminosity for formal pieces.
- Copper with moss agate, jasper: autumnal palettes with organic textures.
- Gunmetal with hematite, onyx: modern, graphic silhouettes; watch weight for comfort.
Quality Control and Professional Finish
Before calling a piece done, run a quick checklist:
- Do all caps sit flush with consistent reveal?
- Are loop sizes uniform and oriented the same way?
- Are crimps neat and, if visible, capped with crimp covers?
- Are sharp ends filed and tucked?
- Is the weight distribution comfortable and visually steady when worn?
Tiny improvements compound. Matching loop diameters and ensuring every cap hugs its bead converts “handmade” into “hand-finished.” When selling, include a small care card and a polishing cloth; it underscores value and increases customer confidence.
Process Flow for Efficient Making
Batching tasks streamlines production without sacrificing artfulness:
- Design and layout: choose caps and beads, mock up segments.
- Pre-fit: ream tight beads, sort caps by size and finish.
- Metalwork: cut wire lengths, pre-form consistent loops using the same plier jaw position.
- Assembly: move from center outward on necklaces; mirror builds for earrings.
- Finish: polish, seal, and final inspect under bright, raking light.
Learning to See: Training Your Eye
Photograph your prototypes on neutral backgrounds and at human scale. Zoom in: are caps crowding the bead, or do they create a breathing margin? Rotate the piece to observe how light travels across cap contours. Seeking a feel of poised balance? Remove one element, then add a different size or finish. A/B testing on the bench will sharpen your sense faster than any rule-of-thumb.
Safety and Comfort in the Studio
- Eye protection when cutting wire or reaming beads.
- Dust control: ream under water or use a mask for stone dust.
- Tool maintenance: sharp cutters and smooth plier jaws reduce slips and scratches on caps.
Keep a small parts tray or bead board with ridges; caps roll easily. Label your cap sizes and finishes, since 6 mm and 7 mm look deceptively similar in a hurry.
From Beginner to Signature Style
Start by mastering simple capped earrings and single-station pendants. As you gain fluency, push structure: stack caps, invert them, or create transitions that make the cap itself a focal. Over time, your choices—preferred cone profiles, a certain hammered cup, a unique finish combo—coalesce into a recognizable voice. That’s how a tiny component becomes your hallmark.
Quick Reference: Rules Worth Remembering
- Fit first: cap diameter ~60–80% of bead for cups; test every combo.
- Seat tight: bend wire right at the cap exit for no-gap loops.
- Repeat with intent: rhythm is soothing; disruption creates focus.
- Finish clean: no sharp edges, consistent loops, protected patinas.
- Wear test: comfort and drape are as important as looks.
Putting It All Together
Bead caps do more than decorate. They choreograph light, create visual punctuation, and quietly reinforce structure. With attention to proportion, a bias for clean mechanics like wrapped loops, and a willingness to iterate, you’ll turn everyday beads into heirloom components. Practice until your hands memorize the distances and angles; let your eye refine the rest. Soon you’ll reach for caps not as an afterthought but as a primary dialect of your design language—one that adds enduring beauty, function, and versatility to everything you make. And when you look back at your early pieces, the difference will be clear: steadier loops, truer symmetry, deeper detail, and that quiet confidence that comes from well-honed wire-wrapping.