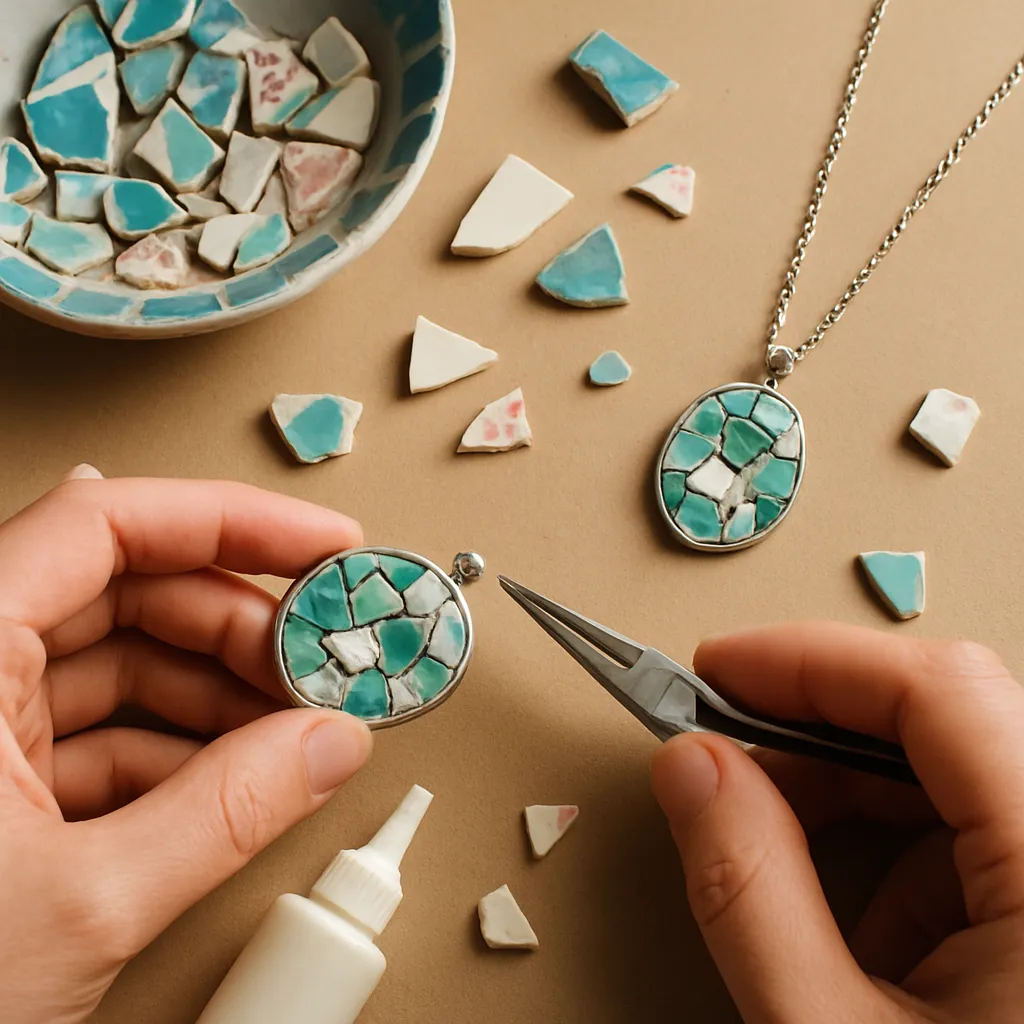
Mosaic jewelry made from broken ceramics turns overlooked fragments into miniature works of wear-able art. Each shard carries a history—tea shared, dinners celebrated, patterns once circling a plate—and when set into metal, those stories travel with the wearer. The practice is practical and poetic: it’s deliberate upcycling, a tactile lesson in patience, and an invitation to design with limits rather than blank canvases. With two hands, a few basic tools, and a mindful approach to safety, you can craft pendants, earrings, rings, and bracelets that look refined yet feel grounded in everyday life. This guide walks you through materials, techniques, and design principles so you can build pieces that balance beauty and strength. Along the way, you’ll learn how to work with adhesives and grout, how to compose with irregular shapes, and how to honor the humble shard—and the memories it holds—without turning the process into guesswork. Most importantly, you’ll gain confidence in the slow, satisfying rhythm that good handcraft requires and discover how small details add up to enduring, wearable craftsmanship.
The allure and heritage of mosaic jewelry
Long before the term “DIY” existed, artisans laid tesserae into mortar to immortalize scenes in villas and temples. Rome produced micromosaics of astonishing precision, while Byzantine floors told sweeping visual epics. In the 19th century, travelers cherished pocket-sized micromosaics set into brooches and watch fobs, proof that mosaics could be intimate as well as monumental. The practice of embedding broken ceramic into decorative objects blossomed later in “pique-assiette,” a French folk approach that prizes the charm of repurposed tableware—tea saucers, tiles, and chipped pitchers. Mosaic jewelry continues that lineage on a smaller scale, using the language of fracture—edges, glints, negative space—to frame patterns and colors. It also resonates with aesthetics that celebrate imperfection, especially the Japanese philosophy of wabi-sabi and the spirit of kintsugi, where repaired cracks are honored instead of hidden. While authentic kintsugi involves lacquer and powdered gold on a reunited vessel, mosaic jewelry borrows the cultural sentiment: beauty in repair, meaning in remnants, and respect for materials that have served before.
Making jewelry with ceramics is a study in constraints. Unlike cutting gemstones to a plan, you often begin with existing motifs: a vine snaking a rim, a cobalt wave, a dotted border. The thrill lies in isolating those micro-motifs and letting them play against metal and light. Because ceramics reflect rather than transmit light, they read with graphic clarity; even a small shard can carry a field of color or a crisp line. The result is visually strong, refreshingly personal, and wonderfully tactile.
Materials and tools
Working with shards does not demand a jeweler’s full bench. Start small, invest thoughtfully, and upgrade as your projects mature. Essential items include the following; choose quality where safety or precision matter.
- Broken ceramics: Porcelain, stoneware, and earthenware with sturdy glazes; avoid crazed glazes that flake. Unpatterned white shards make great neutrals.
- Cutting tools: Tile nippers for ceramic, wheeled glass nippers for finer control, and a small hacksaw with a carbide rod blade for delicate scoring.
- Shaping and smoothing: Diamond files, needle files, and wet/dry sandpaper (220 to 1200 grit). Wet work reduces dust and yields smoother edges.
- Personal protective equipment: Safety glasses, nitrile gloves, and a dust mask or respirator rated for fine particulates (when dry sanding). Keep a damp work surface to trap dust.
- Jewelry bases: Pendant trays, ring blanks, cuff bracelet blanks, bezel cups, and glue-on pad findings. A metal bezel frames and protects shards while adding polish.
- Adhesives: A two-part epoxy adhesive for structural bonds; UV resin for clear doming; cyanoacrylate for quick tacking (use sparingly to avoid bloom).
- Fillers and finishes: Pigmented or neutral grout for a traditional mosaic look; clear sealant to protect porous clay bodies and stabilize matte surfaces.
- Layout aids: Modeling clay or museum putty to dry-fit pieces, tweezers, toothpicks, cotton swabs, isopropyl alcohol, and a silicone mat.
- Metal findings: Jump rings, ear wires, chains, clasps, and pin backs in hypoallergenic alloys (stainless steel, sterling, titanium). Consider nickel regulations in your region.
- Finishing touches: Microfiber cloth, polishing pads for metal, wax-based metallic paste for a faux kintsugi highlight, and small brushes.
Good tools pay for themselves in control and repeatability. The finer your files and sandpapers, the cleaner your edges, which improves both comfort and perceived quality. When in doubt, slow down, wet the work, and let the abrasive—not your hands—do the heavy lifting.
Sourcing and preparing broken ceramics
Great jewelry begins with evocative shards. Thrift stores, flea markets, online local listings, and charity shops often yield patterned plates and tiles with chips or cracks that disqualify them from table duty but make them ideal for art. Ask pottery studios for discard bins; students and professionals often scrap test tiles and seconds that are glazed, fired, and begging for a second life. If you’re reworking family pieces, confirm the value before you cut—some heirlooms are better preserved intact. When in doubt, photograph a piece thoroughly before harvesting fragments; the image can accompany finished jewelry as provenance.
Consider safety with vintage glazes. Some older wares may contain lead or cadmium. While jewelry isn’t tableware, perspiration and friction contact the skin, so exercise caution. Lead-check swabs provide a basic screen; if a piece tests positive or you’re uncertain, skip it for wearable projects or fully encapsulate with a robust, jewelry-safe barrier coat. Be extra cautious with jewelry for children, and comply with local safety standards for metal and coatings.
Breaking and trimming work best when controlled. Place the ceramic between layers of thick cloth or in a zip bag wrapped in a towel. Score a line where you want a controlled break using a carbide scribe or scoring wheel, then apply gentle pressure with nippers. Think like a mosaicist: aim to capture graphical elements—leaf tips, stripes, small florals—rather than large rectangles. Keep shards in small trays by color or motif for faster layout later.
Soften edges for comfort and safety. Work over a basin with a bit of water and sand edges using diamond files or wet/dry paper. This reduces airborne dust and yields an edge that won’t snag clothing or skin. If a glaze chips at the edge, feather it with a fine file and consider later masking with metal or grout. Clean all pieces with warm water and mild soap, then wipe with isopropyl alcohol to remove oils that could interfere with bonding.
Design foundations: from motif to masterpiece
Good jewelry is a study in scale, rhythm, and relationships. Start with the motif. Turn the shard until a tiny landscape emerges: a curve becomes a wave; a petal becomes a fan. Build a hierarchy—one element as the star, supporting shapes as chorus. This is the heart of composition: deciding where the eye lands first and how it travels.
Color is your second compass. Borrow classic palettes—blue and white, black and ivory, green and gold—or extract a triad from the shard’s pattern. A quick refresher in color theory helps: complements (opposites on the wheel) pop, analogous colors (neighbors) soothe, and a restrained palette looks chic. Because ceramics are opaque and glossy, even small fields read powerfully; reserve large, high-chroma shards for pendants and use quieter shards for earrings to avoid visual heaviness.
Balance mass with negative space. A bezel tray simplifies framing but can feel heavy. Open-backed designs feel light but demand meticulously smooth edges. Think about the wearer, not just the photograph: large earrings might photograph beautifully but feel uncomfortable; a pendant that dominates the collarbone can fight with necklines. Sketch or mock up with museum putty to audition arrangements before you commit with glue.
Step-by-step: building a pendant, ring, or pair of earrings
- Step 1: Select the base. Choose a pendant tray or ring blank with a slight lip for protection, or plan an open-backed piece with a custom wire frame if your shard’s edges are silky smooth.
- Step 2: Dry-fit the shard(s). Use a dot of removable putty to test positions. Rotate the shard to find the most expressive orientation. Consider jump-ring placement so a pendant hangs level.
- Step 3: Prepare bonding surfaces. Lightly scuff the underside of the shard and the metal base with a fine abrasive for better mechanical key. Wipe both with alcohol and allow to dry.
- Step 4: Mix and apply epoxy. Use a measured, two-part epoxy adhesive. Apply a thin, even layer to the base and a touch to the shard. Seat the shard with gentle pressure; avoid squeeze-out onto the visible face.
- Step 5: Align and secure. Check alignment from all angles. Use low-tack tape or a small weight to hold position while curing. Respect full cure times—usually several hours to overnight.
- Step 6: Decide on grout. If you’ve composed multiple shards within a frame, fill gaps with fine grout. Mix to a peanut-butter consistency, press in with a toothpick, and wipe the face clean with a barely damp cloth before haze sets.
- Step 7: Seal and protect. After grout cures, apply a thin sealant to unglazed edges or matte clay to prevent staining and improve wear resistance. Avoid flooding glossy glazes unless you want a domed look.
- Step 8: Finish metal. Attach jump rings, ear wires, or chains. Burnish or polish metal surfaces and check for rough spots that could catch on garments.
- Step 9: Wear test. Before gifting or selling, wear the piece for a day. Note comfort, swing, snag potential, and balance. Small tweaks now prevent returns later.
Techniques and variations
Grouted versus tight-fit mosaics
Grout emphasizes the “mosaicness” of a piece and can unify shards that don’t quite meet. Neutral grout lets the pattern sing; colored grout can frame or contrast. Tight-fit mosaics read more like inlay—sleek and modern—but demand greater precision in cutting and edge finishing. Try both approaches and note how they change the visual weight and mood.
Open-back elegance
Open-back designs feel airy and refined. They rely on immaculate edge work and smart engineering—hidden micro-tabs, a wire collar, or prongs soldered to a frame. The payoff is significant: light passes around rather than through, making glossy glazes sparkle while keeping the piece feather-light.
Inlay into clay or wood
Polymer clay, air-dry clay, or hardwoods can host ceramic inlays. Press shards into a prepared surface, remove them, cure the substrate if needed, then bond permanently. Sand flush for a seamless look. Seal wood appropriately to stabilize humidity changes that could stress the bond.
Faux kintsugi highlight
To honor a crack or seam, run a whisper of wax-based metallic paste or enamel paint along the line. Used sparingly, this creates a sophisticated nod to repair culture and draws the eye without overpowering the design.
Micro-mosaic moments
For micromosaic effects, clip finer-than-rice shards from test tiles or pastel porcelain. Set them in thin epoxy within a shallow tray, placing tesserae with tweezers. Work in small zones to avoid premature curing. This approach shines in oval lockets and narrow ring channels.
Safety, ergonomics, and workflow
Sharp edges, silica dust, and fumes are the main hazards. Break and sand wet whenever possible; water tames shards and binds dust. Wear eye protection regardless—chips travel farther than you think. Ventilate when using resins or strong epoxies, and choose adhesives formulated for jewelry. Keep a “shard station” with a silicone mat and a magnetized wand or tape loop to collect micro-debris. Dispose of dust and slurries in the trash, not the sink, to protect your plumbing.
Work in short sessions to protect hands and neck. Nipping and filing are repetitive; rotate tasks and stretch. Stabilize your elbows on the table and bring the work to your eye level rather than hunching. A small, damp towel under the work keeps pieces from skittering and catches particles. Label curing trays by time and date so you don’t disturb bonds prematurely.
Finishing details that make pieces sing
Edge comfort equals perceived quality. Run fingertips along every contour; if you feel a snag, your customer will too. Micro-bevel the back edge of glazed shards to prevent chipping. Wipe glossy faces with a lint-free cloth and a drop of glass cleaner only after full cure. For metals, use polishing pads or a sunshine cloth; avoid tumbler polishing finished mosaic jewelry, which can stress joints and abrade glazes.
Choose findings that match the design’s voice. Rustic shards pair well with antiqued brass; minimalist fragments favor brushed silver or matte black steel. Add a contrasting jump ring for a visual accent or a larger bail to fit wider chains and scarves. When appropriate, include a micro-engraved tag with your maker’s mark; provenance increases perceived value and trust.
Think about durability. Pendants tolerate weight, but earrings and rings suffer knocks. For rings, recess shards slightly below a protective lip; for bracelets, place mosaics on the least-exposed area of the cuff. Seal unglazed bodies and grout to resist cosmetics and skin oils. Communicate care instructions with every piece.
Care, longevity, and simple repairs
Jewelry built with ceramics is tougher than it looks if worn mindfully. Advise customers to remove pieces during sports, heavy lifting, and vigorous kitchen work. Clean gently with a damp cloth; avoid ultrasonic cleaners and prolonged soaking. Store separately in a pouch to prevent scratches between pieces. If a shard loosens years later, scrape residual adhesive carefully, roughen both surfaces, and rebond with fresh epoxy. Hairline grout cracks can be wicked with thin CA glue, then over-touched with a matching grout slurry for invisibility.
Troubleshooting and quality control
- Adhesive haze on glaze: Likely from cyanoacrylate bloom. Polish with plastic-safe polish or switch to epoxy with cleaner cure.
- Shard wobbles after cure: The bed was uneven. Lift, level the base with a thin epoxy skim, let it thicken slightly, then reset the shard.
- Grout crumbles: Too dry or under-mixed. Rehydrate a tiny batch, pack firmly, and seal after curing.
- Visible gaps that collect lint: Backfill with tinted epoxy or a finer-grain grout; consider a micro-bead border as a decorative fix.
- Weighty earrings: Reduce shard size, thin the base, or switch to lever-backs that distribute load more comfortably.
- Tarnishing findings: Use higher-grade metals or apply a light wax coat and include a care card advising storage away from humidity.
Ethics, story, and the value of materials
Part of the charm lies in the shard’s story. Note where each piece came from—a Paris flea, your grandmother’s saucer, a local potter’s glaze test—and include a small card with that tale. Honesty about reuse matters. Don’t harvest from intact, historically significant pieces; prioritize chipped, cracked, or orphaned items. When claiming eco benefits, be specific: how many grams of ceramic were diverted from landfill, or how much of your packaging is recycled. Concrete details turn vague green claims into credible sustainability statements.
Pricing, presentation, and selling
Price based on time, materials, overhead, and margin. A simple formula multiplies your hourly rate by time spent (including prep and finishing), then adds materials and a 10–20% buffer for consumables. Wholesale requires keystone pricing (retail roughly double wholesale), so build margins with efficiency rather than cutting quality. Photograph on neutral backgrounds and on a model; scale matters online. Show the shard’s origin side-by-side when possible to anchor the story. Offer gift-ready packaging with protective padding; sharp corners should never threaten the unboxing experience.
At markets, display shards in small dishes near finished pieces to invite conversation. Provide a tactile sample of your smoothing work so buyers feel the comfort. Keep a concise care card tucked into each box. Consistency—fonts, tone, studio name—builds recognition over time.
Project blueprints to try
Blue-and-white oval pendant
- Select a willow-pattern plate fragment with both blue motif and white field.
- Shape to fit an oval tray, preserving one elegant curve of the pattern along the lower edge.
- Bond with epoxy, cure, then outline the interior seam with a hairline of metallic paste for a subtle highlight.
- Hang on a mid-weight chain with a contrasting dark jump ring for punctuation.
Modern geometric studs
- Clip triangular tesserae from a matte, monochrome tile.
- Wet-sand to near-identical shapes; undercut slightly to nestle into flat pad posts.
- Epoxy in place; after cure, file edges to mirror one another for a crisp, architectural look.
Heirloom teacup ring
- Harvest a petal-shaped sliver from a floral teacup rim, prioritizing a mini-rosebud.
- Set into a low-profile bezel cup on an adjustable ring shank; leave a micro-gap for comfort.
- Seal unglazed edges; finish with a brushed metal texture that complements the delicate graphic.
Minimalist cuff with linear shards
- Choose two or three slim, rectangular shards from a monochrome tile.
- Arrange parallel along a flat cuff blank with tiny spacers; align edges precisely.
- Tight-fit, no grout; a laser-straight silhouette suits tailored wardrobes.
Checkerboard earrings with grout
- Alternate tiny black and white squares clipped from two contrasting tiles.
- Set in shallow squares; press in a charcoal grout to soften contrast and unify.
- Finish with long ear wires to elongate the silhouette for evening wear.
Going deeper: refining process and voice
As your practice matures, build a shard library organized by motif, scale, and gloss level. Pre-shape common cab sizes—8×10, 10×14, 13×18 mm ovals; 12 mm rounds; 8×30 mm bars—so you can design quickly when inspiration strikes. Keep a swatch book of grout colors and metal finishes to guide combinations and reduce decision fatigue. Most importantly, develop a signature: perhaps you always preserve a factory rim, always pair shards with hammered textures, or always bias compositions to the left like a comet’s tail. Recognition grows from repetition.
Refine your studio habits. Measure epoxy by weight for consistent cures. Warm resin bottles in a water bath for fewer bubbles. Degas pigmented grout swatches on a tile to predict dry-down color. Log each piece with photos of the original source and notes on what you’d tweak next time. These small practices turn art-making into a sustainable business without sacrificing soul.
A final note on mindset
Working with fragments teaches patience and presence. You learn to see possibilities inside limits and to accept that not every shard will obey. Some days the line you want is hidden at the bottom of the scrap bin; other days a perfect curve appears as if by appointment. Let process lead: listen for the click when a shard seats just right, trust your eye for proportion, and take pleasure in finishing well. The reward is jewelry that wears like a talisman—polite during the day, luminous at night, and forever a conversation between pattern and metal, memory and motion.
With a handful of safe practices, a respect for materials, and attention to design, you can turn ordinary fragments into extraordinary companions. Mosaic jewelry is more than decoration; it is a portable archive of meals, makers, places, and time—carried close to the skin, rebuilt by your hands, and bound by choices that honor both beauty and function.
