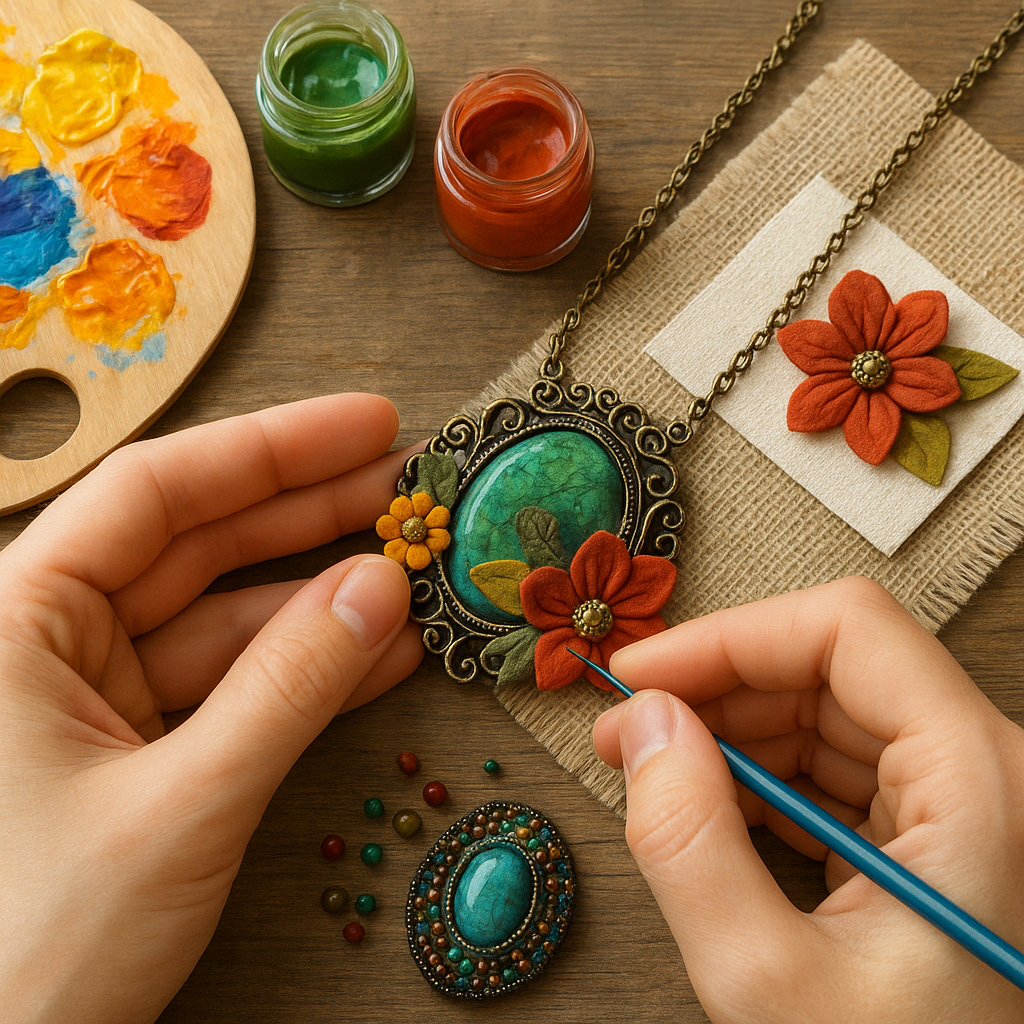
Mixed media accessories are small canvases with big personalities. When you combine fibers, metals, ceramics, paper, leather, wood, and found objects, the result is a pocket-sized artwork that can be worn every day. The magic lies in curating materials for contrast and compatibility, then guiding them into a single coherent voice. This guide explores how to design and construct standout accessories using mixed media—pieces that feel considered, comfortable, and strong, while still carrying the soul of handwork.
Why Mixed Media Elevates Handcrafted Accessories
In the world of handcraft, mixed media is a methodology as much as a style. It is the practice of selecting materials for their visual and tactile contribution, then orchestrating them in ways that a single material cannot achieve. Think matte linen against polished brass, translucent resin beside etched wood, or a hand-embroidered motif stitched into leather. These juxtapositions generate visual rhythm and tactile curiosity.
Handmade accessories especially benefit from mixed media because the scale is intimate. A brooch or pair of earrings invites close inspection; millimeters matter. By layering materials, you introduce depth and shadow, catching light from different angles, and giving the wearer a reason to touch and to notice details.
What Counts as Mixed Media
Mixed media simply means more than one kind of material, but the range is vast:
- Textiles: cotton, silk, wool, felt, handwoven tapes, lace, ribbon, and macramé.
- Metals: brass, copper, aluminum, silver, steel findings, wire, sheet metal, chain.
- Clays and mineral media: polymer clay, porcelain shards, stone cabochons.
- Paper-based: handmade paper, book pages, card, washi, decoupage layers.
- Leather and alternatives: vegetable-tanned leather, cork, Piñatex, mycelium-based sheets.
- Wood and plant fibers: thin veneer, bamboo, rattan, seed pods.
- Plastics and resins: acrylic, thermoform sheets, epoxy and UV resin elements.
- Glass and ceramics: beads, tiles, lampwork components.
- Found objects: vintage buttons, keys, watch parts, sea glass, bottle caps.
Benefits You Can See and Feel
- Depth: layered surfaces create shadows and visual hierarchy.
- Contrast: rough vs. smooth, matte vs. glossy, heavy vs. airy.
- Story: reclaimed materials carry history; hand-stitched marks carry time.
- Adaptability: customize for seasons, occasions, or cultural motifs.
- Resourcefulness: offcuts and remnants become highlights rather than waste.
Materials: The Palette of Possibilities
The best projects begin with thoughtful material selection. You are not simply picking items you like; you are assembling a team that will function together. Consider thickness, weight, moisture sensitivity, flexibility, edges, and how each part will be handled during wear. A paper element may need reinforcement. A metal piece might require deburring and rounding so it does not catch clothing. A fiber component might need stabilizer to keep its shape.
Compatibility and Weight
Not every material plays well with every other. Metals can stain fabrics as they patinate; water-based finishes can buckle paper; strong solvents might fog plastics. Before a full build, create a small test swatch: bind a cut of textile to a metal tab using your chosen method, wear it a day, and note changes. Regarding weight, remember that an ear lobe tolerates much less than a scarf pin. Keep heavy components close to the body (like on cuffs and collars), and position weight above support points to avoid torque.
Safety and Skin-Side Considerations
Nothing should scratch, snag, or leach. Choose nickel-free findings for sensitive skin. Round the corners of rigid pieces. When applying colorants, ensure they are rated for skin proximity and will not transfer when damp. Avoid unsealed metal edges on areas that see sweat, such as the underside of a necklace pendant.
Ethical and Environmental Choices
Handcraft is part of a larger ecosystem. Favor secondhand components, traceable fibers, and certified tanning or plant-based leather substitutes. Select dyes and finishes with clean safety data and responsible disposal guidelines. Even your packaging can reflect these values with recycled paper and minimal plastics.
Design Principles That Make Pieces Wearable
Accessories succeed at the intersection of creativity and constraint. Design that is captivating on the table must remain practical on the body. That is where principles like composition, color, and texture meet scale, movement, balance, and comfort.
Composition: Hierarchy and Focal Points
Decide what the eye should see first. Arrange forms so one element leads and others support. Use alignment and repetition to create rhythm. Triangulation (placing key features at three points) gives stability. Remember that accessories are often viewed on a moving body—avoid layouts that only work from a single angle.
Color: Harmony, Contrast, and Mood
Pick a color story early. Analogous hues (neighbors on the wheel) soothe; complementary pairs energize; triadic schemes sparkle. Reuse an accent color in small doses across the piece to tie disparate materials together. Match temperature as well; warm brass may complement warm-toned wood better than cool aluminum. Test under daylight and indoor light because reflective metals and gloss finishes can shift perceived tone.
Texture: The Tactile Message
Texture can be visual (printed pattern) or physical (raised embroidery). Mix them intentionally. If you add a rough, fibrous surface, counter it with something sleek to avoid a uniformly busy feel. Watch for snag risk near knits and hair. Repeating a texture in more than one place can integrate the whole.
Proportion, Scale, and balance
Consider the human frame. A large pendant needs breathing room to not overwhelm; a cluster of small pieces can exceed the impact of one large piece if grouped cleverly. Keep the piece centered around its support point to prevent twisting. For earrings, counterbalance a heavier front with lighter but bracing elements behind or above.
Comfort and ergonomics
Even the most beautiful accessory will be abandoned if it pokes or pinches. Design for movement: a cuff should flex with wrist motion; a collar necklace should not jab when the chin dips. The skin side should be smooth, sealed, and clean. Consider hair tangling risk, weight distribution across cartilage, and temperature (metal against skin outdoors in winter can be uncomfortable). Make mockups from cardboard or felt to test fit before costly materials.
Techniques and Joining Methods
The joint is the truth-teller in mixed media. It reveals your craft fluency and determines the life of the piece. Learn to choose and combine mechanical joins, stitching, and responsible adhesives so that each material stays where it should without stress or discoloration.
Mechanical Joins
- Wire wrapping: versatile for beads and small stones; always tuck tails and file ends.
- Rivets and micro-bolts: perfect for leather-to-metal or wood-to-metal; add washers to spread load.
- Tabs, prongs, and bezels: capture edges of rigid components without glue.
- Stitching: thread, sinew, or micro-cord pass through pre-punched holes; use waxed thread for grip.
- Slots and interlocks: laser-cut or hand-cut slots allow materials to clasp each other without fasteners.
Chemical Bonds
- Epoxy: strong, gap-filling, excellent for porous-to-nonporous bonding; allow full cure time.
- Cyanoacrylate (CA): quick for small, tight joints; avoid on flexible fabrics; can bloom on plastics.
- PVA and fabric glues: flexible, good for paper and textiles; not for high-stress points.
- Contact cement: ideal for leather-to-leather; apply to both surfaces, wait until tacky, then press.
- UV resin: precise, clear domes; cures with UV light; check heat sensitivity of adjacent materials.
Thermal Techniques
- Soldering: metal-only joints; mind heat sinks near stones or plastics.
- Heat-activated film: bonds textiles and thin veneers; uses controlled heat and pressure.
- Thermoplastics: shape acrylic or bioplastic sheets with heat; avoid scorching; test bend radius.
Surface Prep
Clean, key, and dry. Degrease metals with isopropyl alcohol. Lightly abrade glossy surfaces so glue can bite. Check that both surfaces are flat or consider gap-filling adhesives. Clamp or weight for even pressure. Purpose-made jigs help align parts and preserve geometry during cure. Document times and ratios; a craft notebook becomes your private lab.
Finishes and sealants
Protective coats unify mixed surfaces and shield sensitive parts. Choose flexible finishes for textiles and leather, hard varnishes for wood, lacquer or wax for metals. Consider anti-tarnish coatings for copper and brass if the piece will touch skin or fabric. Spot-test finishes so they do not yellow paper or make fabrics stiff. Apply thin, even coats, and let each layer fully cure for best clarity and abrasion resistance.
Cold connections as First Choice
Whenever possible, prioritize non-glue methods. They are repairable, age gracefully, and seldom react with adjacent materials. Friction-fit tabs, stitched channels, and tiny screws can often replace a blob of glue and elevate the craft value of your accessory.
Step-by-Step Projects to Spark Your Practice
1) Lightweight Statement Earrings: Linen, Brass, and Paper
Goal: Bold profile without weight; soft edges near the face; movement without noise.
- Materials: brass sheet (0.3–0.5 mm), linen scrap, handmade paper, hypoallergenic hooks, micro-rivets, matte varnish, awl, small files.
- Process:
- Sketch an elongated organic shape. Transfer to brass; saw and file smooth.
- Cut matching but slightly smaller shapes from linen and paper.
- Seal the paper back and front with varnish; let dry. Stabilize linen edges with fray preventer.
- Punch rivet holes; dry-fit layers: brass front, linen mid, paper back.
- Rivet layers together at two points to prevent rotation; file rivet ends flush.
- Attach hooks using small jump rings; ensure dangle clears the jawline.
- Tips: Deburr every edge; seal the paper again after assembly. Keep total weight under ~6 grams per earring.
2) Textile-and-Metal Cuff: Leather, Embroidery, and Copper
Goal: A cuff that molds to the wrist, with a stitched motif and metallic glow.
- Materials: vegetable-tanned leather strip, copper sheet, embroidery floss, 2-part epoxy (sparingly), rivets, edge beveler, wax.
- Process:
- Cut copper panel smaller than leather strip to keep edges soft.
- Emboss or texture the copper lightly; round corners.
- Punch stitch holes along copper perimeter; pre-punch matching holes in leather.
- Optional: very small dots of epoxy to tack center; stitch copper to leather with saddle stitch.
- Rivet the ends to a clasp or create a snap closure reinforced with a backing washer.
- Burnish leather edges; wax and buff for a satiny feel.
- Tips: Keep copper away from direct skin contact if your wearer is sensitive; a leather backing avoids green marks.
3) Botanical Brooch: Pressed Leaf, Paper, and Resin Dome
Goal: Preserve a delicate organic specimen in a wearable window.
- Materials: bezel cup or bottle cap, pressed leaf/flower, archival paper, UV resin or epoxy resin, brooch pin, sandpaper, alcohol.
- Process:
- Cut archival paper to fit the bezel; seal both sides to prevent bubbles.
- Adhere the paper backing inside; allow to set.
- Place the pressed botanical; cover with thin layers of resin to avoid heat spikes. Pop micro-bubbles with gentle heat or a pin.
- After full cure, scuff the back of the bezel and attach the pin with a mechanical mount or a strong metal-to-metal bond.
- Tips: Avoid direct sunlight during curing if using botanicals that fade; add UV inhibitors when possible.
4) Upcycled Clutch Accent: Denim, Plastic Blister, and Wood Veneer
Goal: Turn packaging waste into a sculptural focal point for a bag.
- Materials: clean clear blister plastic, thin wood veneer, denim offcuts, contact cement, double-cap rivets, zipper or magnetic clasp.
- Process:
- Cut veneer into a wave form; gently curve with steam or heat.
- Trim blister plastic to echo the wave; flame-polish edges or sand progressively up to 1000 grit.
- Laminate veneer to denim with contact cement; stitch perimeter for strength.
- Mount plastic over the veneer using tiny riser spacers and rivets, creating a shadow gap.
- Attach the accent panel to the clutch front panel before final bag assembly.
- Tips: Keep the plastic clear by avoiding solvent glues on visible edges; manage fingerprints with gloves.
5) Headband with Mixed Media Rosettes: Felt, Wire, and Beads
Goal: A comfortable hair accessory with sculptural flowers that won’t snag.
- Materials: wool felt, millinery wire, seed beads, fabric glue, headband base, bias tape.
- Process:
- Cut felt spirals; roll into rosettes and anchor with discreet stitches.
- Wrap millinery wire with bias tape; shape into leaves; stitch to rosettes.
- Bead centers with fine wire or strong thread; bury knots within felt.
- Pad headband contact points with felt; cover the band in bias tape for a soft underside.
- Attach rosettes using stitching through a felt foundation rather than glue-only.
- Tips: Ensure all bead edges are recessed; test by rubbing against a lightweight knit.
Durability and Care
In small objects, forces concentrate at joints, edges, and thin sections. Plan for durability from the start by respecting material limits and anticipating wear: sweat, flex, friction, and impacts. A beautiful accessory should survive a day in a tote or a sudden rain shower.
Stress Mapping and Redundancy
Identify load paths: where does the pull of a chain or the push of a clasp travel? Spread forces via washers, backer plates, or stitching across multiple holes rather than a single point. For flexible materials, make the joint flex too; rigid-to-flex joints often fail unless the rigid part has a compliant interface (fabric hinge, leather tab).
Edge Management
Break every sharp edge. Chamfer, burnish, or round off corners. For paper and fabric edges, seal with thin coats that do not create a hard ridge. For metal, progress through grits and finish with a gentle buff.
Care, Storage, and Cleaning
- Storage: keep away from direct sunlight; store metals with anti-tarnish tabs; separate pieces to prevent abrasion.
- Cleaning: dry cloth for most surfaces; spot clean textiles with mild soap; avoid soaking mixed pieces.
- Maintenance: check moving parts seasonally; re-wax leather; refresh patinas or clear coats as needed.
Repairability
Design with service in mind: use screws or rivets you can remove; avoid irreversible bonds on expensive components. Include a small repair kit or instructions when selling.
Concept to Prototype: A Repeatable Workflow
Professional outcomes come from consistent process. Adopt a rhythm that lets you experiment while capturing what works.
- Define intent: what feeling or story should the piece transmit? Where will it be worn?
- Pull a limited material palette; sketch silhouettes; decide support points.
- Mock up in paper and felt; check proportion on a mannequin or mirror.
- Choose joins and finishes; plan the order of operations; set curing windows.
- Build a test swatch for each risky interface; record times and results.
- Assemble with clean hands and staged tools; protect surfaces; cure fully.
- Wear-test for a day; make notes; iterate details like hook length or backing size.
Surface Storytelling: Prints, Patinas, and Relief
Beyond basic color and texture, surface treatments create narrative layers. Print with block stamps on leather or fabric, then stitch accents across printed lines for dimensionality. Patinate copper to turquoise and trap that hint of age under a microcrystalline wax. Add low relief by embossing paper or hammering metal over soft backing.
Consider shadow as a design layer. A raised wood veneer over a dark textile creates a halo; a resin dome magnifies a collage beneath. Use recessed cavities to protect fragile elements, especially on bracelets and rings that see knocks.
Fittings, Findings, and Closures
The small hardware pieces that connect your accessory to the body deserve attention equal to the focal components.
- Earring hooks and posts: choose hypoallergenic options; adjust drop length for face shape and hairstyle.
- Clasps: toggle, lobster, magnetic; match clasp weight to piece scale; add safety chains for heavy items.
- Pin backs: locking mechanisms for thick coats; bar length should suit fabric thickness.
- Jump rings: use closed or soldered rings for high-stress points; orient seams away from pull direction.
Hardware can contribute aesthetically too: oxidized brass speaks differently than polished steel. Match finishes intentionally or deliberately contrast them for effect.
Photographing and Presenting Mixed Media Accessories
Mixed media surfaces can be tricky to photograph because they mix gloss and matte. Use diffused light to soften hotspots. A white card opposite the light source can bounce detail into shadows. Capture macro images that show stitching and joints; buyers appreciate evidence of craft. If selling, include a scale reference (hand, coin, or measurement) and show the piece on a body to demonstrate proportion and movement.
Your description should mention materials, techniques, care instructions, and any special ethical choices. A simple story—like where a found object came from—adds resonance and can justify price.
Safety and Wearer Comfort
Beyond ergonomics, consider allergies and environmental exposure. Nickel and certain dyes are common irritants. If you heat-treat or solder, thoroughly clean flux residues. Avoid sharp micro-wires protruding from beadwork. For hair accessories, test in different hair types; what glides through thick curls may slip in straight hair unless you add anti-slip backing.
Environmental Practice and Responsible Making
Good craft is also good stewardship. Build your studio habits around minimal waste and protective practices. Ventilate when using solvents or resins. Collect metal offcuts for recycling. Cure glues fully before disposal. Prefer reusable rags over single-use wipes. When you must use plastic, choose durable grades and design for longevity and repair.
From Hobby to Microbrand
If you plan to sell, organize your workflow into repeatable units. Create recipes for your favorite pieces: exact measurements, hole spacing, thread types, finishing times. This consistency helps when scaling up or training a helper. Price with a clear formula that includes your time, consumables, overhead, packaging, and profit margin. Tell the truth about your materials—buyers value honesty over grand claims.
Common Pitfalls and How to Avoid Them
- Overloading a small piece with too many features. Solve by editing to one focal point and two supporting textures.
- Relying on glue where a mechanical join would be better. Solve by planning attachment points early.
- Ignoring the skin side. Solve by designing backs as carefully as fronts; smooth and seal everything that touches the body.
- Skipping test swatches. Solve by adopting a habit of small trials for new combinations.
- Weight creep in earrings. Solve by weighing components as you go and swapping heavy materials for lighter analogs (e.g., aluminum for brass, balsa or veneer for hardwood).
Sustainability, Story, and Value
Accessories are excellent vessels for meaning. When you use reclaimed textiles from a family garment or shape a pendant from beach-combed glass, you stitch memory into form. Use the language of sustainability honestly; share process images. This transparency deepens appreciation and deters fast-fashion comparisons. In your brand narrative, build continuity by exploring a theme across multiple pieces rather than repeating a single design endlessly.
Material Sourcing with Intent
Visit local reuse shops for hardware, sample books, and offcuts. Partner with neighbors—woodworkers or upholsterers often have beautiful scraps. Keep a catalog of these treasures with notes about provenance, because provenance itself can become a design constraint that sparks originality.
Thoughtful upcycling
Upcycling is more than gluing a bottle cap to a ring base. Elevate the material: refine edges, integrate it into a new structure, and let it converse with higher-end elements. The goal is not novelty alone but a synthesis that feels inevitable once you see it made.
Testing and Quality Control
Create a checklist for every finished piece:
- All edges softened and sealed; no burrs or snags.
- Joints tested with gentle pulls and flexes; no shifts or creaks.
- Finishes cured; no tackiness; colorfast where applicable.
- Back sides clean; signatures or maker’s marks applied discreetly.
- Care card included; packaging protects protrusions and fragile layers.
Document failures as data, not defeat. Cracked resin, delaminated leather, or tarnish blooms teach you about climate, stress, and chemistry. Over time, your pieces will age more gracefully because you understand the environments they occupy.
Ideas Bank: Mixes That Sing
- Matte felt + mirror acrylic + stitched grid lines.
- Heat-colored titanium + silk cords + wood spacer beads.
- Paper marbling under resin + oxidized copper frame + linen backing.
- Stone cabochon in a leather bezel + seed bead fringe + brass bail.
- Laser-cut bamboo + hand-painted gouache + beeswax finish.
Treat each combination as a hypothesis: define your desired effect, assemble, and evaluate. Repeat with small variations—thicker paper, different thread, altered spacing—until the result clicks.
Workflow Tools and Studio Setup
A minimal but well-chosen toolkit accelerates creativity: fine files, flush cutters, micro-riveting set, doming block, burnishers, punches, awl, small clamps, jeweler’s saw, soft-jaw pliers, cutting mats, and a dust mask for sanding. Consider a small photo station and a test corner for finishes, with scrap tiles and offcuts organized by material type. Label your experiments and keep them visible; they will spark new designs months later.
Finish with Intention
The final decisions often matter most. Choose a satin sheen rather than high gloss when textures are varied—it reduces glare and unifies surfaces. Leave some processes visible, like a line of stitching or a tiny rivet head, so the human hand remains part of the visual language. Embrace patina when appropriate; not everything must look new forever. Design for graceful aging by selecting metals and fibers that develop character rather than merely wear out.
Closing Thoughts
Mixed media accessories thrive on curiosity and respect for materials. As you practice, your eye sharpens. You will start to see potential in every offcut and every forgotten object, yet you will choose carefully, editing to what the piece truly needs. With thoughtful design, mindful technique, and a commitment to craft, your accessories will stand out not just because they look different, but because they feel inevitable—like they could not have been made any other way.