From a single strand of wire to a filigree lattice that seems woven from air, the leap is smaller than it looks. Wire art thrives on repetition, rhythm, and patience; beginners are often surprised by how quickly their hands learn the dance of loops and binds, and how forgiving the material can be when approached with care. This introduction to the intricate world of weaving will demystify fundamental patterns, tools, and finishing methods so you can craft wearable pieces that feel solid, look delicate, and carry the quiet satisfaction of handmade precision.
What Is Wire Weaving?
Wire weaving is the practice of creating patterns by wrapping thinner wires around thicker base wires to build structure, texture, and visual interest. Unlike soldered metalwork, weaving relies on mechanical bonding: the way wires interlock through tension, friction, and strategic turns. The results can range from utilitarian joins—binding two frame wires together—to highly ornamental motifs used in pendants, rings, and cuffs.
Historically, wire techniques emerged alongside jewelry-making traditions in many cultures. From ancient chains made by coiling and linking to the delicate Celtic and Scandinavian styles of ornamentation, the practice evolved into modern wire weaving, which borrows from textile logic: rows, pattern repeats, and edges that determine the “fabric” of a piece. When you weave wires, you are effectively building a miniature architecture where each wrap acts like a brick and each base wire behaves like a column.
The beginner’s advantage is twofold. First, you can practice with inexpensive materials like copper and brass while learning control and pattern literacy. Second, weaving scales easily: the same technique adapts to very small decorative bands or to large structural sections of a bracelet. Mastering a handful of basic weaves opens a surprisingly broad design vocabulary.
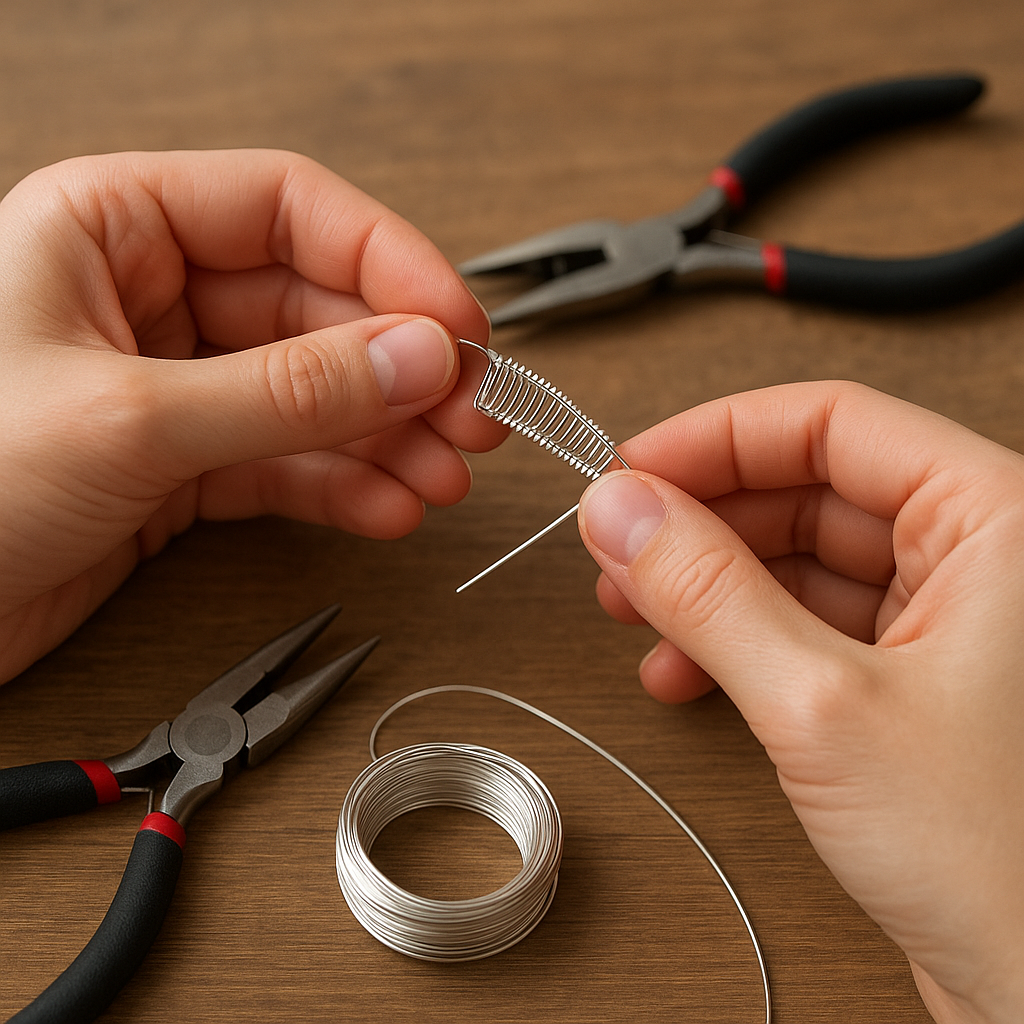
Tools and Materials for Beginners
Start small and dependable. Good tools won’t guarantee tidy work, but they will remove unnecessary struggle and let you learn more quickly. Keep your initial kit compact; you can expand as you discover your preferences and favorite patterns.
- Cutters: Flush cutters produce clean ends that sit snugly against a frame. Reserve a sturdy pair for thicker base wires and a finer pair for delicate wraps.
- Pliers: Chain-nose pliers for precision and bends, round-nose for loops and curves, flat-nose or nylon-jaw pliers for gripping without marring. Nylon jaws are especially helpful for straightening.
- Files and abrasive pads: Smooth cut ends and remove burrs. A fine needle file set plus 600–2000 grit sandpaper or polishing pads will cover most needs.
- Measuring and marking: A ruler, soft tape measure, fine-tip permanent marker, and a thin chalk or wax pencil for temporary marks.
- Surface and support: A rubber or leather bench mat to prevent parts from bouncing, a small steel block for light hammering, and non-marring clamps or tape to hold base wires together as you start.
- Forming aids: A ring mandrel or dowels of different diameters; pens, knitting needles, and knitting looms can substitute in a pinch.
- Tumbling and polish (optional): A rotary tumbler with stainless shot strengthens and polishes many non-plated metals; polishing cloths and microcrystalline wax help maintain shine.
For wire selection, beginners typically work with copper or bronze for value and predictability. Silver-filled and sterling are excellent once you control tool marks; aluminum is soft and light, but it work-hardens unpredictably and can leave residues. Plated craft wire is tempting for its colors, but the coating can scratch or crack during shaping. If you use it, practice gentle forming and avoid aggressive filing.
About sizes: wire is measured by gauge in most regions (smaller number = thicker wire). A practical beginner recipe is 20–22 gauge for base wires and 26–28 gauge for weaving. Thicker bases (18 gauge) create bolder frames but demand firmer wraps; thinner bases (24 gauge) produce ultra-delicate pieces but can deform easily. When in doubt, 20/26 is a forgiving duo: it’s stout enough for structure and slender enough to weave comfortably.
Understanding Wire: Metals, Tempers, and Behavior
Temper describes how springy or soft a wire feels. “Dead-soft” bends easily and is perfect for weaving and sculpting. “Half-hard” retains shape better for frames and clasps. Most beginners use dead-soft for both base and weave to reduce fighting spring-back. As your control improves, mixing tempers can yield sharper edges and more resilient fittings.
Metals behave differently. Copper is predictable, work-hardens steadily, and responds well to texturing and finishes. Brass is slightly stiffer and takes crisp bends. Bronze offers a warm tone and excellent strength. Sterling silver is richly responsive under tools and polishes beautifully; argentium reduces tarnish and fuses well if you later explore heat-based techniques. Stainless and titanium require specialty tools and are less common for weaving because they are hard to manipulate and can be rough on cutters.
When wire becomes stubborn or stiff due to repeated bending, it has work-hardened. Gentle annealing—a controlled heat treatment—can return certain metals (like copper and sterling) to softness. However, annealing should be approached with proper ventilation and heat-safe practice, and it’s rarely necessary for a beginner’s first projects. You can prevent excessive work-hardening by planning bends, minimizing re-bending, and using the right temper from the start.
Core Principles That Make Weaves Neat
Beauty in weaving comes from consistency, not complexity. Simple patterns can look masterful when the fundamentals are respected. Train your hands to maintain even control, and your pieces will instantly look more refined.
- Control of tension: Pull the weaving wire firmly enough to sit snug against previous wraps, but not so tight that the base wires collapse inward or twist. If you see the base wires bow or flare unpredictably, relax your pull and use your pliers to nudge them back into parallel.
- Spacing: Visualize the space each wrap should occupy before you place it. Using a fingertip or a nylon-jaw plier to gently press the wrap into position after each turn helps set tidy spacing from the start.
- Line and symmetry: Keep base wires parallel unless the design dictates a deliberate curve or splay. Reference edges—the top of a cuff or the outer border of a pendant—and measure often so each side mirrors the other.
- Anchoring: Begin and end weaving runs with 3–5 tight wraps around a single base wire. This creates a “knot-like” anchor that resists unraveling and visually finishes the section.
- Directionality: Work in consistent directions. Many weavers wrap away from themselves and flip the piece to maintain familiar hand motions. Consistency helps muscle memory and produces predictable edges.
- Wire management: Keep the weaving wire straight; if a kink forms, stop and smooth it immediately. Hold a short length in your working hand and leave the rest coiled or on a small bobbin to prevent tangling.
- Marking pattern repeats: Lightly mark frames where repeats should start or end; this ensures that both sides of a piece remain matched.
Five Foundational Weaves Step by Step
The following patterns appear in countless designs. Practice them on scrap lengths: two or three base wires about 15–20 cm long each, and at least 60–80 cm of weaving wire per trial. Start slowly and critique spacing, edge neatness, and wrap consistency.
1) Figure-8 (Infinity) Weave
- Step 1: Anchor 3–5 wraps around the lower base wire.
- Step 2: Bring the weaving wire up between the base wires and wrap the upper base wire once or twice.
- Step 3: Cross diagonally down between the base wires and wrap the lower base wire once or twice.
- Step 4: Repeat, keeping diagonal crossings consistent in angle and length. Adjust the frequency (1/1, 2/2) to change the rhythm and coverage.
2) 2–2 Basket Weave
- Step 1: With two parallel base wires, anchor to the lower wire.
- Step 2: Wrap the lower base wire twice, then bring the weaving wire up and wrap the upper base wire twice.
- Step 3: Continue alternating two wraps on each base wire. For more texture, use 3–3 or vary the count (2–1–2–1) to create a gentle wave.
3) Ladder Weave (Three Base Wires)
- Step 1: Align three base wires like rungs (outer-left, center, outer-right). Anchor around the left outer wire.
- Step 2: Cross to the center wire, wrap once, then cross to the right outer wire, wrap once.
- Step 3: Reverse direction: center once, left once. The result is a ladder of evenly spaced wraps that binds all three wires with small stitches.
4) Coil-and-Bind
- Step 1: Pre-coil 6–8 cm of weaving wire around a single scrap wire or needle; slide the coil off to create a spring.
- Step 2: Use this coil as a spacer between two base wires. Every 3–5 coil turns, bind the coil in place with a single tight wrap around both base wires.
- Step 3: This creates a flexible, airy texture often used for decorative borders or articulating sections.
5) Herringbone Edge
- Step 1: Anchor on one base wire near the edge of your frame.
- Step 2: Wrap once on the adjacent wire, then cross back to the first. Each repeat fans outward and then returns, forming a chevron edge.
- Step 3: Keep crossings shallow and consistent; the herringbone is an accent weave that shines when edges are crisp.
As you practice, change wrap counts, try a third base wire, or shift the angle of crossings. You will see how small changes alter weight, openness, and visual flow.
Project 1: A Simple Basket-Weave Ring
This ring is a fast study that teaches control, edge finishing, and forming. Use two base wires of 20 gauge (about 20–22 cm each) and a 26–28 gauge weaving wire (at least 80 cm). Have your ring form ready.
- Step 1: Preparation. Straighten base wires with nylon jaws. Lightly mark the midpoint of each base wire; this is where your weave will center.
- Step 2: Start the 2–2 weave. Align the two base wires and tape them together near one end. Anchor to the lower wire and begin the 2–2 basket weave over a 2–3 cm section, keeping edges square.
- Step 3: Form the band. Place the woven section against your ring form and gently bend both ends around it to create a band. The woven section should sit on top (the “face”).
- Step 4: Overlap and bind. Where the ends meet under the finger, allow a slight overlap of base wires. Bind them with 3–5 tight wraps of the weaving wire to secure the joint.
- Step 5: Tidy ends. Clip any excess weaving wire and tuck the tail into the weave with chain-nose pliers. File the underside where base wires overlap to remove burrs.
- Step 6: Size and set. Check fit on the form and adjust gently until comfortable. Optional: lightly hammer the underside on a steel block to work-harden the shank.
Variations: Add a micro-bead between wraps for sparkle, widen the woven section for a bolder look, or step the wrap count to 3–3 at the center to create a subtle focal ridge. Because a ring experiences frequent wear, ensure all ends are flush and smooth to avoid snagging.
Project 2: Framing a Cabochon Pendant
This project introduces three-base weaving and a simple bail. Use three 20 gauge base wires (about 25–30 cm) and a 26 gauge weaving wire (120–150 cm). Choose a flat-backed stone or glass focal—also known as a cabochon—roughly 3–4 cm tall.
- Step 1: Create the frame. Stack the three base wires. Starting 5–6 cm from one end, ladder weave across all three for the height of your cabochon. Keep the weave centered and edges even.
- Step 2: Shape around the stone. Gently curve the ladder section around the cabochon’s perimeter. The center wire should hug the middle thickness; outer wires become the front and back rails.
- Step 3: Secure the seat. Where the ends meet at the top, cross the outer wires to create a cradle. Use a short 2–2 basket weave or a few tight wraps to lock the frame at the top.
- Step 4: Build a bail. Draw the joined wires upward, form a loop on the ring form or a small dowel, then weave a short 2–2 or figure-8 section to add structure. Bend the ends back and tuck them neatly behind the frame.
- Step 5: Lock the stone. With the remaining base wire tails, form small prongs or decorative sweeps that fold over the cabochon’s face at 2–4 points. Use minimal pressure to avoid chipping the surface.
- Step 6: Finish. Clip and tuck all ends, then burnish edges with a smooth tool or the back of a spoon to settle the weave and smooth high points.
Tips: If your cabochon is slippery, use a tiny dot of museum wax during shaping to hold placement until final prongs are set. Consider adding a narrow herringbone edge around the perimeter for a refined border.
Forming, Hardening, and Surface Refinement
Forming is the transition from a flat sample into a wearable shape. When curving woven sections, support both edges to avoid stretching one side. Use a dowel or ring form and progress gradually: a series of small bends beats one big bend every time. If your base wires splay, re-align them before proceeding; small misalignments compound quickly.
Work-hardening gives strength to finished pieces. There are several non-invasive ways to do this:
- Planishing: Light taps with a smooth-faced hammer on a steel block harden and crisp the profile. Avoid hammering near stones or thin wraps.
- Tumbling: A short tumble with stainless shot peens the surface gently and increases spring. Mask soft gemstones or use a protective pouch to avoid abrasions.
- Burnishing by hand: Running a polished steel or agate tool along edges compresses the surface, subtly hardening and smoothing high points.
Finishes add character and depth. A darkened surface can make pattern ridges “pop,” while a bright finish emphasizes sparkle. The most popular approach is a controlled darkening (via chemical or fume) followed by selective polish of the high spots.
Patinas, Oxidation, and Protective Coats
A classic jewelry finish uses a sulfur-based bath to create a dark patina on copper or silver. This surface treatment sinks into recesses of the weave and leaves raised areas bright after you buff them, producing a strong sense of depth and texture. You can also experiment with heat coloration on copper and brass for straw-to-rainbow tones, though the results vary with alloy and cleanliness.
Chemical oxidation demands preparation: degrease your piece with dish soap and warm water, rinse thoroughly, and avoid touching with bare fingers to keep oils off. Apply the oxidizing solution according to manufacturer guidance, then neutralize and rinse well. Once dry, lightly sand or polish the raised areas to reveal shine while leaving the recesses dark. A microcrystalline wax or clear lacquer can slow tarnish and protect your finish; wax maintains a more natural sheen, while lacquer offers stronger barrier protection at the cost of a different feel.
Note for plated wires: Aggressive finishing can breach the plating and expose base metal. Test on a scrap first. For plated pieces, prefer gentle hand-polish and minimal abrasion.
Troubleshooting: Common Issues and Practical Fixes
Every weaver’s bench pile tells a story of false starts and smart recoveries. The key is diagnosing the cause and correcting the process rather than fighting symptoms.
- Gaps between wraps: Increase wrap count per segment or press each wrap snugly against the previous with a flat-nose plier before moving on. Keep the base wires supported to prevent spreading.
- Uneven edges: Confirm that base wires are parallel; use temporary tape or a binder clip. Establish a counting habit (e.g., always two wraps per side) and mark the start and stop of repeats.
- Twisting base wires: You may be pulling too hard or crossing at steep angles. Reduce pull tension and aim for consistent diagonal paths in figure-8 patterns.
- Weaving wire breaks: Avoid bending the wire back and forth in the same spot. If a break happens, anchor a new length with 3–5 wraps in a low-visibility area and continue.
- Tool marks and scratches: Pad plier jaws with tape or use nylon jaws. Lightly sand scratches in one direction and finish with a finer grit to blend.
- Stone won’t stay: Increase contact points by adding subtle prongs or a second binding weave. Ensure the frame hugs the stone’s contour before closing prongs.
- Shape distortions during forming: Pre-form base wires before weaving long sections, so the weave follows a curve rather than forcing it later.
Design Thinking: Proportion, Flow, and Texture
Great wire weaving balances structure with ornament. Consider proportion first: a very ornate weave may overwhelm a small stone, while a wide frame demands a pattern with enough visual weight to fill it. Flow matters: the eye should travel along the piece, guided by lines that echo each other, converge at focal points, and resolve cleanly at edges and bails.
Texture comes from contrast. Pair a dense weave against a smooth arc of bare frame wire; place a tight pattern next to an open, airy section. Vary the wrap count or switch to a lighter base gauge near the edges to create a sense of taper. Repetition builds harmony; a motif that appears in the bail, the border, and the clasp ties the composition together.
Sketching helps. Pencil a few silhouettes and note where a weave will start and stop. Mark where the piece transitions from structural binding to decorative flourish. In wire work, committing to fewer, better-executed ideas often beats crowding the frame with every technique you know.
Practice Routines That Build Skill Fast
Structured practice accelerates mastery. Consider short daily sessions with clear goals rather than occasional marathons. A few targeted drills:
- Edge discipline: Weave 5 cm of 2–2 weave and aim to keep both edges perfectly straight. Assess with a ruler or by sighting along the edge at an angle.
- Tension mapping: Make three samples of figure-8 with intentionally different tensions (light, medium, firm). Study how tension affects width, arc, and spring.
- Speed control: Set a timer for five minutes and weave steadily without rushing. Count total wraps and note error rate; repeat while aiming for the same count with fewer mistakes.
- Form-first trials: Pre-curve base wires into a gentle arc, then weave. Compare the neatness to a sample formed after weaving. Observe where distortions occur and adjust your process.
Keep a “library” of samples labeled with metal, gauge pairings, wrap counts, and notes. Over time, this becomes a powerful reference that guides future design choices and avoids repeating past difficulties.
Safety, Ergonomics, and Workspace Setup
Even a small bench can be efficient and safe. Use good lighting and a neutral mat to spot tiny cuttings. Always point cut ends away from yourself and others; collect trimmings in a dedicated container. Wear eye protection when cutting or hammering, and ensure adequate ventilation when using chemicals or heat.
Ergonomics matters: relax your shoulders, keep wrists neutral, and take short breaks to stretch fingers and forearms. Fatigue amplifies mistakes and tool slips. If hands feel sore, lighten your grip and let the tools—especially smooth pliers and mandrels—do more of the work. Rotate tasks: switch between weaving, filing, and forming to vary motions.
Care, Wear, and Longevity
Handwoven pieces can last for years with minimal maintenance. Store jewelry in dry, airtight bags to slow tarnish and reduce scratches. After wearing, wipe with a soft cloth to remove skin oils and environmental residue. Avoid prolonged exposure to chlorine, saltwater, and sulfur-rich environments (hot springs, certain paper products) that accelerate tarnish.
For cleaning, use mild soap and water plus a soft brush; dry thoroughly before storage. For darkened finishes, avoid abrasive polishes that could erase intentional depth in the weave. If a piece loosens over time, a careful re-burnish along key edges may restore firmness without disassembling the work.
Sustainability and Sourcing
Crafting responsibly begins with mindful purchasing. Many suppliers offer recycled copper and silver, and you can reclaim usable lengths from practice pieces. Save offcuts by size and metal; small bits become jump rings, decorative coils, or test coupons for finishes. When possible, choose local suppliers to reduce shipping footprint, and dispose of chemical solutions per local guidelines.
Durable design is sustainable design: well-hardwired join points, smooth edges that resist snagging, and replaceable components (like removable chains) extend a piece’s life. Inform buyers or gift recipients how to care for finishes; education is part of stewardship.
Beyond the Basics: Combining Weaves and Mixed Media
Once you’re comfortable, combine patterns to build complexity. A bracelet might begin with a basket weave, flare into a figure-8 at the centerpiece, and finish with a herringbone border. Introduce beads by threading them onto the weaving wire at regular intervals or by setting them between base wires with locking wraps. Mixed metals—copper with sterling highlights—create visual contrast and guide the eye to focal features.
You can also experiment with negative space: deliberately leave areas un-woven to create windows that lighten the composition. Strategic emptiness makes woven sections feel richer, not heavier. Keep transitions clean; a tidy anchor wrap before and after each pattern change serves as punctuation in your design sentence.
In Closing: A Craft of Rhythm and Patience
Wire weaving rewards steady hands and a curious mind. The fundamentals—consistent tension, measured spacing, clean edges—are simple to name and endlessly worthwhile to practice. Your first pieces will teach you how the material wants to move; your next pieces will show you how to guide it. As you build a small library of patterns and samples, you’ll find that almost any complex design resolves into a series of straightforward, repeatable actions.
Most of all, weaving invites you to slow down and enjoy the process. Each wrap is a moment of attention; together they accumulate into something sturdy and unexpectedly elegant. Start with a few meters of wire and an uncomplicated plan. The rest—flow, signature style, and confidence—emerges in the gentle cadence of your hands at work.