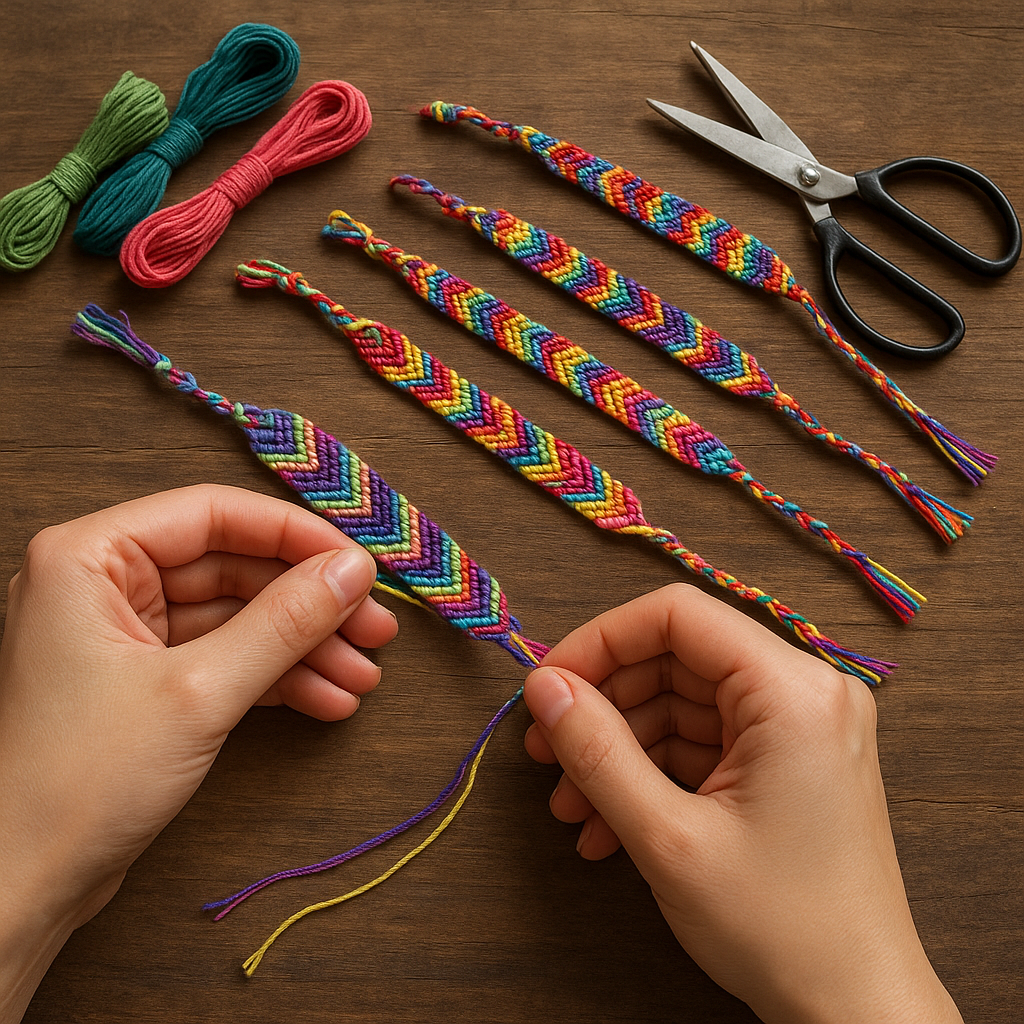
Friendship bracelets are tiny textiles with large meanings. They honor milestones, stand in for promises, and carry memories on the wrist every day. The challenge, of course, is making them last—surviving showers, summer sweat, coat sleeves, and the constant slide of the wrist against desks and doorknobs. This guide focuses on building bracelets that resist fray, maintain color, and hold their shape for months or years, all while retaining the handmade warmth that makes them special.
Materials and Tools That Stand the Test of Time
Durability begins before the first knot. Choosing thread and tools with longevity in mind ensures fewer mid-project frustrations and a bracelet that ages gracefully. Consider fiber composition, thread structure, and finishing compatibility, then match them to your wear conditions.
- Embroidery floss: Widely available, soft on skin, and easy to knot. Look for long-staple fibers and mercerized finishes that add sheen and reduce fuzz. Natural fibers feel great but may wick moisture; pair them with protective finishes.
- Micro-cords (nylon or polyester): Smooth, strong, and less prone to absorbing sweat or water. Great for sleek patterns and adjustable closures; melts cleanly with heat to seal ends.
- Hemp and linen cords: Rustic style with surprising strength. They soften with wear but can be abrasive initially. Choose higher-quality cords with uniform twist and minimal slubs.
- Beading thread (braided): Ultra-strong and abrasion-resistant. Best used as a hidden core to increase lifespan in high-wear designs.
- Finishes and sealants: Clear fabric sealants, beeswax, or microcrystalline wax add surface protection to knots and tails. Test on a small sample to check flexibility after curing.
- Tools: A clip board, safety pin, or macramé board anchors your work; fine scissors ensure clean cuts; a lighter or thread burner handles synthetic tails; a needle helps weave ends under knots for a neat finish.
Consider your climate and wearer’s habits: swimmers and surfers benefit from synthetic fibers; classroom wearers may prefer soft cottons. The best bracelets match material properties to the wearer’s life.
Understanding Fibers: Why Some Bracelets Last
Fiber chemistry shapes how the bracelet handles sweat, friction, sun, and water. Natural fibers like cotton breathe well but may swell and shrink when soaked, gradually loosening patterns. Synthetics like polyester resist moisture and UV better, keeping edges crisp. Blends often provide the sweet spot: natural comfort with synthetic resilience.
Thread structure matters too. Loosely spun strands fuzz faster, while tightly spun or braided threads distribute abrasion across multiple micro-filaments. Mercerization (for cotton) strengthens fibers and improves dye uptake, which reduces bleeding. For bracelets that will be worn daily, aim for smooth, tightly constructed threads that won’t snag on zippers or desk edges.
Color stability is crucial. Seek colorfast labels and run a quick test: dampen a white cotton swab, rub it against the thread, and check for transfer. Pre-washing threads in cool water with a drop of mild detergent removes factory sizing and prevents uneven shrinkage mid-project.
Setting Up: Measuring, Cutting, and Securing
Even robust fibers need thoughtful preparation. Start by measuring the wrist: wrap a flexible tape measure where the bracelet will sit, then add 2–3 cm (about an inch) for comfort when planning your finished length. For knotted patterns, cut strands three to four times the intended finished length; complex patterns or thicker cords may require more. It’s safer to trim excess than splice midstream.
Organize strands by color and position. Tape the top ends to a table, clip to a clipboard, or pin to a sturdy cushion on your lap. Set a comfortable working height with good lighting; your body mechanics matter. Gentle, consistent posture helps maintain steady tension, which directly affects symmetry and shape.
Before knotting, condition the strands. Run natural fibers through a small amount of beeswax or a synthetic wax to reduce fuzz and add structural integrity. This step also helps keep strands parallel during intricate crossings later.
Core Knots and Tension: Techniques for Longevity
Friendship bracelets typically rely on four building blocks derived from the half hitch: forward knot, backward knot, forward-backward, and backward-forward. Mastering the feel of these ensures predictable edges and compact patterning.
Forward Knot (FK)
Working left to right, the left strand ties a double half hitch over the right neighbor. Keep the working strand at a consistent angle—like a 45-degree guide line. Pull just enough to seat the knot without distorting the base strands. Over-tightening can cause curling; under-tightening leaves gaps.
Backward Knot (BK)
The mirror of FK: from right to left, tie a double half hitch with the right strand over its neighbor. Edges often wobble due to inconsistent pull; aim for the same knot height every time. A good check is running your fingertip across a row—uniform bumps mean stable structure.
Combo Knots (FBK and BFK)
These provide direction changes and enable chevrons, diamonds, and letters. They also help flatten the fabric by balancing forces at edges. Use combo knots to correct minor tilts, especially in patterns with many diagonal lines.
Think of each knot as a tiny brick. When you stack bricks evenly, walls stay straight. When bricks vary in size, the wall waves. Consistent hand feel is the difference between a bracelet that frays along uneven ridges and one that wears down slowly and evenly.
Patterns Built for Wear: From Chevron to Diamond
Dense patterns last longer because they distribute friction. Open, lace-like designs snag more easily. Consider these classic patterns with durability tweaks:
- Chevron: A symmetrical staple that self-stabilizes because tension alternates across the center. Make edges sturdier by doubling the outermost strand or using a slightly thicker cord at the margins.
- Diagonal stripe: Simple and strong. Reinforce the leading edge by finishing each row with a purposeful, firm double hitch rather than a casual pull-through.
- Diamond: Adds visual complexity. Keep shapes crisp by marking the centerline with pins on your board; slight guide marks keep diamonds from bulging.
- Herringbone and zigzag: High surface coverage with varied directionality reduces wear on any single point. Great for vibrant color stories.
- Alpha patterns (grid-based): Ideal for text or icons. Use a synthetic core thread and wrap with the design color for excellent structural support.
For longevity, avoid long floats where one strand travels over many others without locking. Every two or three moves, secure the traveler with a hitch to prevent snagging.
Closures and Adjustability: Secure Endings
A durable bracelet needs a reliable way to put it on and take it off. The right closure balances security with daily convenience and reduces stress on the final knots.
- Loop and button: Begin with a lark’s head on a dowel and build a reinforced loop; finish with a compact button knot or sew on a low-profile shank button. Works well for variable wrist sizes and ensures repeatable clasping.
- Sliding macramé: Create a short tube of square knots around both bracelet tails; pull to tighten or loosen. Use a synthetic micro-cord for the slider so it resists abrasion. Dab a micro-drop of flexible fabric glue inside the last knot.
- Barrel or Celtic button knot: A pure cord solution with no hardware. Ideal for outdoor wear and water exposure.
- Crimp ends with chain: For mixed-media bracelets, use jewelry crimps sized to the cord. Choose nickel-free components for sensitive skin and clamp gently to avoid cutting fibers.
Whatever method you choose, protect the transition point—where the bracelet body becomes the clasp. Consider stitching a few extra reinforcing wraps or weaving tails under multiple rows before trimming.
Finishing, Sealing, and Aftercare
Finishing turns a good bracelet into a great one. Trim tails with very sharp scissors to prevent fray and avoid angled cuts that catch on clothing. For synthetic cords, carefully melt the tip with a thread burner; gently press while warm to mushroom the end and lock it in place. For natural fibers, a tiny dab of flexible sealant at the tail can prevent unraveling without stiffening the entire area.
Selective sealing preserves softness. Apply a thin coat of diluted sealant to the inside surface only, focusing on high-friction zones like edges and clasp junctions. Avoid saturating the whole bracelet; too much rigidity invites cracking over time.
Care habits extend life dramatically:
- Rinse after saltwater or chlorinated pool exposure; pat dry and air-dry flat to maintain shape.
- Avoid long, hot showers with the bracelet on. Heat accelerates dye migration and fiber fatigue.
- Inspect the clasp weekly; tighten loose knots before they become failures.
- When storing, keep bracelets in a breathable pouch; plastic traps humidity and encourages musty odors.
If you’re planning for maximum resistance to rain or sweat, consider a light waxing step. A soft coat of waxed finish reduces fiber swelling while adding a gentle sheen. Test first to confirm that colors remain vivid.
Ergonomics and Work Habits That Improve Longevity
Stable hand position makes your pattern denser and more uniform. Sit with forearms supported so your shoulders don’t dictate pull strength. Anchor the project so it doesn’t pivot when you tug. Work under decent light to prevent squinting, which can translate to over-tightening. Take short breaks and stretch fingers; relaxed hands produce smoother, more repeatable rows.
Use a rhythm: count knot sets quietly or use a metronome app to keep pace. A steady cadence naturally produces consistent row height. When something looks off, stop immediately instead of “fixing later.” Unknotting a single row is far easier than correcting a twist that spiraled for ten minutes.
Common Mistakes and How to Fix Them
- Wavy edges: Usually a tension mismatch. Correct by focusing on edge knots—pull them snug, then equalize pressure across the row. Doubling the edge strand helps stabilize.
- Color bleeding: Pre-wash threads and avoid soaking in hot water during wear. If bleeding occurs, rinse promptly with cool water and a dash of vinegar to set remaining dye.
- Curling bracelet: Often due to consistent over-tightening in one direction. Balance with opposite-direction knots in following rows or add a counter knot at the end of each row.
- Fraying tails: Trim cleanly and reseal. For natural fibers, weave tails through the back with a needle before sealing.
- Clasp failure: If a slider loosens, add two more square knots and a microscopic drop of flexible glue inside, not outside, to preserve aesthetics.
Water, Sun, and Adventure: Building for the Elements
Bracelets worn outdoors benefit from planning around moisture and UV. Synthetic cores and shells resist swelling and fading; natural-fiber accents provide warmth and texture. For a truly waterproof-leaning design, construct the inner structure from braided fishing line or micro-nylon and wrap it fully with your pattern strands, locking every few moves so the wrapper cannot shift.
To combat UV, choose pigments known for stability or deeper tones that fade less visibly. Rotate multiple bracelets to reduce cumulative sun exposure—like shoes, accessories last longer when alternated.
Designing for Strength: Layered Structures and Hybrid Builds
Incorporate hidden support. Build a core bundle of two to four strands and wrap your pattern around it. Use a dense herringbone or chevron to lock the outer layer to the core. The result feels plush while resisting flattening. For high-friction bracelets, include a synthetic strand at each edge to function as “rails.”
Another approach is double weaving: complete a basic diagonal bracelet, then overlay a second, narrower band stitched through the first with a fine needle and matching thread. The overlay protects high-wear zones and adds color dimension.
Closures Revisited: Quick Guide to Sliding Systems
Square-Knot Slider
Bring both tails parallel; use a separate micro-cord to tie six to ten square knots around them. End with a secure finishing knot and seal the inner channel lightly. This creates strong adjustability without hardware.
Barrel Knot End
Tie a compact barrel with the bracelet tails to form a low-profile nub that passes through a reinforced loop. It’s elegant, hardware-free, and ideal for water sports.
Button-and-Loop
Stitch a flat button or knot a bead in place to achieve a click-in fit. Test the loop size frequently while tying; loops tend to shrink slightly when the bracelet relaxes post-finish.
Pattern Recipes for Longevity
Reinforced Chevron
Use 10–12 strands; double the outermost pair with synthetics, the rest natural fibers for color richness. Finish with a slider. The double edges prevent scuffing and maintain shape despite jacket cuffs.
Alpha Initials with Core Support
Run a braided core down the center and wrap the design color across each row, locking every third knot through the core. Letters stay crisp and won’t warp with sweat or frequent adjustments.
Herringbone Rail
Construct herringbone columns flanking a central stripe. The “rails” take the brunt of abrasion, preserving the central motif. Ideal for hikers and backpack straps.
Responsible Making: Sustainability and Skin Safety
Source fibers from suppliers that disclose dye processes and labor conditions. Look for OEKO-TEX or similar certifications where possible. For sensitive skin, choose nickel-free hardware and threads free from reactive dyes. Wash completed bracelets before gifting to remove any residual finishing agents.
Repurpose offcuts into key fobs or zipper pulls. Keep a small jar for micro-scraps to stuff pin cushions; nearly nothing needs to head to landfill.
Maintenance: Extending Life After Gifting
Include care notes with your gift. Suggest removing the bracelet for heavy lifting, oil changes, or painting. Recommend periodic checks of the clasp and gentle rinses after beach days. Offer a “tune-up” service—friends can return a bracelet for a quick tightening or reseal; the ritual reinforces the bond the bracelet symbolizes.
Troubleshooting, Repair, and Rescue
Even well-made bracelets encounter snags. If a thread breaks near the edge, weave a matching strand under adjacent knots and mirror the broken path for two or three centimeters; secure with micro-sealant on the back. If a clasp fails, retrofit with a slider by leaving a small gap at the end of the body, rethreading tails, and building a new adjustable tube.
For severe fading, over-dye the entire bracelet in a darker, stable color. Natural fibers take dye readily; synthetics shift less, producing tonal variations that often look intentional and beautiful.
Teaching and Scaling: From One Bracelet to Many
When teaching beginners, choose patterns that reinforce consistent pull and rhythm—diagonal stripes or chevrons. Provide pre-measured kits and emphasize knot redundancy: two hitches per move, never one. In group settings, adopt a shared quality checklist: straight edges, even bumps, tidy backs. A communal standard improves every maker’s output and yields bracelets that endure.
For small-batch selling, document your process. Note thread brands, batch numbers, and finishes. Keep a simple abrasion test: rub a sample against denim 300 times and evaluate fuzz and color transfer. Iterate materials until the bracelet passes your benchmark.
A Maker’s Mindset: Patience in Service of Longevity
Long-lasting bracelets come from patient setup, deliberate knots, and mindful finishes. Think like a textile engineer and a storyteller at once. Respect the micro-architecture of every row, and the bracelet will repay you with months or years of faithful wear. What the eye sees as color and pattern, the wrist experiences as comfort and resilience—as if each knot were a compact promise held in place.
Quick Reference: Best Practices at a Glance
- Choose fibers for the environment: synthetics for moisture, naturals for comfort, blends for balance.
- Pre-wash and test for bleed; look for genuine colorfast properties.
- Anchor securely and maintain consistent tension—use rhythm to guide strength.
- Prefer dense patterns with minimal floats; reinforce edges and clasp transitions.
- Finish selectively; seal tails and high-wear zones without over-stiffening.
- Use closures that are easy to operate and resist stress during daily wear.
- Rinse after salt or chlorine; air-dry flat and inspect regularly.
From Technique to Tradition
Friendship bracelets thrive at the intersection of craft and connection. When you refine materials, perfect knot structure, and honor finishing details, you give your design the gift of time. The bracelet becomes a companion—an everyday artifact that outlasts seasons, takes scuffs with grace, and keeps the story of its making close at hand. Whether your style leans minimalist or maximalist, the path to longevity is the same: practice, patience, and thoughtful choices—thread by thread, row by row, until strength and beauty are woven together.
Glossary of Essential Terms
- durability: The bracelet’s ability to resist wear, fray, and fading over time.
- tension: The consistent pull applied to each knot; crucial for uniform shape.
- braiding: Interlacing strands to form a cord; can be structural or decorative.
- closure: The mechanism that fastens the bracelet, from sliders to buttons.
- waxed: Fibers treated with a wax layer to reduce fuzz and repel moisture.
- waterproof: Highly resistant to water ingress; achieved through synthetic cores and finishes.
- knot: The fundamental unit of structure in friendship bracelets.