When your love of handmade adornment meets a packed calendar, the right approach can turn tiny time slots into wearable art. Think of time as material: something you cut, arrange, and link with intention. A smart plan, a compact toolkit, and a few reliable shortcuts allow you to keep the heart of craft while moving with purposeful efficiency. This guide gathers practical methods, design choices, and setup ideas for crafters who want quality pieces without marathon sessions—whether you’re preparing for a market, gifting on a deadline, or simply fitting creativity between commitments.
Designing for Momentum
Speed in jewelry making begins long before pliers touch wire. It starts with a clear goal and a design game plan that reduces hesitation. Build a personal decision matrix—materials you trust, silhouettes you love, fasteners that never fail—and let that prework carry you when minutes are scarce. A well-defined creative system removes friction and protects your flow, shaping a dependable workflow you can enter quickly and exit with a finished, polished piece.
Time-aware design also leans on repeatable forms. Pick a baseline set of shapes—teardrops, bars, circles—and iterate with texture, surface finish, or color. By varying only one or two elements at a time, you minimize measuring, recutting, and second-guessing. This is the heart of productive batching: shift your mindset from single projects to families of related pieces. Make five pairs of ear wires in one sitting, then five sets of jump rings, then assemble in a burst. Your hands remember; your pace accelerates.
Consider assemble-first thinking. Many complex-looking designs are simple at their core: a focal plus a chain, a frame plus drops. Favor shapes that can be premade and stored—clasps, ear wires, bails—so future builds become plug-and-play. For true speed, opt for modular components: charms with closed loops, pre-soldered rings, standardized bar lengths, and connectors that can be rearranged without tools. The modular approach also helps you pivot if a bead cracks or a color clashes; swap, click, done.
Limit your palette for rhythm. A two-metal policy (e.g., brass and sterling accents) and a preselected color triad prevent decision fatigue. Keep a “design dice” card on your bench—three rows labeled Shape, Texture, Accent, each with five predefined choices. Roll a quick combo when you’re stuck, then commit. Constraints accelerate originality by clearing mental clutter.
Tools, Materials, and Tiny Helpers That Save Minutes
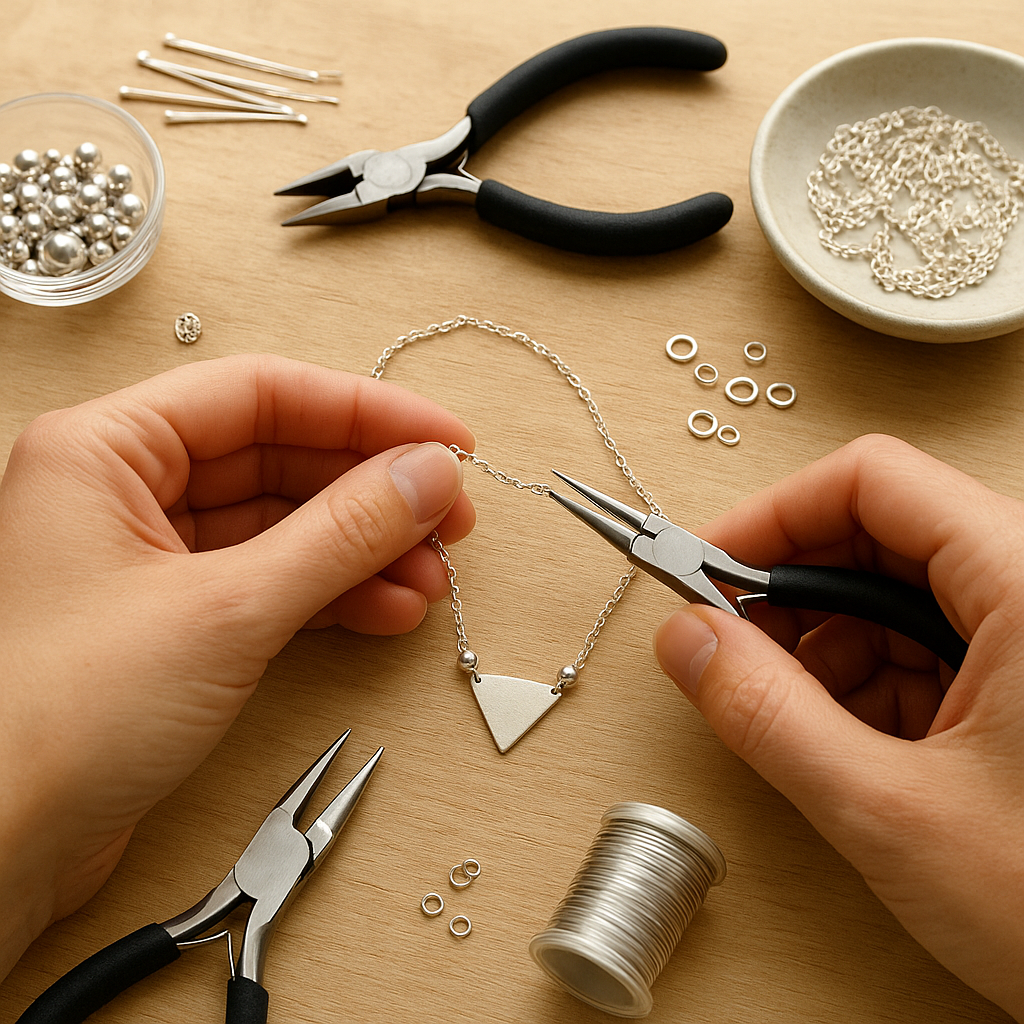
Working fast doesn’t mean buying every gadget; it means arranging the essentials within easy reach and leaning on tools that reduce fiddly steps. Create a portable station—a shallow tray with anti-slip mat—that moves from dining table to couch to balcony. Stock it with cut-resistant mat, flush cutters, round/chain-nose pliers, nylon jaw pliers, a mini ruler/tape, a bead scoop, small bench block, light mallet, fine needle file, and a microfiber cloth. Add stackable tins for findings and color-coded envelopes for chain lengths.
Use fixtures to standardize bends and lengths. Simple jigs—a nail in a wood block, a knitting needle sized to your preferred loop—deliver repeatable curves in seconds. Pre-cut chain and wire on a quiet evening; label bags with length and gauge. Magnetize a small tray for needles and steel tools so they stop wandering. Keep a dabber card with three adhesives (gel CA, flexible jewelry cement, and UV resin) clearly labeled by best use.
Measure once, cut many. If your go-to bracelets are 17.5 cm, make a cardboard template with notch marks at 16.5, 17, 17.5, 18, and 19 cm for quick custom requests. Create color swatches of your metal finishes and top bead hues; snap a photo to keep on your phone for on-the-go supply shopping.
Choose materials that favor speed and clean assembly: pre-soldered closed jump rings for security, crimp tubes with integrated covers, leverback ear wires that skip rubber stoppers, and ball-end headpins that avoid extra wrapping. Standardize gauges: 20 ga for ear wires and simple frames, 24–26 ga for wraps, 18 ga for statement shapes. With fewer gauges, your tactile memory speeds up and miscuts drop.
From Idea to Gift Box: A Time-Smart Process
Breaking the build into micro-stages helps you tuck making into pockets of time and avoid the “almost finished” drawer. Think of your process as five checkpoints: design cue, material staging, fabrication, assembly, and finishing. Each is a mini-session you can complete on a lunch break or between chores:
- Design cue (5–10 min): sketch two variations, decide hardware, choose metal tone and accent color. Save a photo of the sketch with notes.
- Material staging (10–15 min): pull findings, cut chain, pre-shape frames, line up beads/charms. Place each project in a labeled zip bag.
- Fabrication (10–30 min): make ear wires, form loops, stamp pendants. Use a timer to stay focused.
- Assembly (10–20 min): link components, attach clasps, wrap briolettes.
- Finishing (5–15 min): file rough edges, patina or seal, buff, inspect, and package.
When pressed for time, fuse stages across pieces. For instance, make a dozen pairs of ear wires on Sunday; you’ll thank yourself on Thursday night when a last-minute gift idea strikes.
Technique Library for Fast Makes
Wire Wrapping Without the Tangle
Set a micro-goal: three master loops in five minutes. Use 24 ga for wraps that cinch easily without kinking. Stabilize beads with tiny silicone earring backs during wrapping to stop slippage. If a loop misaligns, pinch with nylon pliers and rotate rather than reopen.
Quick Bead Stringing That Looks Intentional
Lean on patterns that read as sophisticated but set up fast: 3–1–3 repetition (three small, one accent, three small) or gradient runs across a limited hue range. String on coated beading wire with a memory for gentle curves. Crimp, test tug, clip, and add crimp covers for a clean, professional look in minutes.
Surface Texture in Seconds
For metal charms and stamped bars, a cross-peen hammer texture hides micro-scratches and adds sparkle that forgives minor mishits. Tap consistently along edges, then burnish lightly.
Cold Connections That Don’t Stall You
Rivets and micro-screws join layers quickly without soldering. Pre-punch holes using a screw-down metal punch to avoid measuring drift. Keep a rivet-length reference strip taped to your bench block.
Fast Color and Shine
Alcohol inks on sealed metal or polymer clay deliver vivid gradients in a few swipes. Heat-set gently with a craft heat tool and seal with a thin coat of wipe-on varnish. For clay, pre-roll sheets to standard thickness using cards as shims; cut, texture, bake, and sand only visible edges.
Knots You Can Tie Blindfolded
Three knots cover 90% of quick textile jewelry: overhand (stops beads), surgeon’s (elastic closures), and lark’s head (charm attachments). Practice to muscle-memory; post-it arrows on your mat prevent flipping cord directions.
UV-Cured Embellishments
UV resin locks dried flowers, micro-glitter, or foil accents in a bezel in minutes. Work in thin layers, pop bubbles with a pin, cure, and dome lightly. Mask metal edges with washi tape for sharp lines. Keep safety eyewear nearby and ventilate.
Project Blueprints You Can Finish Fast
10-Minute Minimal Ear Climbers
What you’ll need: 20 ga wire (sterling or gold-filled), round/chain-nose pliers, flush cutters, small mandrel (pen), fine file.
- Cut two 5 cm lengths. Round ends with file.
- Form a gentle S-curve around the pen; pinch one end into a snug U for the ear back.
- Hammer lightly on a bench block to work-harden; polish with cloth. Done.
15-Minute Bezel Charm Necklace
What you’ll need: Pre-made bezel charm, 45 cm chain with clasp, two 4 mm jump rings, UV resin and micro inclusion (optional).
- Upgrade the charm: add a dried petal under a thin resin layer, cure.
- Attach charm to chain with jump ring; add a 5 cm extender if desired.
- Buff chain with cloth for sheen.
20-Minute Stacked Bar Bracelet
What you’ll need: Three 30 mm metal bars with pre-drilled holes, short chain segments, four 4 mm jump rings, lobster clasp.
- Arrange bars vertically with 1 cm chain links between.
- Connect with jump rings; attach clasp to one end, extender to the other.
- Hammer texture edges for sparkle that hides micro-marks.
30-Minute Gem Drop Hoops
What you’ll need: 18 ga hoop wire, two briolettes, 26 ga wrap wire, ear posts or ear wires.
- Form two 30–35 mm hoops around a mandrel. File ends smooth.
- Cold close with a tiny overhand bend, or solder if equipped.
- Wrap briolettes to small rings, then onto hoops; add ear wires.
45-Minute Textured Bar Pendant Set
What you’ll need: Three 40 mm metal bars, letter stamps (optional), bench block, hammer, chain, jump rings.
- Stamp letters or pattern, texture lightly, darken impressions with patina, wipe.
- Seal with clear lacquer; assemble on chains of staggered lengths.
- Finish with matching earrings using shorter bars.
Organization That Buys Back Time
Your bench is a time machine when it’s tidy with intent. Separate consumables from tools, and set restock triggers so you never pause mid-creation. Keep a two-bin system for beads and findings: a working bin and a backup. When the working bin empties, reorder and swap. Use color-coded stickers for metal tone (gold, silver, copper, black). Track counts with a tiny ledger card clipped to each bin—no apps required unless you prefer them.
Think of inventory as a living palette. Curate by project families: “dainty chains,” “bold hoops,” “nature charms.” Pre-assemble subcomponents you always use: five lengths of 5 cm chain, ten lobster clasps with jump rings attached, a dozen ear wires. Store each in labeled mini-bags within a shallow drawer so your hand lands on the right part without searching.
Create a micro photo setup that pops open in seconds: white foam board, a window, and a phone stand. Keep a sticky note checklist taped to the board—wipe jewelry, center piece, adjust exposure, shoot, back up. Fast documentation protects your time when you need to list or share work quickly.
Quality Without Drag
Speed should never cost wearability. A short, consistent finishing routine ensures comfort and longevity. Build a five-point inspection you can recite: smooth edges, closed loops, aligned pairs, secure crimps, clean surface. Keep a loop for close checks and a lint-free cloth at hand.
Edge care is where minutes vanish. Preempt them. Use pre-tumbled components when possible. After filing, swipe with a fine sanding sponge and buff. A quick pass in a rotary tumbler can harden ear wires and brighten surfaces while you prep the next stage. Introduce polishing cloths as your last step to remove oils and fingerprints.
Seal porous stones gently with wax, protect patina with microcrystalline wax, and choose nickel-free metals for sensitive skin. Crimp covers neaten ends in seconds and look premium. Remember: quality cues—the way a clasp clicks, the smooth feel of a loop—speak louder than ornate details.
Comfort, Safety, and Flow
Protect your hands and posture so you can return to the bench tomorrow. Set chair height so your forearms rest level with your mat; use task lighting angled to prevent shadows. Warm up wrists with a minute of opening–closing motions before using pliers. Good ergonomics is not a luxury; it’s speed insurance.
Ventilate when using adhesives, patinas, or UV resins, and keep a small spill kit: alcohol wipes, paper towels, a scrap of nonstick mat. Label all chemicals clearly. Wear safety glasses when hammering or cutting. A clean, well-lit space reduces mistakes and keeps your creative brain available for design, not damage control.
Speed Through Planning: Kits, Templates, and Prototypes
Keep a rotating set of pre-bagged micro-kits, each with everything for a single project—chain, clasp, rings, focal, notes. On a tight day, pick a bag and build. Pair this with a “decision tree” card: if X bead doesn’t fit, swap Y; if chain kinks, switch to snake chain; if color clashes, pivot to monochrome.
Make tiny test pieces to fix issues early. Paper and wire doodles are forms of prototyping. Bend a quick wire shape before committing in sterling; stamp a pattern on a scrap before the final bar. Ten minutes of test saves an hour of redo.
For sellers, maintain templated descriptions and pricing sheets. Keep standard sizes and lengthening options clear. With a few keystrokes, your piece can be listed, priced, and posted, leaving more bench time for the next idea.
Rapid Assembly Tricks That Look Considered
Swap complexity for repetition with intention. Layer three simple chains of varied textures for depth; add a single charm to the shortest chain. Use graduated bead sizes to imply movement. Cluster small charms for a “collected” look that assembles fast.
When time is thin, change the plane, not the process: flip a bar horizontally, offset a charm, rotate a frame from vertical to diagonal. These micro changes alter the vibe without new techniques. A signature spacer—tiny hematite or metal daisy—can unify diverse materials quickly.
Troubleshooting Under Pressure
Time pressure magnifies small missteps. Build reflex fixes:
- Open jump rings front-to-back, not side-to-side, to maintain their circle and save re-shaping time.
- If a wrap loosens, tuck the tail under with chain-nose pliers rather than unwinding the entire coil.
- For stubborn crimps, rotate and crimp again at 90 degrees; add a cover if the tube looks pinched.
- Use an eraser to stabilize tiny components during gluing or bead alignment.
- Color mismatch? Switch to monochrome metal and let form carry the design.
Batching Without Boredom
Working in themed sprints keeps your mind fresh. Dedicate one evening to ear wires, another to charm prep, a third to assembly. Rotate musical playlists or scents to signal the phase; your brain will anchor faster each time you return. Timebox with a kitchen timer—two 20-minute sprints with a 5-minute stretch break can outpace a weary 90-minute session.
Small-Space, Low-Mess Strategies
Contain your craft with mats, trays, and a “leave-no-trace” cleanup habit. Keep a collapsible bin for scraps and a compact vacuum for stray chain bits. Store glues upright in a cup with rice for stability. Use silicone mats for resin and wipe-on finishes; peel and go. Label pliers handles by function with washi tape so they return home quickly.
Material Choices That Favor Speed
Pick metals that shape and polish quickly: brass for warm patina, aluminum for lightness and ease, sterling for hypoallergenic reliability. Choose beads with consistent hole sizes to avoid reaming midstream. For cord, opt for micro-macramé nylon that melts cleanly with a quick flame touch—no messy frays.
Hardware that shortcuts steps: leverbacks (no stoppers), magnetic clasps with safety loops for quick closures, and swivel connectors that prevent kinks. Pre-made bails snap onto drilled stones, turning found objects into fast focal points.
Fast Finishing That Lasts
Seal, buff, and protect in minutes. Keep a small tray labeled “needs finish” and move items through a simple pipeline: de-burr with file, smooth with sponge, brighten with a polish, seal if needed, then dry on a mesh rack. Introduce quick-dry sealants for copper and brass to reduce tarnish returns. Use a handheld steamer or warm soapy water and soft brush to clear residue before drying and buffing.
Have a consistent cue for completion, like a colored tag you place on finished pieces ready for packaging. This single visual signal prevents rechecking and mental loops.
Packaging That Amplifies Handmade Speed
Prepare a grab-and-go packaging caddy: branded cards, tissue, small boxes, ribbon or cord, and thank-you notes. Pre-stamp logo cards in batches. Use a bone folder to crease tissue fast and neat. Keep a tiny measuring ribbon clipped to the caddy for instant sizing confirmations.
When selling, a care card template (metal tone, cleaning tip, storage advice) prints four per sheet. Batch cut with a guillotine for crisp edges. A minimal, consistent look broadcasts professionalism while staying fast.
Mindful Pace and Craft Soul
Speed isn’t about rushing; it’s about clarity. When you design for flow, prepare your space, and choose forgiving techniques, your hands do more with less friction. Pause when something fights back. Ten seconds of breath can salvage ten minutes of work. Remember the joy in small wins: a pair of ear wires that match perfectly, a loop that sits flush, a chain that drapes just right. These are the quiet triumphs of handicraft, made visible.
Advanced Shortcuts for Repeatable Quality
Make measuring slaves: a cardstock strip with pierced holes at 1, 1.5, 2 cm, etc., for speedy jump ring spacing; a hoop sizing dowel marked at your common diameters; and a wire length chart taped inside your toolbox lid. Keep a “first article” sample of your best ear wire; compare new pairs against it for instant QC.
Adopt a light touch of automation where it counts: a small rotary tumbler for work-hardening; a bench-top polisher for brushed finishes; a UV lamp for fast cure times. None of these replace hand skill—they compress waiting time and elevate baseline consistency.
Ethical and Sustainable Speed
Time saved is not time wasted when you use it to choose better materials. Source recycled metals, reuse offcuts for tiny charms, and upcycle vintage chains into modern silhouettes. Package minimally, protect maximally. Offer repair or refresh options; it deepens relationships and keeps your pieces in circulation longer.
Scaling Your Fast-Make System
As your collection grows, guard the human touch: vary textures, let small asymmetries breathe, sign your stamped work subtly. Document your process in a single sheet with photos. If you ever delegate tasks—ear wires, chain cutting, carding—your style remains intact. Keep the creative decisions in your hands, share the repeatables.
Checklist: The 20-Minute Make
- Pick a pre-bagged kit; glance at design cue.
- Dry fit components; confirm length with template.
- Form loops or attach charm; test closures.
- File edges; wipe, buff, seal if needed.
- Photo on mini setup; package with care card.
Speed note: If anything eats more than five minutes unexpectedly, park it in a “fix later” tray and switch to a fresh kit. Momentum over perfection—finish one piece first, then circle back.
Common Pitfalls and How to Avoid Them
- Overdesigning: Strip one element—either texture, color variety, or dangle count. Clean lines read as intentional and assemble faster.
- Tool chasing: Duplicate your most-used pliers in a travel tray; keep them leashed to your mat with a magnet strip.
- Material roulette: Lock in a monthly palette. Replace choices with small variations in tone or finish.
- Adhesive mess: Use toothpick applicators; less glue cures cleaner and stronger. Keep acetone or alcohol wipes nearby for quick cleanups.
- Unclosed loops: Train your eye—if you can see daylight in a loop, it’s not closed. Close now, save a return later.
Why Fast Can Still Feel Handmade
Even in speed, your signature remains: the way you taper a wrap, choose a curve, or balance a cluster. Let repetitive practice refine touch rather than flatten character. Document small choices—a preferred ear wire angle, a standard dangle length—so they become the language of your line. Craft is not defined by slowness, but by attention. With an intentional system, small pockets of time add up to a body of work that’s consistent, wearable, and unmistakably yours.
Putting It All Together: A One-Hour Mini Collection
Try this timed sprint to experience compounding gains. Warm up for three minutes—hand stretches, tool check, mat clear. Then:
- 0–10 min: Assemble two pairs of minimal ear wires; texture lightly; work-harden.
- 10–25 min: Create a bar pendant with stamped line texture; patina and seal.
- 25–40 min: String a simple bracelet with a 3–1–3 pattern; crimp and cover.
- 40–50 min: Add a charm to a pre-cut chain; attach clasp; check lengths.
- 50–60 min: Final pass—file, buff, shoot quick photos, package.
By the hour’s end, you’ll have a cohesive set: earrings, pendant, bracelet, and a charm necklace—proof that structure and care make speed a creative ally.
Final Encouragement
Handicraft thrives on rhythm. Build yours with templates, tidy tools, forgiving materials, and a calm sense of order. Make decisions once, reuse them often, and let repetition unlock nuance. Whether you finish one small piece before breakfast or roll out a micro-collection on a Sunday afternoon, your time is well-spent—and your jewelry will show it.