Jewelry studios of every size—kitchen-table hobby spaces, weekend market booths, and dedicated micro-workshops—rely on the remarkable versatility of resin. It pours like honey, captures botanical moments in crystal clarity, takes color as vividly as glass, and cures into durable forms that designers can sand, drill, and polish. But not all casting materials are the same. Choosing the best formulation for your project directly affects clarity, cure speed, bubble control, long-term color, and the way a piece feels against skin. This guide explains how to select the right material for pendants, bangles, inlays, bezels, and statement earrings, while staying true to the craft values that make hand-made adornment so compelling.
Understanding Resin Types for Jewelry
Knowing the main families used in jewelry helps you match properties to creative intent. Each chemistry has a signature set of strengths and trade-offs. The “best” choice depends less on a universal rule and more on pairing the specific features you care about—clarity, cure speed, thickness, bubble tolerance, and finish—with the demands of the piece you’re creating.
Epoxy
epoxy systems dominate handmade jewelry because they are forgiving, optically clear, and bond well to bezels, pigments, and inclusions. Two parts—resin and hardener—are measured by weight or volume and mixed. Epoxies tend to have longer pot life (working time), low to medium exotherm, and good self-leveling. They excel at doming on flat surfaces, deep pours for pendants, and encapsulating botanicals or fabrics. Many are formulated with UV stabilizers for better long-term resistance to color shift. Downsides: full cure can be slow, surface dust can settle during the long gel phase, and some hardeners can amber slightly as they age. Epoxy’s balanced behavior makes it an ideal first choice for beginners and a dependable staple for professionals.
Polyurethane
polyurethane casting systems cure fast—even within minutes—and some deliver exceptional abrasion resistance and flex. They accept silicone molds beautifully and can reproduce crisp details, making them popular for small-batch component manufacturing or inlay chips. However, many polyurethanes are moisture-sensitive, which can lead to bubbles or foaming in humid shops. They may be more opaque or slightly tinted compared to ultra-clear epoxies, though specialized “water-clear” formulations exist. Because cure is rapid, you must stage pigments, molds, and inclusions ahead of time. If your style emphasizes speed, mold precision, or production-friendly demolding, polyurethane can be a compelling option.
Polyester
polyester resins are budget-friendly and cure hard, and older studio practices favored them for large castings. In jewelry, they are less common today because they produce strong odors (styrene), can be brittle, and require careful catalyst handling. Achieving consistent clarity without internal fractures demands close attention to heat and cure times. While costs can be attractive, the drawbacks—odor, work environment demands, and brittleness—often push jewelers toward epoxy unless they need specific polyester effects or are replicating a vintage technique.
UV Resin
UV curables harden when exposed to specific light wavelengths, typically within minutes. They’re perfect for on-the-spot repairs, micro-domes, tiny bezels, or attaching small findings. Their biggest advantage is speed: you can stage a photo-ready prototype during a lunch break. However, depth is limited; thick pours may cure unevenly, leaving a soft interior. UV-curable pieces often benefit from a protective topcoat or post-cure under a stronger lamp to stabilize the surface. Use UV systems when your focus is on quick iteration, small surface accents, or open-backed bezels that need a clean, fast seal.
Bio-based and Specialty Systems
Innovations include plant-derived content and waterborne coatings designed to lower fumes and improve sustainability. While many bio-based products are epoxy hybrids with partial renewable content, they increasingly close the performance gap with conventional resins. If environmental footprint is a design priority, seek formulations that disclose bio-based percentages, low VOC, and end-of-life guidance. Specialty systems also include flexible epoxies for soft-touch finishes and heat-resistant blends for summer-safe wear.
Key Selection Criteria that Shape Results
When comparing options, look beyond a single headline claim (like “crystal clear”) and weigh how multiple variables interact. The following properties consistently shape both making and wearing experiences.
Clarity, Transparency, and Optical Depth
For botanical encapsulation, gemstone imitations, or water-like surfaces, clarity is essential. Look for “water-clear,” “non-blushing,” and accelerated UV testing data when available. Consider refractive index: small differences affect how edges glow and inclusions “float.” If you plan to add opaque pigments, absolute clarity may be less important than consistency and gloss.
Viscosity and Flow
viscosity dictates how the material pours and self-levels. Low-viscosity blends seep into tiny crevices, reduce bubble entrapment in fine molds, and produce sleek domes. However, they may run off edges more easily. Higher viscosity works well for controlled doming on flat pendants where you want a rounded, lens-like surface that stays put. If you’re embedding heavier items (stones, shells), medium viscosity helps stabilize placement before gel.
Pot Life, Gel Time, and Demold Window
pot life controls how long you can mix colors, position flowers, or tease out marbling. Short pot life is frustrating for intricate work but perfect for quick batches. Read the technical sheet: cooler rooms extend work time; warmer rooms shorten it. Demold time is equally important for production schedules—fast demold resins speed small-batch turnover but leave less room for bubble correction.
Cure Profile, Exotherm, and Layering Strategy
All two-part systems release heat as they cure. In deep pours, too much volume at once can generate internal stress, microbubbles, or even deformations. To avoid issues, pour in layers, let each layer reach a soft gel, then continue. If you love ultra-thick pendants, pick a “deep-pour” formula specifically engineered for low exotherm. Conversely, shallow bezel fills and domes can use standard blends with excellent results.
Hardness, Flexibility, and Wear
Jewelry lives in a world of zippers, countertops, handbags, and keys. Choose a system whose cured Shore D or pencil hardness resists scratches while balancing brittleness. A slightly flexible finish can shrug off knocks better than glass-hard brittleness, especially for bracelets. For rings and bangles, a higher surface scratch resistance protects glossy finishes. Consider topcoats or micro-mesh polishing to restore luster after months of wear. Selecting for hardness ensures longevity without sacrificing comfort.
UV Stability and Color Preservation
Sunlight and indoor UV sources can shift color over time. Stabilized systems include UV absorbers and HALS additives that delay yellow tint. If you sell at outdoor markets or create pale palettes, prioritize yellowing resistance. Store raw materials in opaque containers, rotate stock frequently, and avoid curing in direct sunlight unless the product specifically calls for it.
Odor, Allergens, and Studio Safety
Some chemistries carry distinct odors or volatile compounds. Read SDS documents, wear nitrile gloves, and ensure good ventilation during mixing, pouring, and sanding. Masking protects against fine dust when dry-sanding cured pieces. If you or clients have sensitivities, test-wear finished pieces and consider hypoallergenic findings. Good safety practices not only protect your health but also keep surfaces and molds cleaner for better results.
Adhesion and Compatibility
Certain pigments, silicone oils, or mold releases can inhibit cure or cause “fish-eyes.” Always test a new additive on a small sample. For open-backed bezels, seal porous backings (paper, fabric, wood) with a thin glue or clear coat to prevent wicking and dark stains. If you plan to add pieces later—posts, bails, stones—confirm that your chosen adhesive bonds well to the cured surface or roughen with fine grit before gluing.
Storage, Shelf Life, and Waste
Two-part systems age. Hardeners in particular can darken or crystallize. Buy sizes you’ll finish within the recommended window, keep caps clean, and store in cool conditions. Date each kit on arrival. Manage waste by planning multiple small pours, using leftover drips for test tiles, or casting scrap into terrazzo-style chips for later projects.
Matching Resin to Jewelry Styles
Each design places unique demands on thickness, clarity, and toughness. Below are common jewelry categories and what properties to emphasize when selecting materials.
Domed Pendants and Flat Bezels
For coin-style pendants and flat photo bezels, choose low to medium viscosity, good self-leveling, and a longer pot life for dust control and bubble release. If the design calls for a proud dome, pick a formula praised for edge tension—some blends “hold an edge” better, making it easier to build a rounded lens. To minimize bubbles with paper inserts, seal the artwork with a clear barrier before the main pour.
Thick Cast Pendants and Botanicals
Pressed-flowers, moss, or seashell inclusions shine in thicker castings. Deep-pour epoxy reduces exotherm, keeping clarity high across layers and preventing internal fogging. Dry botanicals thoroughly and pre-seal them to prevent trapped moisture from outgassing. Build in layers around the inclusions so they appear suspended, and rotate the mold to examine for hidden air pockets before cure.
Statement Earrings
Earrings benefit from weight-conscious choices. A lighter, slightly flexible formula reduces ear fatigue and minimizes chipping if a piece drops. UV-curable resin is handy for tiny dangles or for quickly adding posts and small accents. For larger shapes, cast thin sheets, then cut with a jeweler’s saw or craft blade before full cure if the chemistry allows a “green” cutting window.
Bangles and Rings
High-contact pieces demand scuff resistance and dimensional stability. Consider systems that cure to a higher Shore D, and prioritize scratch resistance. For ring shanks that contact skin continuously, keep surfaces smooth and edges softened. If you plan to turn bangles on a lathe, pick a formulation known for chip-free machining and stable cure through the cross-section.
Open-Backed Bezels and Negative Space
Open backs create striking, light-filled pieces. UV resin excels at building a quick window, but watch for oxygen inhibition on the surface; a brief post-cure under a stronger lamp or a clear top film can help. For two-part systems, tape the back with high-quality packing tape or specialized barrier film, burnish to seal, and pour in multiple thin layers to reduce leaks and bubbles.
Wood, Metal, and Inlay Hybrids
Wood-and-resin combinations showcase organic grain against glassy color. Seal the wood first to prevent bubbles as air escapes from pores. For stone inlay or terrazzo effects, a slightly thicker viscosity holds chips in place. After cure, progress through wet-sanding grits and polish to a high gloss. For metal bezels, scuff interiors lightly for better adhesion, and ensure the metal is clean and degreased.
Aesthetic Effects and Additives
Colorants and textures expand what’s possible. Whether you prefer translucent washes or marble-like opacity, follow additive guidelines to avoid cure inhibition or muddy results.
- Mica powders: Swirling metallics and pearlescent sheens that stay suspended in medium-viscosity pours.
- Opaque pastes: High-tint pastes create solid colors; add sparingly to avoid weakening the matrix.
- Alcohol inks: Vivid blooms and cells when used carefully; test first, as some inks can inhibit surface cure or bleed over time.
- Metal leaf and foils: Brilliant highlights; apply in fragments to avoid large trapped bubbles.
- Glow and color-shift: Phosphorescent pigments charge under light; interference powders add iridescence without opacity.
- Glitters and flakes: Choose solvent-resistant options; seal printed glitter to prevent dye bleed.
To keep compositions crisp, add heavy inclusions close to gel time so they “float less,” and use toothpicks or silicone tools to position details. For layered art, lightly scuff cured layers for mechanical bond unless your system allows chemical bonding between fresh coats within a set time window.
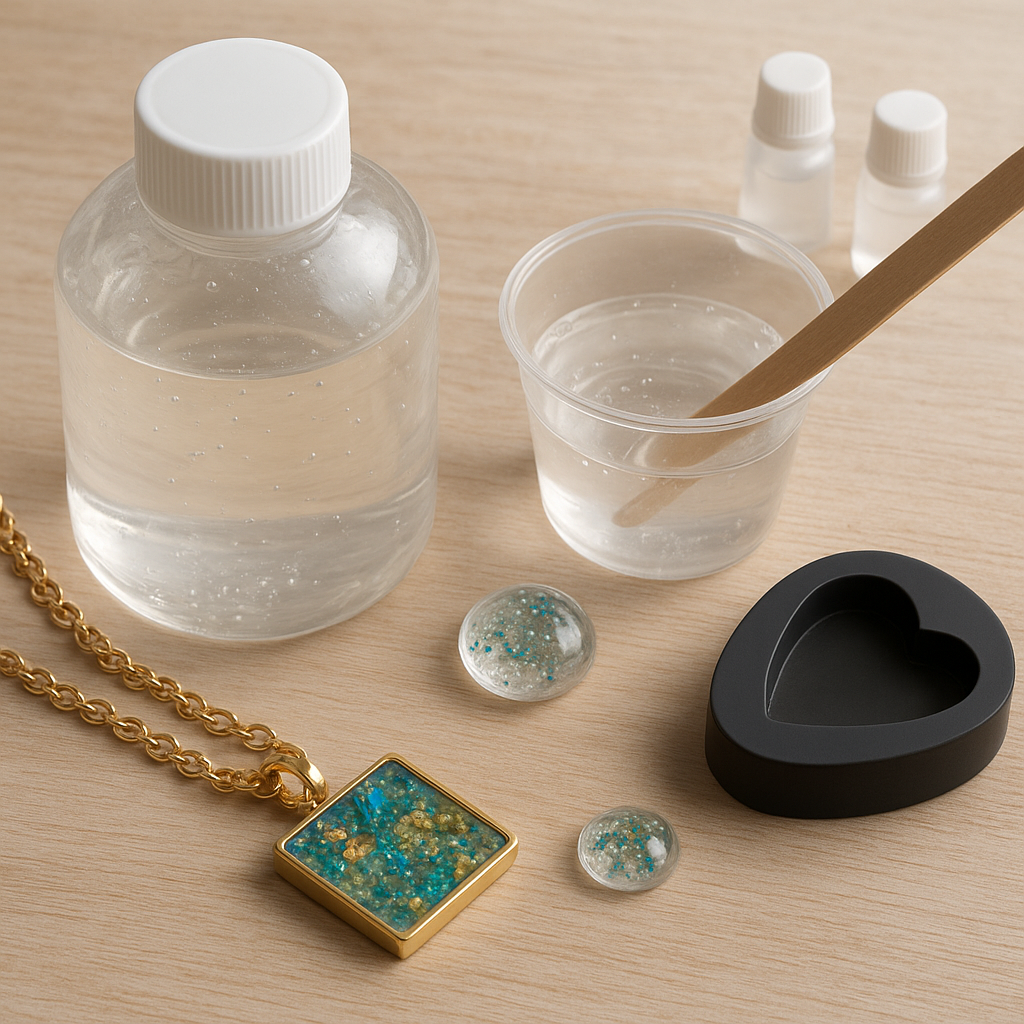
Tools, Setup, and Safety Essentials
A consistent bench routine does more for flawless finishes than any single product. Create a workflow that reduces dust, manages temperature, and gives you time to correct small mistakes before they lock in.
- Measuring and mixing: Use dedicated graduated cups or a precision scale depending on the manufacturer’s instruction (volume vs. weight). Mix slowly with flat sticks, scraping sides and bottom to minimize air. Consider double-cup transfers for thorough blending.
- Temperature control: Most systems behave best around 20–24°C (68–75°F). Warm bottles slightly for lower viscosity; never overheat. Keep molds at room temperature to avoid cold-induced microbubbles.
- Bubble management: A quick pass with a heat gun or torch releases surface bubbles; avoid over-heating edges. For intricate molds, pre-wet with a thin coat and tap gently to free trapped air. Pressure pots compress bubbles; vacuum chambers extract them—both strategies are classic degassing methods.
- Surface protection: Silicone mats catch drips. Anti-dust covers (food tents, clean bins) protect slow-curing domes.
- PPE and environment: Nitrile gloves, eye protection, and smart ventilation habits are baseline. When dry-sanding, use a dust mask or wet-sand to keep particles out of the air.
- Finishing: Let pieces cure fully before sanding. Work through grits (e.g., 400 to 3000) and polish with plastic-specific compounds. A final carnauba or microcrystalline wax can add slickness and repel fingerprints.
A Practical Decision Framework
Use this quick path to map materials to your design goal.
- If you need fast results for tiny bezels, spot fixes, or on-site demos: pick UV resin and a reliable lamp; finish with a protective clear coat if needed.
- If your design is a deep pendant with botanicals or layers: choose deep-pour epoxy with long pot life and low exotherm; pour in stages.
- If you are producing small components in silicone molds at volume: consider moisture-controlled polyurethane for rapid demold and crisp details.
- If you plan a budget-friendly opaque style and can manage strong odor and ventilation: polyester may work, but weigh its brittleness and fumes carefully.
- If scratch resistance and long outdoor wear matter: select an epoxy with UV stabilizers and higher surface hardness; consider a hard topcoat.
- If weight is a concern for large earrings: aim for thinner sections, lighter fillers, and a flexible epoxy blend.
Common Mistakes and How to Troubleshoot Them
Every studio encounters hiccups. Use these patterns to diagnose and improve outcomes.
- Tacky or soft surface after cure: Often due to off-ratio mixing or incomplete blending. Verify weight vs. volume instructions and mix long enough to unify components. If the batch underneath is firm, you can wash the tacky film with isopropyl alcohol, lightly abrade, and recoat.
- Persistent bubbles: Warm components, mix slowly, and pre-wet mold surfaces. For delicate botanicals, seal inclusions first and stage them carefully. Consider pressure or vacuum where appropriate.
- Cloudiness in deep sections: Exotherm or moisture is the usual culprit. Pour thinner layers, reduce batch size, and control humidity. Switch to a low-exotherm deep-pour formula for very thick pieces.
- Fish-eyes or craters: Surface contamination (oils, silicone) repels the pour. Clean bezels and molds, avoid aerosol lubricants near the bench, and test new pigments for compatibility.
- Yellow tint developing in storage: Old hardener, inadequate UV stabilization, or sunlight exposure. Rotate stock, store in opaque containers, and favor UV-stabilized systems for pale palettes.
- Edges pulling back during doming: Viscosity too low or surface tension mismatch. Let the mix thicken slightly before doming or choose a blend known to “hold an edge.”
- Cracking or brittleness: Excessive exotherm, over-catalysis (for polyester), or a too-brittle chemistry for the application. Slow the cure and choose a formulation with a bit more flex for bangles.
Care, Finishing, and Long-Term Wear
How you finish and advise clients to care for jewelry ensures that pieces age gracefully. Even hard finishes pick up micro-scratches over time; the right maintenance restores luster and preserves clarity.
- Post-cure patience: Allow full cure before heavy sanding or drilling to prevent heat-softened gouges. Use sharp bits at low speed and cool with water as needed.
- Sanding workflow: Flat blocks preserve planes; foam pads conform to curves. Wet-sand to manage dust. Step through grits methodically; don’t skip grades.
- Polishing: Plastic polishes or automotive finishing compounds remove haze. Microfiber cloths buff to gloss; avoid cotton that can leave lint.
- Protection in use: Recommend removing jewelry for chlorinated pools, saunas, or solvent-rich environments. Store pieces away from direct sunlight to slow color shift.
- Refinishing services: Offering re-polish or topcoat refresh services can differentiate your studio and extend customer relationships.
Budget, Sourcing, and Sustainability
Material choices intersect with business realities and environmental goals. By planning ahead, you can cut waste and create more responsibly.
- Cost per milliliter: Compare not just sticker price but coverage and yield per typical project. Fast-cure systems may reduce labor time even if they cost more per ounce.
- Batch efficiency: Pour small test tiles first to check colors, then scale up. Consolidate mini-pours to reduce leftover drips; cast extras into future-use chips.
- Responsible practices: Favor low-VOC products when possible, capture sanding slurry to avoid drain microplastics, and re-use molds thoughtfully. Consider bio-based options where performance matches need.
- Packaging and shelf life: Smaller kits reduce aging waste for low-volume makers. Date labels, inventory rotation, and clean decanting extend product life.
Design Playbook: From Idea to Finished Piece
Turn criteria into action with a repeatable studio routine that protects quality without stifling creativity.
- Define the wearing context: Day-to-day pendant, event statement piece, or outdoor market favorite? Prioritize scratch resistance, UV stability, or weight accordingly.
- Map thickness: If exceeding 10–15 mm, plan layered pours with low-exotherm chemistry.
- Choose color strategy: Transparent for botanicals; pearlescent for marbling; opaque for graphic shapes. Test on sample sticks.
- Dry run: Stage inclusions, test bezel seals, and set out tools before mixing begins.
- Controlled mix: Measure accurately, stir patiently, and pour deliberately. Use a torch sparingly for surface bubbles.
- Dust discipline: Cover slow-curing domes; keep a clean box nearby for protected cures.
- Finish line: After full cure, sand and polish; photograph under diffused light to showcase clarity and depth.
Advanced Techniques for Character and Craft
When you’re ready to push beyond basics, controlled instability—cells, veils, veining—adds drama. The key is understanding how chemistry and motion interact.
- Swirl timing: Pour two colors with different densities just before gel. Gentle figure-eight motions create ribbons without fully blending.
- Veining with metallics: Add a whisper of mica-laden mix as the surface skins; tease lines with a needle. Overworking muddies effects.
- Terrazzo chips: Cast leftover pigmented scrap, break it, and set flakes into a lightly thickened base. Sand flush for modern geometry.
- Botanical lifelike depth: Stage petals at different layer heights; a final ultra-clear cap amplifies a lens effect.
- Gradient panels: Pour tinted bands side-by-side; use a comb tool to merge boundaries subtly before gel.
Quality Control for Market-Ready Work
Customers examine edges, backs, and findings as closely as the front face. Elevate the unseen details to professional standards.
- Back polish: Even if a piece sits against clothing, a smooth back signals craftsmanship.
- Finding alignment: Posts centered and square; bails aligned with pendant mass to reduce spin.
- Edge comfort: Micro-chamfer sharp rims; jewelry should never snag fabric or irritate skin.
- Color consistency: Batch-control pigments by weight for repeat orders; keep lab notes with ratios, temperatures, and cure times.
Putting It All Together
There is no single formula that wins every category. Instead, the best choice emerges from the intersection of your design’s thickness, clarity goals, wear demands, and production tempo. For most crafters, a well-balanced epoxy serves as a universal studio workhorse. Add a fast-curing polyurethane for molded components, and keep UV on hand for micro-domes and speedy fixes. Develop a bench habit that masters bubble control, layer strategy, and finishing workflow. With these tools in place, your jewelry will capture the luminous qualities that make poured pieces feel alive—glassy depths, suspended botanicals, and colors with a quiet glow—while standing up to everyday wear.
Quick Reference: Property Priorities by Use Case
- Ultra-clear botanical pendants: deep-pour epoxy, long pot life, low exotherm, strong UV stabilization, staged layers.
- High-gloss photo or paper bezels: medium viscosity, doming capability, pre-sealed artwork, dust covers, slow cure for bubble release.
- Lightweight statement earrings: thin casts, flexible epoxy, translucent tints, careful finishing for edge comfort.
- Production molds and repeats: moisture-managed polyurethane, fast demold, pigment pastes pre-mixed in small jars.
- Open-back windows: UV base layer for sealing, then thin epoxy pours for depth; or full UV build with post-cure protection.
- Bangles and rings: harder surface cure, excellent scratch resistance, optional protective topcoat, thorough post-cure before machining.
Final Notes on Technique Mastery
Consistent success grows from practice samples, honest observation, and small tweaks: a slightly warmer shop, a slower stir, a different mold release, or a change in pour order. Keep a studio log, label each test with ratios and conditions, and photograph results for future reference. Over time, your choices will feel intuitive. You’ll sense when a mix is thick enough for a perfect dome, which pigments need under-mixing for a cloudy marble, and how long a layer can rest before the next pour for maximum clarity. Mastery lies as much in process as in product—and with thoughtful selection and controlled experimentation, every piece can capture the luminous, handcrafted presence that makes resin jewelry irresistible.