Every great piece of handmade jewelry deserves a home that keeps it safe, easy to find, and ready to shine the moment a client inquires. Thoughtful organization is not only about neatness; it’s a strategic, creative process that preserves materials, accelerates making, and presents your brand at its best. Whether you work at a tiny kitchen table or a full-scale studio, the right storage approach protects finishes, prevents loss, and gives you back time to design.
Guiding Principles for a Clutter-Free, Craft-Smart Studio
Before buying bins or rearranging furniture, define how you work and what you truly need at arm’s reach. The following principles adapt to any space and style, from wire-wrapping artisans to metalsmiths and bead weavers.
- Map your making zones: sketch where you design, cut, form, solder, polish, photograph, and package. Store items where they’re used to minimize movement and cognitive load.
- Embrace vertical space: pegboards, wall-mounted rails, and magnetic bars lift tools and spools off the bench, freeing your working surface.
- Open vs. closed storage: open shelves and trays speed access for high-frequency tools; lidded bins and drawers shield sensitive items from dust, UV, and humidity.
- Standardize container sizes: uniform bins and trays nest and stack cleanly, saving inches and visual clutter.
- Color and category codes: assign colors to metals (e.g., blue for silver, green for brass), types (beads, wire, findings), or production stages (to-make, WIP, ready-to-photograph).
- Design for flow: place raw materials upstream of tools, then finishing supplies, then packaging and shipping, mirroring the life of a piece from sketch to sale. A dependable workflow reduces backtracking and mistakes.
Materials That Like to Be Pampered: Beads, Wire, Sheet, and Stones
Components are the heart of every piece. Good storage not only keeps them sorted but also preserves finish quality, color, and shape.
Beads and Seed Beads
Tiny parts vanish quickly without clear, compartmentalized storage. Consider:
- Shallow, locking organizers with adjustable dividers. Look for tight hinges and clear lids to see contents without opening.
- Vial systems for seed beads: 5–10 ml tubes in foam-lined trays keep colors upright and spill-resistant.
- Color and size indexing: left to right by hue; top to bottom by size. Add sample swatches on an index card for fast selection.
- Travel bead boards with snap lids: keep current palettes intact between sessions and protect in-progress patterns.
Wire, Chain, and Cord
Coils that kink or tangle waste materials and time. Choose winding and dispensing methods that match your metals and gauges.
- Spool trees and dowel racks: mount them on walls or inside cabinets to save space and reduce tangles.
- Floss bobbins for chain: wind fine chains or silk cord onto labeled bobbins stored in photo boxes.
- Anti-kink reels: for soft wire (e.g., dead-soft silver), lightweight reels prevent flattening; avoid tight bends that cold-work the metal.
- Gauge segregation: keep steel or nickel-based items separated from precious metals to avoid contamination and misleading magnet tests.
- Clear sleeves for specialty wire: store half-round and square profiles in rigid, labeled sleeves so edges stay crisp.
Sheet Metal and Stampings
- Flat files: slip sheet metal between polyethylene sheets or acid-free envelopes inside a flat file or wide drawer.
- Dividers by alloy and thickness: label with gauge and temper; include a small offcut for quick hardness tests.
- Rust and tarnish precautions: keep carbon steel away from humidity; separate silver from sulfur sources (rubber bands, felt with sulfur dyes, some foams).
Gemstones, Cabochons, and Delicates
- Compartment trays lined with archival foam or flocked plastic: avoid PVC; choose polypropylene, polystyrene, or PET for transparency and stability.
- Coin flips or gem jars: secure singles or matched pairs with labels including origin, cut, size, and treatment notes.
- Protect soft stones: keep pearls, opals, and turquoise in separate cases; add a humidity buffer to prevent cracking or dehydration.
Preventing Tarnish, Dust, and Damage
Metal finishes are vulnerable to air, moisture, and sulfur compounds. Your goal is to slow reactions without adding chemicals that outgas or stain.
- Desiccants and absorbers: silica gel packets maintain lower humidity; recharge per manufacturer guidance. Activated charcoal helps adsorb sulfur compounds in confined spaces.
- Intercept or VCI materials: specialized papers and foam scavenge reactive gases. Rotate every 12–24 months depending on exposure.
- Seal-and-stash: place silver in zip pouches with anti-tarnish tabs; keep brass and copper separated to avoid cross-contamination of patinas.
- Avoid risky materials: rubber bands, some felt, PVC pages, and off-brand foam can emit sulfur or plasticizers that tarnish or imprint textures.
- Clean before storing: residues from polishing compounds or liver of sulfur accelerate tarnish; rinse, dry, and bag promptly.
A dedicated anti-tarnish station—small bags, tabs, and a desiccant bin—near your finishing bench makes long-term care automatic.
Tool Control: Pliers, Hammers, Torches, and Benchtop Essentials
Tool storage needs to be both protective and fast to use. Good handling saves edges, faces, and alignment while supporting safe posture and efficient reach.
- Pegboards with shaped outlines: hang pliers, shears, and calipers on labeled hooks. An outline shows when something’s missing.
- Magnet strips and tool rails: strong neodymium bars for steel tools, soft rails for delicate burnishers or gravers to avoid marring.
- Drawer grids: shallow drawers with foam cutouts cradle chasing tools and stamps; add a simple index on the underside of the lid.
- Bench shelf risers: elevate everyday tools in a single tier so handles are visible, not piled.
- Fire and gas safety: store fuel canisters upright in ventilated cabinets away from heat; cap lines when not in use; keep a Class B/C fire extinguisher accessible.
Thoughtful tool layout directly improves ergonomics. Aim for neutral wrist angles, light grasp force, and short reach distances. Position anvils and vises at the right height to avoid shoulder hunching, and use anti-fatigue mats if you stand for long sessions.
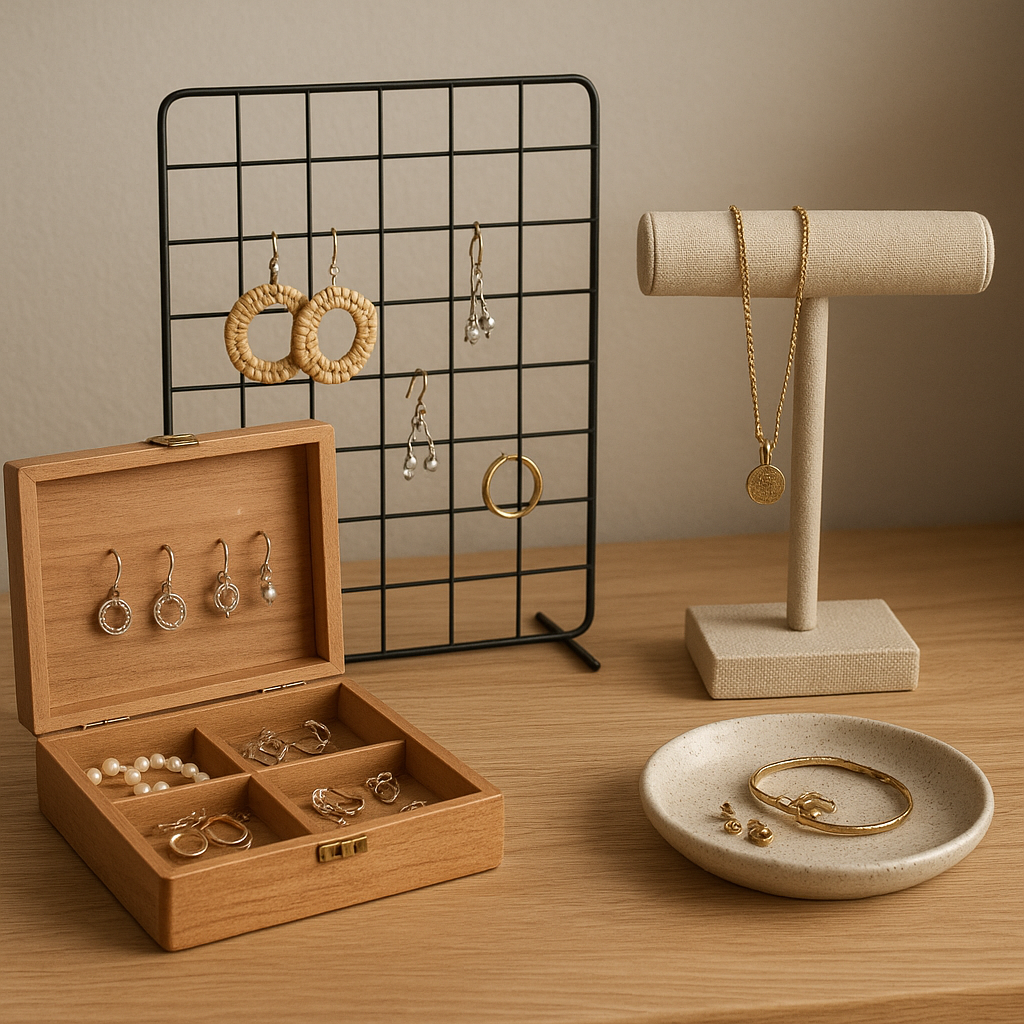
Storing Finished Jewelry: Trays, Inserts, and Photo-Ready Cases
Finished work deserves clean, lint-free, and brand-consistent storage, ideally doubling as display and photography props.
- Stackable display trays: flocked or linen-lined trays slide into cases; assign one tray per collection or material.
- Bracelet and necklace busts with dust covers: use breathable fabric covers to prevent lint and fading.
- Earring cards and shadow boxes: pre-card inventory for markets; store in shallow bins sized to your show crates.
- Modular travel cases: hard-sided cases with customizable foam protect delicate pieces; pre-pack show sets to reduce last-minute scrambling.
Bring consistency to labeling and presentation so storage flows straight into display. Choose a modular system that scales as you add new lines without redoing the whole studio.
Inventory, Labeling, and Digital Tracking
Robust tracking stops duplicates, preserves pricing logic, and helps you reorder materials before you run out. Cleanly labeled physical storage paired with digital records prevents late-night hunts for that one perfect clasp.
- Item IDs: generate a short code for each piece and material batch (e.g., SIL-18G-DSF for silver 18-gauge dead-soft wire). Include the code on bin labels and in your spreadsheet or app.
- Barcodes or QR: print small labels linking to product pages or material specs. Scan to pull up pricing, photos, or care notes.
- FIFO and date stamps: put newer materials at the back so you use older stock first. Stamp arrival dates on bags or bin cards.
- Photo catalog: photograph trays by section; store images in a folder named for the tray ID—perfect for quick audit checks before and after markets.
- Kanban cards: when a bin reaches a reorder threshold, place a bright card in your planner or task app to trigger buying.
Even a simple spreadsheet boosts inventory clarity: columns for SKU, materials, hours, price, stock count, and location (e.g., “Tray B2” or “Show Case 3”).
Mobile Making and Market-Ready Kits
Many makers travel: to classes, pop-up markets, and art fairs. Portable storage needs protective shells, quick access, and smart weight distribution.
- Rolling crates and hard cases: nested trays inside a hard-shell case protect while moving. Use foam corners to stop tray slide.
- Show tool roll: a fabric roll with clear pockets for pliers, snips, and small files; add a mini bench pin clamp for on-the-spot repairs.
- Gridwall and risers: store flat with labeled bungees; keep hardware in a dedicated pouch so you never borrow from other kits.
- Weather-proof covers: zip-top bags or poly sleeves for signage and price lists; a spare tablecloth in a sealed pouch.
At markets, success hinges on accessibility: price tags visible, sizes graded, and backstock in reach but hidden from shoppers. Use a dedicated back-of-table drawer tower with a small top surface for tools and polishing cloths.
Packaging and Shipping Stations
A compact, well-outfitted packing zone reduces breakage and elevates customer experience.
- Drawer by task: one for boxes and pouches, one for tissue and ribbons, one for care cards, and one for mailers and labels.
- Brand-safe materials: acid-free tissue, non-PVC window boxes, and recycled padding. Include patina-friendly options for brass or copper items.
- Crush resistance: choose mailers or boxes with appropriate edge crush test (ECT) ratings; small rigid mailers for studs prevent posts from bending.
- Quality checks: lint brush, microfiber cloth, and tamper-evident seals in a “final polish” caddy.
Climate Control, Cleanliness, and Safe Materials
Relative humidity and airborne contaminants directly influence the lifespan of metals and organic materials.
- Monitor humidity: aim for 35–50% RH for most metals; keep pearls and opals away from overly dry air to prevent cracking.
- Air filtration: a small HEPA purifier reduces dust that scratches glossy finishes or gemstones.
- Material safety: prioritize containers made from polypropylene (PP), polyethylene (PE), or PET. Avoid unknown foams, vinyls, or dyed fabrics that can transfer color.
- No sulfur zone: store eggs, onions, rubber, and new foams far from silver and copper storage to minimize tarnish triggers.
Ergonomic Layout and Mental Clarity
Your storage is a daily collaborator. Beyond tool positioning, audit how the space makes you feel and how quickly you can reset after a session.
- Clear reset ritual: dedicate the final 5–10 minutes to resetting trays, bagging parts, and emptying scrap trays.
- Visual calm: opaque bins for rarely used items reduce visual noise; open racks for the few daily tools you love.
- Task lighting: illuminate drawers and shelves with motion lights; color-true bulbs improve stone selection and finish inspection.
Scrap, Offcuts, and Reclaim
Scrap is value. Store it intentionally to keep alloy streams pure and ready for refining or reuse.
- Separate by metal: dedicated tins for sterling, fine silver, brass, copper, and gold; label clearly and keep lids shut.
- Chip and dust control: bench sweeps collected in a fine-mesh bag; vacuum with a HEPA filter to capture micro-scrap.
- Re-melting notes: store clean, flux-free scrap; contaminated or solder-heavy bits go to the refiner with clear weight and notes.
DIY and Budget-Friendly Storage Hacks
You don’t need expensive systems to achieve excellence—creativity stretches every dollar while reflecting your brand’s spirit.
- Hardware bins reimagined: stackable screws-and-bolts organizers with clear fronts become perfect bead towers.
- Cutlery trays as tool docks: line with non-slip drawer liners; dedicate slots to pliers by function.
- Binder brilliance: 3-ring binders with zip pouches store chain samples, findings cards, and receipts. Add a color key and consistent labeling.
- Photo boxes and dividers: 4×6 photo cases hold earring cards or project kits; label spines for quick grabs.
- Repurposed spice jars: for crimp beads, crimps covers, and small toggles; mount magnetic spice tins to a steel strip under a shelf.
Brand-Forward Display That Stores Beautifully
Storage doubles as silent marketing when it echoes your brand’s textures and palette.
- Coordinated liners: linen, cork, or vegan suede across trays, busts, and pouches create cohesion.
- Signature accents: a specific metal clip, wax seal, or color edge on cards helps pieces feel part of a curated family.
- Photography-ready sets: keep a small backdrop, risers, and reflectors in a labeled tote so you can shoot new arrivals instantly.
5S for Makers: A Simple Studio Discipline
Borrowed from lean manufacturing, 5S brings order without killing creativity.
- Sort: remove what you don’t use; donate duplicates; retire worn tools.
- Set in order: give everything a home; label shelves and drawer fronts.
- Shine: clean benches, trays, and lights weekly; polish acrylic lids to maintain clarity.
- Standardize: define container sizes, naming, and tray IDs; document in a one-page studio guide.
- Sustain: schedule monthly micro-audits; adapt as collections evolve and your scalability needs grow.
Quality Preservation: Textiles, Leathers, and Organics
Leather cords, silk ribbons, and wooden elements benefit from gentle, breathable storage.
- Breathable pouches: cotton or Tyvek envelopes prevent sweating and mildew; avoid tight plastic for leather.
- Colorfast tests: store dyed cords separately until you confirm color stability; keep silica packets nearby to deter mold.
- Flat reels: wide reels prevent crease memory in ribbons and laces; add end clips to stop unwind.
Safety and Compliance Touchpoints
Smart storage choices also protect your health and business.
- MSDS/SDS binder: store safety data sheets for chemicals; keep neutralizing agents and spill kits nearby.
- Child-safe storage: if you work from home, lock away sharp tools, chemicals, and small parts.
- Weight and stability: anchor tall shelving; distribute heavy materials low to avoid tip hazards.
Case Studies in Efficient Layout
Micro studio: a fold-down wall desk with a pegboard interior; two narrow rolling carts dock under the desk. Beads in vial trays on the top shelf; a single tray for current projects; packing supplies in one cart; tool roll hung on a hook.
Shared maker space: each maker gets a color-coded crate with a locking lid; common tools on labeled rails; a signed-out tray for precious metals; a community “orphan findings” bin sorted monthly.
Market-focused artist: everything pre-packs into two hard cases and a rolling cart: one case of display trays, one for backstock and repairs; gridwall panels clipped and strapped; a “15-minute setup” checklist taped inside the lid.
Routine Maintenance and Studio Rhythms
Storage systems thrive with gentle, regular care. Build schedules that fit your production seasons.
- Weekly: reset benches, recharge desiccants, restock anti-tarnish tabs, swipe shelves with a microfiber cloth.
- Monthly: audit one category (wire, beads, tools); clear duplicates; update reorder thresholds.
- Quarterly: rotate show inventory, sanitize travel cases, and deep-clean displays so they photograph beautifully.
- Annually: retire worn liners, test drawer slides and latches, and donate unused organizers.
Sustainability and Long-Life Choices
Choose materials and methods that last, repair easily, and reduce waste without sacrificing performance.
- Refillable over disposable: refill desiccant canisters and reuse anti-tarnish boxes where possible.
- Repairable containers: select bins with replaceable latches; keep spare hardware on hand.
- Second-life materials: reclaimed wood shelves sealed with non-yellowing finishes; recycled paperboard for packing.
Thoughtful choices add durability to your studio ecosystem and keep your budget focused on what matters most: making.
Common Pitfalls and How to Dodge Them
- Over-categorizing: if it takes longer to put away than to use, simplify. Merge low-use categories.
- Invisible labels: use large, high-contrast labels you can read at a glance; place on the front and top for stacked bins.
- Stacking too high: top bins become unreachable; favor shelf risers or drawers to keep everything within safe reach.
- Mixed metals in one bag: store silver, brass, and copper separately to preserve finishes and speed picking.
Quick Wins You Can Do This Week
- Create a “project pod”: one tray or box that holds a single collection from sketch to shipping.
- Install a small pegboard: move four daily tools off the bench; add a mini shelf for flux and tweezers.
- Label three bins: start with wire, findings, and in-progress pieces; you can expand later.
- Set a reset timer: five minutes before you stop for the day, tidy only what’s visible—instant morale boost.
From Storage to Story
Storage isn’t a backroom chore; it’s an extension of your craft. The moment your hand reaches for a neatly coiled wire, finds the exact clasp, or opens a spotless tray with a finished set, you reinforce the care embedded in every piece. Align your systems with how you think and make, let your trays and cases echo your brand voice, and give your future self the gift of clarity. With a dash of planning, a little maintenance, intentional labeling, and a commitment to steady refinement, your studio will run smoother, your materials will last longer, and your creative energy will stay focused where it belongs—on the art itself.
Checklist: Materials and Tools Worth Considering
- Clear, locking organizers with adjustable dividers for beads and findings.
- Vial trays for seed beads; foam-lined gemstone trays.
- Spool trees, dowel racks, and chain bobbins.
- Flat files with acid-free sleeves for sheet metal.
- Desiccants, activated charcoal, and anti-tarnish tabs.
- Intercept or VCI papers for long-term storage.
- Pegboards, magnetic tool bars, and foam drawer inserts.
- Stackable display trays and hard-shell travel cases.
- Label maker, barcode or QR labels, and a simple inventory spreadsheet.
- HEPA air filter, hygrometer, and bright task lighting.
Bringing It All Together
Great storage lets creativity lead and chaos take a back seat. From a single tidy drawer to a wall of coordinated trays, evolve in steps that respect your pace and budget. Prioritize what speeds making, protects finishes, and delights customers. As your collections grow and your processes mature, the same core system can expand without upheaval. Invest in what you use daily, keep seldom-used items tucked away, and let your storage quietly amplify your craft’s precision, beauty, and heart.