Metal stamping jewelry transforms raw metal blanks into wearable stories. With a handful of tools, a steady surface, and patience, you can press letters, numbers, and icons into copper, brass, aluminum, or silver to create keepsakes that feel both rugged and intimate. This craft rewards curiosity: small refinements in grip, pressure, and listening to the strike can turn tentative impressions into crisp, confident marks. Whether you’re making a custom pet tag, a mantra cuff, or a pendant that gifts meaning to someone you love, metal stamping welcomes beginners while offering limitless room to grow.
What Metal Stamping Is—and What It Isn’t
Metal stamping in the jewelry world is the practice of using hardened steel stamps, each bearing a character or motif, and delivering one or more hammer blows to transfer that design into softer metal. Unlike engraving, which removes material, stamping displaces it, compressing the surface so the mark sits below surrounding metal. The result is tactile, durable lettering and illustration with a handcrafted vibe that machines can’t quite replicate.
Don’t confuse this with industrial stamping that uses massive presses and dies to cut or form metal at scale. The handmade version relies on feel, control, and personal style. You will learn to judge your strike, manage spacing, and choose metals and finishes for each project’s purpose—quietly blending art, craft, and a touch of metallurgy.
Core Tools for Beginners
Starting well means picking tools that make learning easier and results more predictable. You don’t need a studio; a sturdy table and the kit below can take you far.
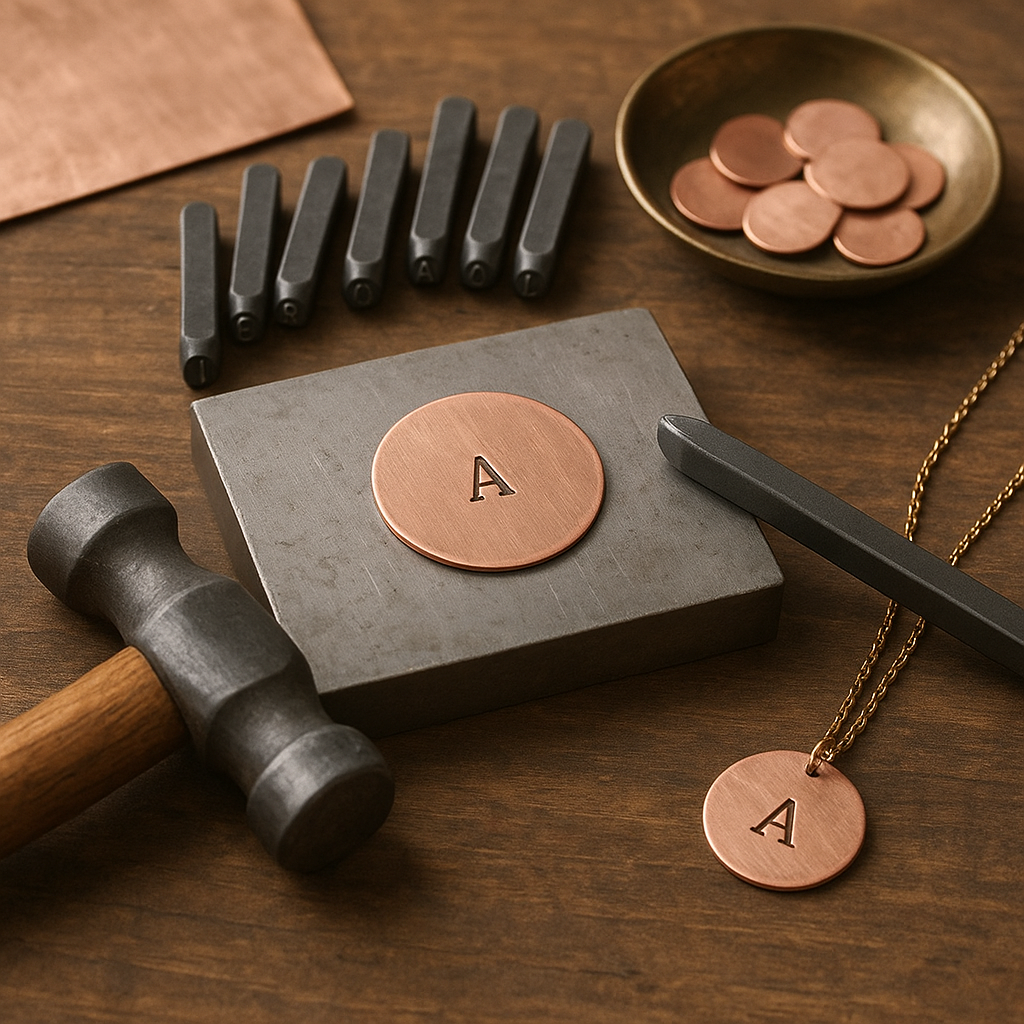
- Alphabet and number stamp sets: Choose a size (commonly 1.5–6 mm). Softer alloys such as brass or copper stamp easily; your stamps should be high-quality hardened steel with cleanly cut faces. Avoid bargain sets with inconsistent character depths.
- Design stamps: Hearts, stars, arrows, botanical motifs, borders, and texture stamps expand your creative language. Start with a few you love, then build out.
- Bench block: A hardened steel block (2.5–4 inches square) provides a flat, dense surface. Place it on a sandbag or folded leather to dampen noise and rebound.
- Hammer or mallet: A brass hammer (1–2 lb) minimizes bounce and helps prevent mushrooming of stamp heads. A steel hammer can work but transmits more shock to stamps and wrists.
- Holding aids: Blue painter’s tape acts as a straightedge and keeps blanks steady. Letter guides, stamp jigs, or simple masking tape “hinges” improve placement.
- Blanks and findings: Aluminum, copper, brass, or sterling blanks in discs, bars, and tags. Add jump rings, chains, bracelet blanks, key rings, and ear wires.
- Shaping and finishing: Files, needle files, sanding papers (400–3000 grit), polishing cloths, tumblers with stainless shot, and a hole punch for adding jumprings.
- Darkening agents: Liver of sulfur gel for silver and copper alloys, paint-like stamp enamels for aluminum and brass, or acrylics and waxes for antique effects.
- Safety essentials: Eye protection, hearing protection, and good lighting. Non-slip matting under your block reduces vibration and fatigue.
Choosing Metals and Gauges
Not all metals behave the same. Aluminum is light, bright, and extremely forgiving—great for first attempts and practice. Copper is luscious and stamps easily, developing a warm surface coloration over time. Brass resists wear and looks classic, though it takes a firmer strike than copper. Sterling is stampable and polishes beautifully; fine silver is even softer but costs more. Stainless steel and titanium are unforgiving; leave them until you have experience and the right tools.
Thickness matters. Jewelry makers often describe sheet thickness in gauge: lower number equals thicker metal. For pendants, 18–20 ga (about 1.0–0.8 mm) balances weight and ease of stamping. For cuffs, 14–16 ga (1.6–1.3 mm) prevents deformation and feels substantial. Thinner blanks demand light strikes and support to avoid distortion, while thicker pieces can handle more enthusiastic blows.
Metallurgy influences results. Softer alloys accept crisp impressions with a moderate strike; harder alloys require more energy and precise control. This is where understanding hardness pays off: it informs your metal choice, hammer weight, and the amount of force you deliver.
Setting Up a Comfortable, Quiet Workspace
Your surface must be solid. A wobbly table eats force and produces muddy impressions. Place your steel bench block on a sandbag or a folded leather scrap; this focuses energy into the blank and reduces clanging. Keep frequently used stamps within reach in a rack or tray, and mark the top of each stamp (with paint or a filed notch) so you can orient characters by touch.
Think about ergonomics. The hammer should swing from your elbow and shoulder, not your wrist alone. Stand or sit at a height that lets your forearm remain roughly parallel to the bench block. Use good lighting—angled desk lamps reveal shadows around the stamp tip so you can see if it’s vertical. If noise is a concern, place a silicone mat under the sandbag and consider ear protection.
Planning Your Layout and Line Flow
A little planning prevents letter drift and cramped words. Sketch ideas on paper, then transfer key baselines and boundaries to your blank using painter’s tape. Create a straight lower edge with tape to rest the bottoms of letters against as you stamp, or angle the tape for arcs and curves. If you’re stamping a disc, lightly mark center and cardinal points at 12–3–6–9 o’clock and connect dots with imaginary paths for even spacing.
For long phrases, stamp from the center outward to imbalance less and maintain spacing. For short names, begin at the left and commit to steady rhythm. Embrace air: negative space around words makes jewelry feel considered. When you want repeatability, a template or simple jig can help with alignment across multiples.
Body Mechanics and the First Strike
Good habits pay dividends. Hold the stamp vertical with your non-dominant hand, thumb and forefinger pinching just above the shank’s midpoint. Anchor one edge of the stamp by placing its face lightly against the metal and rocking until it lies flat. In many cases, one confident, square strike is ideal. Lift the hammer to a consistent height, then drop through with a controlled motion—don’t snap your wrist at the last moment.
Some decorative stamps benefit from the tilt-and-tap approach: plant one edge, tap lightly, rotate the stamp without lifting, and tap along the design to ensure every segment is seated. Letter stamps, however, are best with a single committed blow to avoid double impressions.
Develop striking consistency by practicing on inexpensive aluminum or copper strips. Stamp the full alphabet, tracking how depth changes with height and force. Learn how your hammer weight pairs with each metal thickness. The goal is fewer surprises and a rhythm that becomes second nature.
Step-by-Step: Your First Pendant
Materials
- One 19 mm (3/4″) aluminum or copper disc
- Alphabet stamps in your chosen font
- Steel bench block, brass hammer
- Painter’s tape, fine-tip marker
- Hole punch, jump ring, chain
- File and polishing cloth
- Darkening medium suited to your metal
Process
- Mark center: Use a ruler to find approximate center. Place a small dot on tape or mark on scrap paper under the disc to guide your positioning.
- Place tape baseline: Run painter’s tape across the disc to create a straight edge for letter bottoms.
- Stamp: Begin at the center letter and work outward for even spacing. Keep the stamp upright; strike once firmly. If a letter is faint, gently reseat the stamp into its own impression by feel and add a very light follow-up tap.
- Punch hole: Add a clean hole near the top using a metal-rated punch. Deburr with a counter-sink bit or a conical file.
- Darken: Apply your chosen darkening product, wipe the surface, and polish so only the recessed letters remain shaded.
- Assemble: Attach a jump ring and hang your pendant on a chain.
Bracelet Cuffs and Bars
Cuffs are crowd-pleasers for short quotes. Stamp your phrase on a flat strip first, then bend it to shape using bracelet-bending pliers or a mandrel and rawhide mallet. Stamping after bending invites bounce and mis-hits because curved metal doesn’t sit flush. For a comfortable fit, round corner edges and create a slight radius at the ends so they don’t catch on clothing. A light tumble softens edges and work-hardens the piece to help it hold shape on the wrist.
Finishing: Edges, Shine, and Contrast
After stamping, refine the edges so the piece feels intentional. Knock down sharp corners with a file, then move through sanding grits in one direction before cross-sanding at a higher grit to remove scratches. A hand polish with treated cloth restores gleam; tumbling with stainless shot and a drop of burnishing solution raises mirror-like brightness and work-hardens the surface.
Coloring the recesses helps letters pop. For copper and silver alloys, a sulfur-based solution encourages controlled oxidation. Rinse thoroughly, let dry, and polish back the surface so only the recesses remain dark. Alternative colorants include acrylic paint, specialized stamp enamel, or oil pastels sealed with microcrystalline wax. Some makers lean into time’s touch and develop a deliberate patina, especially on copper, to create depth and warmth. Finish with waxes or lacquers that add durability while preserving the look you love.
Design Language: From Minimal to Ornate
Great stamped jewelry often blends text and symbols with rhythm and restraint. Consider how letter size pairs with blank size; oversized fonts on tiny discs feel crowded. Use decorative borders to frame words, or pepper a phrase with simple stars and dots as visual punctuation. Mixed metals—say, a brass bar on a dark leather cord—add contrast without overcomplicating the message.
Experiment with arcs on discs and vertical alignments on bars. Stack tiny symbols to form tall botanicals. A textured field, achieved with a light pebbled stamp or gentle hammering, can disguise minor errors and set off polished letters. The more you observe spacing and repetition in typography, the more effortlessly your pieces will communicate.
Metallurgy in Plain Language
When you strike a stamp, you push metal aside and compress it. The affected zone strengthens through work-hardening, which is why repeated strikes without moving the stamp can produce a brittle feel near the impression. Heat can soften many alloys—jewelers call that annealing. Copper and silver respond well: heat to a dull red and quench (follow metal-specific guidance), then pickle to remove firescale. Softer metal takes cleaner impressions with less force. Aluminum behaves differently: it lacks a practical heat-softening stage for this craft, so simply choose a workable thickness and strike with confidence.
Surface cleanliness matters. Oil and fingerprints interfere with darkening agents. A quick wipe with alcohol before and after stamping improves finish adhesion. If you plan to solder components later, stamp first and darken after, since heat can alter colorants and change the look of the letters.
Troubleshooting Common Issues
- Double impressions: This happens if the stamp lifts or shifts after the first blow. Press down, keep the shank vertical, and commit to one clean strike. If it occurs, texture the entire area to camouflage the ghosting.
- Uneven depth: Caused by uneven force or an unlevel bench block. Shim the block flat, maintain a steady strike height, and check that the stamp face is fully seated before impact.
- Crooked lines: Use tape baselines, mark the top of each stamp, and read characters before hitting. Center-out stamping helps phrases stay balanced.
- Bent blanks: Striking near an unsupported edge can bow the metal. Keep the blank fully on the block. For thin metals, consider a lighter hammer and gentler blow.
- Incomplete impressions on design stamps: Try tilt-and-tap—anchor one edge of the stamp, tap, rotate around the design’s perimeter with light taps, then give a decisive final strike.
- Scratches after coloring: Sand to a uniform scratch pattern first. Colorants emphasize surface texture; polished peaks and rough valleys will show. Finish sanding before darkening.
Safety, Care, and Tool Longevity
Eye protection is non-negotiable. Metal shavings and tiny chips from stamp heads can fly. Hearing protection helps during long sessions. Keep a relaxed grip; white-knuckling increases fatigue and injury risk. Between sessions, wipe stamps with a lightly oiled cloth to prevent rust and store them dry. If a stamp head mushrooms, dress it with a file to remove burrs. Label sets so you don’t mix fonts of similar size. A clean, flat bench block is your ally—if it gets nicked, flip or dress it to keep impressions crisp.
Three Beginner Projects to Build Skill
1) Tiny Initial Charms
- Stamp a single initial on 9–12 mm discs.
- Practice centering by eye and by using tape crosshairs.
- Finish with a soft matte sanding for a modern look.
2) Coordinates Bar Necklace
- Use a long bar blank and stamp latitude and longitude with a small sans-serif font.
- Start in the middle and work outward; separate degrees, minutes, seconds with dots or tiny triangles.
- Darken numerals; polish edges to a high shine for contrast.
3) Mantra Cuff
- Stamp a short phrase along a 6-inch cuff strip.
- Add subtle texture between words with a tiny dot stamp to minimize the appearance of spacing variations.
- Bend to shape on a mandrel; tumble to burnish and strengthen.
Layout Tricks the Pros Use
- Baseline tape: Press letter bottoms against tape for straight lines. Replace tape as it loses adhesion or picks up metal dust.
- Top marks on stamps: Paint or file a notch at the 12 o’clock position to orient letters without turning them to check.
- Center-out sequencing: Find the middle of a phrase; stamp that letter first to balance space at both ends.
- Disc grid: Lightly mark a crosshair, then split quadrants to place characters evenly around the perimeter.
- Test strikes: Stamp the first and last letters on a scrap blank to preview spacing before committing on your final piece.
Texture and Mixed Techniques
Layering techniques deepens your visual toolkit. Combine stamped words with hammered backgrounds, or stamp around a domed disc created with a dapping block to add dimension. Rivet a smaller, stamped tag onto a larger brushed plate for a multi-level design. Add colored resin to a recessed symbol for a pop of gloss. Use a rolling mill with lace or paper to imprint subtle backgrounds, then stamp letters on top for contrast.
Color and Surface Chemistry
Coloring isn’t only about visibility; it sets mood. Cool blacks emphasize crisp fonts. Brown-gold tones feel vintage. Warm grays read quiet and minimal. For copper and silver, controlled sulfur solutions create reliable darkening in minutes. For brass and aluminum, paint-like fills or specialized enamels deliver durable contrast without chemical baths. Seal with wax for a low-sheen look or lacquer for longer-lasting protection, especially on skin-contact pieces prone to oils and moisture.
Time and Cost: Getting Started Without Overspending
A thoughtful starter kit ranges from modest to mid-tier. Expect a solid alphabet set, bench block, brass hammer, and a handful of blanks to cost less than many hobby setups in other crafts. Consumables—tape, polishing media, darkeners—are inexpensive per piece. As your confidence grows, upgrade stamps with crisper fonts and expand into design sets and specialty tools like bracelet benders and tumblers. When gifting or selling, factor your time, materials, and finishing supplies into pricing, and remember that personalization usually commands premium value.
Caring for Stamped Jewelry
Customers cherish pieces that age gracefully. Offer simple care cards: avoid harsh chemicals, remove jewelry before swimming, and store pieces dry. Copper and brass naturally deepen in tone; many wearers love the evolving character. If a bright look is desired, include a polishing cloth. For silver, an anti-tarnish strip in packaging helps. If you apply lacquers, choose ones formulated for skin contact and test for long-term clarity.
Ethical Making and Material Choices
Handicraft can honor place and planet. Seek recycled sterling and responsibly sourced copper and brass. Reuse offcuts for small charms; melt or trade scrap. Minimize harsh cleaners in your studio and ventilate when using patination chemicals. Thoughtful packaging—paper over plastic where feasible—signals care. Build habits that support sustainability from the first project, and your practice will feel more grounded and resilient over time.
Practice Drills That Actually Work
- Depth ladder: Stamp the same letter ten times, increasing force by small increments. Compare legibility and surface distortion at each step.
- Spacing grid: Draw a small grid on scrap and stamp letters at intersections to learn even spacing by eye.
- Curve control: Practice arcs on paper first, then on aluminum discs with tape guides, aiming for even spacing without crowding at the ends.
- Pattern repetition: Use a small dot or star stamp to create borders. Train your hand to repeat equal gaps.
- One-and-done: Challenge yourself to stamp a short word with single committed blows. Confidence reduces double strikes.
Frequently Asked Questions
- Can I stamp stainless steel? Yes, but it’s unforgiving. Use stamps rated for stainless, a heavier hammer, and a very solid surface. Expect more effort and faster tool wear.
- Why do my letters look stretched? The stamp face may not be fully seated. Ensure the face is flat on the metal before striking, and avoid hitting near an unsupported edge.
- Do I stamp before or after bending cuffs? Stamp first on a flat strip for stability, then form the cuff. Touch up polish after shaping.
- How do I keep letters straight? Tape baselines, mark stamp tops, and stamp center-out for long phrases. Work slowly; rushing invites drift.
- What if I make a mistake? Texture the area uniformly, add a design stamp to repurpose the space, or fill the mis-hit with a small rivet element. Most errors can become features.
From Hobby to Micro-Business
Personalized gifts drive demand year-round: initials, birth flowers, coordinates, dates, and short quotes. Photograph work in soft natural light, show scale on a hand or a simple prop, and write clear product descriptions including metal type, size, and finish. Offer proof images of proposed layouts for custom orders. Packaging that protects and delights adds perceived value—think small kraft boxes, minimal branding, and a care card.
A Word on Craft Mindset
Metal stamping rewards patience and curiosity. Early pieces may show wobble or shallow impressions; they’re part of your learning archive. As your ear tunes to the ring of a solid strike and your hand learns how stamps feel when truly seated, results accelerate. The heart of the process isn’t the tools or even the metal—it’s the quiet feedback loop between your eye, ear, and hand. Keep notes, iterate small changes, and treat every piece as practice for the next.
Essential Checklist Before You Strike
- Is the bench block stable and flat? Add a sandbag or leather underneath to absorb vibration.
- Are stamps oriented correctly? Top marks visible and facing you.
- Is the blank fully supported on the block? Avoid overhanging edges.
- Do you have a baseline or center mark? Tape and tick marks prevent drift.
- Is the stamp face seated flat? Rock gently to find full contact.
- Are eyes and ears protected? Safety is part of craft professionalism.
- Do you have polishing and coloring supplies ready? Finishing completes the story.
Beyond the Basics: Personal Signatures
Every maker develops a recognizable style. Some favor ultra-clean sans-serif type and mirror polishes; others lean rustic with brushed surfaces and darkened letters. You might standardize letter spacing and line heights across all pieces, or intentionally vary them for a lively, hand-drawn feel. Consider adding a tiny maker’s mark on the back—an initial, a symbol, or a micro-logo stamp—and keep a logbook of projects with notes on fonts, metals, and finishes. Over time, these practices elevate your craft from good to distinctive.
Final Encouragement
Start small, practice often, and listen to the sound of the strike. Experiment with stamps and metals until your hands memorize what clean impressions feel like. Embrace the imperfections that make handmade jewelry human. With steady attention to technique, thoughtful layout, and finishing that suits the story you want each piece to tell, your stamped jewelry will carry more than words—it will carry moments, places, and people, etched into metal for years to come.