Few jewelry projects combine modern elegance, tactile playfulness, and approachable making quite like ear threader earrings. Lightweight chains and slender wires glide through a piercing, allowing the wearer to adjust length and balance with a simple pull. For the handcrafter, threaders are a perfect canvas: quick to prototype, economical in materials, and endlessly adaptable to personal style. Whether your aesthetic leans minimalist, bohemian, or architectural, you can master a handful of metalworking fundamentals and produce threaders that feel bespoke, comfortable, and resilient enough for everyday wear. Along the way you will deepen your sense of craftsmanship, discover the subtle art of comfort-focused design, and explore techniques that scale from a kitchen table setup to a full studio bench.
Understanding Ear Threader Earrings
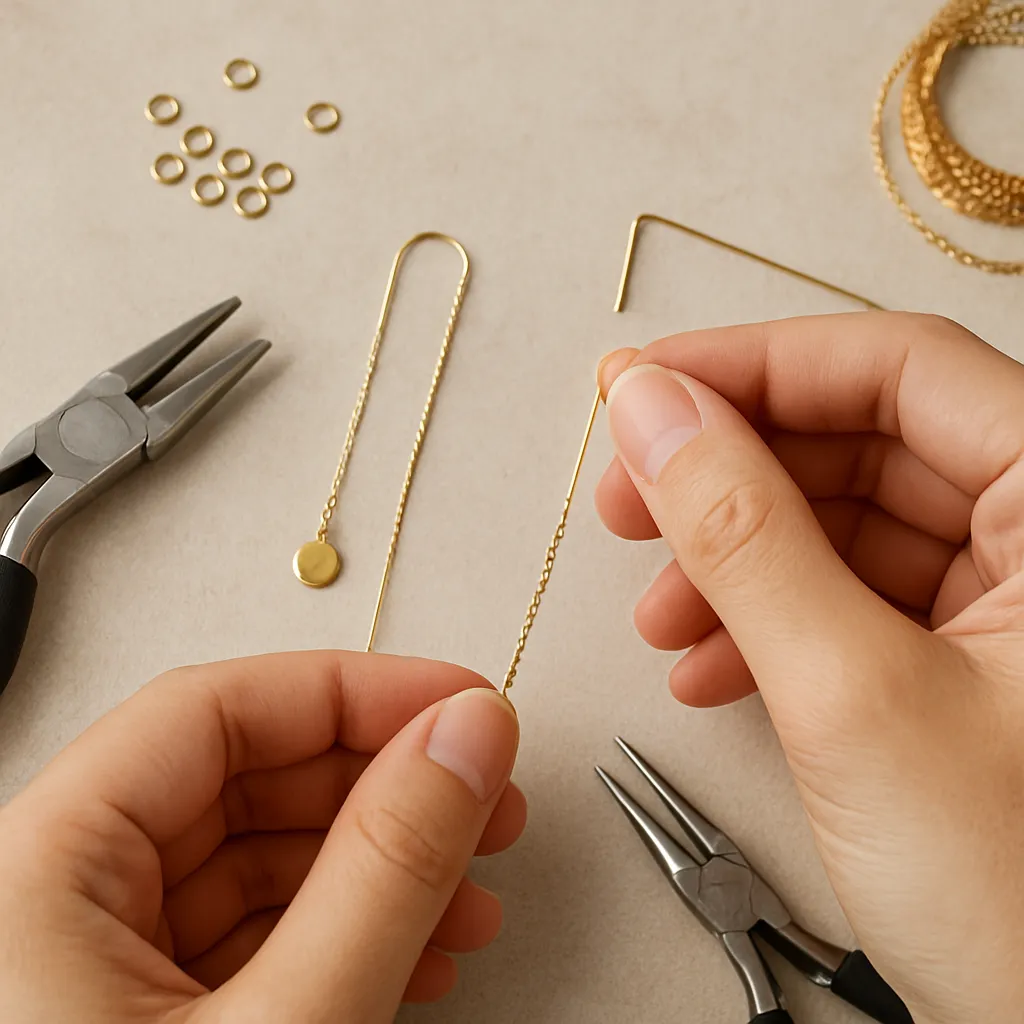
Ear threaders are long, slender earrings designed to pass through a pierced lobe and hang partially on each side of the ear. Typically, they consist of a delicate chain or ultra-smooth wire with a low-friction leading tip. Some designs include a curved U-bar that sits in the piercing and distributes weight evenly, while others use a continuous length of chain or wire with a small decorative drop. Because the length is adjustable by sliding the chain to your preferred position, threaders invite interaction: they can be worn asymmetrically, draped through multiple piercings, or paired with ear jackets for a sculptural effect.
What sets threaders apart from hooks or studs is their kinetic quality. When the wearer moves, the earring sways with gentle delay, creating a sense of line and movement that complements sharp silhouettes and soft knits alike. At the same time, threaders are marvels of restraint. The forms are clean, the weight is minimal, and every detail that touches skin must be deliberate. Small choices—edge rounding, chain selection, fineness of polish—determine whether the piece feels like silk or sand. That demand for comfortable minimalism makes threaders a superb study in ergonomics and proportion.
Historically, thread-through designs echo ancient wire ornaments in which thin, flexible metals were coiled or passed through hair and cloth. Modern threaders emerged as sleek, contemporary interpretations in the late twentieth century, coinciding with a resurgence of linear, architectural jewelry. Today, handcrafters embrace them because they can be made with a short bill of materials, finished in small batches, and personalized in infinite ways—from gem-set micro-charms to hammered geometric paddles, from oxidized industrial surfaces to mirror-bright finishes.
Tools, Materials, and Workshop Setup
You can build beautiful threaders with a basic hand-tools kit and a small, well-lit workspace. As your skills grow, add specialist tools to increase speed and consistency. The following lists prioritize comfort-in-wear and reliable construction over flashy gear.
Essential tools
- Flush cutters for clean wire and chain ends
- Round-nose pliers for forming gentle curves and loops
- Chain-nose or flat-nose pliers for controlled bends and closing links
- Nylon-jaw pliers to straighten wire without marring
- Assorted needle files and a #2 or #4 hand file for shaping and deburring
- Cup bur or berry bur (1.2–1.8 mm) to round the lead tip that passes through the ear
- Sandpaper and polishing papers (400–8000 grit) for progressive smoothing
- Steel mandrels or dowels (2–8 mm) to form consistent U-bars and curves
- Micro torch and soldering surface if you plan to attach delicate chain with solder
- Tumbler with steel shot for work-hardening and burnishing, optional but helpful
Materials to prioritize
- Wire in gauges 20–24 AWG. Thicker (20–21) works for a U-bar; finer (22–24) is kind to piercings.
- Fine cable, curb, or snake chain with small, smooth links that glide through skin comfortably.
- Metals: recycled silver, gold-fill, niobium, titanium, or 14k+ gold if budget allows. Choose alloys that are hypoallergenic and nickel-safe for sensitive ears.
- Tiny beads, gemstones, or charms with secure attachment points for embellishment.
- Silicone or rubber backs as optional safety stoppers for new wearers.
For many makers, sterling is the sweet spot of affordability, workability, and market appeal. Gold-fill adds warmth and tarnish resistance without solid-gold pricing. Consider titanium or niobium for highly sensitive clients; both are biofriendly and accept vibrant anodized colors for design variety.
Safety and comfort are non-negotiable. Ventilate when using a torch or chemical patinas, and keep a dedicated area for metal dust. Always collect offcuts and filings for recycling. Store finishing compounds, acids, and solders clearly labeled, and keep a bowl of clean, warm water with gentle soap for pre-wear cleaning of earring leads.
Design Principles for Comfort and Balance
Threaders succeed or fail on small details. Apply these principles to produce earrings that feel silky, hang evenly, and survive daily wear.
- Gauge selection: For the portion that passes through the piercing, 22–24 AWG is typically ideal. Too thin can feel sharp and cut-like; too thick increases insertion friction. If you use a formed U-bar, make it from 20–21 AWG to distribute weight and resist deformation.
- Edge finishing: The leading end must be rounded until glassy. Use a cup bur lightly, then refine with 2000+ grit papers. Finish with micro-mesh or a felt wheel. The tip should be free of burrs that could snag skin.
- Length: Common total lengths range from 70–140 mm for chain threaders and 40–70 mm for formed-wire versions. Offer one short and one long option for different face shapes and hairstyles.
- Weight distribution: Place heavier elements (gemstones, metal paddles) near the bottom. If both ends carry weight, aim for near-equal visual mass to reduce creeping in or out during wear.
- Friction control: A lightly textured U-bar prevents sliding without roughness. For chain-only designs, a small silicone stopper behind the lobe adds security for active days.
- Symmetry and pair matching: Mark lengths with a ruler or jig. Mirror each curve for a professional look; slight asymmetries can seem intentional only if they’re bold and obvious.
- Skin contact surfaces: Anything touching the piercing must be finished to high luster. Even if you prefer matte exteriors, reserve internal contact paths for a soft, slick finish.
Think of comfort as an invisible luxury; if you design for it, the wearer only notices beauty. In practice that means testing prototypes on a card with pierced holes or a silicone ear model, evaluating whether the earring slides too easily, catches on fabrics, or rotates oddly. Iterating on these variables trains your sense of precision and proportion.
Three Core Construction Methods
Below are robust, repeatable ways to build threaders at a home bench. Each method emphasizes clean contact points, secure connections, and simple tooling.
Method A: Chain Threader with U-Bar
- 1. Cut a 30–40 mm length of 20–21 AWG wire for the U-bar and a 90–120 mm length of fine cable chain.
- 2. Taper and round the ends of the wire. Smooth thoroughly with files, sandpapers, and a cup bur where the wire will enter the piercing.
- 3. Wrap the wire across a 3–4 mm mandrel to form a gentle U. Straight legs should be parallel and 15–20 mm long.
- 4. Attach the chain to one leg using a tiny closed jump ring. If a ring feels bulky, drill or punch a micro hole in the end of the leg and thread a fine link directly.
- 5. For permanent attachment, use clean, minimal soldering with easy solder. Heat-sink the chain in a damp tissue to protect links, and quench, pickle, and rinse thoroughly.
- 6. Polish contact areas to high shine. Test the U-bar in a silicone ear model; it should glide without scratching and rest comfortably with the chain falling forward.
- 7. Add a small decorative element at the chain’s far end, ensuring it is lighter than the U-bar to maintain balance.
Method B: Continuous Chain Threader with Weighted Drop
- 1. Choose a super-smooth chain, 100–140 mm long, that will slip through the piercing without harsh edges.
- 2. Create a slim, rounded lead by soldering or cold-connecting a micro needle made from 24 AWG wire to one chain end. The transition must be seamless.
- 3. Attach a tiny charm, bead, or hammered paddle to the opposite chain end. Keep the drop’s weight modest for daily-wear comfort.
- 4. Tumble or hand-burnish the first 15–20 mm of chain that will contact the skin to reduce micro-burrs between links.
- 5. Offer silicone stoppers so wearers can fix the threader’s position behind the lobe when needed.
Method C: Formed-Wire Threader (No Chain)
- 1. Cut 60–90 mm of 22–24 AWG wire. Straighten with nylon-jaw pliers.
- 2. Round the leading end to silk-smooth. This is the single most important comfort step.
- 3. Form a long, shallow S-curve or sleek J-shape around 4–6 mm and 8–10 mm mandrels for consistent radii.
- 4. Lightly hammer the lower curve on a bench block to add spring and a refined line. Maintain a low-profile cross section for comfort.
- 5. Add a micro loop at the tail for a dangle, or leave the line pure for minimalist designs.
- 6. Final-finish all skin-contact paths to a near-mirror state.
Whichever method you choose, test for snagging: run the lead and first 20 mm along a fine silk ribbon or lightweight knit. If the fabric catches, refine again. Achieving cloud-soft edges is the hallmark of thoughtful ear threader design and a tangible mark of your symmetry and discipline.
Surface Finishes and Visual Character
Surface treatment transforms simple geometry into personality. A few classic approaches work particularly well on threaders:
- High luster: Use progressive grits and then buff with rouge or a tumbler. A bright lead minimizes friction and enhances glide. Meticulous polishing is crucial for both beauty and comfort.
- Matte or satin: Create a fine brushed look with 1000–2000 grit papers or Scotch-Brite. Keep inner-contact areas polished, reserving matte only for the exterior.
- Hammered facets: Light planishing creates tiny mirrors that dance in the light. Use a polished hammer face and support on a smooth block.
- Oxidized character: Apply a controlled patina on silver for depth, then buff high points to reveal highlights. Seal with microcrystalline wax if desired.
- Bicolor and mixed metals: Pair a warm gold drop with a cool silver U-bar, or use bi-metal paddles for subtle luxury.
Choosing and Setting Embellishments
Decorative elements let you tailor threaders to occasion and audience without compromising comfort. Keep scale light and connections secure.
- Gem drops: Briolettes or micro-faceted rondelles add sparkle without heft. Wrap carefully with 26–28 AWG wire to protect fragile tips.
- Pearls: A single small pearl feels timeless. Knotting isn’t typical on threaders; instead, secure with a tiny cup-and-peg finding or tight wire wrap.
- Geometric paddles: Forge and thin a small paddle from sheet, drill a fine hole, and suspend. The flattened surface makes a lovely canvas for textures.
- Organic charms: Leaves, shells, or cast botanicals bring nature into an elegant silhouette.
- Color stories: Coordinate with wardrobes—oxidized silver for monochrome looks, gold-fill with warm gemstones for sunny palettes.
Metallurgy Essentials for Better Making
Even simple earrings benefit from a grasp of basic metal behavior. Knowing when and how to heat or rest metal gives cleaner bends and longer-lasting shapes.
- Work-hardening: Bending and hammering stiffen the metal. After forming, a few planishing taps on the lower arc can add spring so the earring resists deformation in storage.
- Softening: If wire kinks or cracks, reset the grain by gentle annealing. Heat to a dull red (in dim light) and allow to air cool (for ferrous metals) or quench (for nonferrous) per alloy guidance, then pickle. Proceed with light hands.
- Solder choice: Use easy solder sparingly and clean thoroughly afterward. Keep heat small and focused to protect micro chains and avoid discoloration.
Always neutralize and rinse after chemical processes, and be certain that no residues remain on the segment that passes through skin.
Troubleshooting and Quality Control
- Sharp leads: If insertion feels scratchy, you haven’t rounded enough. Return to the cup bur and micro-mesh until the lead feels like glass.
- Twisty chain: Some chains have a natural bias. Reduce with a very light twist counter to the bias or choose a different weave, like snake or fine curb.
- Uneven pair lengths: Create a simple jig or note fixed measurements at your bench to standardize cuts and bends.
- Solder blobs: Use smaller pallions and better flux coverage; pickle and refinish. Excess solder near the lead is unacceptable for comfort.
- Tarnish: Store silver in anti-tarnish pouches and include a care card. Educate clients about humidity and cosmetics interactions.
- Allergy feedback: Offer nickel-safe alloys and disclose compositions. Niobium and titanium are excellent for sensitive wearers.
Wearer Care and Maintenance
Provide simple, clear care guidance with every pair:
- Before first wear, wash hands and clean the lead segment with mild soap and warm water; pat dry.
- Insert slowly; never force. If a piercing feels tight, choose a finer-gauge design.
- Remove before vigorous exercise, swimming, or sleep if you are a restless sleeper.
- Store flat or hung to prevent tangling, ideally in a small pouch or carded box.
- Clean occasionally with a gentle cloth. Avoid abrasives on matte finishes unless you plan to re-brush the whole surface.
Scaling Up: Selling, Packaging, and Compliance
If you intend to sell your threaders, focus on consistency, comfort, and documentation. Buyers return for pieces that look great, feel better, and arrive with thoughtful presentation.
- Photography: Show the adjustability—style each earring at different lengths. Include scale references, such as a ruler or a model photo.
- Packaging: Card the earrings so the lead can’t scuff other components in transit. Include a small anti-tarnish tab for silver.
- Labeling: Mark appropriate fineness (e.g., 925 for sterling) according to local laws. Be transparent about plating or gold-fill.
- Compliance: Observe nickel-release regulations in your region. Maintain supplier certifications for metals and findings.
- Pricing: Track time per pair, material cost, overhead, and a margin for growth. Batch processes—cutting, forming, finishing—boost efficiency.
Sustainable and Ethical Making
Conscientious material choices are increasingly important to makers and clients. Opt for recycled metals from reputable mills, or certified fair-mined gold when possible. Reduce waste by saving every offcut and swarf for refining. Choose minimal, plastic-free packaging, and design modularity into your work: swappable drops let a single threader system serve many looks by replacing only the smallest element. Communicate these decisions in your product copy to align with eco-aware buyers.
Style Play: From Minimalist to Maximalist
Threaders offer a wide range of expression—subtle alone, striking when layered. Consider curating sets:
- Minimal core: One pair of smooth, unadorned chain threaders in a neutral metal finish.
- Evening accents: Detachable crystal or gemstone drops that elevate the same base for formal wear.
- Day-to-night: Small hammered paddles for daytime texture, swapped for long linear bars after dark.
- Asymmetry set: One long, one short, designed to be worn together or separately for editorial flair.
Encourage clients to experiment with multiple piercings by threading through one lobe and out another hole or pairing a single threader with a structured stud. The ease of position-shifting is the soul of their versatility.
Measurements, Jigs, and Repeatability
Develop a small suite of jigs to standardize bends and lengths. Even cardboard with marked curves can guide you to predictable results. Typical dimensions that please most wearers include:
- U-bar: 3–4 mm inner radius, legs 15–20 mm, wire 20–21 AWG.
- Lead segment: 15–25 mm of ultra-smooth polished path.
- Total chain length: 90–120 mm, with a 5–15 mm decorative drop.
- Formed-wire threader: 50–70 mm overall line, 22–24 AWG wire.
- Target weight: Under 3 g per earring for all-day comfort; under 1.5 g for ultra-light minimalism.
Record exact choices for each model so you can reproduce a bestseller months later. Meticulous notes accelerate prototyping and deepen your command of precision in every batch.
Advanced Variations and Techniques
- Twist-textured wire: Use a pin vise to apply a gentle twist before forming; sand contact paths smooth afterward.
- Micro chain soldering: With heat sinks and paste flux, you can solder minute links for invisible joins—practice on scrap first.
- Granulation accents: Fuse tiny spheres to a paddle for a tactile, ancient-meets-modern vibe.
- Mixed media: Add fiber tassels or silk threads to the drop, protected by metal caps to keep things sleek.
- Kinetic joints: A micro-swivel hidden at the drop reduces twisting and maximizes sparkle.
Practice Rituals That Elevate Your Work
Commit to a short bench ritual before each session: sharpen attention with five minutes of filing scrap wire smooth, practice three consistent U-bends on a jig, and polish one lead to perfection. Repetition builds muscle memory for small, reliable movements. Over time, you’ll internalize the tolerances that separate merely good earrings from truly excellent ones, and your quiet devotion to craftsmanship will read in every silky lead and balanced curve.
A Note on Comfort Testing and Feedback
After finishing, clean the first 25 mm of each earring in warm water with mild soap, then wipe with a jewelry-safe disinfectant. Invite a trusted wearer to try on a prototype and report on insertion feel, sliding resistance, and fabric snags. Collect honest comments and revise. Keep a log of iterations, including finishing grits and chain types. Over several cycles, your designs will converge on confident comfort and elegant restraint—understated pieces that people reach for daily because they simply feel right.
From Bench to Beloved Accessory
Ear threaders exemplify small-scale design done thoughtfully: intimate objects conceived at a workbench, shaped with patient hands, and finished to whisper-quiet comfort. They welcome both first-time makers and seasoned metalworkers with a satisfying mix of quick wins and deeper study—how bends behave, how finishes catch light, how proportion warms a face. With attention to ergonomics, commitment to safe and elegant contact surfaces, and a playful eye for modular styling, your threaders will move gracefully through a day: slipping through a piercing like a silver line, settling into balance, and catching the eye as they arc with the wearer’s breath. As you refine methods—timing your torch work, mastering clean soldering, practicing disciplined polishing—you’ll find a signature in the details. Perhaps it’s a whisper-fine hammered texture, or a moonlit patina, or the reliable snap-back of a perfectly tempered U-bar after gentle annealing. Whatever your language, let your designs speak in quiet confidence, proof that small objects can carry the weight of genuine, durable beauty.