Music has always begged to be touched: a vibration in the air that wants a body to carry it. Making jewelry inspired by music turns sound into metal, wood, thread, and light, allowing a melody to rest on skin and a beat to circle a wrist. This guide approaches musical inspiration not as a novelty motif but as a design language you can master. Whether you are a beginner bending wire into lyrical curves or an experienced maker translating complex polyrhythms into beads, you will find methods here to pull songs out of your head and render them as wearable form. Along the way, you will learn how to map sonic qualities to textures, choose materials that sing, and finish pieces so they age beautifully and carry stories worth wearing.
Translating Sound into Form: The Design Foundations
Before tools or metal, begin with listening. Put on a piece that moves you and take notes not on lyrics alone but on structure: pulse, contour, density, space. Translate that listening into visual variables:
- Pulses become repeated elements: rivets, beads, stitches, or hammered dots paced in time. A slow, steady rhythm might suggest wide, even spacing; a frantic one calls for tighter clusters and syncopated intervals.
- Melodic contour becomes line: an arcing wire, a saw-pierced waveform, or a carved groove that rises and falls with the tune’s silhouette.
- Harmony layers become stacks: overlapping charms, soldered plates, or inlays where one material peeks through another, a nod to the way intervals color sound into harmony.
- Dynamics become contrast: high/low relief, matte/shiny finishes, slim/thick profiles—your “quiet” can be satin-brushed, your “loud” mirror bright.
- Timbre becomes texture: rough for rasping distortion, stippled for brushed cymbals, fluted for wooden warmth, faceted for crystalline voices.
- Silence becomes negative space: a well-placed opening, window, or airy chain segment to let the eye rest as the ear does between phrases.
Designers who experience cross-sensory associations will recognize these moves as a form of synesthesia: translating tonal color into actual color, attack into sharp angles, legato into curves. Even without formal music theory, you can work with a few intuitive questions: What part of the song feels heavy or light? Where does it gather? Where does it breathe? Use those answers to sketch three quick thumbnails for every idea: one literal, one abstract, and one that exaggerates a single feature (tempo, texture, or interval). Literal might be a treble clef or guitar headstock silhouette; abstract might be a tessellation of beat marks; exaggerated might be a sweeping wire arc that captures a single climactic note.
A reliable workflow: listen, free-sketch for two minutes without erasing, circle the two strongest ideas, then build a mini “scoreboard” of decisions—materials, finishes, fastening method, and wear point (ear, wrist, neck, lapel). Each choice should echo the music’s mood. A delicate ballad likely suits a fine chain and small pendant; a driving techno piece works with an assertive cuff in patterned sheet or stacked acrylic.
Materials, Tools, and Safety for the Music-Minded Maker
Materials are your orchestra. Choose them not only for look but for meaning and durability.
- Metals: Brass and copper are warm and easy to work; sterling silver offers strength and brightness; bronze carries a mellow tone suited to percussion-inspired pieces. Recycled cymbal bronze yields golden sheet or pick-style pendants with authentic provenance.
- Strings and wires: Retired guitar and piano strings upcycle beautifully into hoops, bangles, or woven pendants. Stainless steel requires tougher tools; nickel-free options are best for sensitive skin.
- Wood: Maple, rosewood alternatives, and walnut echo instrument luthiery; veneer offcuts make light inlays. Stabilize soft woods; seal with wax or oil for a tactile finish.
- Stone and glass: Faceted black spinel or onyx for bass lines, opal or moonstone for airy vocals, glass seed beads for rhythmic grids.
- Composites: Paper micarta crafted from old sheet music, bio-resins with embedded stage confetti, or acrylic layered like records. Cure and ventilate carefully.
- Textiles and leather: Braided cords for headphone nostalgia, drumstick wrap leather for cuffs, or woven bands mapped to beats.
Essential tools include round/flat/chain-nose pliers, flush cutters, a jeweler’s saw with 2/0–4/0 blades, bench pin, files, needle files, sandpapers 320–2000 grit, mallets and planishing hammers, dapping block, mandrels, rivet tools, and a small torch if you solder. For texturing, consider stamps, dot punches, and sandblasting or rotary tools with abrasive wheels. A basic beading kit or loom covers grid-based designs; a pyrography pen or micro-carver handles wooden timbre.
Safety is nonnegotiable. Wear eye protection, tie back hair, and use dust masks when sanding wood or shell. Ventilate for flux, liver of sulfur, and any resin. Keep quench water away from hot tools, and know where your fire extinguisher is. Label chemical jars and store acids safely. Tape sharp saw blades during transport. Good habits protect your studio and your body for the long creative haul.
Consider finishes early. Will you embrace high polish, brushed grain, or controlled chemical color? Learn the basics of patination so you can tune surfaces like EQ: a hint of oxide in recesses to deepen contrast; sealed heat color on titanium or niobium to sing in spectral hues; or sulfur-based darkening to push a pattern forward. Whatever you choose, test on scrap of the same alloy before touching a final piece.
Techniques That Echo Musical Elements
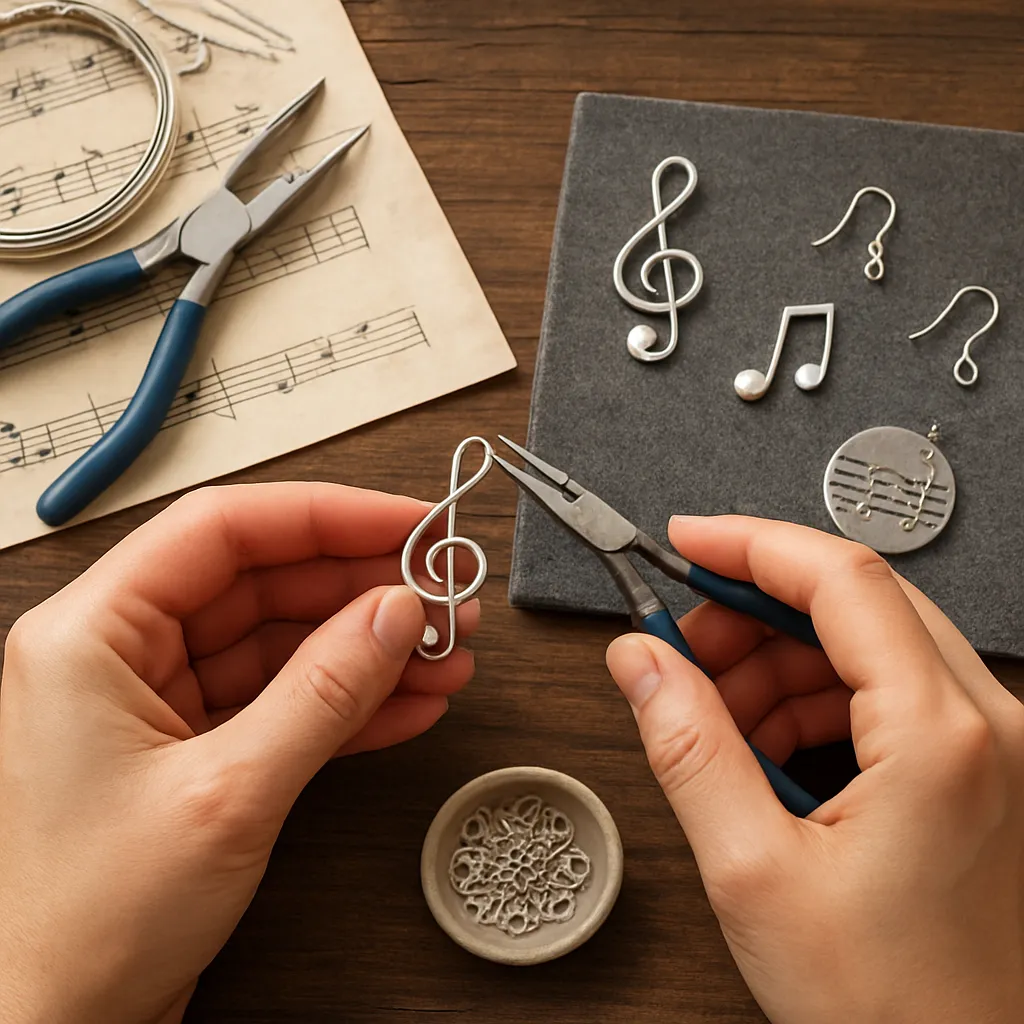
Wire as Melody
Wire bends gracefully into clefs, noteheads, and flowing staves. Practice consistent coils and spirals for controlled arcs; straighten sections with nylon-jaw pliers for crisp staff lines. Solder joints where stress accumulates (pendant bails, clasp loops) or reinforce with stealthy wraps. A run of graduated coils can model a crescendo, while alternating tight/loose turns capture tremolo.
Saw-Piercing as Waveform
Transfer a song’s waveform to metal with carbon paper or spray adhesive on printed stock. Drill pilot holes; pierce with a fine blade following the contour. Back the sheet with blue tape for stability, then file and sand edges to a satin roll. Open spaces within the waveform invite highlights and shadow like rests inside a phrase.
Texturing as Timbre
Stippling, cross-hatch, roll-printing through a mill with woven fabric, or hammering with cross-peen edges produce tactile “sounds” under light. Combine matte and mirror to set rhythm in reflection. Sandblast for a velvet hush; stone-set a single accent “note” to punctuate a phrase.
Cold Connections as Counterpoint
Rivets, tabs, and screws layer materials without heat, ideal when combining metal with wood, acrylic, or found objects (mics screens, keys, string windings). Visible hardware becomes visual percussion. Double-cap tubular rivets give a clean look; peened wire rivets offer rustic charm.
Bead Weaving as Meter
Peyote stitch, loom weaving, and brick stitch excel at grids where you can encode meters (5/4, 7/8) as repeating cell patterns. Assign colors to beats and weave measures as blocks, then seam into bracelets or collars. Use edge beads as “barlines.” Allow one or two deliberate irregularities to honor improvisation in jazz or folk traditions.
Projects: From Listening to Wearable Form
1) Waveform Pendant from a Beloved Passage
Concept: A literal yet elegant translation of sound into silhouette, suited to metal, wood, or acrylic.
- Materials: 22–20 ga sheet (brass or sterling), fine chain, small jump rings, clasp, transfer paper or adhesive spray, safety gear.
- Steps:
- Record a short phrase or select a public-domain passage, import into a free audio editor, and isolate a 3–5 second clip. Export a high-contrast waveform image.
- Scale to pendant size (~45–60 mm width), print, and adhere to metal. Mark bail location with balance in mind.
- Drill starter holes if you plan inner piercings; otherwise, saw around the outer contour.
- File edges to smooth; sand 320 to 2000 grit. Texture select surfaces for dynamic contrast.
- Optionally oxidize recesses, then polish raised areas for legibility. Attach jump rings and chain.
Design tip: Choose a passage whose waveform has distinctive asymmetry; a perfectly even block reads as generic. Leaving negative space under high peaks prevents visual heaviness.
2) Polyrhythm Cuff in Loom-Woven Beads
Concept: Encode overlapping meters as color bands to create a hypnotic wrist pattern.
- Materials: Beading loom, size 11/0 seed beads, Nymo or FireLine, clasp or cuff findings, graph paper.
- Steps:
- Map two meters: for instance, 3 against 4. Assign one color to each meter’s strong beat and a neutral for offbeats.
- On graph paper, plot rows representing time. Align the starts and watch accents drift past each other; this shifting is your visual groove.
- Warp the loom to cuff width and weave the pattern, keeping tension even. Weave in tails securely.
- Edge-stitch a border bead for clean finish; attach clasp or fold the ends into metal cuff caps with epoxy.
Design tip: Limit your palette to three or four tones so the time-play remains readable. A matte bead for offbeats and a metallic for downbeats subtly differentiates stress levels.
3) Cymbal Bronze Guitar Pick Pendant with Hammered Nodes
Concept: Transform a cracked cymbal into a talisman that remembers the stage, with forged surfaces that catch light and hint at resonance.
- Materials: Scrap cymbal bronze, jeweler’s saw, files, sandpapers, planishing and ball-peen hammers, hole punch, chain or leather cord.
- Steps:
- Trace a standard pick shape or a custom teardrop onto the cymbal section free of cracks.
- Saw, file, and round the edges thoroughly to avoid snagging fabric or skin.
- Mark a perimeter where light “beats” will fall. Use a ball-peen hammer to create dimples like nodal points; planish lightly between to even the field.
- Drill or punch a clean hole for the bail. Brush finish with Scotch-Brite, leaving hammer marks proud.
- Seal with microcrystalline wax to resist fingerprints without killing the stage-worn character.
Design tip: Preserve faint factory lathe lines where possible; they read like groove cuts on a record and add authentic history to the piece.
4) Morse-Code Lyric Bracelet
Concept: Encode a short line of text as dots and dashes in beads or metal segments—subtle for personal meaning without overt text.
- Materials: Two bead types (round for dots, tube for dashes), spacer beads, elastic or cable with crimps, or strips of metal alternated with tiny jump rings for a hard version.
- Steps:
- Translate the text to Morse code. Assign bead shapes and a spacer color for separation between letters and words.
- String in sequence, testing on the wrist for visual flow and comfort. For metal, cut tiny bars and dots, file, and connect with micro rings.
- Finish with discreet clasp; include a small tag that decodes the message for the wearer alone.
Design tip: Keep the phrase short for readability and balance. Consider mixing finishes—matte “words,” polished “letters.”
5) “Chord Stack” Riveted Pendant
Concept: Represent a triad or seventh chord as stacked plates, each metal signifying a scale tone.
- Materials: Thin plates of copper, brass, and silver; 18–20 ga wire for rivets; center punch; drill bits; jeweler’s saw.
- Steps:
- Cut three or four geometric shapes that nest, largest at the back. Deburr and pre-finish surfaces.
- Lay out rivet positions like chord tones on a staff. Drill through all layers clamped together for alignment.
- Rivet with snug peened wire heads; slightly dome each for tactile punctuation.
- Stamp a tiny interval symbol on the back if you want a secret maker’s note.
Design tip: Mix metals to read as sonic color—copper for warm thirds, brass for bold fifths, silver for bright roots, and an oxidized accent for sevenths.
Meaning, Ethics, and Your Personal Voice
Music carries private histories: first concerts, family songs, road trips, practice rooms. Jewelry can hold these memories gracefully when you build intention into material and form. Think about symbolism at three scales: motif (waveforms, clefs), material (cymbal bronze, violin maple), and structure (a repeating cell to honor habit or prayer). Document the story on a card with each piece; it invites conversation without dictating interpretation.
Ethics sharpen voice. Source conflict-free stones, allergen-safe metals, and reclaimed components when you can. Upcycle broken instruments with respect—credit the object’s past in your product note. Emphasize sustainability: repairable clasps, timeless proportions, and finishes that can be renewed. Avoid copying band logos or trademarked marks without permission; instead, translate feeling into abstraction that remains uniquely yours.
Wearability is a quiet virtue. Consider ergonomics early: weight distribution across a chain, earring length relative to shoulder line, cuff spring tension, and how textures meet skin and fabric. A piece that moves in tune with a body will be chosen from the jewelry box again and again.
Finishing, Care, and the Long Life of Music-Made Pieces
Good finishing sustains clarity the way mastering polishes a record. Move through grits with patience, removing the previous grit’s scratches before advancing. Tumble small metal with stainless shot and burnishing soap for global smoothness; hand-buff focal planes to keep crisp geometry. If you antique surfaces, seal thoughtfully: microcrystalline wax for warm touch, lacquer for busy wrists, or oil for wood. Revisit edges—the meeting of plane and skin is where people judge quality unconsciously.
Hardware should be tuned like tuning pegs: jump rings fully closed and, when needed, soldered; clasps sized to the wearer’s hands; ear wires deburred and work-hardened. Provide a small care card: keep silver in anti-tarnish pouches, avoid chlorine, remove during vigorous play. Offer a refurbish service; longevity becomes part of your brand’s promise.
Finally, treat process as practice. Keep a sketchbook of motifs heard on walks, in cafes, at rehearsals. Pin swatches of textures, scraps of failed cuts that accidentally taught you something, and pacing diagrams of songs that surprise you. Over seasons of making, your ear will refine your hand. The best pieces do not imitate instruments—they capture the way a human listens. That is the quiet core of enduring craftsmanship.