Few materials capture light, color, and memory the way glass beads do. Whether they are pressed in century-old Czech molds, flame-shaped at a torch, or tumbled from reclaimed bottles, these tiny objects invite the hands and the eye into a dance of pattern, rhythm, and color. Making your own beaded jewelry is both accessible and profound: a quiet dialogue between material and maker that celebrates personal style, sustainability, and tactile joy. It can be done at a kitchen table with a small kit or expanded into a studio practice with advanced tools, but at every level it rewards patience, curiosity, and refined craftsmanship. The following guide explores materials, design, and construction in depth, offering grounded techniques and inspiring ways to evolve your practice while honoring the long, global heritage of glass-bead handicraft. It also champions mindful creativity, so you can turn a handful of beads into heirlooms that feel as good as they look.
Materials and tools: understanding glass, structure, and support
Knowing your materials will shape every choice you make. Glass beads come in a spectrum of origins and forms, from evenly sized Japanese seed beads known for precision to rustic, hand-wound African trade beads with beautiful irregularities. Consider the following qualities as you build a collection: surface finish (matte, luster, AB, metallic), edge profile (sharp vs. rounded holes), weight, and the quality of light transmission. Pay particular attention to translucency, which determines how colors appear against skin and how beads interact with metal and fiber nearby. Highly transparent beads glow warmly on the body, while opaque beads read as graphic shapes. Frosted beads diffuse highlights, and metallic coatings add dramatic sparkle—each finish changes the visual “voice” of your design.
Seed beads (sizes 6/0 to 15/0) are the backbone of weaving, fringe, and embroidery. Pressed and fire-polished beads add facets and structure for stringing or wirework, while lampwork focal beads offer a handcrafted center with miniature patterns encased in glass. Czech druks, cathedral cuts, bugles, cubes, magatamas, tila and half-tila plates, SuperDuos, and lentils each contribute distinct geometry and spacing. Make small test swatches to see how they nest, stack, and reflect light; the way two bead shapes meet can unlock a technique or inspire a repeating motif.
Essential tools for confident making
- Bead mat or flocked tray to prevent rolling and to visualize layouts clearly.
- Beading needles (sizes 10–12) and specialty short needles for embroidery on stiff backings.
- Thread options: nylon (Nymo, S-Lon), gel-spun polyethylene (FireLine, WildFire), silk for knotting, and polyester for abrasion resistance.
- Wires: dead soft and half-hard copper, brass, sterling, or gold-fill in gauges 20–26 for links and wraps; memory wire for rigid bracelets.
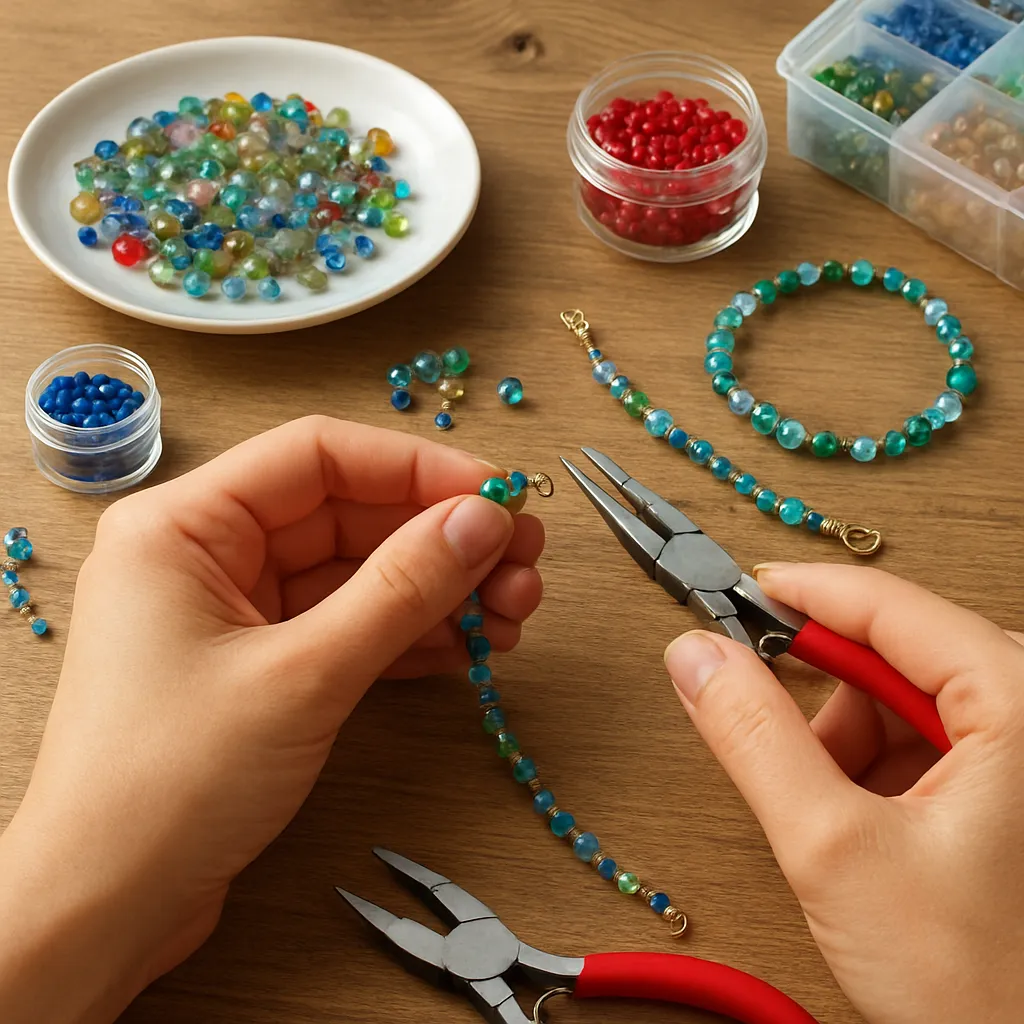
- Pliers: chain-nose, flat-nose, round-nose, and nylon-jaw pliers; flush cutters for clean ends; bail-making pliers for consistent loop sizes.
- Dedicated crimping pliers, plus micro sizes for delicate projects, paired with quality crimps and guards.
- Beading board with measuring channels for quick bracelet and necklace sizing.
- Awl or knotting tool, bead reamer for smoothing sharp holes, and micro files for metal cleanup.
- Adhesive (G-S Hypo Cement or flexible epoxy) for selective reinforcement—not as a substitute for technique.
- Organizers with labeled compartments, anti-tarnish tabs for metal parts, and small calibration rulers for consistency.
Support hardware and structural components
Jewelry’s invisible heroes—clasps, spacers, wire guardians, and crimps—carry load and ensure daily wearability. High-quality findings give your piece a professional, durable backbone. Lobster clasps are secure and ubiquitous; toggle bars can serve as a design feature; magnetic clasps help with dexterity but must be chosen based on pull strength appropriate to the weight of your beads. Jump rings should be properly closed with a twist, not a pull, to keep the ring round and strong. Use wire guardians anywhere beading wire meets metal to reduce friction and extend life.
Speaking of life: prioritize durability in your materials. Most high-end lampwork beads are cooled in a kiln through controlled annealing, a process that relieves stress and strengthens the glass. When buying handmade focal beads, ask the maker about their process. Inspect beads for sharp inner-hole edges that can abrade thread; ream or line them or choose a more abrasion-resistant thread better suited to rugged surfaces.
Design foundations: color, form, and wearable balance
Strong design is the quiet engine of memorable jewelry. It begins with intention: What mood should the piece evoke? Which outfit or setting will it complement? Are you emphasizing a focal bead, a repeating pattern, or a gradient flow? Great design also respects the wearer’s body—movement, skin tone, lifestyle, and sensitivity—so your jewelry becomes an effortless extension of personal style. Good design also honors symmetry and asymmetry as tools, not rules, using them to guide the eye and create rhythm.
Building a palette that breathes
Start by selecting a base family (neutrals, earth tones, jewel, or pastels), then add contrast sparingly. Limit the number of major hues to prevent visual noise. Consider simultaneous contrast: a muted bead near an intense neighbor may appear duller than it is, while complementary colors can “vibrate” if both are saturated. Scale saturation and value deliberately—soft gradients calm, bold jumps energize. Try the classic 60–30–10 balance: about sixty percent dominant color, thirty percent secondary, ten percent accent or metal. Metallic spacers reset the eye; matte beads rest it; faceted beads wake it up. Document combinations in a swatch journal for repeatable results.
Proportion, scale, and flow
Proportion governs how large beads feel on the body. For a petite wrist, excessive bulk reduces comfort and range of motion; for a statement collar, generous scale can look intentional and architectural. Mix sizes to create cadence: small beads between larger forms act like punctuation, clarifying transitions. Mind negative space—small gaps or airy sections give designs room to breathe. Test drape on a bust or your own neck to see how gravity alters line and spacing. Shorter necklaces can splay; longer strands settle into gentle arcs. The sweet spot usually emerges in live wear, not on the board.
Hardware placement and wearability
Functional choices protect the design and the wearer. Place a smooth spacer next to the clasp for comfort at the nape. When a focal bead is heavy, offset with stabilizing beads or a split chain to reduce twist. Consider seasonal clothing: a pronounced texture might snag delicate knitwear. When in doubt, prioritize quiet comfort; elegance often follows. Establish micro-standards: minimum loop diameter for earring wires, maximum pendant weight for daily comfort, and “snag testing” across fabrics in your wardrobe.
- Visual checks: squint to see overall contrast; flip to grayscale photos to evaluate value structure.
- Tactile checks: run the piece across a silk scarf to catch burrs; roll bracelets over the back of your hand to feel weight distribution.
- Longevity checks: tug gently at transition points; flex strand repeatedly to confirm it returns to shape without kinking.
Core techniques, step by step
A great piece often relies on humble, repeatable methods performed with care. Mastering fundamental technique builds consistency and confidence, allowing complex designs to emerge from simple moves executed well.
Stringing with professional finishing
Stringing on flexible beading wire is fast, strong, and beginner-friendly, yet elegant when finished properly.
- Measure: Determine finished length, then cut beading wire with at least 10 cm extra for handling.
- Anchor: Slide a crimp, wire guardian, and half your clasp onto the wire. Loop back through the crimp and guardian, making a small, neat loop.
- Seat: Pull the tail so beads won’t jam against hardware; leave a hairline gap to preserve fluid drape.
- Set: Use a dedicated crimping tool. First, create a firm fold in the crimp’s inner channel; then rotate 90 degrees to round it into a compact barrel.
- Cover: Optional crimp covers provide a bead-like finish and extra protection.
- String: Lay out your pattern; pre-count sections to avoid unstringing for adjustments.
- Close: Repeat the crimp sequence at the other end, checking fit on the body before finalizing.
- Trim: Use flush cutters close to the bead; never cut the main strand accidentally. Gently roll the first beads over the tail to conceal it where possible.
Wirework links and rosary chains
Wire-wrapped links elegantly connect glass beads, protecting them from friction and creating modularity for repairs.
- Cut wire a few centimeters longer than needed; it’s easier to trim than to add.
- Create a right-angle bend above the bead; form a loop with round-nose pliers; wrap the tail neatly 2–3 times.
- Thread the bead, repeat the bend, and complete the second loop before wrapping to connect modules continuously.
- Plan consistent loop diameters for a clean line; use bail pliers for identical sizing.
- Work-harden gently with nylon-jaw pliers to reduce deformation in wear.
Bead weaving: peyote and right-angle weave
Peyote stitch builds supple, bricklike fabrics that curve naturally; right-angle weave forms flexible grids perfect for crystals and round beads.
- Thread choice: Gel-spun threads resist abrasion, while nylon knots more easily for repairs.
- Tension: Aim for firm but not rigid; if edges cup, your tension is too high; if the panel feels floppy, increase it or reduce thread path length.
- Edges: Add turning beads or picots to prevent curling and to create decorative borders.
- Closures: Stitch-in clasps align with bead size; add reinforcing passes through stress points.
Loom weaving with seed beads
A beading loom delivers crisp patterns and symmetrical panels.
- Warp with even, consistent spacing; pre-plan clasp integration by leaving warp tails long enough to braid or stitch back into the fabric.
- Use a wide-eye needle to carry weft through beads placed below the warps; on return, pass above to lock them.
- Finish by weaving in ends over multiple passes; apply a tiny dab of flexible adhesive only where necessary.
Traditional knotting between beads
Knotting with silk creates luxury spacing, prevents bead loss if the strand breaks, and adds graceful drape.
- Pre-stretch silk; condition lightly with beeswax if desired.
- Use an awl to snug knots against each bead; keep spacing even.
- Finish with French wire (bullion) at clasps to protect the silk from metal friction.
Fringe, tassels, and movement
Fringe adds drama and motion. Use lightweight seed beads near the tips to minimize swing weight and reduce whiplash that can strain threads. Anchor each fringe with a slight turnaround stitch and a small stopper bead to lock tension.
Advanced methods and surface play
As your confidence grows, combine glass with textile, metal, or found elements to tell richer stories. Surface contrasts—matte next to glossy, transparent beside opaque—add depth. Small sculptural forms emerge when you layer components and allow them to interact. Consider gentle etching on select beads (with proper safety), bead embroidery on suede or felt backings, or cold connections with rivets to frame a glass cabochon without heat.
Working with large-hole and focal beads
Focus requires framing. Use cones to taper transitions, leather or multi-strand cable to fill space, or grommets to protect edges. Stabilize heavy focals with a split-strand approach that redistributes load across two anchor points, reducing spin and torque on the neck.
Bead embroidery and cabochon bezels
Backing materials like ultrasuede and stiff stuff allow painterly compositions. Start with a beaded backstitch around a cabochon, then add rows of peyote to lock it in. Layer fringe, picots, and accent stones; finish by stitching on a second backing and edging with brick or whip stitch for a polished perimeter.
Reclaimed glass and ecological choices
Creative upcycling turns discards into distinctive components. Sea glass, bottle glass, and vintage chandelier prisms can be drilled (with water lubrication and a diamond bit), capped, or wire-wrapped. Pair reclaimed elements with ethically sourced seed beads and fair-trade Krobo beads to tell a sustainability story. Keep hardness and edge smoothness in mind; round or cap any abrasive edge that touches skin or thread.
Mixed-media joins: fiber, leather, and chain
Blend glass with waxed linen, silk ribbon, or hand-braided cords for texture. Connect to chain with wrapped loops rather than open jump rings in high-stress zones. When adding leather, test conditioners to avoid staining adjacent glass or thread. A rhythm of soft (fiber) and hard (metal) intervals can highlight the sparkle of glass by contrast.
Structural integrity and stress testing
Before release or gifting, test your piece. Suspend a necklace with a simulated load for 24 hours and check crimps, knots, and links. Flex bracelets 50–100 times to ensure the strand returns to shape without kinking. Document your build process—wire gauges, crimp sizes, thread types—so repairs or reproductions remain consistent.
Sourcing glass beads ethically and economically
Good sourcing protects your vision and your values. Czech and Japanese manufacturers excel at precision; Indian and Indonesian producers offer expressive, hand-finished character; Ghanaian artisans create recycled-glass beads with soulful texture. If buying lampwork, verify kiln annealing and ask about bead hole sizes to match your thread or wire. Purchase small test lots before committing, and maintain a swatch book keyed to supplier, lot number, and finish codes; coatings can vary across batches and may wear differently.
- Ask vendors: Are these dyes or surface coatings? How abrasion-resistant is the finish?
- Hole quality: Are inner edges fire-polished or sharp? Can I ream them safely without flaking?
- Consistency: What’s the variance tolerance in size and roundness?
- Ethics: Who made these beads? Is there documentation on labor standards?
- Care: Any special storage or cleaning recommendations to preserve luster?
For budget planning, break costs into per-piece components: beads, findings, stringing materials, and labor time. Track waste rates (offcuts, test swatches) to price accurately. Buying in grams or strands? Convert to cost-per-bead and cost-per-centimeter of strand to compare apples to apples. Seasonal sales can stock your basics; splurge on a few special focals to anchor collections.
Finishing, care, and longevity
Finishing is where a project becomes jewelry. Choose clasps that match both weight and aesthetic. Burnish wrapped loops to tuck cut ends. Verify that no bead edges saw against thread; where needed, add a tiny buffer bead or switch to a more robust fiber. After assembly, wipe the piece with a soft cloth to remove skin oils and manufacturing dust, which can dull sheen over time.
Care tips enhance lifespan: store glass pieces flat when possible to minimize strand stress; separate by fabric pouches to prevent abrasion between surfaces; keep away from prolonged direct sunlight if dyes are involved; avoid harsh chemical cleaners, especially on coated or AB finishes. For matte and etched beads, use lukewarm water and mild soap, then dry thoroughly. Teach your customers or gift recipients simple habits—last on, first off; remove before swimming or vigorous activity—to reduce wear.
Project blueprints to grow your skills
Project 1: Gradient necklace with focal lampwork bead
Materials: one lampwork focal with clean holes, two small accent spacers, 4–6 colors of coordinated seed beads or rounds for gradient, flexible beading wire, crimps, wire guardians, clasp, crimp covers.
- Map a gradient from lightest to darkest; test on a neck form to preview how transitions read in an arc.
- String the focal at center; flank with spacers to frame it and reduce wear.
- Build outward symmetrically with small color blocks; keep each block length proportional to bead size for smooth fades.
- Finish with the crimp-guardian-clasp sequence; test drape and adjust before final crimping.
Project 2: Rosary-linked glass chain bracelet
Materials: 4 mm and 6 mm fire-polished beads, 24–22 gauge wire, jump rings, lobster clasp, short length of chain for adjustability.
- Create alternating bead sizes in wrapped links for rhythm.
- Insert a short chain segment at the clasp side to fine-tune fit for different wrists.
- Optional: add a small charm near the clasp to act as a counterweight, keeping it underside.
Project 3: Loom-woven cuff with metallic highlights
Materials: size 11 seed beads in three neutrals and one metallic accent, loom, beading thread, clasp.
- Design a geometric repeat; weave metallic beads sparingly as “beats” in the pattern.
- Finish warps by weaving them back into the body and capturing in the clasp hardware.
- Edge-stitch with contrasting seed beads to seal and decorate the sides.
Project 4: Embroidered pendant with recycled glass cabochon
Materials: recycled glass cabochon or tumbled shard, ultrasuede backing, size 11 and 15 seed beads, beading needles, thread, bail finding.
- Glue the cabochon lightly to backing; secure with backstitch, then bezel with peyote.
- Layer decorative rows, alternating matte and luster finishes for depth.
- Attach a bail; finish the back with a clean second layer and whip-stitch edges closed.
Project 5: Tassel earrings with controlled swing
Materials: size 15 seed beads, small rounds, fine chain, ear wires, headpins.
- Build tapered strands that end in the smallest beads to reduce pendulum force.
- Place chain inside the tassel core to add shimmer without weight.
- Keep overall length flattering to jawline; test motion to confirm comfort.
Troubleshooting common challenges
- Thread frays or breaks at a bead: Ream the hole gently, swap to abrasion-resistant thread, or insert a tiny spacer to redirect contact points.
- Crimps slipping: Use the correct size for your wire and apply the two-stage crimp properly; avoid over-filling the crimp with too many wire passes.
- Necklace kinks at transitions: Add a soft spacer bead, increase the gap near hardware, or restructure the sequence with graduated sizes.
- Beads with inconsistent size in weaving: Sort visually into subgroups by size to maintain pattern fidelity, or design a pattern that embraces variation.
- Finish scratches fabric: Locate burrs with a silk scarf test; file and burnish metal ends until smooth.
- Color looks dull on skin: Swap to more transparent or higher-luster beads near the face; test under indoor and daylight conditions.
Studio flow, documentation, and evolving your voice
Creative momentum thrives on small habits. Keep a rolling tray for “in-progress” palettes and a separate tray for orphans that might inspire future combinations. Photograph layouts before stringing to capture spacing. Maintain a build log listing wire gauges, thread types, bead codes, and clasp sources—future repairs or reproductions will be easier and more reliable.
Design voice grows from constraint and iteration. Set weekly prompts: a single bead shape across multiple colorways; one color family in varied finishes; or a study of asymmetry where only one side “breaks” the rule. Treat the board like a sketchbook and your finished pieces as edited poems; not every idea needs publication, but every trial teaches you something about proportion, flow, and the quiet elegance of restraint.
Presentation, gifting, and small-scale selling
Presentation is part of the work. Good light reveals glass’s inner fire; neutral backdrops keep focus on form. For photos, diffuse daylight or a lightbox avoids harsh reflections on glossy finishes. Provide simple, accurate size information and care cards. If selling, align materials and labor with a pricing formula that respects your time and ensures sustainability. Offer repair services; your willingness to maintain a piece signals confidence in construction and invites long-term relationships with clients.
Story matters: note where a focal was made, why you chose a particular pattern, and how the palette connects to a season, place, or memory. This narrative gives your work context and emotional resonance, transforming adornment into keepsake.
A mindful path forward
Working with glass beads is a practice in patience, intention, and delight. Tiny choices—adding a spacer, softening a transition, retying a knot—compounded over time yield jewelry that breathes with the person who wears it. As you refine skills and expand your palette, keep returning to fundamentals: clean lines, considered materials, and finishes that respect the body. Let the light in glass teach you about nuance: how transparency, reflection, and shadow shape the story on the skin. With steady hands and curious eyes, your beaded work will carry the quiet authority of pieces made to be worn, loved, and repaired, season after season.