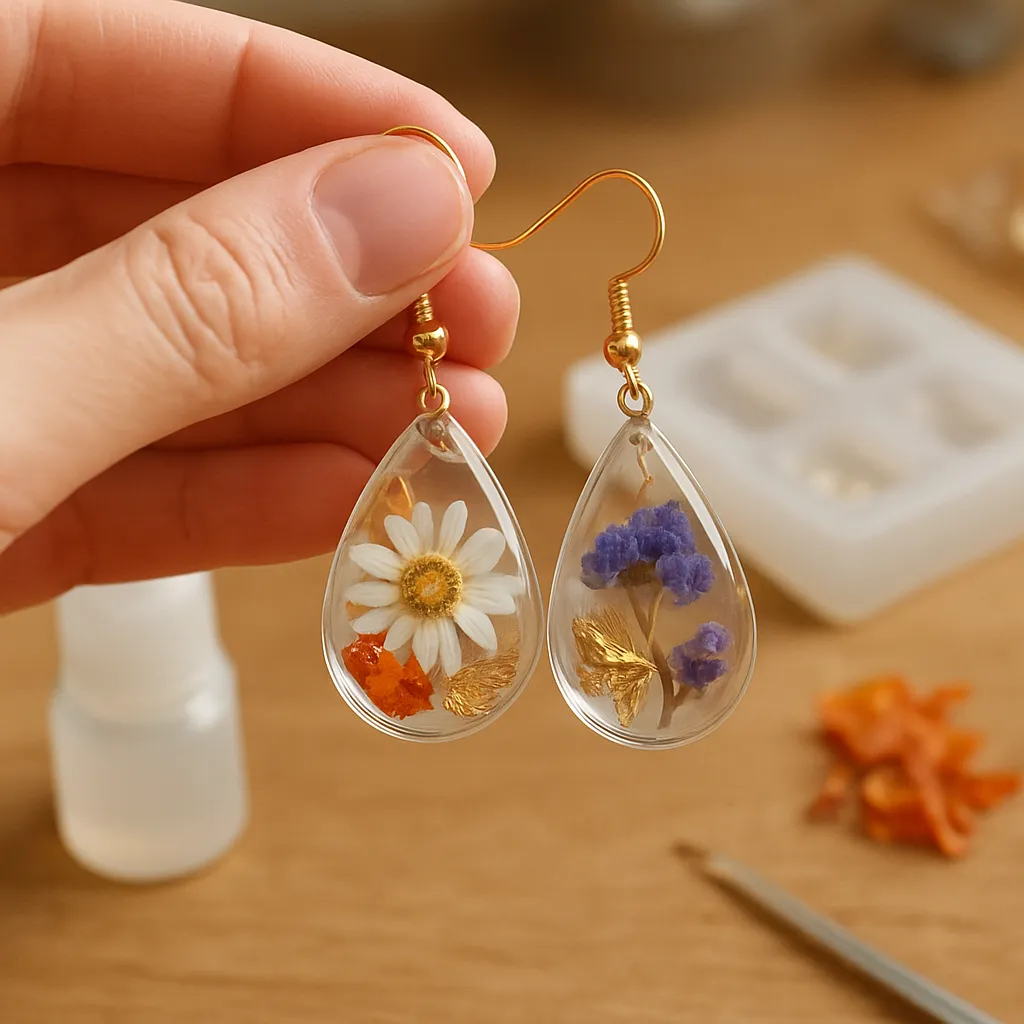
Small objects carry big stories. A pressed wildflower from a summer hike, a sprinkle of beach sand, a sliver of a vintage map—each can be transformed into wearable memory through the art of DIY resin earrings with embedded objects. This craft merges meticulous technique with playful experimentation, allowing makers to frame tiny treasures in crystalline form. Whether you are new to jewelry making or expanding a studio practice, creating embedded-object earrings offers a rewarding blend of design, chemistry, and personal narration—capturing moments you can literally wear, gift, or sell.
Why Embedded-Object Resin Earrings Captivate
Embedded-object earrings sparkle for reasons both visual and emotional. Clear castings highlight texture, color, and negative space, while the surrounding transparency adds depth that traditional settings often miss. The process invites slow looking: you position botanical petals one by one, align a watch gear to spin elegantly in the light, or float a fleck of gold leaf for dramatic contrast. Every inclusion feels intentional and intimate. Equally important, the learning curve is welcoming—basic materials are accessible, and the space requirements are modest. A well-ventilated tabletop, patience during curing, and a thoughtful workflow are enough to get started.
Materials and Tools: What You Need and Why
Choose your epoxy system and supporting tools with your end result in mind. While many products can achieve a glossy, glass-like finish, subtle differences affect clarity, durability, and turnaround time.
- Resin system: Two-part casting resins (mix of resin and hardener) cure at room temperature, often within 24–72 hours, and are favored for their depth clarity and lower shrinkage. Single-part UV resins cure with ultraviolet light in minutes, making them great for small, quick projects or for sealing surfaces, though they may be less ideal for thick pours.
- molds: Silicone molds designed for jewelry deliver clean shapes—teardrops, ovals, trapezoids, open bezels, and freeform designs. Transparent molds help you observe bubbles and alignment. For custom shapes, makers often 3D-print masters and cast their own silicone molds.
- Measuring and mixing: Graduated cups (preferably silicone or PE), precision scale for weight-based systems, mixing sticks, and a slow-stir approach to reduce air incorporation.
- Surface preparation: Isopropyl alcohol for wiping tools, painter’s tape for capturing dust, and a silicone work mat for easy cleanup.
- Finishing: Micro-mesh sanding pads, fine-grit wet/dry sandpaper (400–8000+ grit), buffing wheels, polishing compounds, and a dust-free area to apply final topcoats.
- Jewelry hardware: Posts, hoops, and jump rings (hypoallergenic options like surgical steel or titanium are considerate choices), plus strong jewelry adhesive. These components are collectively called findings and define comfort and style.
- Embedding objects: Pressed flowers, tiny shells, miniature gears, dried pigments, mica flakes, ethically sourced butterfly wings, archival paper snips, fabric swatches, tiny beads—anything lightweight, dry, clean, and sealed.
Tip: Keep a “resin-only” set of tools to avoid cross-contamination. Label cups and sticks so ratio-specific tools don’t mix between product brands. Small investments here eliminate major headaches later.
Safety First: Ventilation, PPE, and Smart Habits
Good studio habits protect your health and the quality of your work. Resin is a chemistry craft: it involves reactive components, potential fumes, and irritants. Make safety an integral part of your process.
- Ventilation: Work in a well-ventilated area. Use cross-ventilation or a fume extractor designed for craft use. Avoid bedrooms and shared eating spaces.
- Skin protection: Wear nitrile gloves (more chemical-resistant than latex) and keep exposed skin minimal. Clean accidental drips promptly with isopropyl alcohol, not solvents that drive chemicals deeper into skin.
- Respiratory protection: Follow manufacturer guidance. Some resins have low odor but still benefit from a mask with organic vapor cartridges, especially in small rooms.
- Eye protection: Safety glasses prevent accidental splashes during mixing or sanding.
- Heat awareness: Resin reactions are exothermic. Avoid large pours that may overheat and crack. If a cup heats rapidly, spread it in a shallow tray to dissipate heat safely.
- Storage and labeling: Keep resins and hardeners sealed, labeled, and out of sunlight. Store away from children and pets. Note the product’s shelf life; expired supplies can underperform.
Consider allergies and sensitivities for wearers. Offer nickel-free and hypoallergenic metals. Disclose materials when selling: transparency builds trust and reduces returns.
Design Planning: Selecting, Drying, and Sealing the Objects
Objects to embed—often called inclusions—benefit from careful prep. Moisture is the enemy of clarity and cure. Organic materials like flowers and leaves should be fully dehydrated using a flower press, silica gel, or a patient book-press method over a few weeks. For color retention, silica gel yields brighter hues.
- Sealing: Porous items (paper, fabric, dried petals) should be sealed with a clear acrylic spray or brush-on archival medium. This prevents trapped air from off-gassing and forming bubbles. Multiple thin coats, fully dried between applications, are better than one heavy coat.
- Scale and silhouette: Select objects that read clearly at jewelry scale. A single fern leaflet can be more impactful than a full frond. Prep a small composition board to audition layouts.
- Color planning: Resin’s clarity intensifies contrast. Choose complementary hues or intentionally monochrome palettes. Metallic accents (gold leaf, copper flakes) add light play without overwhelming the main subject.
- Weight and buoyancy: Lightweight items tend to float. Plan for layering: pour a partial layer to anchor pieces, let it gel, then place your item, and top with a final layer.
When embedding sentimental materials (e.g., wedding confetti or memorial petals), practice with similar substitutes before committing the originals. Rehearsal avoids heartbreak and helps you refine placement and thickness.
Step-by-Step: Casting with Two-Part Resin
This workflow emphasizes clarity, bubble control, and clean edges. Adjust timings to match your product’s pot life and room temperature.
- Prep the station: Dust is your nemesis. Wipe the area with a slightly damp cloth, then dry. Lay out mold, mixing tools, and sealed objects within reach. Warm the resin bottles in a water bath for 5–10 minutes to lower viscosity and release bubbles (keep lids on and containers dry).
- Measure with accuracy: Follow the manufacturer’s ratio exactly (by weight or volume). Variations can cause tackiness or brittleness. Mix slowly for 2–3 minutes, scraping sides and bottom of the cup.
- Rest and de-bubble: Let the mix sit for 1–2 minutes so surface bubbles rise. Pass a heat gun quickly across the top to pop bubbles; avoid overheating the cup.
- First pour—base layer: Fill the mold to 25–40% to create an optical “floor.” Use toothpicks to coax bubbles out of corners. Allow the layer to partially gel—still tacky, not fully set—so objects won’t sink or float unpredictably.
- Place the objects: Using tweezers, set the items gently. If you want an object to appear suspended mid-depth, let the base layer cure further before adding a small amount of fresh resin beneath it.
- Top off the mold: Pour slowly along a stick to reduce bubble formation. Slightly overfill flat molds to account for shrinkage and enable a gentle dome, or leave a hairline gap if you plan to apply a doming topcoat later.
- Bubble patrol: Briefly sweep a heat gun or torch across the surface 10–20 cm away. Quick passes only. If a bubble clings to an object, nudge it upward with a pin.
- Dust cover: Invert a clean container over the mold to protect from airborne lint during curing. Leave undisturbed on a level surface for the full cure time.
For single-part UV resins, the approach is similar but faster: apply thin layers, cure each under a UV lamp, and avoid thick, heat-building pours. UV topcoats shine for sealing edges or doming surfaces after sanding.
Open Bezels versus Closed Molds
Open bezels are metal frames without a back, adhered to a non-stick surface like packing tape. You build up resin in layers, trapping objects inside, then peel away the tape for an airy, stained-glass effect. Closed silicone molds deliver more volume and optical depth, producing pieces that can be later drilled, sanded, and re-shaped. Try both: bezels excel for delicate botanicals; molds suit high-clarity “floating” layouts.
Finishing: From Demold to High Gloss
With a full cure, it’s time for demolding. Flex the silicone gently to break the seal and pop out the pieces. If edges have flashing or meniscus lines, trim with a craft blade before sanding.
- Shaping and smoothing: Wet-sand using progressive grits: 400, 800, 1200, 2000, and up to 8000 or micro-mesh. Keep the surface wet to reduce heat and dust. Use a flat block to preserve geometry.
- Optical refresh: After sanding, a thin topcoat or UV dome returns “wet” clarity. For pristine edges, place the piece on a level silicone mat and nudge the resin to the perimeter with a toothpick, avoiding drips.
- Buffing: For pieces not receiving a topcoat, use plastic-specific compounds and a soft wheel at low speed. Heat is the enemy—work slowly. Proper polishing elevates even modest pieces to a professional finish.
Drill holes for findings using a bench pin or hand drill, starting with a micro bit and stepping up gently. Submerge the drilling point in water to capture dust and cool the workpiece. Clean with isopropyl alcohol before attaching hardware.
Attaching Jewelry Hardware and Balancing Comfort
Hardware decisions influence weight, sensitivity, and movement. Connect components with quality jump rings (close the ring by twisting, not pulling apart). Use a two-part jewelry adhesive for posts and flat pads; cure fully before wear. Consider wearer comfort: lighter designs reduce tug on lobes, and hypoallergenic options expand audience. Angled attachments can change how an inclusion faces the light—test orientation before committing to glue.
Advanced Creative Techniques
- Layered storytelling: Build three to five ultra-thin pours, placing elements at different depths. This creates parallax—the design subtly shifts as the earring swings.
- Tinted translucency: Add a tiny amount of transparent dye to simulate stained glass, or mix pearl mica for soft diffusion. Keep colors faint to avoid hiding embedded details.
- Gold leaf veining: Tear leaf into wisps and embed sparingly. Contrast a botanical on one side with metallic “constellations” on the other.
- Foam control: A light mist of isopropyl alcohol over the surface can pop microbubbles in some systems—test first, as not all brands tolerate sprays.
- Edge painting: After curing, paint edges with metallic enamel, let dry fully, then apply a clear topcoat for a gilded cameo look.
- Pressed lace or fabric: Seal with acrylic first to prevent fray and bleed. Translucent fabrics create ethereal patterns when backlit.
- Magnetic pairs: Hide small neodymium magnets within each earring half of a double-drop design so they attract lightly in motion. Ensure full encapsulation to avoid exposure to skin.
Troubleshooting: Diagnosing Common Issues
- Sticky surface: Often under-mixed or off-ratio. If uncured after the specified window, try a warm cure extension (check manufacturer limits). Otherwise, remove the tacky layer mechanically (scrape and sand) and recoat with a properly mixed batch.
- Cloudiness or swirls: Overheating, moisture, or incompatible additives can cause haze. Keep objects dry and sealed; avoid large, thick pours in one go.
- Trapped bubbles: Pre-seal porous items, warm the resin slightly, and pour in thin layers. Use a heat source with quick passes only. For extremely bubble-prone designs, consider a pressure pot to collapse microbubbles during cure.
- Yellowing over time: Choose UV-stabilized systems and store finished pieces away from sunlight when not in use. Slight ambering can be masked with warm-tone tints or gold accents.
- Float or drift of objects: Pour a base layer, let it gel, set the object, then top up. For very buoyant materials, “tack” them with a small drop of resin cured in place before the final pour.
- Edge ripples and fisheyes: Residual oils or silicones repel resin. Clean molds and objects with isopropyl alcohol, and avoid hand lotions during setup.
- Cracking: Sign of thermal stress from rapid exotherm or a drop impact. Keep pours thin or staged, and consider flexible mold designs that reduce stress on demold.
Sustainability and Responsible Making
While no petrochemical-based resin is fully “green,” thoughtful choices reduce impact:
- Mindful sourcing: Explore partially bio-based resins and reputable brands with strong safety data sheets. Opt for durable designs that last, discouraging disposable fashion cycles.
- Waste minimization: Batch projects to use full mixes. Keep a “scrap mold” to pour leftover resin into cabochons for future designs. Reuse mixing cups and silicone sticks across many sessions.
- Object ethics: Use ethically sourced botanicals and found materials. Avoid wildlife parts where collection is harmful or illegal. Consider archival papers and inks for longevity.
- End-of-life planning: Offer repair services. Design for reversible hardware so metal components can be recycled. Provide care cards so earrings remain in circulation longer.
Packaging matters. Choose recycled boxes and plant-based padding. A small polishing cloth in the package improves the wearer’s long-term experience and reduces premature disposal.
Care, Wear, and Longevity
Educate recipients to prolong clarity and luster:
- Avoid prolonged sunbathing, saunas, or hot cars; heat can soften some finishes.
- Keep away from acetone, perfume, hair sprays, and harsh cleaners; wipe with a microfiber cloth and mild soap if needed.
- Store separately to prevent scratches—pouches or divided boxes preserve gloss.
- For domed surfaces, occasional gentle buffing renews sparkle.
Include a concise care card with each pair you sell or gift. Clarity now means fewer misunderstandings later—and happier repeat customers.
Inspiring Project Themes and Motifs
- Botanical specimen earrings: Single pressed bloom per earring, negative space emphasized. Pair with delicate gold leaf “pollen” accents.
- Beach-comb duo: Tiny shells and a pinch of sand layered to evoke shoreline strata. Use a pale blue tint fade for water depth.
- Map keepsakes: Crop a meaningful neighborhood or travel route. Seal thoroughly to prevent ink bleed, then set at mid-depth so letters hover.
- Minimalist metalwork: One small gear centered in a clear oval, paired with a brushed steel post for a graphic, industrial look.
- Birth flower sets: Twelve flower varieties pressed and sealed, sold seasonally with printed lore. Perfect for personalized gifting.
- Constellation shimmer: Suspended mica flecks arranged as star patterns with a translucent night-sky gradient from navy to clear.
- Textile threads: Encapsulate colored threads from a cherished garment, arranged as radiating lines, then finished with matte edges and glossy faces.
Workflow Optimization for Consistency
Establish a repeatable pipeline to reduce errors and speed production:
- Batch prep: Press and seal multiple sets of botanicals in one session. Label envelopes with date and type so you can monitor dryness.
- Standardized mixes: Record temperature, humidity, and ratio by brand. Keep a project notebook with cure observations for each batch.
- Quality control: Inspect under raking light to catch surface dimples early. If an imperfection is minor, plan a topcoat stage rather than starting over.
- Photography station: Keep a small lightbox ready. Capture finished pieces while they’re pristine. This also reveals dust or fingerprints you might miss by eye.
Selling and Storytelling
Embedded-object earrings sell best when their story is visible. Share the origin of your materials—“wildflower from the lakeside path,” “map of the old bookshop quarter,” “shells gathered on a rainy-day walk.” Pair with lifestyle photos that show scale and movement. If offering customs, provide clear guidelines: what materials you accept, size requirements, and turnaround time. Ensure your pricing accounts for material costs, studio overhead, time, packaging, and a buffer for occasional remakes.
Customer trust grows with transparency: list base metals, adhesives used, and care recommendations. For gifting seasons, curate small collections—botanical, cartographic, oceanic—so buyers can browse by theme. Limited editions help balance scarcity and demand.
Documentation, Iteration, and Mastery
Every casting teaches something: the way a petal edge curls in a dome, how a microbubble rose from a fabric seam, or how a domed topcoat refracted the object below. Document successes and setbacks with notes and quick photos. Over time, you’ll build a personal “resin playbook,” specific to your climate, resin brand, and favorite embellishments. Lean into iteration—repeat designs with small variables to understand their influence. The payoff is a portfolio of consistent results and the confidence to scale production or teach workshops.
A Practical Example: Botanical Teardrop Earrings
Here’s a compact walkthrough to visualize the stages:
- Day 1: Press and dry small pansy petals using silica gel; after two days, brush off crystals gently. Seal petals with two light coats of archival spray; dry overnight.
- Day 3: Clean a teardrop silicone mold with tape. Warm resin bottles in a water bath. Mix 15 g total resin at a 1:1 ratio by volume (or per brand guidelines). Stir slowly; rest to release bubbles.
- Pour a 2 mm base, heat-gun pass, then rest 20 minutes. Place one petal per cavity with tweezers, curve aligned to the teardrop. Add a whisper of gold leaf near the tip.
- Top up slowly; bubble patrol with quick heat passes. Cover to protect from dust; cure fully per label.
- Demold. Wet-sand edges through 800 to 2000 grit to remove flashing. Rinse, dry, then apply a thin UV dome coat; cure under lamp for a high-gloss finish.
- Drill a small hole near the top apex; attach a 4 mm jump ring and hypoallergenic ear wire. Photograph in soft daylight to capture translucency.
The result is a balanced composition where the petal’s veins appear to float, leaf flecks catch the light, and the teardrop silhouette frames the subject like a miniature gallery.
Common Myths Debunked
- “More heat equals fewer bubbles.” Excess heat can trap bubbles or cause surface ripples. Correct mixing, sealing, and thin pours beat brute-force heating.
- “Any flower can be used fresh.” Fresh botanicals almost always brown and bubble. Proper drying and sealing are essential.
- “One topcoat fixes all flaws.” Topcoats enhance clarity, but deep defects or ratio errors often require sanding or remaking. Start with disciplined fundamentals.
- “All resins are the same.” Viscosity, UV inhibitors, work time, and hardness vary widely. Test samples before committing to a large production run.
Scaling Up: From Hobby to Microbusiness
When orders grow, systems matter. Standardize SKUs by shape and inclusion, and pre-assemble kits for each. Track resin lot numbers in case a batch behaves unexpectedly. Offer a modest warranty window (e.g., free hardware replacement within six months) to demonstrate confidence. Align packaging with brand identity—soft botanical palettes for nature themes, or minimal black-and-steel for industrial motifs. Consider small-batch drops to avoid overproduction and keep inventory fresh.
Ethics, Culture, and Meaning
Beyond technique, embedded-object earrings invite reflection on value. They are slow art in a fast world—honoring provenance, seasonality, and observation. When you set a pressed clover in clear glass-like resin, you celebrate not only its shape but the moment you found it. Objects become narratives. Communities of makers share tips, trade seeds, swap molds, and run local workshops. Through these exchanges, handicraft remains a living conversation—heritage renewed with each pour.
Final Thoughts: The Joy of Small Wonders
At their best, resin earrings with embedded objects are tiny galleries of meaning. Embrace the iterative path: from your first clean demold to your first market sale, each piece will refine your eye and hand. Keep your station tidy, your ratios precise, your inclusions thoughtfully prepared, and your curiosity open. In return, you’ll gain shimmering, durable keepsakes that carry light, color, and memory—miniature windows into the worlds you love.
