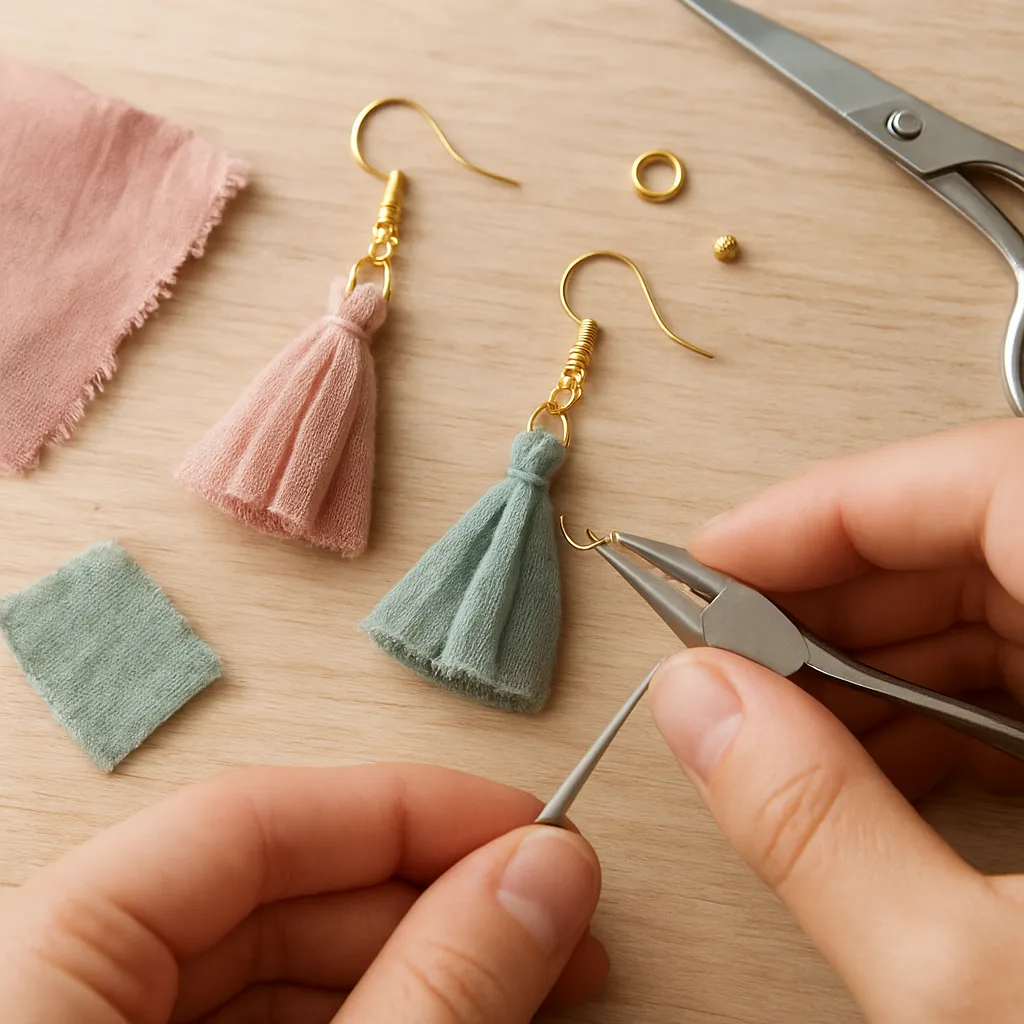
A pair of bold, lightweight tassel drops can turn a simple outfit into a conversation piece, and making them yourself invites personality into every movement. DIY fabric tassel earrings are a gratifying blend of material play and practical technique: you choose the cloth, engineer the proportions, and finish with hardware that suits your ears. The result is portable joy—colorful, swishy, textural accents that reveal your eye for detail and your love of handmade design.
Why Fabric Tassel Earrings Capture the Eye
Unlike their metal-only counterparts, fabric tassels create a soft silhouette with kinetic drama. Each step of a wearer’s day sets tiny threads swaying, catching light and framing the face. This motion is flattering and expressive; it signals care without insisting on formality. Historically, tassels have embellished garments, home textiles, and ceremonial objects across continents. From Ottoman sword knots to Chinese knots and Latin American rebozo adornments, the form has always represented craft, detail, and play. Translating that lineage to the ear brings cultural echoes into contemporary style—portable, personal, and endlessly variable.
Beyond aesthetics, this project is practical. Fabric is forgiving to cut, bind, and shape; it’s budget-friendly; and it plays well with small-batch studio setups. A designer can produce a one-off statement pair from a special remnant or build a coherent collection by repeating forms in tonal families. With a few hours and a handful of tools, you’ll handle decisions often reserved for professional studios: fiber choice, tassel core structure, wirework, and proportion. That learning compounds across future projects, making this an ideal gateway into jewelry-making.
Materials and Tools You’ll Actually Use
Start with what you have and upgrade as your skills sharpen. Good tools reduce frustration and leave cleaner results.
- Cloth for tassels: woven cotton, linen, silk, light denim, viscose, rayon, or thin wool. Jerseys can work if stabilized.
- Stabilizers and edge-control: fray-preventing liquid (PVA or fabric sealant), clear nail polish for test swatches, or pinking shears.
- Cone caps or end caps: metal cones hide bindings and transition the tassel to jewelry hardware.
- Wire and findings: 20–24 AWG craft wire for wrapped loops, jump rings (4–6 mm), ear hooks (fishhook, leverback, or huggie), or clip-on pads.
- Adhesive: a strong jewelry glue; look for a flexible bond that cures clear. Ventilate while using.
- Tools: sharp fabric shears, rotary cutter and mat, chain-nose pliers, round-nose pliers, flush cutters, awl or thick needle, ruler, fine comb, and a small square of cardboard (for winding tassel fringe evenly).
- Optional accents: seed beads, gemstone rondelles, thin cord or waxed linen for bindings, small charms.
As you gather items, pay attention to gauges and finishes. Wire that’s too soft collapses under stress; cones with rough interiors can snag strands. Quality findings have crisp plating and closed jump rings or at least tight seams. The point is not to chase perfection but to eliminate failure points before they happen.
Choosing the Right Fabric for Tassels
Your tassel’s mood is set by fiber and weave. Natural fibers like cotton and linen give a matte hand and easy breathability; silk shimmers with high-end movement; rayon and viscose drape dramatically with less volume. Synthetics can be ultra-smooth and bold in color, but they may need heat-sealing to stop fray. Test with a small strip: pull at cut edges, twist the piece, and watch how threads behave after a light combing.
Weave matters. Looser weaves produce airy, boho tassels with obvious strand separation, while tight poplin yields sleek, compact fringes. Twill and chambray introduce subtle diagonal lines; chiffon adds translucency but benefits from stabilizer. To reduce bulk, avoid heavy upholstery fabrics unless your concept embraces oversized proportion.
Pre-wash if you’re using remnants from garments or if colorfastness is unknown. Agitation and a mild detergent reveal dye behavior; blot on a white paper towel after washing to test for bleed. If color transfers, seal with vinegar or a commercial dye fixative or designate the piece for dark outfits only.
Designing with Color and Texture
Before cutting, step back and plan the visual story. Drawing a small grid of earlobe silhouettes with swatches taped beside them helps commit to direction. Think about proportion to face: 30–50 mm tassels often suit daily wear; 70–100 mm makes a statement. Weight remains low because of fabric, but volume reads bold. Harmonize or contrast with hair color and undertones; a light tassel pops against dark hair, while jewel tones glow on minimal palettes.
Build a palette using simple rules of harmony: analogous hues (neighbors on the wheel) feel calm; complementary pairs vibrate with energy; monochrome gradients rely on depth, not hue change. Reserve one highlight fiber—perhaps a thin metallic thread—to stitch into bindings or as micro-fringe among matte strands. The tactile side matters too; pair smooth with slightly nubbly fibers for dimensional interest. Introduce one decisive color hit instead of many competing accents when aiming for sophistication.
Texture helps the eye read form from a distance. If the tassel is all satin, it can appear flat under certain lighting. Add a band of micro-braid near the neck of the cone or mix a few slubbed threads among the fringe. The brain notices the contrast in texture and tags the piece as intentional, crafted, and worthy of a longer look.
Preparing Fabric: Cut, Seal, and Control Fray
Cutting strips evenly is the secret to a neat tassel. Use a rotary cutter and metal ruler on a self-healing mat for consistency. Typical strip width is 2–5 mm for delicate styles and 6–8 mm for bolder swish. If your weave unravels readily, paint a whisper-thin line of fray-preventer along the cut edge before the final trim. Pinking shears can help, but they lend a zigzag finish; decide whether that edge will be hidden under a binding or become a design feature.
For rolls with soft drape, cut on the bias (diagonal to the grain) to encourage fluid movement; for crisp lines, cut along the warp or weft. If you aim to create a tassel core (a folded wrapped bundle), measure a cardboard piece to your target tassel length, wind strips, then slide them off in one controlled loop. That loop becomes the tassel fringe when cut. Control is the difference between fussy trimming and confident, straight lines.
To prevent stiffening, use less adhesive than you think you need. Apply with a toothpick on bind points only. If testing heat-sealing for synthetics, melt edges with care: a brief pass near a lighter flame is enough. Always do this in a ventilated space and keep the fabric moving so it doesn’t bead excessively.
Core Techniques for Building Tassels
Three reliable constructions will cover most styles:
- Wrap-and-bind: Form a bundle of strips, align tops, and wrap tightly with thread or fine cord roughly 8–12 mm below the top to form the “neck.” The bound segment fits under a cone for a clean transition.
- Fringe-on-core: Create a slim core from cord or small tubing, then attach fringes via larks-head knots or glue rows. This method yields very even distribution and is great for striped effects.
- Knot-and-suspend: Tie the strips around a small wire loop, then conceal the knot beneath decorative wrapping. This makes replacing or adding strands easier later.
Whatever the method, aim for a neat head (the part under the cap), consistent density all around, and a straight fall. If you plan to add beads above the cone, ensure the top loop and wire wrap are proportioned to keep everything aligned.
Step-by-Step: Classic Cone-Capped Fabric Tassel Earrings
This is a versatile build that suits everyday wear and special events with small material changes.
- Step 1: Cut fabric into 2–4 mm strips at a length 10–20 mm longer than your target tassel. You’ll trim to final later.
- Step 2: Group 20–40 strips depending on thickness. Fan them to check density; add or remove until the bundle looks substantial but not bulky.
- Step 3: Align tops. Dab a thin line of glue 8 mm from the top and start a binding with waxed linen or strong thread. Wrap 12–18 times under tension; tie off securely. Avoid bulky knots by switching to a surgeon’s knot and burying tails with a needle.
- Step 4: Slide a metal cone over the head, checking for snugness. If the cone wobbles, add one more turn of thread or a whisper of glue to build diameter.
- Step 5: Trim the tassel bottom on a flat surface with a ruler guide. Cut in tiny increments; a long clean cut is harder to correct if it goes crooked.
- Step 6: Make a top loop. Thread a headpin or piece of 22–24 AWG wire through the cone and create a wrapped loop with round-nose pliers. Leave a small gap for connecting to a jump ring if needed.
- Step 7: Add a decorative bead over the cone before finishing the loop if your design calls for it. Keep scale in mind: beads 3–6 mm usually complement cones without dominating them.
- Step 8: Connect the tassel to your ear hook via a jump ring. Open jump rings by twisting sideways, never pulling apart; close until you feel the ends click and align.
- Step 9: Comb the fringe gently with a fine comb. Steam lightly from a safe distance to set the drape. Let it dry on a rack or hanging card.
- Step 10: Repeat for the second earring, matching length precisely. Lay both on a grid to check line and symmetry.
Estimated time for a first pair is 60–90 minutes, including fabric prep; experienced makers can finish in 30–45 minutes. Keep notes on strip count, cone size, wire gauge, and binding distance—that’s your recipe for consistent replication.
Alternative Builds to Explore
Minimalist wrap: Use a very slim cone or skip the cone entirely. Bind in a contrasting thread and coat the binding with a thin sealant for a matte, thread-wrapped collar. This is chic with linen and raw silk.
Beaded spine: Thread seed beads onto a central wire before inserting through the cone. The beads peek above the fringe and add micro-sparkle without weight.
Layered ombré: Build three mini tassels in related hues, each shorter than the last. Nest them beneath one cone, darkest inside, lightest outside. The gradient reads curated and lively.
Clip-on adaptation: Use clip-on pads with a small loop. Ensure lighter density so pressure on the lobe remains comfortable. Silicone cushions help distribute force.
Comfort, Safety, and Long-Wear Decisions
Comfort starts with weight and balance. Keep each earring under 6–7 grams for all-day wear; fabric helps. If a cone plus beads tip the scale, reduce strip count or choose a smaller cone. Weight should sit close to the lobe pivot to avoid forward tilt; compact beads near the top create counterweight without bulk.
Metal sensitivities matter. Look for stainless 316L, titanium Grade 1–2, niobium, or 14k gold fill for reliably hypoallergenic results. Nickel sneaks into some plated brass or low-quality stainless; buy from suppliers who disclose composition. If plating is used, thicker micron layers last longer but still wear; reinforce your product notes with care instructions.
Adhesives and sealants can outgas; cure them fully before wearing. Work with ventilation and avoid skin contact during wet stages. Test dyes for bleed by misting the finished tassel with water; blot on white tissue. If you see color, either seal the tassel with a light spray fixative or set expectations for occasional dry-only cleaning.
Finishing Touches That Read Professional
Small upgrades add up to big polish. Start with clean wirework: tight wrapped loops sit flush, jump rings close seamlessly, and cuts are free of burrs. Consider tumbling metal components before assembly for a gentle shine. Then turn to textile finishing: micro-trim stray threads with embroidery scissors; square the hem line against a cutting mat; and steam at the end, not the middle, to avoid warping your in-progress measurements.
Consistency is quality. If you’re making multiples, build a jig: a cardboard rectangle marked at target lengths for easy comb-and-trim. Use hanging cards to store pairs so the fringe learns to fall straight. Add a tiny maker’s mark tag near the cone or a distinctive color wrap that becomes your signature. Professionalism is an accumulation of quiet decisions, the visible index of your craftsmanship.
Troubleshooting: Common Issues and Fixes
- Uneven fringe: Lay the tassel on a mat, comb, and trim using a ruler edge as a guide. If asymmetry persists, reshape by steaming and pressing lightly with a cardstock strip.
- Fray explosion: Reduce agitation during wear by sealing the lower 2–3 mm. If you like a raw look, seal only the interior strands and let the outermost remain soft.
- Cone wobble: Increase head diameter with a few extra wraps of thread, or line the cone with a narrow strip of felt.
- Loop misalignment: Re-wrap the top loop with a short wire segment and a neat wrap; don’t force the cone to sit correctly on a crooked loop.
- Static cling: A light anti-static spray from distance or a quick pass of steam calms synthetic fibers.
- Color bleed: Prewash future fabrics; for current pieces, advise dry-only cleaning and avoid rain exposure with light garments.
Care and Maintenance for Long Life
Store tassel earrings hanging or flat on cards with a dust cover. Avoid crushing in boxes with other jewelry. After wear, comb gently and recharge the drape with brief steam if needed. Keep perfumes, hairsprays, and oils away from the fringe; apply those before putting on jewelry. If a strand snags, don’t yank; trim and lightly seal the cut point. Metal can be wiped with a polishing cloth; avoid liquid polishes near fabric. With respectful habits, fabric tassels can look fresh for years.
Sourcing and Sustainability
Fabric earrings thrive on remnants. Shop your own stash first—offcuts from hemming, pieces of a vintage scarf, the last 15 cm of a bold print. Thrifted garments in high-quality fibers are excellent donors once cleaned and deconstructed. For new yardage, favor OEKO-TEX certified textiles, organic cotton, or deadstock. Write down the origin of special pieces; customers love stories, and provenance can justify premium pricing. Upcycling also shrinks waste streams and strengthens your studio’s sustainability narrative.
Cones and hooks benefit from responsible sourcing too. Many suppliers now disclose nickel content and provide recycled metal options. Choose packaging that matches your values: recycled card backers, glassine or compostable poly substitutes, and minimal inks.
Styling Ideas and Gifting Notes
A small tassel in matte linen is a daily driver with tees and denim; a longer silk fringe suits evening light and clean necklines. Sleek cones plus monochrome fringe turn a business-casual blazer into a canvas for personal flair, while multicolor boho bursts pair best with simple tops. Hair up or down shifts the read; updos showcase length, while mid-length hair benefits from beads or cones that peek between strands.
For gifting, mount the pair on a card with a short care tip and the fabric origin. Include a tiny swatch or a note like “cut from a vintage sari” to connect the wearer to the material’s life before jewelry. If size is a concern, keep to 45–60 mm for safer universal appeal.
Pricing, Selling, and Photographing Your Work
Price with clarity: materials cost (fabric, cones, hooks, wire, packaging) plus an hourly rate multiplied by time, then add overhead and a profit margin. Many makers use (materials + labor) × 2 or × 2.5 for retail; for wholesale, halve retail if volumes are meaningful and timelines realistic. Collections built around a unifying element—same cone, varying fringe—make inventory and photography efficient.
For photos, hang earrings so fringe falls naturally. Use indirect daylight and a neutral backdrop with one styled shot per listing to suggest scale. A macro of the cone junction and wire wrap communicates quality. Avoid over-saturation; aim for colors that match real life to reduce returns. Include one “on-ear” or model shot for scale; if you prefer not to show a human model, use a printed silhouette at true scale and measure from piercing point to tassel bottom in the description.
Inspiration Through Traditions
Tassels speak many languages. Moroccan key tassels, Chinese knot tassels, and European passementerie all demonstrate how a simple bundle of strands becomes symbolic through placement and detail. Acknowledge inspiration transparently. If your palette echoes Andean textiles or the proportions nod to Asian knotwork, say so respectfully and avoid sacred or ceremonial markings. This practice enriches your work with context while honoring sources.
Going Further: Advanced Techniques
Wire-wrapped spines: Insert a slender wire inside the tassel and create a structured S-curve that holds shape, then conceal the top hardware with a cone. This yields sculptural drama while keeping weight low.
Macramé crowns: Instead of a metal cone, build a micro-macramé cap from waxed linen or fine nylon. The handwoven crown introduces pattern and an all-fiber look ideal for those who avoid metals.
Hand dyeing: Ombre dip-dye strips before assembly. Use fiber-reactive dyes for cellulose fibers and acid dyes for protein fibers; rinse thoroughly and neutralize. Keep dye away from metal findings to prevent corrosion.
Hybrid fringe: Mix narrow ribbon with raw-edged fabric and a handful of metallic threads for sparkle. Anchor with a hidden internal binding and cover the outside with a braided wrap that becomes a signature ring.
Small Studio Workflow and Storage
Batch tasks to save time: cut all strips for a week’s production in one session, bind heads during a podcast, then do wirework at a well-lit table. Use small trays to keep each pair’s parts together, labeling cone size, bead type, and strip count. Hang finished tassels to relax overnight before final trimming and packing. This staged approach reduces rework and ensures your measurements reflect the tassel’s “settled” length.
Ethical and Skin-Friendly Choices
When in doubt, disclose. List metal composition, approximate weight, and care practices. Offer titanium or niobium upgrades for sensitive wearers and mention if adhesives are solvent-based. If reusing vintage fabric with unknown dyes, test and note results. Ethical clarity builds trust, and trust builds a return customer base that values your time and taste.
Frequently Asked Questions
How long should my first pair be?
Start at 50–60 mm including cone. This length suits most faces, keeps weight negligible, and offers enough strand length to practice trimming accurately.
What if my tassels puff instead of hanging straight?
Reduce strip width slightly, increase density, and steam from below. A tiny touch of diluted PVA near the bottom edge can encourage a columnar fall without stiffness.
Are fabric tassels durable enough for daily wear?
Yes, if edges are controlled and the head is secured under a snug cone. Treat like a delicate scarf: avoid moisture, comb lightly, and store hanging.
How can I make them more formal?
Switch to silk or satin, add a slim gemstone bead above the cone, and keep the palette minimal—black, deep navy, or metallic neutrals.
Can I make clip-ons look as polished as pierced?
Absolutely. Choose high-quality clip bases with loops, keep tassels shorter, and line the clip pad with silicone. A decorative element at the pad (a small cabochon) finishes the look.
A Practical Checklist Before You Gift or List
- Edges sealed or stabilized without visible stiffness
- Cones seated securely; no spin or rattle on the head
- Loops wrapped neatly and centered
- Jump rings fully closed and aligned
- Final length matched within 1 mm between pieces
- Dye fastness tested; care note added if needed
- Weight checked; under 6–7 g per piece for comfort
- Packaged on a card that supports hanging fringe
From First Cut to First Compliment
What begins as a pile of strips becomes a fluid ornament through a sequence of small, intentional moves. The magic is not in secret supplies but in your growing command of proportion, cohesion, and finish. Treat each pair as a sketchbook page—some experiments become signatures, others teach a lesson about drape or edge control. With attention to materials, patient technique, and gentle testing, you’ll build a vocabulary of forms that feel unmistakably yours. The reward is more than a beautiful pair; it’s a direct line from idea to adornment, carried near the face where stories are told and heard, where hand and eye meet in wearable art made from humble fabric and a few well-chosen parts.
