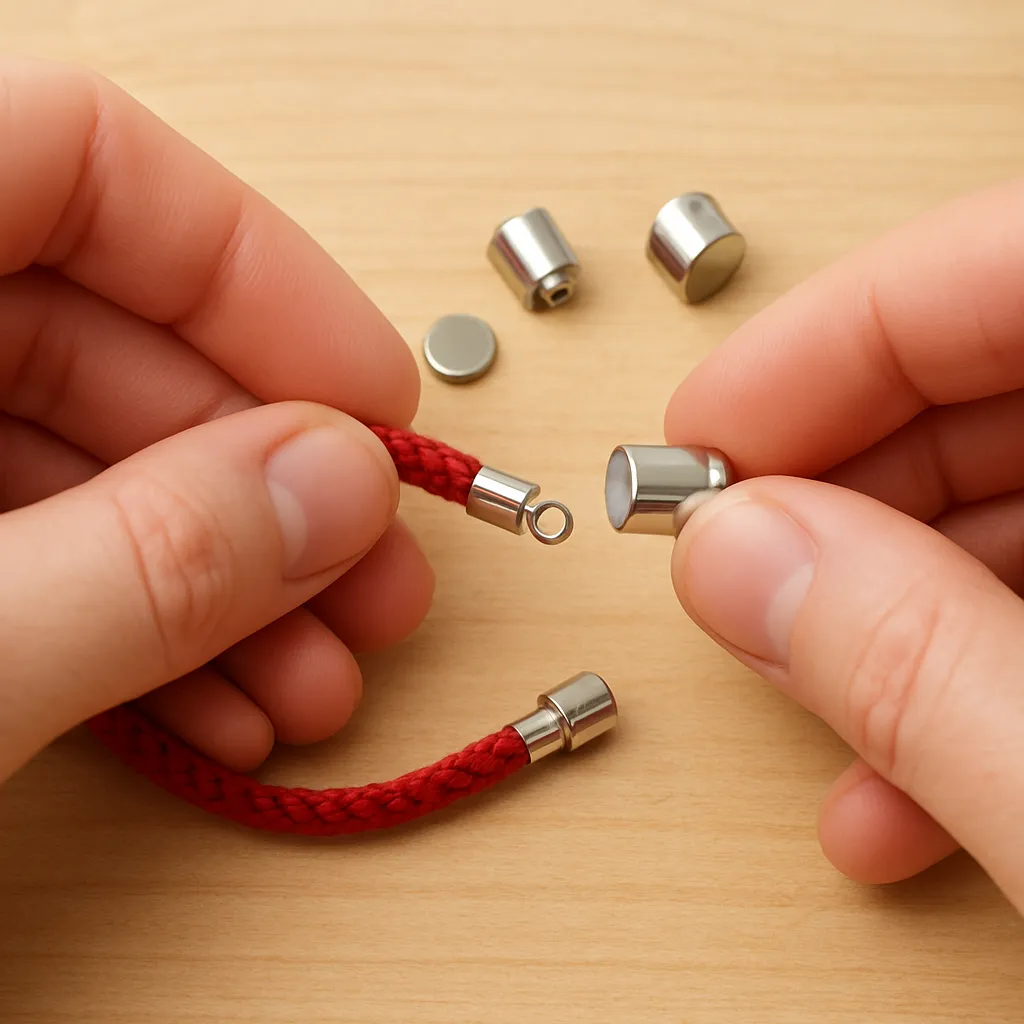
Magnetic clasps are among the most elegant and practical fasteners in handicraft, prized by jewelry makers, leatherworkers, and sewists for their smooth closure, unobtrusive profiles, and one-handed usability. They transform fiddly closures into a satisfying click and can be hidden inside fabric layers, embedded in cord ends, or integrated into sleek metal housings. Used thoughtfully, they elevate function and finish; used carelessly, they can snag threads, demagnetize near heat, or compromise the comfort and longevity of a handmade piece. This guide explains how magnetic clasps work, how to select the right style and strength, and how to install, test, and care for them so your creations remain reliable and beautiful without sacrificing safety.
Understanding Magnetic Clasps: Types, Materials, and Mechanics
Magnetic clasps rely on two mated components that close by magnetic attraction. They may use a magnet-to-magnet pair or a magnet combined with a ferrous steel target plate. The closure can be purely magnetic, or it can include mechanical features—like an indexed ridge, dovetail, or bayonet seat—that improve alignment and reduce accidental release.
Common types you’ll encounter
- Barrel and ball clasps: Cylindrical or spherical housings that hide small magnets. They are popular for necklaces and bracelets and often include a seat that resists lateral motion.
- Box and tab clasps with magnetic assist: A low-profile rectangle that slides or clicks into a bay. The magnet provides the pull-in; a lip or tab adds mechanical retention.
- Slide-lock multi-row clasps: Designed for multi-strand bracelets or necklaces. Magnets help the slide engage while rails prevent lateral drift.
- Glue-in end-cap clasps: Common for leather or braided cords, kumihimo, or paracord. The magnetized head pairs with another head; the cord is secured in a socket with adhesive.
- Sew-in magnetic snaps and hidden closures: Two-piece snaps with prongs for bags, wallets, and garments, or flat disc magnets encased in fabric between the lining and fashion layer.
Materials and finishes
The core magnets in craft closures are often neodymium (NdFeB), prized for strong attraction at small sizes. Housings and caps may be brass, stainless steel, or zinc alloy, finished with plating such as nickel, gold, gunmetal, or a lacquered enamel. High-quality components minimize plating porosity, keep edges deburred, and resist skin contact issues. Stainless steel 316L and PVD-coated parts offer increased skin compatibility, and gold-filled or rhodium finishes provide premium appearance with improved wear resistance.
How they hold: pull and shear
Clasps resist two distinct forces. Straight-line separation is “pull,” typically specified by manufacturers as pounds or newtons. Lateral movement is “shear,” resisted by seat geometry and friction. Many failures occur when a clasp resists pull adequately but releases under rotational or prying loads during daily use. Designing with a positive seat, correct polarity, and textured contact face increases friction and prevents rotation from prying the halves apart. Some makers add a recessed pocket or a ridge; these small geometry tweaks provide dramatic improvements in stability under motion.
Field strength and ratings
While you rarely need to calculate flux density in gauss, it helps to understand that doubling magnet size does not simply double holding force; contact area, air gaps, and metal thickness of the target all matter. A thin lacquer, misaligned halves, or a layer of fabric between the faces reduces effective attraction. As a rule of thumb, aim for a clasp rated for at least twice the expected wearable load and test it under dynamic conditions—twisting, jerking, and snagging—rather than just a gentle pull.
Choosing the Right Clasp for Your Project
Selection begins with intended use, wearer profile, and the materials you’ll join. For a delicate necklace, a compact barrel clasp may be ideal; for a heavy beaded piece or a therapy bracelet frequently donned with one hand, a low-profile box clasp with a magnetic assist provides both ease and security. For bags and folios, sew-in snaps or hidden magnets distribute force across a wider area, avoiding distortion of the fabric panel.
Match strength to the piece
- Lightweight necklaces (under ~30 g): Small barrel/ball clasps or micro slide-locks. You want enough attraction to resist accidental brushing but not so much that opening requires two hands and a hard pull.
- Medium bracelets (30–70 g): Box clasps with magnetic assist or larger barrels with anti-rotation seats. Bracelets experience more jerks during the day; plan for dynamic forces.
- Heavy beadwork or multi-strand designs: Slide-locks with long engagement surfaces or magnet-plus-mechanical latch systems to resist prying and increase shear strength.
- Bags and leather goods: Oversized sew-in snaps or hidden discs placed so that opening is a peel motion, not straight separation; reinforce the panel to prevent tearing.
Skin and allergy considerations
Contact metals matter. Nickel-bearing finishes may trigger sensitivities in some wearers. Look for components marketed as hypoallergenic (for example, 316L stainless, titanium, or PVD-coated parts). When in doubt, add a clear barrier coating on areas that contact skin, or choose designs where the clasp’s exterior is precious metal or polymer-clad.
Environmental exposure
Saltwater, sweat, lotion, and perfume all shorten the life of finishes. Choose clasp bodies with tight seams and corrosion-resilient plating. Sweat is slightly acidic and chloride-rich; it can accelerate corrosion beneath porous platings. For swim-friendly pieces, choose marine-grade stainless or polymer-encased magnets and avoid bare zinc alloys. If your work will see temperature swings—car dashboards, hot workshops—remember that many magnets begin losing strength above 80–100°C and can demagnetize if overheated.
Comfort and ergonomics
Magnets shine for wearers with dexterity challenges or one-handed dressing. Favor shapes with broad faces and indexed alignment so the clasp “finds itself” when brought close. Parkinson’s-friendly designs often use oversized tabs or textured faces that encourage a peel motion rather than a direct tug.
Health and Everyday Interference Considerations
Magnets are not toys. Small, strong magnets swallow hazard warnings for children exist for a reason. More subtly, the magnetic fields that make our closures convenient can perturb medical devices and magnet-sensitive electronics.
Medical devices
- Keep all magnetic jewelry and bag closures at least 15 cm (6 in) away from implanted pacemakers and ICDs, unless a physician advises otherwise. A clasp near the chest while leaning forward can temporarily alter sensing in some devices.
- Hearing aids with magnetic programming ports, insulin pumps, and neurostimulators may also be affected at close range. Provide clear warnings with your products and, when in doubt, suggest non-magnetic alternatives.
Cards and consumer electronics
- Older magnetic-stripe cards can be erased by strong fields; modern chip cards are more resilient, but not immune if pressed directly against a clasp for long periods.
- Compasses and some camera or phone sensors can misread in proximity to magnets. Avoid placing strong closures on map cases or camera straps near a lens mechanism or speaker magnets.
- Never bring magnetized items into MRI suites or near large degaussers; even wearable clasps can become projectiles or demagnetize.
Child and pet safety
Two small magnets can pinch skin; if ingested, they can attract through intestinal walls, causing severe injury. Keep spare clasps and bulk magnets locked away. For children’s items, favor large sew-in snaps with stitched barriers that resist removal, and include clear age-appropriate warnings with any sellable work.
Installation Methods by Material
Installation determines reliability more than magnet grade alone. The best clasp can fail if it’s glued to oily leather, crimped over frayed braid, or sewn into an unreinforced pocket that stretches and tears. Clean fits, mechanical anchoring, and correct adhesives prevent frustration and returns.
Corded designs: leather, braided cords, kumihimo
- Dry-fit: Insert the cord into the socket fully and mark the depth. If the fit is loose, wrap a thin layer of thread as a shim until snug.
- Prepare surfaces: Lightly abrade the inside of the socket and the cord end with 400–600 grit paper; this increases bonding area. Degrease with isopropyl alcohol (avoid acetone on painted finishes).
- Adhesive choice: Use a slow-curing two-part epoxy; it wets out porous cord ends and achieves higher ultimate strength than fast cyanoacrylates. Mix thoroughly, coat both surfaces, and rotate the cord during insertion to distribute adhesive evenly.
- Alignment: Mark polarity on the clasp halves with a wax pencil before gluing so you don’t fix them mismatched. Wipe squeeze-out immediately, then secure upright to cure undisturbed for 24 hours.
Beaded stringing wire and chain
- Crimp method: Use wire guardians or French wire to protect against metal-on-metal wear. Thread the wire through the clasp’s ring, back through the crimp, and compress with the correct die—not pliers—to avoid sharp edges.
- Split/jump rings: If the clasp has closed loops, add a soldered jump ring for security. On bracelets, a small safety chain between ends prevents loss if the magnet releases.
- Braze/solder caution: Heat near magnets can demagnetize them. If you must solder, do so to an intermediate ring, not to the clasp body, and keep the magnet chilled with a heat sink.
Fabric, felt, and leather goods
- Sew-in snaps with prongs: Insert through the fabric and a backing washer. Always add a stabilizer patch behind: canvas, leather, or fusible interfacing. This added reinforcement spreads load and stops tearing.
- Hidden magnets: Encase flat discs in small fabric pockets. Orient polarity consistently, triple-stitch the pocket perimeter, and position so the user opens by peeling a flap rather than straight pulling.
- Leather panels: Skive thick leather so the magnet sits flush; glue with flexible contact cement on the leather side and a bead of epoxy in the magnet cavity. Stitch a perimeter box or saddle-stitch a keeper flap for mechanical retention.
Marking polarity during installation
Use a paint pen dot on matching faces. After installation, those dots should face each other when closed. A reversed half is a common workshop mistake; prevent it with a simple mark-and-check routine before adhesives cure.
Design for Secure Closure and Predictable Release
The hallmark of a well-designed magnetic closure is that it feels secure during motion yet opens predictably when and how the user intends. This balance is controlled by geometry, magnet strength, and how the piece is worn.
Favor peel, not pull
Place clasps so users open by peeling the halves apart. Peel introduces shearing and rotation, requiring less force than a straight-line pull while reducing sudden shock on beads, crimps, or stitches. For bags, mount the magnet high on a flap so the user lifts and rolls it off; for jewelry, design tails or tabs that encourage peeling rather than yanking.
Combine magnetic and mechanical holding
- Indexing seats: A shallow recess or notch locks orientation and counters lateral knocks.
- Stop shoulders: Prevent over-travel and keep faces flush, maximizing contact area and holding force.
- Safety chain or hidden tether: A short, elegant chain or cord that prevents loss if the clasp opens unexpectedly.
- Shielding and backing plates: A thin steel backer can focus flux and enhance holding with less outward field, reducing interference with nearby components.
Match the magnet to the job
Magnet-to-magnet pairs provide higher attraction than magnet-to-steel, but they also emit stronger external fields. In tech-dense environments—phone pockets, camera bags—consider magnet-to-steel closures or use thinner magnets paired with physical indexing to achieve the same real-world security with a smaller stray field. Rotational “bayonet” seats add resistance to sudden tugs without requiring excessive straight-line force at the fingertips.
Testing, Quality Control, and Standards
Before gifting or selling any handcrafted item with a magnetic closure, test it in conditions that mimic real use. Your hands may be gentle, but daily life is not.
Simple workshop tests
- Static pull: Attach a luggage scale or spring scale to measure the force required to separate in line. Record the value for your design notebook.
- Dynamic jerk: With the piece worn or mounted to a stand, apply short tugs, twists, and snags—simulate snagging on a doorknob or shoulder strap.
- Cycle test: Open and close 500–1000 times to observe plating wear, hinge play, and adhesive creep.
- Environmental test: Wipe with a sweat-mimicking solution (slightly salty and acidic) and check for discoloration, tacky residue, or swelling of adhesives.
Metals and allergy compliance
For markets with strict regulations, confirm nickel release compliance and lead content (e.g., applicable EN/ASTM standards). Keep supplier batch records. When a client reports a skin reaction, you’ll want traceability and an alternative clasp ready.
Field containment and measurement
A basic magnet viewer sheet or iron-filings card helps visualize field lines; a handheld meter can approximate field strength and gradients. While torque under twist is harder to quantify than pull, you can assess it by marking faces and measuring the moment at which alignment slips during a slow twist using a small arm and scale. This gives comparable data across designs.
Daily Use, Care, and Maintenance
Care extends lifespan. Perspiration salts accumulate in crevices; cosmetics and sunscreen can soften adhesives over time; and mechanical shock can chip brittle magnet cores inside metal housings.
Cleaning and storage
- Wipe clasps after wear with a damp microfiber cloth; dry fully. Avoid abrasive polishes that can thin plating.
- Keep clasps closed during storage; magnets stored as pairs lose less strength over the years and are less likely to pick up ferrous debris that can scratch faces.
- Separate from magnetic-stripe cards and watch movements in the same jewelry box compartment.
Perfume, lotion, and water
- Apply perfume or lotion first; allow to dry before donning jewelry.
- Rinse clasps exposed to saltwater, then dry. A thin coat of microcrystalline wax can protect some platings.
- Avoid ultrasonic cleaners on glued assemblies; cavitation can compromise adhesive bonds.
Heat and impact
Keep clasps away from heat tools. Excessive heat can lower magnetization and soften resins. Avoid dropping; small chips reduce contact area and can cascade into more rapid wear. Routine maintenance is as simple as inspecting for play, checking for collected iron filings, and ensuring that the release motion still feels smooth and predictable.
Troubleshooting and Repair
Even well-made closures can misbehave. The good news: many issues are fixable with basic bench tools.
Too strong or too weak
- If a clasp is too strong: Add a thin fabric or leather shim between faces to introduce a tiny air gap; this reduces holding without replacing hardware. Also encourage a peel motion with a tab.
- If too weak: Check for debris or plating blisters; ensure full face contact. Upgrade to a clasp with a wider contact area or add a mechanical feature like a lip or slide assist.
Polarity mismatch
If two halves repel, you likely glued a half reversed. Mark polarity before assembly. If already cured, some glue-in sockets allow careful heat and twist removal; warm gently with a heat gun (protect finishes), extract with padded pliers, and re-bond correctly.
Adhesive failure
Remove old adhesive mechanically and with solvent as compatible (isopropyl alcohol for many epoxies after scoring; commercial debonders for cyanoacrylates). Roughen and degrease both surfaces, then re-bond with fresh epoxy or a flexible adhesive suited to the materials.
Plating wear and tarnish
Light tarnish on brass can be polished, but worn plating requires either re-plating (specialist) or replacing the clasp. For precious pieces, consider modular designs where clasps can be swapped without restringing the entire item.
Sustainable and Ethical Sourcing
Magnets and platings have upstream impacts. Choose suppliers who disclose alloy content, surface treatments, and compliance with hazardous substances limits. Opt for durable finishes that last longer, reducing waste. Offer repair services to extend product lifecycles. Reuse good halves when possible and recycle metal offcuts. For packaging, include clear disposal and handling guidance so users do not discard small magnets loosely.
Workshop Safety and Best Practices
Protect your workspace and your hands. Even tiny magnets can leap and pinch or shatter into shards if snapped together hard. Keep steel tools and needles in trays; moving magnetic pieces can scatter them.
Handling and storage
- Store spare magnets with spacers between them to prevent chipping.
- Wear eye protection when working with brittle magnet cores and never grind or drill magnets; the dust is hazardous, and heat can demagnetize or ignite fine particles.
- Ventilate when using adhesives and finishes; read SDS sheets and wear gloves resistant to your chosen solvents and resins.
Layout discipline
Work with only the parts you need for a single piece at a time. Multiples attract across the bench, risking scratches or reversed polarity mix-ups. Keep ferrous swarf and cuttings away from clasp faces; a strip of tape can lift filings cleanly without scratching.
Quick Reference Checklists
Before you buy
- Confirm size, holding rating, and compatibility with your materials.
- Choose skin-friendly finishes and document metal content.
- Consider exposure: sweat, salt, heat, and chemicals.
Before you install
- Mark polarity and orientation.
- Prepare surfaces: abrade and degrease.
- Use the right adhesive and allow full cure time.
- Reinforce fabric or leather panels to distribute load.
Before you sell or gift
- Run pull, peel, and cycle tests.
- Inspect edges, plating, and alignment.
- Include handling and medical device warnings.
- Offer a safety chain option for high-movement wear.
Inspiration: Smart Ways Makers Hide and Highlight Magnetic Closures
Many of the most delightful uses of magnetic clasps blend them into the design narrative. In beadwork, a clasp can become the focal point—an architectural barrel that echoes the piece’s geometry. In leather, a hidden magnet beneath a smooth flap leaves a canvas for clean lines and uninterrupted stitching, the closure felt but not seen. In quilting and textile arts, a trio of small discs placed along a seam allows transformable forms that fold and unfold with a touch.
Designers often stack thin magnets separated by spacers to tune hold and to ensure a gentle breakaway if snagged. Others nest a small magnet inside a wooden or resin cabochon, pairing warmth of material with crisp functionality. For tech-friendly bags, a magnet-to-steel pairing placed behind a stitched welt can give a satisfying snap with a minimal stray field. With thoughtful geometry, even modest magnets can feel luxurious to use.
Putting It All Together
To use magnetic clasps safely in handicraft is to think like both an engineer and a wearer. Choose materials that love skin and resist the environment; design closures that favor peel over pull; test under motion, not just at the bench; and document care for your users. Whether you’re finishing a first beaded bracelet or producing a line of leather folios, harmonize magnet strength, contact geometry, and installation quality. Respect the field’s reach around medical devices, protect small parts from curious hands, and build repairability into your designs.
When the final piece clicks closed with a soft, confident snap—staying shut through a day’s bustle yet opening with an effortless peel—you’ll know the invisible work is done. That is the promise of superb magnetic closures: seamless function hidden inside thoughtful craft.
