Small metal charms can turn a plain bracelet, zipper pull, key fob, or notebook ribbon into a personal statement. With a few hand tools and an eye for detail, you can cut, shape, stamp, and finish your own pieces from copper, brass, aluminum, or silver. Unlike large-scale metalwork, charms are friendly to a kitchen-table setup: they demand little space, teach useful fundamentals, and reward patience with highly wearable results. This guide walks you through choosing materials, setting up a compact workstation, planning motifs, cutting and texturing metal, adding patina and protection, and assembling cold connections—everything you need to craft heirloom-quality miniatures that feel both handcrafted and refined.
Materials, Tools, and a Compact Workstation
Metal charms are the perfect intersection of craft and micro-engineering: thin sheet or small wire shapes transformed by controlled blows, precise cuts, and subtle surface finishes. Selecting the right stock, understanding temper, and assembling an affordable kit of hand tools gives you a foundation you can expand over years of making.
Choosing Your Metal
- Copper: Warm color, easy to form, accepts rich chemical and heat patinas. Great for beginners.
- Brass: Golden tone, slightly springier than copper, polishes beautifully and textures crisply.
- Aluminum: Very light, bright silvery tone, resists corrosion, easy to cut and file, ideal for larger charms that must stay lightweight.
- Nickel silver (German silver): Silvery alloy without actual silver; takes crisp stamping but is harder than brass.
- Sterling silver: Classic for jewelry, workability similar to brass, best reserved for later projects after you refine technique.
- Upcycled metals: Cans, old trays, and cookie tins can work; edges are sharp, coatings may be brittle, and not all are food-safe—use for accessories rather than items that touch skin constantly unless you know the alloy.
For thickness, most charm makers use 22–24 gauge sheet (about 0.6–0.5 mm). Thicker stock (20 gauge, ~0.8 mm) holds deeper textures and resists bending; thinner stock (26 gauge, ~0.4 mm) is lighter but more prone to warping. Purchase “dead-soft” or “soft” temper sheet for easier shaping. Wire (18–22 gauge round) is useful for jump rings, bails, and decorative wraps.
Essential Hand Tools
- Cutting: Metal shears (straight-cut aviation snips) for general shapes, or a jeweler’s saw with size 2/0–4/0 blades for tight curves and interior cuts.
- Support and striking: A small steel bench block (or a smooth anvil) and a sandbag or folded towel beneath it to absorb shock; a ball-peen hammer and a chasing hammer for texture and planishing; a rawhide or nylon mallet to flatten without marring.
- Hole making: A center punch, a hand (screw) punch or hole pliers (1.5–3 mm heads), and optionally a pin vise (hand drill) with quality twist bits for tiny holes.
- Shaping: A dapping block with punches for doming, and round-nose pliers for loops and bails.
- Refining: Needle files (flat, half-round, triangle), a barrette file for clean edges, sandpaper assortment (120–2000 grits), and Scotch-Brite pads or steel wool for satin finishes.
- Marking: Fine-tip permanent marker, scribe, and masking tape or low-tack painter’s tape for pattern transfer.
- Texturing and stamping: Letter/number stamps, decorative stamps, a texture hammer or peen, and a nail set for dotted textures.
- Surface treatments: Polishing cloth, microcrystalline wax, clear lacquer, and optional patina solutions for color.
- Holding and assembly: Flat-nose and chain-nose pliers, side cutters, and tweezers.
- Protection: Eye protection, hearing protection, and a dust mask for fine sanding. Good ventilation whenever using chemicals.
Even with small projects, prioritize safety: tie back long hair, keep sleeves tight, and sweep filings into a dedicated container so they don’t end up on the floor or in plumbing. If you later choose to add heat-based techniques, keep a metal tray as a fire-safe area and have a spray bottle nearby.
Plan Like a Maker: Sketch, Scale, and Transfer
A successful charm begins on paper. Draw two or three thumbnail sketches from different angles. Ask how the charm will hang, which face should be forward, and whether it needs a bail or a hole. Placing the hole too near the edge risks tearing; too far in and the piece may twist awkwardly on a jump ring. Treat design choices as functional decisions as much as aesthetic ones.
Scale and Proportion
Most bracelet charms measure 10–18 mm on their longest side; pendants and bag pulls can be larger. Cut a quick paper or cardstock mockup and test it against the intended chain or accessory. Consider negative space: a cutout moon can feel as bold as a solid disc yet weigh less. If planning layers, sketch each tier, ensuring the base supports the upper pieces without obscuring key features.
Template and Transfer Methods
- Printed template: Print your motif to scale, adhere with repositionable spray or double-sided tape, and cut around it.
- Tape resist: Place painter’s tape on the sheet, draw the outline directly, and cut; the tape protects the surface from slips.
- Carbon transfer: Place carbon paper between pattern and metal; trace the lines lightly with a stylus or dull pencil.
- Direct scribe: Use a permanent marker for bold lines or a scribe for fine detail; refresh marks as needed during filing.
Mark hole placement first and center-punch it before cutting the outside shape; this reduces the chance of losing your alignment as you work. If your charm needs symmetry (e.g., a heart), fold a paper pattern and cut it folded to ensure both halves match, then transfer.
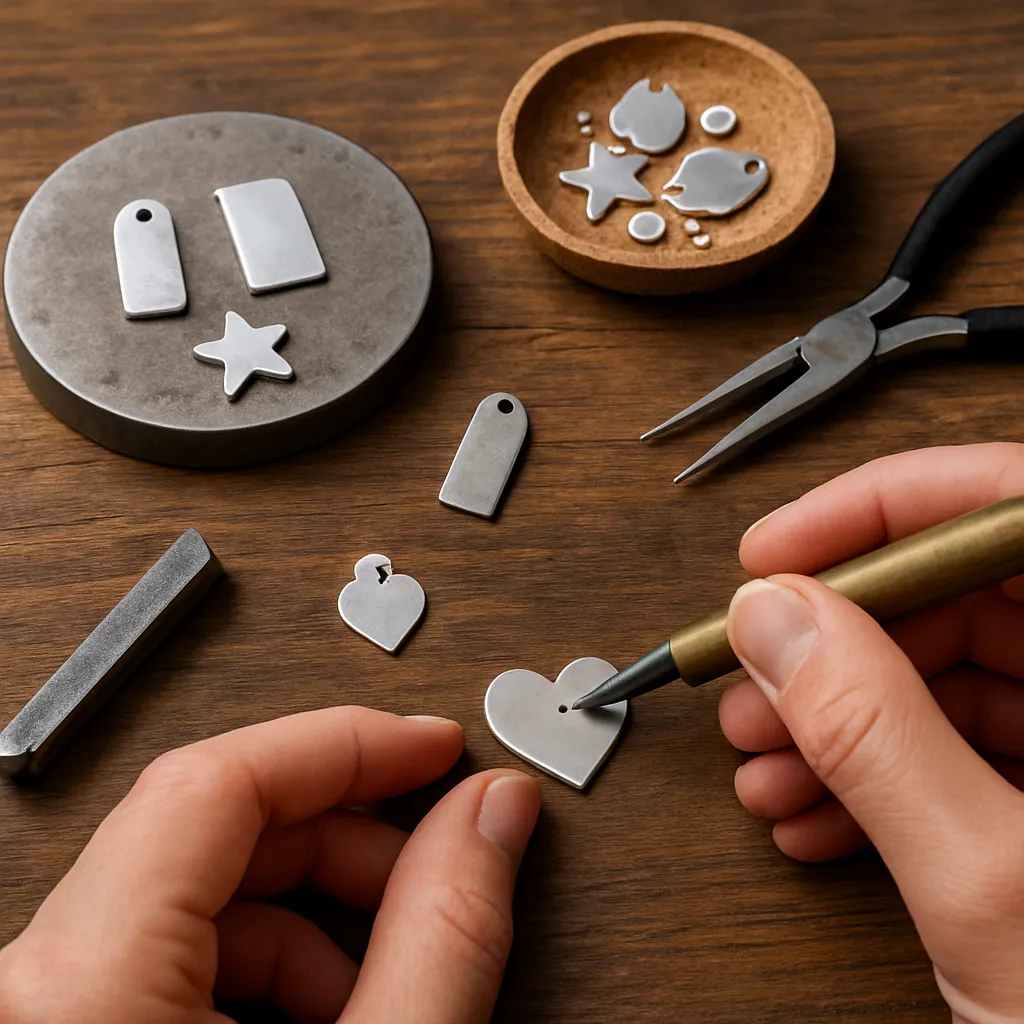
Cutting, Holes, and Edge Perfection
Clean cutting and careful edge work separate handmade from “homemade.” Strive for crisp outlines and smooth transitions; they catch light better and feel great in the hand.
Cutting Techniques
- Shears: Keep cuts smooth and continuous, steering with your non-cutting hand. Support the offcut so it doesn’t bend and tear the edge.
- Jeweler’s saw: Lubricate blades with beeswax or bar soap, hold at a light forward angle, and let the blade do the work. Saw just outside your line, then file to it for precision.
- Interior cutouts: Drill a starter hole large enough for your saw blade, thread the blade through, and re-tension. When finished, re-open the frame to free the piece.
Holes: Clean and Centered
For charm attachment points, use a center punch to create a small divot that guides your bit or punch. With a hand punch, choose a die size that suits your jump ring (1.5–2 mm suits fine chains; 2–3 mm for thicker cords). If using a twist bit, back the metal with wood, drill at moderate speed, and clear swarf frequently. Follow by deburring both sides with a countersink bit, a round file, or a rolled piece of fine sandpaper.
File, Sand, and Round
Refine the outline with files: push strokes for control, using the file’s length. A half-round file is ideal for inside curves; a barrette file cleans outer edges without scarring adjacent surfaces. Progress through sandpapers—220, 400, 600, 800, 1200, 2000—rotating the piece between grits so you can see the previous direction’s scratches disappear. Round edges very slightly; a soft arris improves comfort and sparkle. Wipe the piece clean between grits so stray coarse particles don’t re-scratch the surface.
Shaping and Surface: Texture, Dimples, and Dap
Flat is only the beginning. A subtle dome, a hammered stipple, or a chased line lends depth and makes small charms visible at a glance. Each surface treatment is also a structure: adding a dome stiffens thin sheet, and certain textures distribute stress away from holes and corners.
Doming and Dapping
Place your cut blank in a dapping block with a cavity slightly smaller than the piece. Strike the dapping punch in a circular motion, rotating the piece every few blows to keep the dome even. Return to the bench block and planish with light, glancing taps from a chasing hammer to refine the curve and brighten the surface. A shallow dome of 1–2 mm rise dramatically improves stiffness without much added weight.
Hammer and Stamped Texture
Use a ball-peen for pebbly stipple or a cross-peen for directional lines. Decorative stamps add crisp motifs—stars, leaves, borders. Ensure your metal rests on the steel block and strike once, firmly, with a flat blow. Multiple light taps can “ghost” the impression. Experiment on scrap to learn how your tools speak. Texture has a practical bonus: it hides minor scratches acquired during wear. When describing surface personality, makers often simply say “great texture.”
Work-Hardening Without Heat
As you hammer, the metal’s crystal structure deforms, increasing hardness and spring—an effect called work-hardening. This is useful for strengthening thin charms and wire loops. Work-hardening also makes further shaping harder; if forming becomes difficult or the metal starts to crack at bends, stop and reassess. Refine shape first, then add heavy texturing to finish.
Color and Character: From Bright Polish to Deep Patina
Surface finish is storytelling: satin for subtlety, mirror for glamour, antiqued recesses for vintage drama. Your finishing workflow affects not only looks but also longevity.
Polish, Satin, or Brushed
For a brushed look, draw a Scotch-Brite pad or 600–800 grit paper in one direction across the surface. For satin, use circular motions and finish with a finer abrasive. A mirror polish takes patience: after 2000 grit, switch to a polishing cloth or compound on felt, keeping the piece moving to avoid waves. Clean thoroughly between compounds so residues don’t muddy the shine.
Softening and Resetting with Annealing
If your piece has become too springy to texture cleanly, consider annealing—a controlled heat softening step. With small charms, a simple butane micro torch will heat copper or brass to a dull red (in dim light) within seconds; quench after the glow fades, then pickle or scrub with baking soda to remove oxides. Anneal before adding any delicate attachments or finishes. Silver also anneals well; aluminum does not respond the same way and should not be torch-heated at home.
Patinas: Chemistry as Paintbrush
Adding a patina can highlight textures and stamped impressions:
- Liver of sulfur (for silver, copper, brass): Produces browns to deep blacks. Warm the piece slightly, dip briefly, rinse, and repeat until the depth pleases you. Polish raised areas to create highlights.
- Vinegar-salt fuming (copper, brass): Suspend the piece over a small cup of hot vinegar and salt in a sealed container; check periodically for greens and blues. Rinse and stabilize.
- Ammonia fuming (copper, brass): Similar to vinegar but yields different blues; use with extremely good ventilation.
- Heat color (copper, brass): Gently sweep a flame to coax straw, purple, and peacock hues. Seal promptly; heat colors can be delicate.
Rinse thoroughly after chemical reactions, dry completely, then protect the finish as soon as possible. Waxes leave a soft sheen and tactile feel; clear lacquers lock in brighter colors and high polishes.
Protective Coats that Last
Wax is forgiving: apply a thin layer, let haze, then buff. Lacquer is more durable but demands dust-free conditions. Whatever you choose, proper sealing slows tarnish and keeps patina stable. Reapply wax periodically to high-touch charms like key fobs.
Cold Connections: Jump Rings, Rivets, and Layers
Most charms require no soldering. Cold connections let you assemble layers, add dangles, and secure bails using mechanical means alone.
Jump Rings and Loops
Cut rings from 18–20 gauge wire wrapped on a mandrel. Always open rings by twisting the ends past one another, not by pulling them apart. Close with an audible or tactile “click,” then planish lightly on the bench block to harden. For a fixed bail, form a small loop directly on the charm with round-nose pliers and harden it with a few gentle taps.
Wire and Tube Rivets
Rivets are tiny, elegant fasteners that clamp layers together. For simple wire rivets, drill a snug hole through all layers, insert slightly oversize wire, and peen both ends evenly with a ball-peen hammer until mushroomed and tight. For tube rivets, flare the tube’s ends with a doming punch or a specialized flaring tool. Mastering riveting unlocks multi-layer charms, kinetic components, and mixed-material designs without heat.
Three Starter Projects with Reliable Results
The following project recipes build skills step by step. Adjust dimensions to suit your taste and the chain or cord you plan to use.
1) Stamped Initial Disc, Antiqued
- Cut a 14 mm disc from 22 gauge brass using a disc cutter or shears followed by careful filing.
- Center-punch and punch a 2 mm hole at top. Lightly dome for stiffness.
- Bright-sand to 800 grit, then place on bench block. Align a letter stamp; with a single firm blow, stamp the initial.
- Apply a small amount of liver of sulfur to darken the impression, rinse, and polish the flat face with a cloth so only the recesses stay dark.
- Seal with wax or lacquer, attach a 4 mm jump ring, and finish with a delicate chain.
2) Fold-Form Leaf with Vein Texture
- Cut a tapered oval (18–22 mm long) from copper. Score a light guideline down the center with a scribe.
- Fold slightly lengthwise by pressing over a dowel, forming a gentle ridge.
- With the ridge up, strike along it with the cross-peen to imply a central vein, then add diagonal peen marks for side veins.
- Dome lightly to stiffen. Punch a 1.5–2 mm hole at the stem end.
- Heat-color with a quick flame sweep to coax pinks and purples; quench and dry. Buff the high spots to accent the veins and seal.
3) Layered Star and Moon, Cold-Riveted
- Cut a 12 mm crescent moon in brass and a 6–8 mm copper star. File clean and sand to 600 grit.
- Stack the star over the moon where you want it to sit; mark and drill a 1 mm hole through both.
- Insert 0.9–1.0 mm brass wire, leaving 0.5–0.7 mm proud on each side, and peen gently to form low domes that lock the pieces together.
- Texture the moon’s field lightly with the ball-peen so the star reads as a smoother, brighter highlight.
- Apply a subtle patina to the moon only (mask the star with tape), polish the star’s surface, seal, and add a jump ring at the top of the crescent.
Troubleshooting and Professional Touches
Even careful makers face hiccups. Most missteps can be turned into features—or at least erased from the final piece.
- Misaligned stamp: Re-stamp into a framed cartouche or border to “reset” the composition. Alternatively, add a second, deliberate strike pattern to create a shadow effect.
- Wavy edge from shears: True it with a file, then refine with 400–800 grit paper on a flat block. Finish by drawing the edge across a fine sanding stick at 45 degrees to soften.
- Burrs in holes: Use a small round file, then spin a countersink by hand with gentle pressure. Finish with a rolled piece of 1200 grit.
- Surface scratches after polishing: Step back two grits and remove them uniformly before advancing again. Rushing the grit sequence is the #1 cause of visible lines.
- Rivets loosening over time: Ensure the shank fits the hole snugly. If loose, support the back on the bench block and re-peen with the lightest taps on the dome’s perimeter.
- Dome oil-cans (pops in and out): The blank was too thin or over-dapped. Planish more or add stipple texture to stabilize. Next time, choose thicker sheet or a shallower dome.
Efficient Workflow and Finishes that Wear Well
Batch processing saves time and improves consistency. Cut multiples, dome them all, then sand them together with taped stacks to keep edges parallel. Stamping goes faster when you prepare registration marks on scrap, and patina baths are more efficient with wire hooks and a labeled container system.
Before assembling on a bracelet, test each charm’s movement. If two edges can rub, break the shine with a satin finish—less visible wear. For frequently handled items like zipper pulls, favor brass or nickel silver for durability and reapply wax every few months. Reserve mirror finishes for earrings and pendants less likely to encounter abrasion.
Sourcing, Sustainability, and Cost-Savvy Choices
Buy small sheets (10×10 cm) while learning; they cost little and reduce the fear of “ruining” material. Many jewelry suppliers sell mixed packs of copper and brass in several thicknesses so you can experiment. Save all offcuts: small triangles become geometric charms; slender strips turn into bails or rivet stock. Upcycling is satisfying, but test-drill and sand edges carefully. Coated tin often produces ragged burrs; slow down and take extra deburring passes.
Be mindful of regulations before altering currency or branded items; local laws vary. If you source pre-made blanks, choose ones with cleanly sheared edges and known alloys so finishes behave predictably.
From One Charm to a Cohesive Collection
Develop a visual language. Perhaps you favor domed discs with starburst peen, or botanical silhouettes with fold-formed veins. Repeat two or three signatures—edge bevels, a hammered halo, a specific satin direction—so pieces feel related. Limited palettes help: all brass with copper highlights, or silver with oxidized recesses. A collection benefits from a naming scheme and presentation cards that protect finishes in transit.
Care, Maintenance, and Long-Term Wear
To keep bright metals gleaming, wipe with a soft cloth after wear. Avoid soaking patinated pieces; water can undercut delicate colors. If a charm dulls, use a polishing cloth only on raised areas to protect contrast. Check jump rings for gaps after a few months and close them again if needed. Wax renewals are quick: apply, wait, buff. Lacquered pieces should be cleaned gently with mild soap and water, then dried immediately.
Advanced (Still Basic-Tool-Friendly) Variations
- Roll-printed-like textures without a mill: Sandwich thin paper lace or leaf skeletons between metal and a thick pad, then hammer systematically to transfer relief.
- Edge beading with a dapping punch: Place the edge in a shallow cavity and use a smaller punch to nudge a soft bead profile along the perimeter.
- Pierced silhouettes: Use a saw to open interior shapes—hearts within discs, constellations, initials—then darken the recess for drama.
- Mixed media: Trap a sliver of fabric or stamped paper under a tiny window riveted with clear mica. Keep to hand tools by pre-cutting the mica and using tube rivets.
Putting It All Together: A One-Sitting Charm Workflow
Here is a smooth, beginner-friendly sequence that fits an evening session:
- Sketch three small shapes (disc, leaf, star). Transfer to 22–24 gauge copper or brass.
- Cut with shears; refine outlines with files and 400–800 grit sandpaper.
- Center-punch and punch 1.8–2 mm holes where they will hang best.
- Dome lightly in a dapping block; planish to refine curve and brighten.
- Add decorative hammering or stamps; brush to 800 grit satin.
- Choose finishes: leave one bright; patina another; heat-color the third. Rinse, dry, and protect.
- Form and close matching jump rings; assemble on a test chain to review spacing and motion.
This single sitting covers the heart of the craft and yields a small trio that already looks intentional as a set.
Why Handmade Charms Feel Special
Charms invite intimacy. Their scale demands close looking; their movement rewards light. When your file strokes smooth a corner, when your hammer echoes across the bench block, you leave evidence of care embedded in metal. Over time, a charm bracelet becomes a map of techniques learned: the first clean stamp, the first confident dome, the first layered rivet. With basic tools and repeatable methods, you can create pieces that are durable, personal, and endlessly variable—objects that carry your story and will outlast many trends.
Quick Reference: Principles to Keep at Your Bench
- Plan for hanging: hole placement balances the piece and controls twist.
- Work from coarse to fine: each grit or tool corrects the last’s marks.
- Shape before heavy texture to avoid premature hardening.
- Support well: a stable steel block equals cleaner stamps and straighter rivets.
- Batch similar steps to ensure consistency and save time.
- Finish and protect promptly; stable colors and shine start with clean surfaces and good sealing.
Next Steps and Skill-Building Path
With your first set complete, try more ambitious layering, introduce negative space with interior sawing, and practice decorative borders that frame the central motif. Explore deeper patinas on copper and subtler satin on brass. When you’re ready, fold in simple wirework dangles or experiment with mixed metals for contrast. Each new charm can be a short lesson—one evening, one technique—culminating in a collection that feels uniquely yours.